Leaderboard


Popular Content
Showing content with the highest reputation on 09/22/2022 in all areas
-
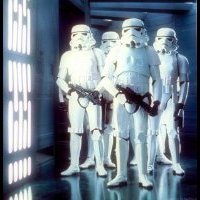
Well, I finally got to fulfill my life long dream of becoming a stormtrooper. Thank you to all of the amazing FISD members who helped me along this journey. I can’t wait to get out trooping and hope to one day meet some of you.2 points
-
I owe a lot of updates. I've got pix, I just haven't had a chance to put them together and upload. That'll come soon. I spent a good bit of time trying to build up the drop siphon bottle. I spent $15 on a right-size Baby Yoda drink bottle at Target, had a perfect cup to function as the lower part, got it riveted together.... and the last rivet cracked the whole thing beyond repair. It just shattered. I guess it was too brittle plastic and too much force. Literally a couple weeks of searching and off/on work on this ONLY piece I didn't want to print... gone. ugh. So I printed the bottle too. Here it is, fresh off the printer after a little sanding. 5% infill and 4 perimeters. It's basically a bottle. Eric's 3D print files are really fantastic. 1/8" rivets even fit in the holes and pop correctly without damaging any surrounding plastic. I put some riv-nuts in the back for mounting the bottle to the oil can. First time I had everything able to be stacked on the oil can. VERY EXCITE! I've got some painting and sanding still left, but it's nice to have all of the parts together at last.2 points
-
Sorry for the delay, procrastination and bad memory are real problems for me. Anyway, I finally sewed on the shoulderpads! Here it is, all parts are now (finally) assembled, I am almost done!2 points
-
2 points
-
Sounds like someone has too much time on their hands But seriously what a worthy effort Joseph, well done, looking forward to seeing the progress. Just one note, the FISD nominated charity is actually JDRF https://www.jdrf.org/ although I'm sure CDF are still a worthy cause. FISD History Did you know? FISD's legacy charity is JDRF (Juvenile Diabetes Research Foundation) The detachment started to support JDRF way back in 2007, but it became the official Detachment charity of choice in 2010. We will be returning our focus to this very worthy cause for at least the remainder of this term and doing what we can to support JDRF through donations and awareness. Paul "Daetrin" 20072 points
-
Quick back-story- I saw Kevin's @kmwilson343 3D E-11 sales thread a while back, and having some down time thought it was time for another project. Since I already own an E-11, I figured I could build it and after completion offer it up for auction here** with the proceeds donated to the JDRF (the FISD official charity) on behalf of the FISD. I got in touch and asked if he had a B-grade for sale (I like a challenge) and he said that he had one that was partially built and would be happy to donate it for the cause and send it my way... and he did! (THANKS)! As mentioned, keep in mind that it was partially built and was a work in progress that was interrupted by me, lol, so I am only carrying it forward. I will be adding a few of my own touches, of course. I will not be posting a ton of photos as there are already many great build threads here, but I will be touching on a few areas that can be a pain when working on a 3D build so please feel free to ask any questions or add any comments. ** Once complete, I have Andrew's permission to do this and will be starting a separate thread for the auction. Unfortunately, due to postal regulations I will not be able to send it outside the U.S. All that being said, time to get started! Looking things over As seen in the pic below Kevin has done a lot of the work ahead of time, and since it was designed by Bryan @trooper96 the details and accuracy are phenomenal! It begins I removed the front sight guard, folding stock and end cap/clip and selector switch for better access to the main body. After some extensive sanding, I thought it best to hit it with a coat of fillable primer. Looks pretty good, right? Well, this is why using the primer helps. Although areas can look and even feel smooth, having everything all one color brings out all those little details that may not be visible otherwise. Time for more Bondo spot glazing. To be continued!1 point
-
Thank you GMRhodes13 for the clarification.1 point
-
Looking good trooper1 point
-
Thanks so much for linking me to that thread, greatly appreciated!1 point
-
Looking great !!1 point
-
A bit of an issue here, but I shall persevere.. Since I will be adding in a coiled wire spring, I had to remove the area in the cocking channel. I caaaaarefully used a Dremel with a thin grinding attachment, and it came out OK. Lots of sanding to be done on the inside of the channel to get it flat and smooth still to come. The issue is that this is one of Bryan's "heavy duty" prints. Awesomely super thick to withstand years of trooping, but it had a PVC pipe glued in (pic 1) for even more strength. This obviously narrows the interior, but I though I could drill out the pipe without damaging the printed outside using a 1" drill bit (2). This way, the wire coil would be the correct width. Here's a hint: Don't try this. It worked well the first inch or so (3) but then started to bind up. I stopped there, as I got the feeling it was going to crack. 1 2 3 I will have to make adjustments and do the best I can with this once that time comes. Suggestion: If you do add an interior PVC pipe for added strength, when installing it I would only use it in the center part and stop at the end of the bolt. This will allow you to add a full size spring.1 point
-
Perfect!! I hope we are sharing some of these memes on our SM platforms, the effort you guys put in should be enjoyed by everyone, they are so great.1 point
-
Hello Jonatan. Thanks for your patience... Don't worry, we've all been on that side, and we know that waiting is the worst. But don't worry, you'll hear from us very soon.1 point
-
This is the current series 9 run of trading cards, nice to look at and see what's out there. You can apply for your own card here: Both are in the Garrison Merchandise Forum which if I remember need you to be a 501st member to get access to.1 point
-
Soft Goods & Accessories Discussion Placing this section a bit out of order near the top, because I'm sure many people are will be wondering... what else do I need order to finish out the suit? Well, let's get into it. 21. Gloves As far as I am aware, there are currently two options for gloves - either Endor Finders on the left, or TrooperBay on the right. Both have their benefits, which I'll get into, but overall, I think I prefer the Endor Finders. Endor Finders In general, I feel the Endor Finders are ever so slightly higher quality, though the soft inner lining will likely get removed, as I did with my all black Rogue One TK gloves from them. I'd rather have cooler hands in the California heat. Both sets of gloves had visible purple staining on the white leather as delivered, from the black thread in the palms and likely just transfer from the material, and the EF gloves also had a clear imprint where the outline of the thumb left a slight impression on the leather of the palm as well. If I purchased these again, I would go for the option to have white palm thread, and while less accurate, I would likely (painstakingly) color in the thread myself with a black paint pen or something that would not stain purple (NOT SHARPIE). TrooperBay These were an older pair of gloves from TrooperBay that came with my fiberglass kit purchase years ago, so I will say I am unsure of the quality when new. They're decent gloves overall, but pretty thin and they are also stained purple on the white leather all over. The handguards are resin cast from original, from Dantooine Props and attached with velcro to the gloves. 22. Boots I have had a pair of boots from Imperial Boots Keep Trooping since I started my ROTK project and will be utilizing them. They're high quality, fit great, and are more comfortable than disco boots. 23. Neckseal, Undersuit/Gaskets & Shiny Shorts I'll likely be using my neckseal and shirt from Sheev's Emporium (which has the awesome and accurate angle change on the arm gasket ribbing), and knee gaskets. I originally ordered them with pants, but I think I'm just going to cut the pants part off of it and have them be sleeves with velcro on the ends like the Denuo Novo ones, but so that they match. The pants were a good idea and they are generally well-made, but make things more complicated. The shiny shorts are from Teresa at Geeky Pink's Phantastic Gaskets, who also make excellent soft parts for FOTKs. The included Denuo Novo gaskets actually look okay but would need to be tailored and are oddly just like... inside out. They have a more shiny/rubbery interior and a cloth exterior - I would just wear them inside out, but would need to remove and resew the velcro, and turn the seams inside out as well. Maybe if I'm having them tailored to fit anyways, but probably not worth the time when I have my Sheev ones. I have no interest in owning actual rubber gaskets at this time and consider their specific mention unnecessary even at L3 - no way would I survive trooping in the Southern California heat anyways. If that's your thing, I believe they are available from Thorsson and Associates. 24. Belt Pouches It should be noted that the tallest pouch that Denuo Novo included does not really fit the largest belt box plate (38A), so I will be utilizing one from TrooperBay instead. 25. Blaster 26. Accessories1 point
-
In order to better get to some of the areas of the grip assembly for sanding (blue arrows) I removed the "screw" (yellow arrow) and thankfully they came apart perfectly! Yes, I finished the grip already, lol. This will also help for painting, as I will be using 3 different ones- flat black, gloss black and silver. Still a little sanding to do, but I'm a lot closer. Dry fit The magazine can be difficult to get smooth because of all the tiny crevices, especially those around the clip on the side. I used a cotton swab to apply the Bondo in the ridges and an exacto knife to apply it around the sides, The curved area will get a different treatment to get rid of the print lines.1 point
-
I have made a few adjustments already. I painted a better shape on the left ear. I tried to clean up the vocoder as well. I trimmed the ab button plates for a better shape I cut the clips of the TD so there was no rounded edge and moved them over. I also trimmed down the end caps so they sat flush with the clips and had the right size gap in between the control panel. I also trimmed the control panel edge to get rid of any return edge. I tried to clean up the return edge on the wrists as well. (don't mind the foam inside) Lastly I flipped the helmet trim around so the thin side faces out. That is it for now. I think I have a solution for both the mis alignment of my sides and the overlap of the back and kidney. I think my back to kidney straps are to short and so are pulling the sides up while also not allowing it to sit high enough above the kidney. I am going to try making longer straps and hopefully that will fix both issues. Thanks, M1 point
-
Welcome aboard Carter! You will find no shortage of assistance here, so ask plenty of questions and ch out a few build threads to give you some ideas.1 point
-
Hello and welcome aboard looking forward to seeing your BBB photos when your kit arrived. Generally for the taller broader frame we would recommend an AM kit (Dave's Darkside Depot), but as you've already ordered a MTK may just have to play around with the gaps and strapping and see how you go. Plenty of folk on the forum ready to assist with your build. If you haven't already check out this thread, everything you need to know for a Stromtrooper build1 point
-
That's your legion forum profile not your membership link, you could read the first post OR try this one https://www.501st.com/members/displaymemberdetails.php?userID=354881 point