
Leaderboard


Popular Content
Showing content with the highest reputation on 06/11/2021 in all areas
-
So I have determined the problem. I wasn't using my phone or doing it as a mobile upload so we can eliminate that. After I posted initially I went back and tried the link choices including Direct Image. After inserting the direct image link nothing happened it remained a hyperlink so I removed it. The issue is I had multiple uploads/ downloads happening and my already abysmal internet speed (>10mbps) simply didn't post the image. So I deleted the link and tried the remaining choices. Mystery solved! Appreciate the troubleshooting input2 points
-
Thighs! I think it’s redundant to mention what a PITA it can be getting happy with how human thighs look, let alone armored versions. You know the old adage ‘measure twice, cut once’? My version is “measure 23 times, still be uncertain it’s right, cut never”. Which in the IT world is called "Analysis Paralysis". I will say, I wish there had been more resources of how people determined their Thigh shaping, so I documented as much as possible. I even resorted to looking at the shape and cut of other Phasmas, tracing the line, calculating the angles, and using that to help form my decisions. In the end, here is how much I decided to cut off the tops and bottoms of the ‘front’ thigh; And the backs; Made my scary cuts, and rewarded myself with a tall one After straightening the edges and much sanding, I got my butt-join parts glued down before calling it a night. I call these shots ‘excessive clamps’ Now that the kids are in bed, I can go glue the other half of my butt join, and start working on the shins! Sent from my iPad using Tapatalk2 points
-
Do the V shapes prod or irritate much? I did some hot water bathing to try and mold them and I made softer U's. However, since I was boiling the water, I thought why not just try to alter the butt plate? This seemed to do a good job, along with changing the right side straps with elastic. The tips still seem to protrude just a bit, so I'll probably use the V-tabs anyway. Thanks for the tip!1 point
-
Welcome to Expert Infantry, Cody! You have a few issues, brother, but nothing that we can't help you take care of. Always feel free to ask us for any assistance you need... we are here for ya' and we hope to see you submission for Centurion soon!1 point
-
This is the link I used for the larger image, notice it has the i. after the http://I. Imgur has the same problem and also plays up with mobile uploads.
 1 point
 -
I have some polar white which is 70's Ford UK and it's got a cream tinge to it, much darker than armor I have on hand. Very hard to color match from the lids on spray cans too. If you find a color code you could have some made by an auto paint supplier, many did this for the Anovos FOTK's to match their supplied helmets.1 point
-
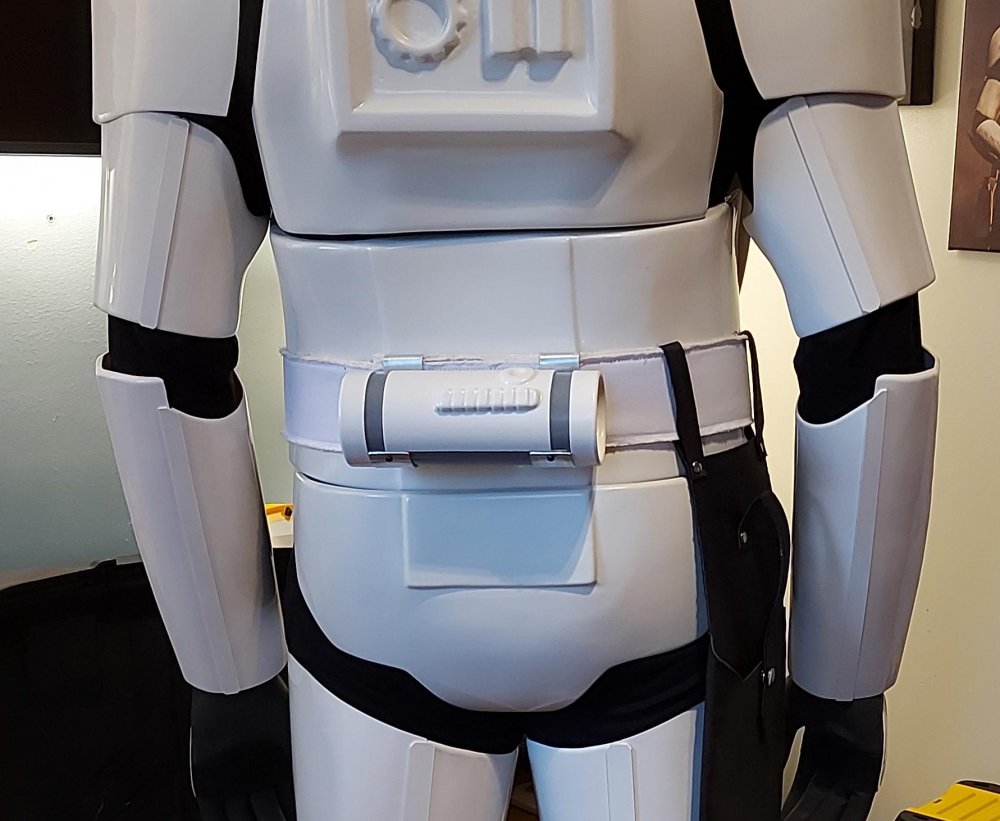
I'm pretty skinny so I just placed some foam behind the ab which holds it out a little more and the ab/kidney meets nicely on the sides, just don't over tighten your belt.1 point
-
Hi Greg, I keep hearing Ford Diamond White but I don’t know for sure if that is a) the closest match from current paints available, or the actual shade used for the originals. As it stands, the photo of yours makes the sprayed helmet look a little in the yellow side compared with Ford Diamond White (and perhaps a little matte). Here’s a comparison of one of mine, if it helps: Left - RS ABS Centre - TM spray painted Ford Diamond White Right - 4 year old RWA ABS helmet1 point
-
Hi Richard, Congrats brother! Your armor is looking great!1 point
-
[emoji1] Love it! Will do my best Sent from my SM-A715F using Tapatalk1 point
-
Congratulations Richard and welcome aboard. Also, growing up is a scam and a lie, don't do it. Stay young forever.1 point
-
Good luck with your submission. You got this trooper.1 point
-
Nice work Brit.1 point
-
Congratulations Richard, and welcome to the Legion.1 point
-
Congratulations Cody, Welcome to EIB.1 point
-
Amended my original posting with the missing photos1 point
-
Comparison references


 1 point
 -
Thanks for the link. Perfect. I've read something similar from UKG, but the differences are equally important, and the bit about hydration was really good. Sent from my SM-A715F using Tapatalk1 point
-
I used JB weld, held up great over the years, it is also sandable.
.thumb.jpg.24427fe4fd3e242e8a143be24c8635d8.jpg) 1 point
1 point -
I came up with a V tab bracket system which helps pull in the butt plate. With a heat gun (or oven) you bend strips of ABS plastic into the shape of a V, only glue the butt plate side and the other remains free to allow movement when you bend. Just helps stop the butt plate from pushing back from the back plate.1 point
-
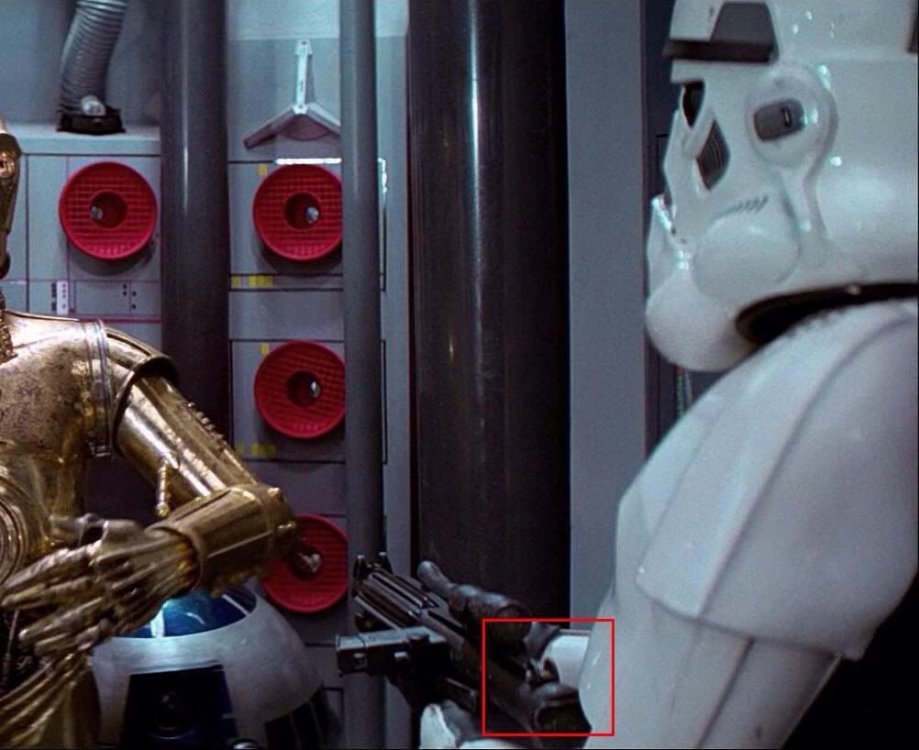
On a separate note from the Hex Nut and Bolt is the final Mounting Method the prop department resorted to for the Counter and Power Cylinders. After initially being Glued on and falling off during production the Counters and Power Cylinders were eventually mounted to the blasters with a wire simply wrapped around them. As you can see after initially being glued on and falling off while filming(especially the trash compactor scene) the Counters were finally mounted to the blaster with a wire wrapped around the base of the scope feet. The ‘Power Cylinders’ eventually utilized the same type of mounting method the prop department resorted to for the counters; A wire was wrapped over the ‘Power Cylinders’ and around the mag well of the Sterling Sub-Machine Gun. Here are several more photos of the Counters mounted with a wire wrapped around the base of the scope feet. some of these images almost look like it could possibly be a thin zip tie too. There was definitely some kind of Wires and Electrical Tape connected to the socket terminals on this Hengstler Counter, old news I know but 4K resolution gives us some new insight. This image also shows the Hex Nut just over Leia’s shoulder.1 point
-
Just as The5thHorseman and I posted about this here 5-6 years ago, the 4K version on Disney+ pretty much confirms the rear sight and pivot pin being removed and replaced with a Hex Nut and Bolt through the rear sight guard as yet another variation of the mounting method for the rear end of the scope rail. I know this is kind of old news but I think we can consider this one confirmed now. Another angle of the Hex Nut & Bolt, which appears to have a Slotted Head. Notice the Scope Rail is bent at an upwards angle behind the Hex Bolt holding it down. More angles showing the Slotted Head. Also a good view of the Greeblie on top of the Scope.
 1 point
 -
One thing I would suggest is that you use a rear cover strip on the insides of the fronts, Matt. The reason being is because that seam gets a lot of wear and tear from being bent repeatedly when opening up the rear seam to put them on. It doesn't have to look good (no one sees it anyway) and it will reinforce the front cover strips.1 point
-
Happy Friday! It's amazing. I have very organized hardware storage bins filled with every conceivable kind of screw, nut and bolt. Yet I don't have anything to fit the grips and scope rings. So, off to the Home Depot and I found some pretty cool screws. These are nylon "pan-head" screws with common (not Robertson or Phillips) heads. Exactly what I needed. They are a bit long, but that is the beauty of the nylon material. Easy to snip to size. Once snipped, I will rough the screw heads with sandpaper, then prime. After they are screwed / glued into place, a quick dab with black paint and you got Uncle Bob. I'll be gluing and clamping the grip panels down as they are very slightly bowed.1 point
-
I just finished a PLA SR-14r myself. I use a real scope like the others did and I haven't weathered it yet, but plan to. I also made it so I can take it apart and put the electronics I made for it, in the moving trigger.1 point
-
Ya. Definitely a learning experience. This is my first large scale print and everything, minus small parts, was printed hollow to save resin. I'll have to look at my 3D files, but the walls are maybe 2 or 3 mm thick as suggested in 3D forums. As you can see from the small grey circles, I do put drain openings in. I guess they are not large enough to let the alcohol enter and rinse properly. The holes are anywhere from 2 to 4 mm diameter. I use an Elegoo Mercury Plus washing and curing station. The black resin is "Water Washable". This doesn't mean you are to rinse items in a sink and let it pour down the drain. That is super bad for environment. It basically means you don't have to use alcohol. To keep things simple, I used 99% alcohol for everything. I rinse items about 5 minutes for larger pieces. These are simple placed inside the curing machine tub, and there is a little spinner that creates a circular current that washes most of the resin away. You let part drain, then switch machine to curing mode. I couldn't find any info (even from Elegoo) about what cure times you should use. I only did about 5 minutes total. So, my takeaway: Create larger openings where able: For example; the magazine housing comes in two pieces. The main large box and a thin base plate (you can see it peeled away in the photo). For the next print I will create a large rectangular opening on the bottom of the magazine housing, leaving enough of a lip to attach the base plate. Anywhere I can't do this I will place the largest holes possible and accept that I have lots of filling to do. Rinse better: A person on a 3D forum says he uses a syringe filled with alcohol or water (when resin allows this) to pump cleaning fluid through the parts. Since the cure station tub holds dirty used alcohol (it is expensive...) after the initial "spin cycle" rinse I will fill another storage tub with water and let it soak and rinse in there. Same forums suggested that leaving parts soaking in 99% for too long can also cause damage to parts. Remove internal supports when able: On same forum someone suggested not using internal supports if able. The supports and structure cure at different rates, causing the warping and cracking. They may also prevent rinsing fluid from circulating properly. Make sidewalls thicker: Helps beef up structure and reduce warping. Elegoo comment to a forum question was 4mm. Downside is more resin is used, but it is better than wasting a big print. Research cure times: For some reason, I think leaving a piece in the UV machine for 10 minutes will cause it to burst into flames LOL If I can swing the time this weekend I will try and reprint. I won't get blaster done by Empire day next week, but it may get done by the time we move in middle of June. Stay tuned all!!!1 point


.jpg.da3d7f5b83c8ba730ca2d8fddc219a01.jpg)


