Leaderboard


Popular Content
Showing content with the highest reputation on 04/04/2021 in Posts
-
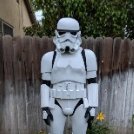
On behalf of the D.O. (and entire) Staff, I would like to congratulate Grave Wong (TK 36036) of the Hong Kong Garrison for becoming Centurion # 498! Way to go, Grave!!! OK troopers, this is nail-biting time. We are down to only 2 spots left in order to be in the Original 500 Centurions, and we have one in the review process.3 points
-
Hi Grave, and thank you for your application for ANH Stunt Centurion! CRL and Centurion Application Requirements: All required photos have been submitted, and on behalf of the entire D.O. staff we are pleased to welcome you to the rank of CENTURION. Congratulations! Other-Armor Fit/Assembly; In this area we review observations made by your fellow troopers and the DO team. Some observations may lead to suggestions to improve the overall look of your armor. Note that we consider both text (CRL) and pictures (screen caps/reference images) when reviewing submissions. First, GREAT job on addressing the issues that were requested, sir! I am really glad that Arthur was there to assist you (Troopers helping Troopers!) and you guys really took care of them in fine style. Well done, gentlemen! Just a few small items here that we noticed that will sharpen up your look: As seen below, it looks like there is quite a bit of paint on the sides of your right Hovi-tip screen. The left one is perfect! A few minutes with a razor knife will take care of this. Reference images As suggested in the CRL, the top of the tube stripes should lean toward the front. Not the biggest of deals, but if they are decals we are suggesting that you replace them for a more screen-accurate look. Reference images In your initial photos, your ABS belt is close to the perfect position... covering just the bottom(s) of the ab-button panels. In the more recent photos it has dropped and is twisted pretty far to the right but keep in mind that the center square button cover should be lined up in the center of the ab plate. Just a heads-up to make sure when suiting up that the belt is in the right position. Reference images And that's it! Now you can say you are one of the "Original 500" Centurions, so get out there in that awesome armor and make the HKG proud!3 points
-
Who's the more foolish? The fool, or the fool who follows him?3 points
-
Esteemed members of the 1st Imperial Stormtrooper Detachment, greetings! This is a momentous and exciting day for all of us. Overwhelmingly, I expect that at this point in time, you truly have no idea as to why it is such an exciting day. Allow me to explain. It is inevitable that we will face change in nearly all areas of our lives eventually. Our costuming hobby is no different. Whether it is new movies, TV shows, or video games which present us with new opportunities, or a bold new idea for an exciting piece of merchandise that excites us, change brings with it a variety of emotions and energy. It is in this spirit of change, excitement, and energy, that this day breaks with new direction for us all. Inspired by the examples presented in the world today, by Disney, LFL, and the 501st Legion as global entities committed to effecting positive change in our world, and in the spirit of unity, camaraderie, and togetherness that we announce a major change in operations for us as members of the 1st Imperial Stormtrooper Detachment. As we all know – or maybe we don’t, but I will explain – the first scenes ever shot for anything Star Wars were some of those on the desert planet of Tatooine. It was there that the first world of Star Wars came to life for us. As a way to honor the history of the saga that shaped so many of our lives, it has been decided that, effective immediately, the 1st Imperial Stormtrooper Detachment, its CRLs, staff functions, websites, Facebook groups, members, etc are absorbed into the Mos Eisley Police Department. We look forward to serving proudly alongside our dirtier comrades in armor and having the opportunity to order new (to us) racing shirts, coins, and patches! With unquestioned loyalty, dirt don’t hurt! (For the purpose of clarification, this is our edition of the annual April Fool's post for 2021, it is not true)2 points
-
Just a few drops of Hyper-Fuel to turbo charge the Hyperdrive!2 points
-
You truly are the the embodiment of "Troopers helping Troopers" Arthur. Grave is in good hands!2 points
-
Congratulations trooper. Let’s work on the remaining “fine tunes” next round.2 points
-
Glad to be of assistance and great to have you over today.2 points
-
After about 3 lightly brushed coats on the stencil. The last coat maybe was 4 hours later I slowly peeled away stencil. came out perfect.2 points
-
Following a recent discussion about the thigh ammo pack on a Stormtrooper’s right thigh, I wanted to post some reference photos. Many of us assume that the central ammo pack (3rd of 5 ammo packs) should be in the middle of the thigh, in line with the coverstrip. As below, this was not the case with the majority of ANH stormtroopers. It was offset to the right, slightly, when viewed from the front. **Depending on the make/accuracy of each person's kit, this may or may not be possible due to where the ammo pack has to be attached to the ridge on the thigh. Photos below;1 point
-
Just checkin’ in with what will possibly be my next build; I’m seriously contemplating an ANH Stunt to add to the roster. First earned my 501st membership last October with a Sandtrooper and I’ve since stockpiled a handful of other detachment costumes, but in the back of my head I find myself thinking, “but I don’t yet have an original Stormtrooper... and I just might have to remedy that”. Anyway, good to be here, thank you for the forum access, and I’ll be sure to gather as much information as I can in the coming days, weeks and months..!1 point
-
Congratulations Grave! It is such an achievement. As Centurion #488, I can say to anyone thinking of embarking on either a new build or upgrades in order to reach the certification, just go for it! The process of researching designs, techniques, materials and mods (if required) to build a set of TK ANH Centurion armour gave me a comprehensive understanding of building armour in general, as well as an appreciation for the fine details that entail EIB and Centurion status. This is experience I will take into my next build, and the next, and so on. Sent from my Imperial Comlink1 point
-
No need for that, brother.... AWESOME job on those fixes! (I will have your review posted up first thing tomorrow)!1 point
-
I will make fine adjustments1 point
-
Grave WongTK-36036 Centurion A4 Joseph Thanks You are welcome, sir! I changed the name of the D.O. to mine, as I am the one who did your approval. https://www.whitearmor.net/eib/certificates/36036-centurion.png1 point
-
Thank you Ray!! Great to meet another fellow Central Garrison member..! I’ve already got an RWA kit on the way so it sounds like we’ll be very close to a simultaneous build!! And it would appear that there also some troops on the horizon so it would be awesome to meet up at one or more of those, too!! I look forward to it!1 point
-
Hahahahaha!! No pressure? After an introduction like that...?! Thank you Dennis, for the very kind words! And like other detachments to which we belong, you better believe I’ll be referencing your information right here in the FISD!! Heck, it was your Centurion pics that piqued my interest and led me here in the first place!! Cheers..!1 point
-
Thanks [emoji106] That's a huge difference between the various pics! Will crack on with it today. Will go for a smaller return, as I've seen a fair few posts talk about keeping it small for comfort while trooping Sent from my SM-A715F using Tapatalk1 point
-
Welcome to FISD Trooper, we are here to help. Good luck1 point
-
Here's a couple of ANH references which may help. There is no specific size of return edge mentioned in the CRL's so I don't think you would have any issues1 point
-
Could very well be lighting, here's a couple and they do appear to have a shine
 1 point
 -
1 point
-
Hello and welcome to the forums, you can find a great info thread here1 point
-
Touched up shoulder bells and brought up my forearms a bit higher I felt they were to low to hand guards. Will drop pic next time I suit up.1 point
-
Was up Joe1 point
-
Hi Joe, I'm from Bellevue and I'm in the very slow process of assembling an AM kit. If you'd like to take a look at it before you decide on what kit to get, let me know. I've only cut the biceps and forearms to fit so far. The rest has only some return edge removed. -Ray1 point
-
Hello Joe, Welcome to FISD!1 point
-
Way to go Grave. Hope there will be news from the D.O. soon. Good luck!1 point
-
Thanks guys! Fingers crossed1 point
-
Welcome to FISD Joe Don't forget to request 501st access so you can see more sections of our forums. Link below1 point
-
Dude! I don’t think I know anyone with your drive. For those who don’t know Joe, he’s banged out 6 Legion costumes since joining in October, and one RL costume, most of them with at least L2 cert, and man are they a sight to behold. We got to know each other as we were working on our first costumes with the Pathfinders Detachment last year. I know once you start this build that you’ll definitely go all the way for Centurion and I can’t wait to see THAT WIP. Your attention to detail will be a source of inspiration to future Storm Troopers. No pressure [emoji6]. Welcome brother!1 point
-
Welcome to the FISD, Joe! You are definitely in the right place for all things "shiny white" TK related. Since you have already built a Sandie, this should be an easy project! Know that we are here to help with any details, and always feel free to ask all the questions you want to.1 point
-
NOW you tell me... I just spent all night converting my HWT pack into a Sandie pack.1 point
-
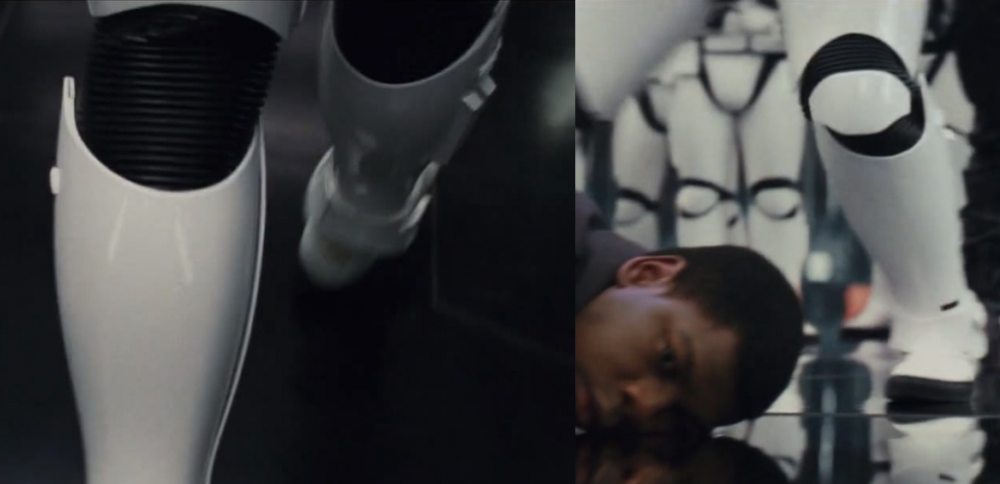
The issue in question was not a matter of centering the front ammo box, but rather the symmetry of the ends of the ammo belt in relation to the corner of the bottom ridge. As Dan pointed out, those middle boxes were rarely (if ever) lined up with the cover strip. However, in all the references I can find the ends are evenly spaced on both sides. A small difference is no biggie, but these were pretty far off. This detail does not affect larger troopers. It doesn't matter if the rear sides of the ammo pack are close to the corner or far away (second image). Either is fine and dandy as long as they are the same distance (or close to it) on both sides. As seen in the first image below, yellow would be a smaller trooper, red would be a larger trooper. Both can have it centered.1 point
-
Ever since being a DO I never required nor did I encourage center alignment. What mattered was the rear or mounting placement. Not sure when, or if this has ever changed.1 point
-
Hi Justin, Yes, I certainly see where you are coming from. And I believe the rivet placement is the key point in the discussion you're referring to, rather than the postitioning of the central ammo pack. That's why I specifically mentioned the different armour makers. With the best will in the world, even some of the 'most common' armour makes are not always overly accurate in some areas, whether this be with their kits or their commissions, so aligning the central ammo pack like the originals might not be possible. This certainly makes it harder for members when they feel their armour maker probably knows the "right" way to build it, yet, this is not always the case. Makers pre-shaping (and potentially pre-trimming) the ammo pack (or any other parts), is, I'm sure, meant with the best intentions. However, it does take away some of the applicants' choice to fine tune certain parts. Unfortunately, the armour makers are not obliged to make changes based on the CRL - it just depends how accurate they want to be. This then comes down to the purchaser on their choice of the various factors, including budget, accuracy, availabilty etc. Regarding the higher levels of approvals, I think a key point to bear in mind is that approvals are based around the wording of the CRL but also based on the visual appearance of the oroginal costumes. I quote "Text descriptions are only one part of the guideline. GML’s and costumers must consider both text and pictures (CRL and Reference) when reviewing the costume." Hopefully these reference photos will help future builders before they attaach their ammo pack. I'm a firm beleiver that the best reference material a builder can have is the oroginal movie suits themselves, within reason. Other build threads are good, especially when it comes to the certain "quirks" of certain makes, however, the end result is to look like those wonderful troopers on screen that we all fell in love with. :-) This is not just a response to the Centurion application that is being discussed, by the way. This has come up in another thread on a different platform and these reference images are hopefully hepful to all. :-)1 point
-
"Change is bad" famous quote by a Grumpy Old Man. "Semper Gumby" quote by me meaning always flexible. For those of us who aren't part of the 501st yet but actively building our first costumes is there anywhere we can look to see how this will impact us? The information and support at whitearmor.net have been invaluable for my build. Will this forum stay active? Do we need to join the MEPD forums and restart our build threads? Will the same people who have been so helpful here still be the ones helping us new builders as we move forward? Will the 501st be providing the necessary disinfectant and insecticides needed if we have to rub shoulders with the unclean ones?1 point
-
Looking awesome Grave, good luck trooper1 point
-
I can highly recommend Questdesign. Not the least expensive option out there, but definitely a high quality blaster and acceptable for Centurion. As Glen mentioned, I would suggest raising the counter, though.1 point
-
Well done, Grave. Overall, that’s looking great. :-) Just to add to what Glen highlighted, one of the rear decals appears to be bigger that the trap and is overlapping the ridge. Also, as it’s a Centurion application I can’t help but mention the helmet alignment. Not that I expect you’ll have to change it, but more for your information if you choose to make another helmet in the future, or for any other troopers looking at this Centurion application. I wanted to highlight the construction/alignment of the helmet. As it stands, it has a very close resemblance to Return of the Jedi (ROTJ) or ESB MKII helmets. These were different to A New Hope and had a different look. Let me stress that this is not a criticism and that 99% of the public would not notice the following at all. I’m purely mentioning this as it’s at Centurion level. Here’s a look at your helmet vs an original ANH stunt helmet; And here vs ROTJ; The main difference is how the faceplate is aligned. You’ve aligned your faceplate with the eyes pointing up into the brow (green line). This gives the helmet a longer appearance (blue line) and a very angled face (red line). The ultra low brow look is more ROTJ, also. https://www.whitearmor.net/forum/topic/47588-imperial-stormtrooper-choosing-your-brow-height/ The back/cap of the MTK helmet does have some similarities to the ROTJ helmet (soft lines) so this is perhaps a helmet derived from an ROTJ helmet. (I don’t know much history of MTK). Changing this at this point would be difficult as the holes have already been drilled etc. As I mentioned at the start, I would not expect you to have to change this for Centurion approval, however, it is hopefully useful information for any future builds you may undertake or, more importantly, for any troopers looking through Centurion applications for reference. If you did decide to change it, here’s an approximate example of how this could be done: Best of luck with your approval, Grave. Best wishes CableGuy1 point
-
Good luck Grave. Nice build.1 point
-
Hi Grave, thank for your Centurion application. One of us will be with you shortly. Added to process line1 point
-
Very nice shots of your armour Grave, only some small areas that Glen pointed out could make you look the best you can. Good luck with your approval sir.1 point
-
Hi Grave, excellent Photos!!! Good luck with your application!!!1 point
-
Good Luck Trooper1 point
-
I have been pondering the way to get the wires from the power connection in the grip up to the LED in the side of the Visor Rail. The Visor Rail will be installed after the Slide and Frame assembly is inserted into the Shell... However, it dawned on me, nothing can be be sticking up from the top of the Slide when you insert the assembly into the Shell assembly. and the location of the light source is not directly over the grip space either. so just pushing something up through the a hole from the grip space, isn't an option... this is where things end up under the Visor Rail I modified... at the back of the slide. I have a couple ideas.... more to come when I have time....1 point