Leaderboard


Popular Content
Showing content with the highest reputation on 10/11/2020 in Posts
-
Was having trouble with the spit rivets deforming the snap as I tried to set it, so got a bit creative with some modelling compound which made the male snap stronger, slightly trimmed the length of each split rivet so they didn't protrude After the compound set got to work on assembly and sorting out my snap setup. Seems to have turned out ok. Just shoulder straps, belt and gloves to go. Sent from my SM-A520F using Tapatalk2 points
-
Those spats look a bit different from the ones that came with my kit. Like if they were a flat piece of abs that was just curved around. Also looks like part of it is securely affixed or permanently attached to the shin and the side where the shin opens up is where the spats are loose at. This was what I was thinking about doing. If its okay for L3 Centurion, I will go this route with my shin/spats.2 points
-
Hi, definitely It's a bit too long for you. If it was me, I would take to a tailor or seamstress. Cut the excess and add velcro. here some reference photos that can clarify the size. Cheers.2 points
-
This is one of my favorites.. Sent from my iPhone using Tapatalk2 points
-
Great news!!!! I just received my 501st HWT Trooper approval. TK31564 reporting as ordered to add to my ANH TK Stunt.1 point
-
TK bondservnt 2392 here. I miss the logo with the helmet and the 2 crossed E-11. can we have it back? This used to be at the top of the page? The FISD
 1 point
 -
I pulled the clamps off the ammo boxes and taped them on, thanks @gmrhodes13! I put E6000 on the large boxes, laid the elastic down, spread some more, and clamped them on the belt. I cut some velcro and hung the drop boxes just under 1" (per the new CRL, but I can shift them if needed). I'm also very happy with how I cut the back belt since it comes up just short of the outer box, so it's hidden behind it! I sprayed satin inside and gloss outside of the thighs. My modified lower trim looks pretty good (they're both in this pic)!! I wish it were better, but it's the best I can get without filling the interior with something... I also sprayed gloss white on the coverstrips so the cut sides are painted. I'll probably flip them over and spray satin inside, so they're completely white.1 point
-
Nice work trooper, a couple of things you may want to adjust before the DO's get here. Belt is on an angle. You could move your forearms upwards which would reduce the gap at the elbow, that will give the same gap between them and also at your wrists, as the forearms are almost touching your handplates. Good luck with approval, not that you'll need it1 point
-
I have a threaded rod in the barrel and a recessed threaded section in the main blaster body so easy to separate, use two soft bags to keep the pieces safe. I've seen some use gun cases / boxes with foam in for transport1 point
-
Following up on my shin armor, I added the 25mm cover strips once it was all finished. Because the seam needs to click flush, the excess E-6000 glue needs to be removed from the inside along the cover strip (by lightly cutting with a blade, and then scraping and sometimes pulling it off in long, glorious strips when it works). So far, especially with my snap failsafe, they seem very secure. I had to pad the front of the inside to try and push that sniper plate further out from my knee, and so that top magnet is more strained and needs the snap on that side to maintain closure:1 point
-
You are correct Monica, the original armour had the spats attached to the shin, using a cloth material and a rubber cement. You are also correct that they were indeed made from a different type of material to your ABS vac formed spats. The screen used parts were injection molded. Glad that the images are of help in reassuring that you are on the right track.1 point
-
Congratulations Ardeshir, another beautiful build good sir.1 point
-
Looking forward to seeing your progress! With your level of build experience and attention to detail, why don't you consider joining the Imperial Attache staff? (Hint hint, wink wink). There are lots of troopers out there who could benefit from your expertise.1 point
-
Hey trooper, Good work so far! [emoji1303] If your kit came with the usual two sets of ears, you could consider trimming to second set to around half the size you have now. This will be more in keeping with the originals and give your lid a slightly sleeker look :-)1 point
-
@Darth147 sorry, I totally missed your question. I must have strayed away from the site for a few days and missed my notifications. Yes, I scaled up to 105%, but that is entirely based on my build. Of course this also means scaling up the belt and ammo boxes in some axis' as well. For me, I scaled the belt to 105 on the X axis but didn't stretch it on the Z. I didn't want to have the belt be to "tall." Also, I don't know what printer you have, but be careful with your slicing if you have to cut it to fit on your print bed. This is why I'm going to be purchasing a CR-10 Max soon. If I do any more builds that require abdominal armor, I'm printing it off in one shot. Back to the belt. The belt front fits fine, but the rear is tricky. Since the rear of the abdominal is where the majority of the stretching occurs, the belt has to do the same. But, since the 3d print belts don't have a lot of flex, you almost have to print the belt as if the abdominal is stretched. I would advise putting on the ab armor and taking a lot of measurements before printing. I got pretty creative with the rear belt to get it to fit, but ultimately I've now opted to make the belt out of HIPS. That's what I've got planned for tomorrow. Let me know how yours turns out. @MaskedVengeance, sorry, I missed your question as well. Initially, I was set on buying the file from GreatApeStudioArt on Etsy, but after researching a few posts on the Bounty Hunter's Guild I found a thread that listed all the accurate files on the web. One of them just happened to be on Thingiverse https://www.thingiverse.com/thing:4401649. I printed it mostly for fun, but now that I've sprayed it with alclad, I love it. I didn't do a build thread for my Mando armor, but I may end up doing it again at a later date. Right now, I'm sewing my soft parts and will be spraying the Beskar tomorrow night. I'll post a pic after Halloween; my wife is going to wear my Mando costume and of course, I'll be cruising around in the ROTK armor. Also, one of the guys in my squad helped write the CRL for Din Djarin V1 and V2 so if you have any questions, I can dig into them for you. Our helmets are identical. Also, if you do the armor, be sure to download a left shin base shape. PandaProps uploaded his on Thingiverse here https://www.thingiverse.com/thing:4212846. The left shin is basically a leather wrap, but the base shape gives you something to wrap the material around. He has a video about this as well. Lastly, a lot of the armor sets don't have the back, kidney, and left knee armor. I think all the designers are still trying to figure everything out. For these, I grabbed the files from GreatApeStudios. Even if you pass on the back armor for now, the knee armor is cheap. For the E-11, I also got that on Thingiverse here https://www.thingiverse.com/thing:4003566. It's a Sterling SMG, but the same designer has E-11 accessories as a separate file. Finally, I've been holding off on updating my build thread with hopes that I'd finish soon and be able to post the complete build, but I've been held up recently. On a positive note, I met up with some members of my local squad for a virtual convention and a "socially distanced trooping event/ photoshoot" last weekend. We had a blast, as a teaser, here's some pics: Yes, we set up a volleyball net for the Tie Pilots. We had a little Kenny Loggins Playing With the Boys kicking in the background and really just had a blast. Though everyone was masked up under their buckets, there were absolutely no complaints and even the snowtrooper agreed that the weather was perfect. Also, I got to sit on a 3d print panel which ended up being pretty popular. If anyone's interested, they can see the replay at https://youtu.be/kDR9_nP7560.1 point
-
aww I missed this thread. Hello and Welcome to FISD Aria. Selamat bergabung. Thats local made bucket from Indonesia. I know its easier to get for the local, but if you want to apply submission for join 501st Legion many things that must be adjusted and fix if you purchase that helmet. IMHO better you purchase assembly or kit that already meet standard 501st Legion 's CRL. Lets talk and I will assist you.1 point
-
You can get up to so much mischief as a Jawa1 point
-
Hey Joseph, thank you so much as always. Well, I've made the adjustments to this one, Centurion next. After that, I have already started the FOTK, so that daunting task is next on the list. But Work has picked up for me now so I may be a little slow going for the FOTK. But already started it a bit.1 point
-
Some great photos1 point
-
Sent from my iPhone using Tapatalk1 point
-
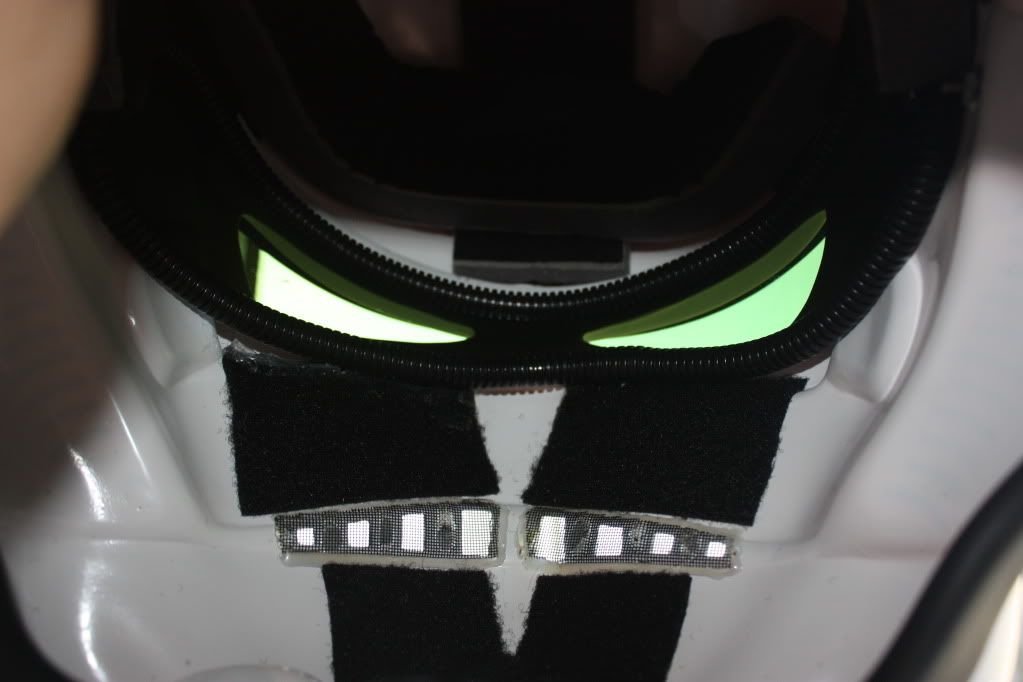
I've seen quite a lot of different ways to add mesh. I use a metal flywire mesh, cut larger than the teeth area so I can fold over, tape in place and add a couple of dabs of black silicon to hold it, normally in both corners then top and bottom in the middle. I've seen tape used, velcro, silicon, hot glue, tabs and screws the list is endless Here are a few examples Even gaffa tape
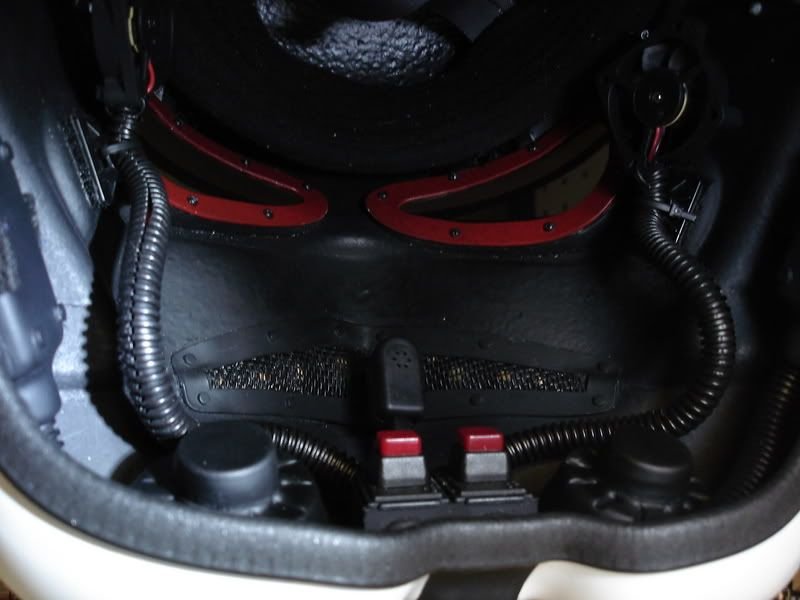
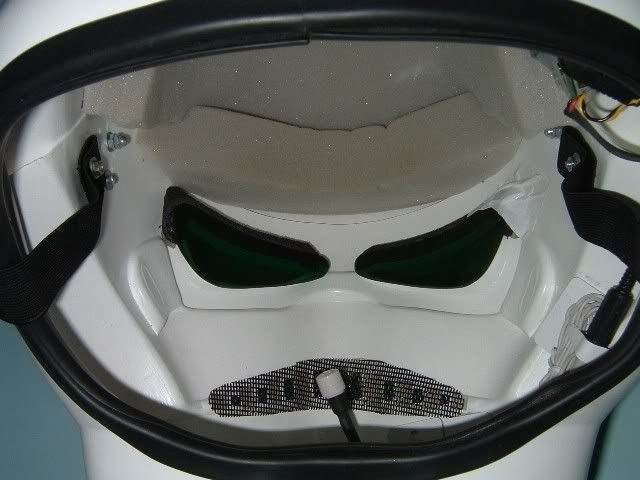
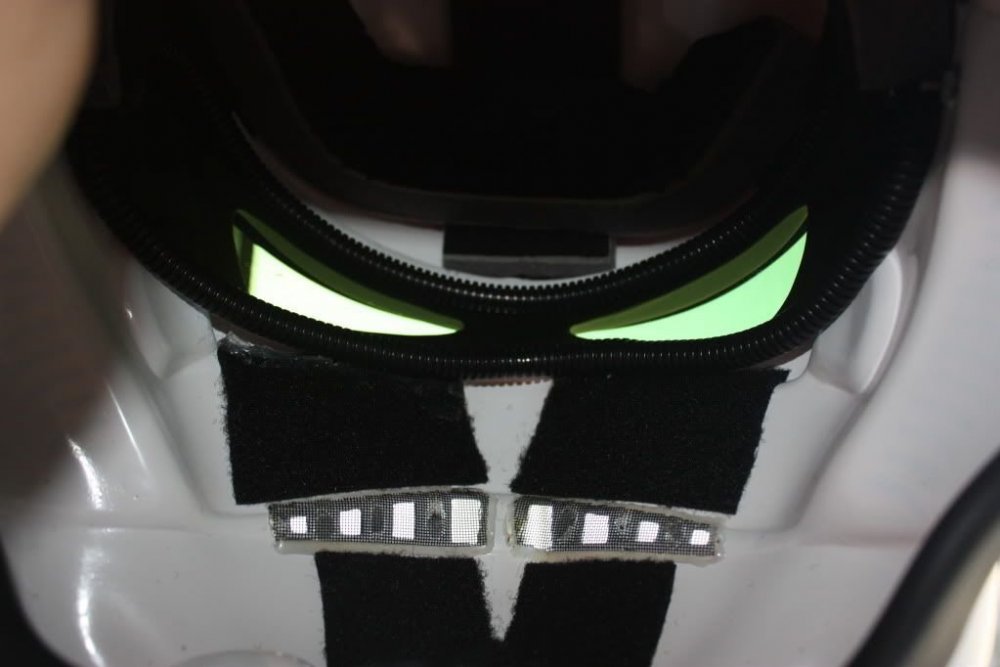
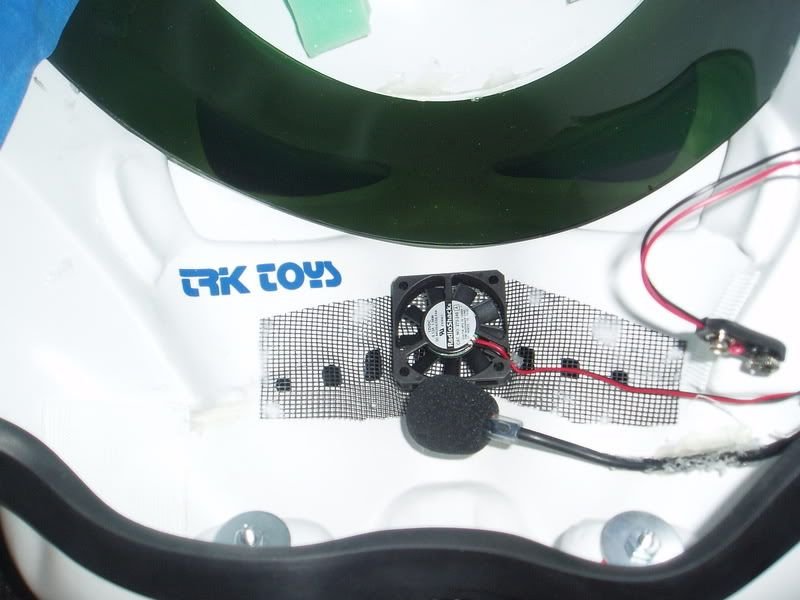 1 point
 -
My Antenna (Non-CRL) version1 point
-
WAY TO GO Ardeshir! Congrats on your 4th approval, brother... So which costume is next? lol1 point
-
My issue was the armor and helmet was a mash up from different era's of Star Wars, Rogue One was right before ANH and the armor was completely different. It also used pieces from The Force Awakens, way outside it's era there. Some didn't like the crisper molded details, very different to ANH. It's all about personally preference, many do like the look and we have many being built on the forums right now.1 point
-
I don't think it's from the movie, there is quite a lot of weathering on the helmet and armor, also the brow trim has dropped so you can see a clean area, no weathering. Here are a couple of examples, notice the coloring of the weathering. Note the guy carrying the DLT-19 is carrying it upside down If you feel like it go through the movie clip by clip here https://starwarsscreencaps.com/4k-star-wars-episode-iv-a-new-hope-1977/1 point
-
Pretty much same build over and over but new helmets, and after L3 this is the last time before this suit gets retired, I swear haha Same photos from my Pre-approval thread - hopefully none are deal breakers and I'll suit up one more time to correct anything for Centurion I appreciate you guys! Hopefully my Hero is fine. All fine here. Thank you. How are you, DOs?1 point
-
Here comes Justin trying to give Glen a run for his money with the number of EI awards! Haha. Congrats on your approval! Sent from my iPhone using Tapatalk1 point
-
Hi, in my opinion the left shin sits better on the boot and it leaves some room if you need to lower the thighs In the following reference photo you can have an idea of what I refer. and with the thighs It seems that the left thigh and shins looks better than the right side. I think you may want to reduce the wide of the lower section to match the left one. hope this can help. cheers.1 point
-
Cover strips stop above the lower ridge of the thighs, front and back, notice some ridge showing in some places and not others. But on the shin fronts the cover strip covers the top ridge on the front On the back of the shin they stop below the top ridge1 point
-
Hi all, As the actual accuracy of the armour kit itself is not really considered with EI and Centurion, it’s almost possible to clear anything. As mentioned, SDS has its share of accuracy issues in terms of the actual moulded plastic parts (helmet, chest piece, moulded ab buttons, overlap construction on the limbs, belt, thigh ammo pack shape etc.), yet it can still be taken up to Centurion (with a lot of hard work). This is because centurion is more about having the correct screws, the correct alignment, minimal black gaps around the kit etc., not about the plastic parts themselves. In this sense, this is quite “fair” towards armour kits from all different makers and price groups. On the other hand, those that want to make the most accurate and realistic suit of armour will choose the most accurately moulded kit within their price range. :-)1 point
-
I've recently submitted for Centurion (pending approval) with my SDS armor. Yes, gasp! SDS!!! Hold the gunfire please. There are many issues with it and the company that I won't go into here, but I was told SDS would never be accepted for EIB or Cent without ALLOT of work. Well, I did it and am almost there. Just takes some mods, patience and perseverance.1 point
-
Hi Ted! As others have said, almost any armor from the vetted vendors list can taken to EI and Centurion levels; some kits may simply require more work than others. The first two links below are the L2 and L3 request forums which you can browse to see the common armor makers. The last link is to a resource thread I made which includes a long list of what I thought were extra-helpful/quality build and submission/request threads towards the bottom of my initial post (you'll need to scroll down quite a bit). https://www.whitearmor.net/forum/forum/19-request-expert-infantryman-status/ https://www.whitearmor.net/forum/forum/72-request-centurion-status/ https://www.whitearmor.net/forum/topic/49412-all-in-one-tk-anh-stunt-index-of-resources-by-maskedvengeance/ I hope this is helpful to you!1 point
-
There's absolutely no preference given to armor maker, but I'm sure you'll notice a few of the same high-quality vendors popping up over and over. It speaks to the consistent quality of those makers and the research of the troopers building them, but not to the DO's preference. Also, a little confused... Anovos does not make ANH Hero helmets, only Stunt (and some early questionable belts). It can be modified to Hero with some work, but wanted to make sure that was clear when considering your submission for EIB. Anovos is a garbage company, but a fantastic set of armor, and my personal favorite sculpt. I've been approved at EIB 3 times now in my Anovos suit and will be submitting for a 4th approval (actually Hero but with a different bucket) soon. A few minor details need to commonly be changed for Centurion (mic tips, ear/TD harware, canvas belt) but not a ton... why would the expectations be lower or would you assume it wouldn't be great?1 point
-
There are some updates needed to the standard Anovos TK kits you may want to look through Tony's build1 point
-
Hi Ted, Actually , EIB and Centurion level is not about the armor maker alone, If you take a look to the Centurion approvals Here You will see that the are different armor makes that achieved L3. When starting building your armor, if you consider the crl requirements in Blue color for L2 (EIB) and Red color for L3 Centurion) you can add all the necessary elements to achieve the Badge . Some makers would need a few more adjustment than others but in essence all are similar. You can read details about EIB and Centurion Leves HERE Hope this can help Cheers1 point
-
The main reason some kits have them like AP for example was so they gave a little more room for larger troopers. If you dont need that bit then yes, cut it off for centurion for accuracy.1 point
-
Note for centurion you can loose the large tab on the rear of the straps.1 point
-
Hello Aria, Welcome to FISD. Please do check this section out first before you commit to buy anything. There is a lot of information here on who is ok to buy from: And also who NOT : I recommend you pour a cup of coffee, take some time and go through the pinned topics on our getting start section first. Yes, there are a lot of reading there but it will help you to make the right decision on who to buy from based on your preferences, who suits you best and price. https://www.whitearmor.net/forum/forum/38-getting-started-read-this-first/1 point
-
Hi all! If you are like me, you have often wondered how people get such nice, round circles when painting the ab buttons. I tried free hand, it was a disaster. I tried circle templates, but often got bleeding under the template. Then, quite my accident, I was dabbing off the paint using the toothpicks I use to stir the paint and.... Look at those nice circles! So, I stirred the paint, and let a few drops come off, then before the next drop comes off.. And then keep waiting for the drop to come off the toothpick... If you want the circle bigger, just stir the paint drop with the toothpick, it slowly gets bigger. And you have nice circles that still have that hand painted look. Try it if you have trouble with painting circles. Good luck!1 point