Leaderboard


Popular Content
Showing content with the highest reputation on 09/02/2020 in Posts
-
This was a long time coming. I have wanted to build my own set of TK armor and join the 501st since not long after its inception. After many conversations with my son about it, we decided to move forward. It has been and continues to be an amazing experience as I am already working on finishing his TK. A cool story is that another couple that we are good friends with were over for a small celebration of their daughter's birthday on the same day that I got my email from my GML about being approved. I had wanted to take a few new pictures for my EIB submission later in the evening when they were gone, but we got to talking about the 501st and the process of building armor around the table ( in the absence of the kids ) and I suggested, off the cuff, that I could put on my armor and present her with a special birthday cupcake from the Empire. When they began to sing Happy Birthday, I emerged from the room, cupcake in hand, and got to watch her eyes light up. She's a big fan of the bad guys...lol. Later on that evening after they had made it home, they messaged my wife and told her that was one of the best birthday suprises she had ever had! It really made me feel good to bring that kind of joy to a youngster and I'm looking forward to many more opportunities ahead.3 points
-
Hello everyone. Wow! What a mind shock at reading everything from the 501st, Whitearmor, Garrison Pages, Armor builders.. nuts. I am 44, father of 4 boys, (Future troopers, well maybe one Sith to be honest), and much as many of us, a huge Star Wars fan. Since I saw that you can actually BUY an authentic replica set of armor from SDS, I have been working diligently to get on board. Over the past many months, I have learned that SDS may not work out for me. The thought of signed armor was the highlight, and I may still utilize some help from contacts in Mexico to acquire a set, however in the mean time, I have settled on a full ABS set from RS Props. I do have a few questions, but first I will indicate where I am in the fulfillment of this dream to be a fellow StormTrooper. I have read all the info from the starting posts on the 501st: I have then found several sets of armor, and as mentioned, settled on RS. I have read through.. thoroughly, (many times lol), the path to take which ultimately led to this post, from the new member application guidelines and faq's here: https://databank.501st.com/databank/Join_Us And now I am introducing myself, in hopes to better help me locate the proper Garrison and liaison. Hi! So, now I am down to my questions.. I reside in Winston Salem, NC. USA. Identifying the contact list for the contact looks to be the Carolina Garrison.. http://www.carolinagarrison.net/ Yet, I am unsure exactly whom to contact. There are 21 different contacts there, and unfortunately they've abbreviated their titles/ranks, hence, I am asking for assistance in my intro. Next I will assume, once, I receive my armor, I will be able to submit the photos, links, and hopefully... move into the ranks officially with the rest of the FISD. (Btw, it was at this point I realized my screen name here included a TK number which... was done on accident, and I am happy to change it if necessary.) Nonetheless, So about me: Craig, 44, Father, I work in the medical industry. I travel frequently. Love Star Wars. LOVE. I have a gift from my girlfriend which is an ID bracelet but with Vaders helmet etched into it. I have created a gaming and video room specifically for the boys n I to enjoy movies (star wars themed of course). I am a degree holding engineer. Love to build things, metal, wood, electronic. So.. I am thrilled to begin and get going with realizing this childhood dream. Thanks for taking a min to read. Future Trooper, CB3 points
-
Well with that news, here is another piece piece
 3 points
 -
Update: Alright, so I went ahead and attached a shim to my kidney armor to close the gap on my right side. Also, Goo-Gone was an excellent recommendation for removing the paint from my metal snaps. I scraped the paint off and then cleaned up the snaps so they’d be shiny. If there’s anything else I need to take care of to get me to that EIB, please don’t hesitate to let me know, looking forward to earning that badge! Thank you all in advance for your invaluable help. Cam Blair TK 220202 points
-
I'll keep it clean then :-)2 points
-
Seams are allowed for L2 so you should be fine Any shims used to achieve this effect are of a similar material and color as the abdomen and kidney armor. Shims fit flush and seams are allowed.2 points
-
I will be starting dialogue today with the Clone DL and LMO's There are a lot of elements to this design that are of clone nature compared to TK nature and we need to make sure it ends up in the right home with the right expertise etc etc. I'm going to follow the correct process for this so everyone is on board with the final decision I think you and those that have been waiting for a home deserve this to be resolved once and for all, especially if this has been going on since 2018.2 points
-
Greetings Troopers, I decided to go ahead and document my process closing the gap between my ab and kidney armor. For my project, my right side had a gap that was about 3” wide at the top and 1.5” wide at the bottom. This was acceptable to be approved as a 501st TK, but in order to achieve level 2 (Expert Infantry), the gap needs to be closed. (Disclaimer: This project is currently a work in progress, I’ll continue to update this thread as I progress through the process. Be sure to read through the tutorial, start to finish, before beginning work on your own armor.) The supplies I used were as follows: 1. ABS plastic 2. Exacto knife 3. 6” ruler/ Measuring tape 4. Small clamps 5. Small super strength magnets 6. E600 glue This project is a work in progress, so if I end up using any other supplies I’ll be sure to annotate them below. With my supplies gathered, I began working. First measure the working edge( the edge you’ll be attaching the shim to) of the kidney armor to prepare to make the first cut. And always remember, measure twice, cut once. Using the Exacto knife, cut a piece of ABS to fit the length of the working edge of the kidney armor. I left a little length on the bottom to be trimmed later. Better too much than not enough. Next, prepare your kidney armor for the shim. You may not need to, but I trimmed away the return edge and removed the nylon strap and snap used to attach the kidney to the ab. I then went over the edge a few times with the exacto knife to ensure the edge was as straight as possible. Prepare your shim and a connecting strip of ABS that will be used to attach the two pieces together. My shim is 7” by 4”, and my strip is 1” by 5”. Yours will be different depending on your kidney armor working edge length and the width of the gap you’re closing. Before gluing, using the clamps, position the shim and the connecting strip on your armor to ensure that: 1. Edges are straight 2. Lengths are correct 3: shim will hold position on its own E6000 glue needs to be left for 24 hours to dry, so you’ll want to ensure your shim will not move during that period. This step is important, ensure the shim will fit exactly how you want it before applying any glue. Apply glue to one side of the the connecting strip. Holding your shim butted against your kidney armor, apply the connecting strip to the inside of your armor. Ensure the connecting strip is evenly placed half on the working edge of your kidney armor and half on the edge of the shim. once I had the shim held in place by the clamps, I used the super strength magnets to keep the shim held tightly during the drying period. And now we play the waiting game. It’s recommended that E6000 be given 24 hours to dry, so make sure your armor is positioned somewhere it will not be disturbed. (As stated above, this is a work in progress, so I’ll provide updates to this project as I continue working. In the mean time, any and all input is very much welcome, I’m by no means an expert and any tips or advice will benefit not only me, but anyone else this tutorial may help in the future. Thanks in advance!) to be continued...1 point
-
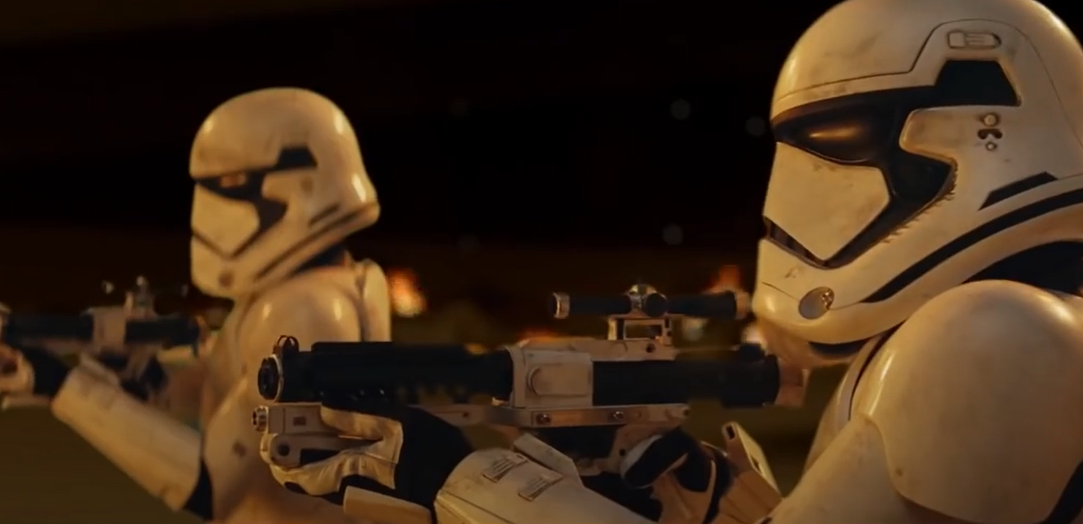
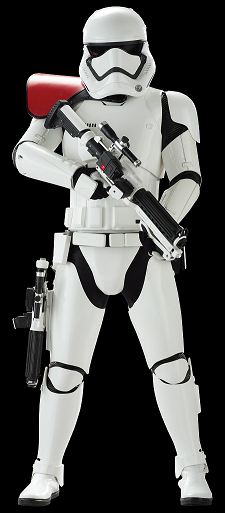
So last month I made a build thread in TLJ FOTK section about getting started on a TLJ FOTK. But I guess it was my bad to think I would get TLJ armor with my TLJ helmet. KB Props armor is TFA by default even if you get a TLJ helm, so that brings about a bit of issues when its time to go for EIB and Centurion. [IE: Cods are different, forearms are different, thermal detonator is different, and probably more I dont know about] Speaking of EIB, theres this #1000 EIB thing going on in the FISD announcements that I think I want to be a part of. So I've decided instead of TLJ to go full TFA to see if I can reach this milestone before the window closes. I'm pretty new to all this but from the previous thread I've already been through the whole BBB moment and got the ball rolling with trimming stuff. I've been scratched by abs, glued my fingers together, and got pinched by neodymium magnets. I've even been burned by CA glue already and almost lit a paper towel on fire! All the great noob stuff ya'll missed! Plan is to look something like this guy by the end of everything. Not gonna have the heavy F11-D at the moment, and I may or may not have the pauldron when I go for EIB cause the window is closing pretty fast, and theres a lot to do! Also 2 rifles? Overkill maybe? Should have an SE-44C holstered I feel like. Guy is packing some serious heat and doesnt even have the ammo vest! Anyways, I'm gonna do like my other thread and list off equipment I have thus far. I'll be editing this to reflect updates on what I have and what I need to get. Parts List: -Hard Bits- TFA Helmet: Anovos (Received) Armor: KB Props (Received) Pauldron: KB Props (Received) Holster: R2Dan (Inquired) Yoke Reinforcement: Ukswrath (Received) -Soft Bits- Belt: JAFO Belts of the First Order (Need to get a bit further in fitment before I commit to a size) Pouches: TrooperBay (Received) Gloves: Endor Finders (Received) Boots: Imperial Boots (Received) Undersuit: StormtrooperUndersuit (Received) Balaclava: UnderArmor HeatGear Tactical Balaclava (Received) Rubber Gaskets: Imperial Gaskets Cloth Gaskets: Sheev's Emporium (Received) Neck Seal: Sheev's Emporium (Received) Harness: Geeky Pink -Electronics- Helmet Cooling: Ukswrath Comm System: Ukswrath Chatter Loop: Ukswrath -Weapons- Z6 Riot Baton aka "Whappity Stick": Force FX Black Series Z6 Riot Baton Hasbro (Acquired) SE-44C Pistol: Arsenal Studio (Received) F11-D Blaster: Arsenal Studio (Ordered) Heavy F11-D Blaster: Branfuhr Studios -Armor Storage- Chest: Husky 37in Rolling Tool Box Utility Cart (Acquired) As I've said in the other thread, this my first stormtrooper and this be exciting times! I hope I can pull this off in time to make it to that special EIB, if not. Oh well, it'll be fun anyway!
 1 point
 -
Hola, soy Rubén carpintero y voy a solicitar el nivel experto, en breve espero subir todas las fotos solicitadas. Un saludo. Name : Ruben Rarpintero Rodriguez 501st ID : 35553 FISD forun name : Ruben1975 Garrison : Spanish garrison Armor : Armour Factory (kit) Helmet : Armour Factory(kit) Blaster : Armour Factory Height : 174cm Weight : 84kg Boots : Armour Factory Canvas Belt : Armour Factory Hand Plates : Armour Factory Neck Seal : Armour Factory Holster : Armour Factor https://www.501st.com/members/displaymemberdetails.php?userID=32895 https://i.imgur.com/unwN4pw.jpg https://i.imgur.com/kwWvuhP.jpg https://i.imgur.com/WSMpwrN.jpg https://i.imgur.com/X2kwqay.jpg https://i.imgur.com/q4PsfwB.jpg https://i.imgur.com/nGomAV5.jpg https://i.imgur.com/WSMpwrN.jpg1 point
-
A lot of sanding but be worth it in the end, keep it up, the end is in sight1 point
-
I wet sanded the cod and butt to 220. And then applied putty to the bells and biceps. Up close, they looked much worse than before. I might have to start doing a 2nd coat of primer, or at least use a filler/primer. That took so long that I didn't have a chance to fit the thighs with the barrel/belt, shins, and boots. Hopefully tomorrow!1 point
-
Thanks for all the comments on achieving the EIB:) Also thanks TK Spartan on the tip for strengthening the hole patch. Makes a lot of sense to stick a small piece of ABS on the back and double the thickness.1 point
-
Finn was a little dirty1 point
-
Nice work, no doubt Mario would have mentioned you are missing quite a few photos, but to start here are a few suggestions Buen trabajo, sin duda Mario habría mencionado que te faltan algunas fotos, pero para empezar aquí hay algunas sugerencias. Your detonator could come downwards on the belt. Butt plate is flaring outwards on the left. Also your right calf top ridge is overlapping. Su detonador podría descender sobre el cinturón. La placa de tope se ensancha hacia afuera a la izquierda. Además, la cresta superior de la pantorrilla derecha se superpone. Detonator end caps appear to be on an angle and there should be no gap between the cap and clips Las tapas de los extremos del detonador parecen estar en ángulo y no debe haber ningún espacio entre la tapa y los clips Vocoder paint is a little narrow La pintura de Vocoder es un poco estrecha Looking forward to seeing the rest of your images. Espero ver el resto de sus imágenes.1 point
-
Ya lo moví, no hay problema. A qué te refieres con acceso total? I have moved, no problem. What do you mean with total acces?1 point
-
@TheDecisiveRaindrop honestly, I'm amazed that they've been listening to my suggestions. I've had other designers essentially tell me to model it myself if I don't like what they made. I never try to come across like that, I really want to help them with their files, but I understand that it's a lot of work. I think this one's kind of curious about what I'm doing more than anything else, but they've been nice to work with. I've already bought a few files from them. Eventually I do intend on learning how to do my own 3d modeling, but for the time being I'll keep doing it this way.1 point
-
Thanks gmrhodes13 & TK Spartan. I appreciate the feedback! Long live the Empire Peter1 point
-
Congrats! I am in awe. I hope to get mine to EIB standards in the new future. Thank you for your hard work and sharing these images. This helps other Troopers, like me, see what we need to do to meet the requirements.1 point
-
Thank you! I feel much better about the swap as well. Andrea from RS has already reached out to me with several emails, and the fitting guides. My current ETA is 8 weeks. Paid in full so, hopefully that rushes things along some. I'm not gonna hide, I squealed, even giddy-like, as a young child on christmas morning just getting the measurements out. I can't imagine the heart attack ill have when it arrives. Maybe I'll video my experience... Thank you! Definitely feel better with FISD support. I was able to make contact with Drew and Jeremy for the Carolina Garrison. I reside in North Carolina, Winston-Salem.1 point
-
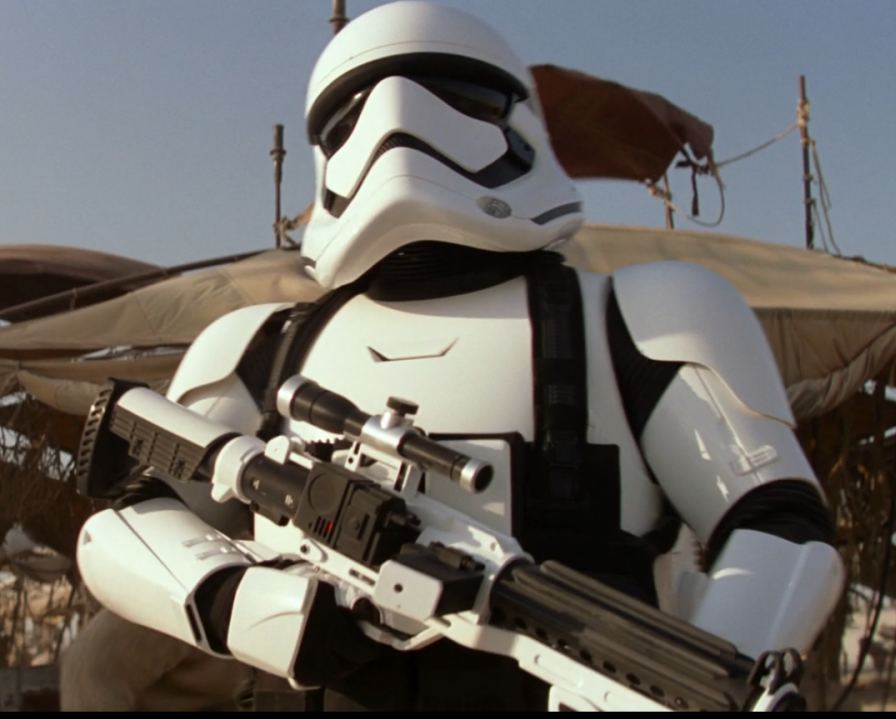
Hi Darren, Excellent question. Being totally honest, both are excellent at their respective price points. I’m in the UK, also, and have trooped my RWA suit for a couple of years. It’s excellent quality, very well priced, and is better looking that many out there. As in, it’s pretty accurate. As an example, that’s me in my RWA suit just over Vader’s left shoulder; For that sort of price, you can add you boots, holster, under suit, balaclava, speaker system and blaster all for a grand or less. RWA is a great way to get into trooping. If you have more disposable income, RS is actually cast from an original suit from 1976 so, it’s more accurate. The finer details are truer to the originals than the fan-sculpted RWA kit. However, as I mentioned early on, it’s all price relative. In my opinion, depending on your budget, you can’t go wrong with either of these options. We’re bloomin lucking with our UK suppliers. :-) Best wishes Dan1 point
-
Ross with RWA also has an active Facebook group, in case you want additional reassurance. I’m sure you can’t go wrong with either. Sent from my iPhone using Tapatalk1 point
-
Hi, both Armor sets are great, both vendors have great communication and service. Mine is RWA and no issues. cheers1 point
-
Hi, this is great and I'm looking at my first Stormtrooper set (ANH) and can see in the UK it's between RS and RWA as both appear to be based on the originals but costs differ significantly i.e. RS £895 (sadly missed the pandemic special) and RWA £490 and would ask is there a difference ? Appreciate anything anyone can share or any other providers as will not be ordering anything on ebay1 point
-
Go Dave!1 point
-
Welcome aboard, Craig. You’ve had a lucky escape - you’ve managed to avoid one of the least accurate armour and helmet makers available (SDS) and gone for one of the very best. Congratulations. :-) Great to have you on board.1 point
-
Craig Whyte TK 19024 EIB A4 Sha Sha Thanks http://www.whitearmor.net/eib/certificates/19024-eib.png1 point
-
Thank you all for the welcoming comments. It's great to be here and given the tick of approval:)1 point
-
Progress Report - 9/1/20 Special deliveries today! My stuff from imperial boots finally got here! Here are the boots! Oooof...they got my glove order wrong. They already got the message and are sending me the proper pair...got a bad feeling it will be a month before they get here. Just in case, I went ahead and ordered a size small gloves through Endor Finders. The IB gloves kinda run big since their smallest size is a medium and I found they were more loose on my hands than I'd like them to be. So perhaps its a blessing in disguise. Also my gaskets and neckseal arrived from Sheev's Emporium. Looks great and feels comfy! Alright back to this pile of ABS on my bed. I need some feedback about a couple of things, as I'm not sure what to do from here. I think this is how the shin has to look, the front part overlaps the back right? I may need to put some shims on the inside cause theres not a whole lot for glue to hold on to. The other side will need a shim too cause it will be the same issue for velcro. Now if this is how they have to be there are some other issues with them. The greeblie space doesnt really line up between the two halves of the shin. The inside tops of the shin dont line up well at all. Only way this will line up is if I cut it, and maybe I can rebuild the return edge with some good use of a file. Now if I'm right about the shins, then the thighs will be done in a similar fashion except those will just be 1 piece instead of velcro together on one side. The thighs have to be STRONG as this is gonna be a high traffic and stress area of the armor. Cant risk velcro coming a loose on my thighs. I finally got around to trimming the back of the thermal detonator plate. I've seen people trim this a bit more but I'm scared to until I get further along with the abdomen armor. Also cut out the circle for the one side of the thermal detonator. Some time this week I'm doing to clean it up and glue that circle to it and then JB weld the thermal detonator to its plate. Alright, its time I go about trimming this edge. I'm not sure how much to take off though. I'm worried there will be gaps between it and the yoke if I do it wrong. It cant stay as it is though, it clashes with my helmet. I finally sorted out which boxes belong to the ab plate so I'm going to set these aside. The belt boxes are another matter entirely... I forgot to dremel out the details on the handplates so I will do that tomorrow for sure. My goal tomorrow is to at least get both shins put together on one side while the other awaits for velcro. If I have time maybe I can get the thighs in order too. 95% of the pieces are trimmed now so its time to get these pieces put together.1 point
-
Hello Craig and welcome! I don't have any answers to your questions but I enjoyed reading about how you got here and about your plans for becoming a Stormtrooper! I am currently in school working on my degree in electrical engineering so it's always inspiring when I meet actual engineers. I appreciate the three prime directives you have instilled in your kids, they seem like they're going to have a pretty bight future with you as their father. I really look forward to seeing your progress here on FISD!1 point
-
Unfortunately the only ones I've seen really dirty are from a deleted scene in TLJ, which aren't used as reference as it is a deleted scene, not in the movie Most troopers on Jakku where pretty clean

 1 point
 -
Thanks for the specifics! Searching now, it looks like it IS an Australian thing I'll keep looking to see if I can find something out here that might work better. At the very least, I can try switching my primer to a primer/filler. Thanks!!1 point
-
I just added this photo to show that I filled the seam. The ammo pack sits on top of the bottom rim against the cover strip. I just added this photo as well.1 point
-
Oh, I already have sir! No time to waste!!!!1 point
-
Nice work, spray putting would have saved you a lot of time Just applied 3 coats to some 3D printed parts and you'd be amazed how much it fills the print lines.1 point
-
Lewis Gun Manual PDF http://www.replicaplans.com/LewisGun/LewisReferenceDocs/TheComplete Lewis Gunner.pdf Also https://www.yumpu.com/en/document/read/21080853/handbook-of-the-lewis-machine-gun-1917-cal-30pdf-forgotten-1 point
-
That model looks awesome!!!! ALSO just got the helmet in the mail today! It's not really skinny, it's just the photos that make it look like that. Since i have it in person now I compared it, and its size is very close to the Black Series ROTK helmet. Gonna start painting this in a few days Also about the modded model: It's probably possible to rip it once its released and be used, but it's his work, so if it was gonna be used outside his mod i'd at least get permission (unless it'll be for your own use, but still). But i gotta admit, these models are beautiful! Only difference to mine is the belt (using the clone belt instead of a TK one) Also a word on the models I had made: They were built upon the In-game model (a very polygonal mess ), but even after getting them made, there were some things I wish I could improve or change about them to make them maybe alittle more accurate. I do want files for the helmet to be released, but I want them accurate enough so if people who wish to go for approval with it can. So if it's possible, can we get the CRL team in here and discuss this build and see what we can do to get accuracy on the helmet and the rest of the suit as a whole? Even if I myself aren't going for approval (for now), I'd want other people to be able to at least have a stepping stone for that to happen (especially since my build is getting a lot of recognition on group post and a good amount of people have told me they want to do this build themselves too).1 point
-
Hello and welcome aboard, good luck with the research1 point
-
It was a lot of fun building the room with my kids. As an engineer, nerd and lover of games. I have instilled in my kids.. 3 prime directives. 1. Always tell the truth. 2. The definition of Integrity, always do the right thing, even when no ones watching. 3. Responsibilities first, then play.. and Play like you mean it! I have posters, a few mannequin's that need armor (wink wink), the accent lighting for the surround sound.. cause yanno.. Tie Fighters and gravity bombs! And I must admit there is a series of old gaming consoles, including a personal rebuilt custom NES. and ya, that was me when I was not in shape at the end lol. Much has changed since that video. A father and son trooper set. I like the sound of that! Hope to see you around as well!1 point
-
More searching on real MG34’s yielded pics of light to medium brown wooden stained butts and very dark reddish brown, almost black Bakelite ones. Kind of like looking through a pint of Guinness. I think I’ll go the Bakelite route. Seems to fit the Empire them more. Just have to find a good tutorial on painting it. So begins another long term project...1 point
-
Vamos Sergio, ya casi !! . Tu insignia de Centurion está a la vuelta de la esquina ! Go go Sergio, your Centurion Badge is around the corner !!1 point
-
I would agree on this 100%. There is so much craziness at least here in the US, it seems this is one of the few places where you can be part of something positive.1 point