Leaderboard


Popular Content
Showing content with the highest reputation on 08/22/2020 in all areas
-
Ok, update on progress. Here are the photos of the TD and brackets as they were. Here is what happened when I tried to rework one off of the first set. I picked up a small table vice from Harbor Freight this morning and beat a little more space into them over the shaft of a screwdriver. I do believe this weakened them slightly and will likely be only a temporary fix until I receive or make replacements. I did email Dave with photos of the brackets I received in hopes that he will help me out. Regardless, here is the end result. And...on the belt... I also re-evaluated the backs of the calves and realized that even though they do close to no gap at the top, the velcro strip is so narrow that it doesn't always hold them tight. So, on Glen's advice, I glued some strips on the inside that were originally cut off the shins to hopefully make the gap less noticeable should it occur. I'll eventually transition to a magnet system once I am more comfortable with the process. Additionally, on the advice of Glen and Mario, I reduced the size of the small ab plate just a little more. I believe this is about as small as I can safely make it. I do also have a whole set of replacement decals if it comes to the point I need to do something with the thicker black lines on the traps. I could possibly trim part of the decal to make it thinner. Anyway...I sit in nervous anticipation for an email from the GML. ***Update*** I reached out to Dave and he’s taking care of the brackets. I can’t recommend him enough when it comes to delivering a quality product with great communication and customer service!2 points
-
Well luckily a few years back, Paul (Daetrin), Joseph (justjoseph), Tony (Ukswrath), Christoph/Danny (Ripper_L), Steve (Starsaber25), Jeff, (Wingnut) Arron (Pyrats) Tim (Dark CMF) myself (Sly11) and a few more, did all get to hang out. I can attest these are all wonderful and interesting people. Celebration for many is the ultimate way to get together and meet the people you talk to though the forums.. Lets hope the world gets back to normal and one day we can all meet up again2 points
-
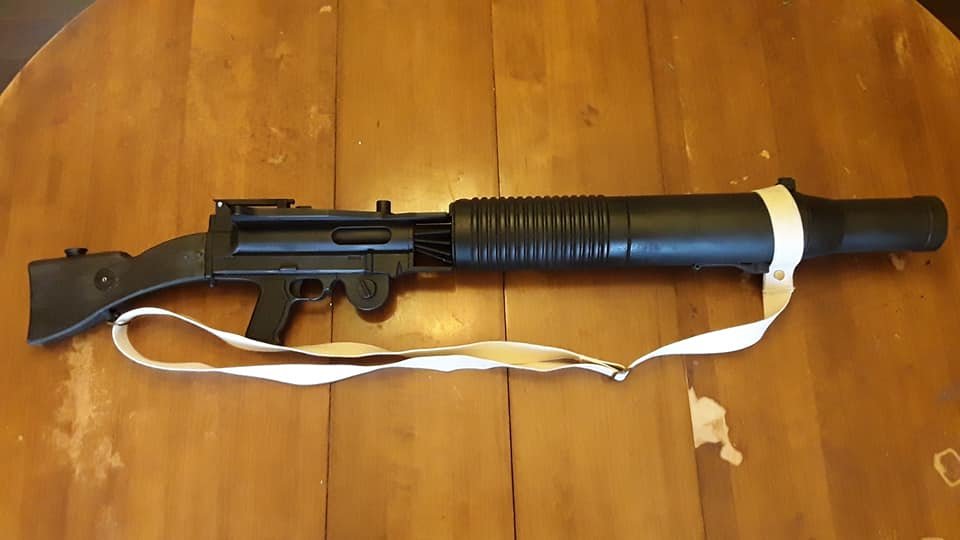
After 5 months of modeling, remodeling, printing, reprinting, and repairing breaks along the way, the T-21 is done. I am split on my feelings. On one hand, I am glad to have this off of my table, but on the other, I am sort of sad that this piece will be trooping with someone else. But I am sure he will get good use out of it! Would love to see what everyone thinks!
 1 point
 -
I was thinking about doubling it, but I can't salvage the snaps I already used so I'll have to order more. Thanks for the tip and reassurance!1 point
-
With the elastic you will find there are two types, one is a lot thicker and stronger so some times you may have to double over the thinner elastic to give you the extra strength. It's a time consuming job but gotta be done1 point
-
All great info, thanks everyone! I'm in a bad news/good news situation now. The bad news is, I noticed some yellowing going on and I had to contact WTF for some replacements. (Side note: he responded almost immediately and the cost was so insanely cheap, I tossed him an extra $20 just to approach what I thought was a fair price!) I decided to go ahead and build what I had anyway. I figure it's at least good practice, and maybe I can use them in a Sandtrooper suit down the road or something. Now, here's the part where I dump a ton of photos and ask you kind folks to tell me all the things I screwed up - so I don't screw them up on the new set! Some things I'm really unsure about: 1. Is the same type and thickness of plastic used for the cover strips as for the armor itself? The sheet I'm carving from is much thicker and stiffer, and it's causing issues with trying to get both sides of the strip flush with the armor surface. 2. How long is unapprovably long for cover strips? I'm afraid I might be at or near that limit with my right bicep. This cover strip also ended up off-center. 3. I had some issues with joining the pieces of different curvature that led to a wavy surface. When I couldn't get edges to lay flush, I always ensured the front-facing edge looked good and let the back edge float however it fell. Any problems there? 4. How do you get a camera to focus on the armor instead of the background? My Galaxy S10 just won't focus on it instead of the background! (This last one isn't an approval question, but I'm still stumped.) There's actually a ton of pictures over here: https://imgur.com/gallery/0AtmsqT1 point
-
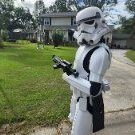
Almost forgot.. I’ve also been sanding off my fingertips on this little fella. Getting the PLA print lines smoothed away has been quite the chore. But it’s looking good and almost ready for the final coat. So. Much. Sanding. Sent from my iPhone using Tapatalk1 point
-
On the thigh ammo belt, I believe both the split rivet and single cap rivet are acceptable at all levels. @justjoseph offers the centurion hardware kit, which would be a nice one-stop shop for what you are needing.1 point
-
Lower leg and thigh work for this round of photos. GMRHodes, I made sure to create two curve areas on the knee ammo belt as per the CRL. TKSpartan, I think I'll go ahead and trim about a 16th of an inch along the bottom front of that sniper knee plate just to nail down the flushness more. Thanks for the suggestions. In order to ensure the lower legs close more tightly I heated along the front area of the left and right pieces. I decided to use the velcro method to close the back area of the shin. I simply glued the velcro strips along the cover strip and back area. For the thigh ammo belt I used the score and snap method to remove from the original piece. I proceeded to cut two curve edges into the bottom corners. In doing so I believe I may have cut too much of a straight angle on each side. Any suggestions on how to fix this miscalculation are most welcome. Here we have the left and right thigh pieces marked along the flash for cutting out and the final sanded result. I've left a half inch distance along the front creases for the front cover strip. For now I've left the return edges at less than half an inch along the top and bottom edges. Is this acceptable or is it advised to go thinner? Lastly, I've seen several suggestions for the type of rivet to be used for the thigh ammo belt. Even the instructions in the CRL seem to contradict each other. (I think I'm shooting for Level 2 Centurion certification?) Geez this stuff is so confusing lol. Anyways, that's it for now and thanks in advance for your time and help!1 point
-
After updating the image yesterday I thought I'd just go check any difference between the Hero positions with Han and Luke this morning and yes both are differently placed, Han's is further back and short straps and Luke is close to belt with longer straps, may have to update the image yet again with optional positioning for Hero
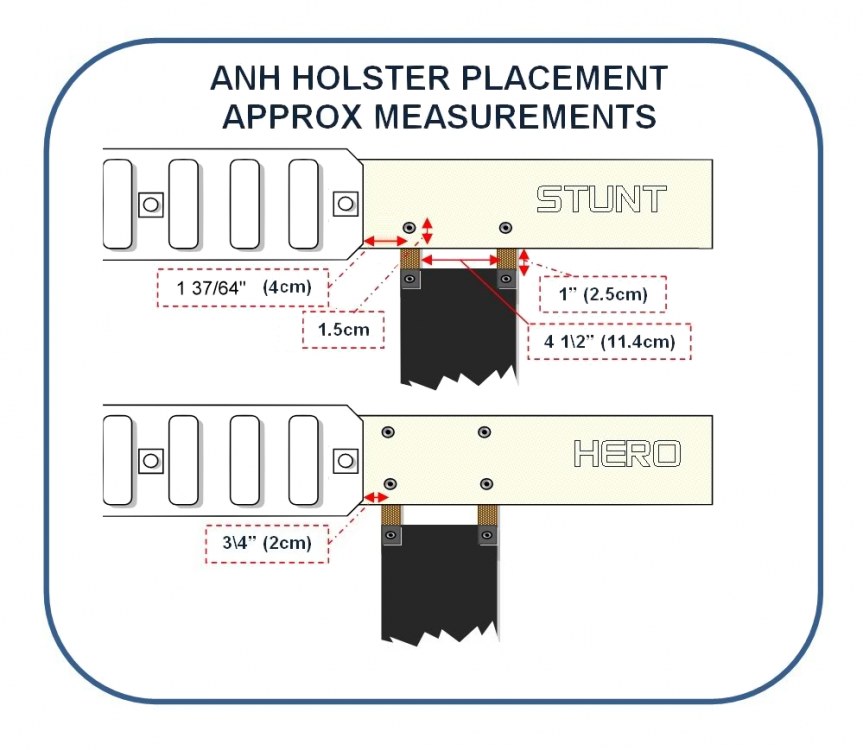 1 point
 -
As title--both the elbow and shoulder gaskets of the stormtroopers in Battlefront II are textured as the same canvas as the belt boxes, not shiny rubber. I don't think this has any immediate relevance to costuming since we don't have a CRL for the game version of the FOTK (unlike, say, the heavy weapons trooper from the previous BFII), but I thought it was worth noting for the record that there is at least one solid canonical source for cloth gaskets...1 point
-
A motley crew indeed, lol.1 point
-
Dropping this off as a reminder of my goal and a bit of motivation. At the get-go I knew the chrome would be a challenge to maintain, so weathering is my answer. In this image I can see all sorts of blemishes and scratches which gives it a nice gritty feel. In either case, the mirror finish has to look good as a base to pull it off. Click into the image to magnify details1 point
-
I don’t recommend gluing the U-trim of the brow. Once you have the helmet alignment correct, the brow trim will stay put by the compression between the cap and face piece alone.1 point
-
Hi Jason, It would be great if you can post the photos a little further away to have a better perspective of uor helmet and include side photos. This can let us see better the issue and alignment. Thanks. You may want to check this Post for Photograpy Tips. So usefull1 point
-
I think updating the image is a good idea even if not necessary for L2/L3, accurate information is always better IMO.1 point
-
On the Ab/Kidney, I trimmed equal amounts off of each. I ended up trimming some off of the butt plate and even added the notch, which isn't a requirement but does help some with mobility and is generally covered by the belt. The ammo belt looks good, but you may need a bit more radius at the bottom. It's difficult to tell from the photo. Also, don't forget to chamfer the corners of your cover stips.1 point
-
I really hope to have the opportunity to attend Celebration 2022, as it appears there won't be one next year.1 point
-
I did think about that, but for some reason didn't do it. I think I wanted to paint the inside before gluing snaps in, and needed to prime before painting the inside or there would be gray inside too... Maybe I'll try that for the thighs, since I don't know of a good way to prop them up except for hanging from snaps...1 point
-
It's all too hard, I just won't bother attaching one
 1 point
 -
I can attest that he is a cool guy1 point
-
The pleasure was all mine, Jason. It was nice to work on armor again!1 point
-
Wanted to publicly thank @justjoseph63 for the massive amount of help he gave me yesterday. I am light years ahead of where I was and learned a ton of good info, and it's all thanks to him.1 point
-
You can post multiple image links into a single post/thread but you want to use the "direct" link option or right click copy and paste. Nice work1 point