Leaderboard


Popular Content
Showing content with the highest reputation on 06/25/2020 in Posts
-
Hot off the press this week! The true story of how the iconic Stormtroopers were created , which subsequently led to a high profile multimillion pound court case. With the endless controversy and conflicting stories reported in the media and on the internet, this book reveals the facts from the crew on the production in 1976 Hit the link for your signed preorder https://www.brianmuirvadersculptor.com/store/c1/Featured_Products.html
 4 points
 -
Thanks for the clearing, @TKSpartan @justjoseph63. I will leave like it is actually.2 points
-
Thanks for clearing @justjoseph63. Learning every day.2 points
-
For EIB approval this is not a requirement, and even though this costume is based on ROTJ armor, most of the video game screen caps appear to show the cap as a distinct separate piece. Based on this, it should also not be an issue for Centurion level approval. (Nice weathering on your bucket, Leonardo)!!2 points
-
Congratulations on making another big step! Looking forward.2 points
-
Thanks for the kind words, troopers! It really means a lot coming from such an amazing group as you all! Keeping up my momentum on the gaskets, I finished everything today! I started by sewing the sleeve to the other side of the vest. Then to finish the edges, I simply folded them under, making sure it fit Cameron correctly as I made my adjustments. It's not the most elegant solution, but it'll do. I sewed two pieces of 1.5" elastic at the back. This allows for good movement. In the front, since there's not a lot of room for a buckle, I opted to sew in some loop velcro on either side of the vest in the middle. I sewed some hook velcro to a short piece of 1.5" elastic to make a closure of sorts. Again, not the most elegant solution, but it works well to keep the vest closed. And it's easy for Cameron to attach, so win-win! Here are all the finished gaskets. Can you tell that Cameron was a little tired of having to "try on-take" off the vest? He was a real sport about it, though. I think I had him in and out of the thing about a dozen times as I tried to figure out how to position the elastics and figure out the lengths for connections. And now I'm at the point where I can't work any further on the kit. :/ Everything is waiting for the last coat of paint and clear coat. The weather isn't cooperating at all, and won't be improving for at least a week. Grrr. Ah well. Maybe time to clean the nerd room, I guess? Anyhow, thanks for reading, and I'll be back in a few weeks once I've got everything painted.2 points
-
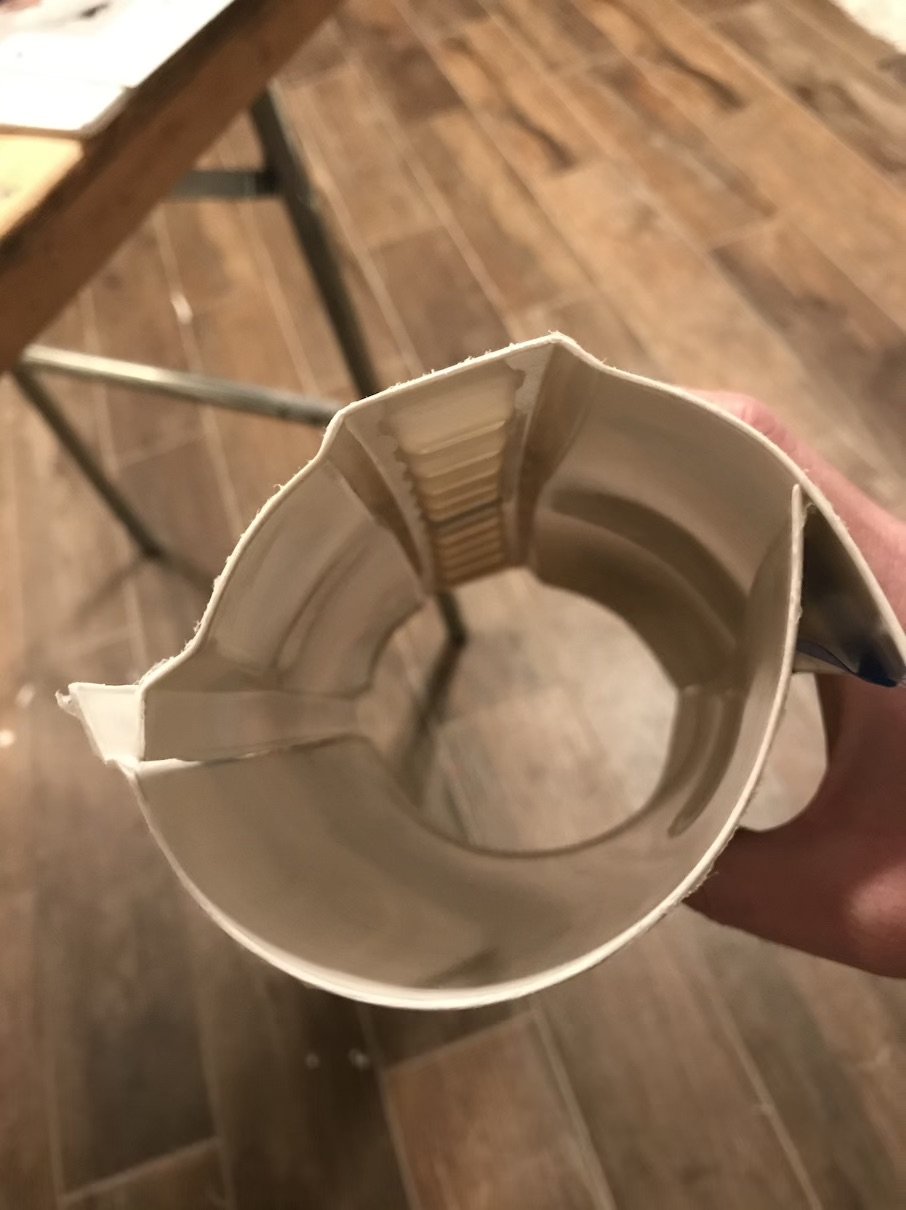
Here is the wrist side of the forearm with the return edge removed. The protective film is still on the armor so that is why there is fuzziness around the edges (Definitely will make sure to remove partially before glueing). Does that look like there's enough return edge taken off?
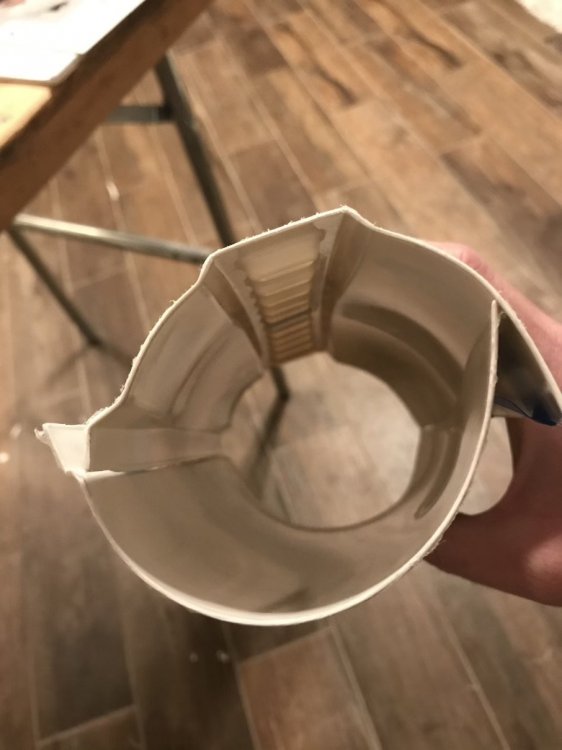 2 points
 -
Hello all! Longtime lurker, first time poster. After years of having the Anovos TK armor (pre-ordered from the original run), I'm thrilled to say I'm finally at a place to put it together. I recently moved to Los Angeles from Chicago so I've had a lot going on but I'm finally set up and ready to build! The Stormtrooper is my dream costume so I'm very excited to get this going. I figured there was no better time than now to get a build thread started in case I have questions (I know I will). I've been a part of the Rebel Legion in the past so I've been around the 501st quite a bit but I've never dived into armor until now so I'm very excited! I've been doing much research around the forums and have been looking closely and a bunch of threads. The main build thread I'm drawing from is Ukswrath's Anovos build thread which has been extremely informative thus far. I decided to make the jump and go for L3 Centurion status right off the bat for the ANH Stunt TK so wish me luck! Some of the pieces I've sourced so far are: EDITED 8/8/20: Acquired Hovi Tip speakers from Ukswrath as well as a cooling bracket for the fans. Armor: Anovos Helmet: Anovos Undersuit: Under Armour-type from Amazon Neck Seal: TrooperBay Holster: Anovos Gloves: TrooperBay Belt: Kittle Boots: TK Boots Flexible Handguards: justjoseph63 E-11: Hellhounds Fans (with cooling bracket): Ukswrath Helmet Electronics (Hovi Tip Speakers): Ukswrath My plan is to replace the waist belt with a Kittle belt as well as install a com set. Also need to get the neck seal. So far I have the armor cut out and am currently in the process of sanding the edges and removing the return edges on the wrists. Will post progress pics as I go but I just wanted to introduce myself and say thanks in advance! Luke1 point
-
6/29 update: I outlined my supplies and process to prepare for the armor here. Take a look please and let me know if you have any suggestions! Thanks! So I ordered my R1TK helmet from Jimmiroquai and within a week he has it finished! He’ll ship it out soon, so I need to get ready! In the meantime, I’m looking through the forums to determine equipment requirements and gather supplies so I’m ready when my LBB (little brown box) arrives. I’ve listed below the items I expect to need, along with my to-do list when the helmet arrives. I don’t have any cosplay experience, or even much crafting, so I’m hoping to keep my tasks simple. Some of my vendor options are limited (pretty much focused on Amazon or Target online), since I can’t go out to Home Depot or anywhere else (for now). I appreciate any guidance anyone will give to better prepare me for this undertaking. Otherwise, just ignore me and I'll keep updating this for my own future reference. Thanks! Equipment Eventually I’ll want fans, a mic and speakers, and possibly hearing assist, but those can wait until I have the full costume and go trooping. It looks like ukswrath has everything I need, and I don’t think I’d go wrong with him. Obtained ukswrath's speaker system Dremel My buddy has one he’ll lend me, along with 1.5” cutoff wheels. Will those be good for all the vents, or should I get smaller Lukcase 22mm (7/8”) wheels too? Needle file set I’ve seen R1TK helmet vents start out rugged and end up perfect after taking some needle files to them. I also read that up/down works best and breaks vents less than in/out. I found some assorted shapes (Flat, Flat Warding, Square, Triangular, Round, and Half-Round) with 3mm width and 4” file length. Glazing putty To fix imperfections, I found Bondo 651 Glazingspot putty tube. CA glue E6000 glue I found a 3.7 oz tube, which I figure will be enough for the helmet (vocodor, mesh, maybe vent backing) Two-part epoxy I don’t think I’ll need this since I’ll have E6000. Am I wrong? Sugru I saw someone recommended using Sugru moldable glue to permanently glue the lens in place, if I don’t go removable. Popsicle sticks, for spreading Interior coating Some R1TK builds recommend coating the inside of fiberglass with resin or Plasti Dip; does that apply to the helmet? I’m not sure if I’d want to insulate the bucket if there’s no need, but I’d want it strong enough to sustain minor hits/falls. If recommended, which is easier/better for inside the helmet: Plasti Dip spray or an Epoxy Resin? Sandpaper I found a pack of 220, 400, 800, and 1000. One sheet of each should be enough for just the helmet. Painting Tape: a few rolls of 48mm (1.88”), maybe one roll of 24mm (0.94”) for smaller areas A few good paintbrushes Drop cloths: 0.7mil clear plastic (will hang some to make a little paint booth) Rust-Oleum 241526 Comfort Grip for easier, more even spraying? Justin (TheRascalKing) outlined his paint walkthrough really well. Since he’s using rattle cans like I want, I’m going to mimic his process. Primer Rust-Oleum 249088 12 oz. flat gray primer spray Paint What does the CRL means by “tears and traps may not be hand painted”? I figure that means brush strokes should not be visible, so spray paint would be acceptable. White: Rust-Oleum 249090 12 oz. gloss white spray paint Gray (teeth, tears, traps, ear bars): Rust-Oleum 338924 (edit) 12 oz. gloss smoke gray spray paint Black (tear, trap, and ear bar outlines): Sharpie oil-based extra fine (edit) point paint marker Black (interior): delta Ceramcoat black acrylic craft paint Clear coat: Rust-Oleum 249117 Painter’s Touch Ultra Cover 2X gloss clear spray paint Black (vocodor, brow, neck trim): Justin recommended Plasti Dip rubber spray Any issues with these choices? Mesh Jim said the helmet comes with mesh. Is he only referring to the frown? I’ll want breathable black fabric for the traps/tears and blue for the tubes. Any suggestions? I’ll probably wait until I can go to a crafts store so I can feel it and cut how much I need. Obtained mesh for the frown Still need mesh for the tears/traps Still need blue mesh for the tubes Lens Jim said the helmet comes with a lens. Does anyone recommend a different lens? Padding I have some extra pads from an old kevlar helmet that should do the trick and can be attached with velcro Neck trim Is it fine to just spray it with Plasti Dip, or do I need to attach a separate piece of tubing? Velcro Strenco 2” black hook/loop heavy duty strips with adhesive (5 yards) Clamps (I don’t think I need clamps for just the helmet) Magnets Mikede N45 grade neodymium magnets 32mm x 3mm (12 discs) PPE Respirator mask DEWALT DPG94-1C Dominator Safety glasses Nitrile or latex gloves Dowellife level 5 cut-resistant gloves Lamp LED desk lamp with 5x/10x magnifying lens To Do Unbox! Wash the fiberglass with soapy water Interior coating? (with Plasti Dip or epoxy resin?) Tape off openings to prevent external adhering Cut out the vents Should I instead cut out the vents before applying an interior coating? I figured the coating would strengthen the trap vents so they might not break as easily. Dremel with cut-off wheels Needle files Sand the interior, tape some openings, and brush paint with black paint Sand with 220 grit Tape off lens and vent holes Prime Fill imperfections with glazing putty Sand with 220 grit Spray with Rust-Oleum gray primer Wet sand with 400 grit Repeat for 2 or 3 coats Wet Sand with 1,000 grit Tape off non-white areas Paint White Spray whole bucket Wet sand with 1,000 Repeat for 2 or 3 coats Tape off white-only areas Spray gray on traps, tears, teeth, and ear bars Wet sand with 1,000 Repeat for 2 or 3 coats Black outline of traps/tears/ears with paint marker Glossy clear coat Spray black Plasti Dip on brow, vocodor, and Jim’s Hovi tips After clear coat so they don’t end up glossy Is it acceptable to paint Jim’s brow, or do I need a separate rubber tube? Attach vocodor with E6000 CA glue Attach Hovi tips Probably drill holes and bolt from inside, so they can be switched out one day with ukswrath’s speaker system Drill holes to attach Tony's speaker system Attach lenses Permanent with Sugru? Temporary with magnetic strips, velcro, or something else? Leave small opening to cut down on fogging Attach frown mesh Permanent? Attach vent mesh Permanent? Maybe with magnetic strips or velcro for removability. Attach padding Adhere velcro hook side to helmet Enjoy..?1 point
-
Hey all, glad to finally have gotten here. I've wanted to join for the longest time but wasn't old enough yet! And then the transition from high school to college put me back a year. But I'm here now! I've already ordered my Rogue One TK armor from Jimmiroquai and just waiting for that to come in. I'll be starting my own build thread soon because Lord knows I'll need the help XD1 point
-
Hi there! After years of having the Anovos pre-ordered kit sitting in the box, I am finally getting at it and building my ANH Stunt TK (going for Centurion)! These boards have been a great help so far and you all have helped more than you know already. I can't wait to troop alongside you all in the Southern California Garrison and around the world! Thanks so much for having me and for all that you do! Luke Here is a link to my build thread:1 point
-
Thanks, the goal is to reach Centurion this year.1 point
-
Thanks again Dan. I really appreciate your help and your friendship!!!1 point
-
Any glue seepage can be removed by rubbing it off with your thumb. You may want to carefully score along the seam with a razor knife first to get a clean line, though. Groovy like Greg Brady, Luke. (Hope that reference didn't go over your head, lol). A few had the pointy piece to some degree, but most were more or less rounded off.1 point
-
Welcome to the FISD Luke. Sent from my SM-G960F using Tapatalk1 point
-
Hola Leonardo ! No está definido en el Crl, no debería a ser problema para EIB , al hacer el review se toma en cuenta además del Crl, las fotos de referencia. esperamos ver pronto tu aplicación. Saludos It's not defined in the Crl, It should'nt be a problem for Level 2 approval. when making the review, the reference photos are taken into account in addition to the Crl . Let us know how things go Cheers Reference Photo1 point
-
Congratulations on making Centurion!1 point
-
Good Afternoon! I hope you all are safe and healthy! Armor = TM Props Helmet= TM Props Blaster= 3D printed Height = 5'9 Weight = 200lbs. Boots = Imperial Boots Canvas belt = TM Props Hand Plates = TM Props Neck Seal = RS Props Holster = TM Props Thank you for looking!1 point
-
Congratulations trooper. Welcome to the ranks of EI.1 point
-
Does anyone have a Stormtrooper armor template? I wanna build my armor from PVC, but I don't have armor templates that I can trace on the sheet and cut out. Does anyone have a printout template that I can use that are up to 501st standards? It would be a big help. Also any tips creating armor out of PVC sheets or armor tips in general?1 point
-
Can't wait to see your build and approval pictures! Feel free to ask any questions you come up with!1 point
-
Looks Amazing Trooper! Good Luck!1 point
-
Looking great Luke1 point
-
Fantastic job David, welcome to EI1 point
-
It follows the idea that once you take away it is harder to put it back. Wearing the armor and moving around will give you a better idea of how much to trim rather than guessing. After my first troop I had armor bites and rubbing rashes which told me areas that needed to be change. Slowly trimmed small amounts away until I could wear it worry free for hours.1 point
-
Hi Luke! looking with interest your build.1 point
-
Congratulations David, welcome to EIB.1 point
-
Ah, the pouches and the neck seal! I will be sewing a neck seal with the same material that I used for the gaskets. And I already have the black canvas material for the belt pouches, but I forgot that those need to be constructed. Easy enough, though! Thanks for the reminder about those. I bought some pleather leggings already. I don't know if I can convince Cameron to let me cut them short, though. He was running around in them yesterday pretending to be a rock star. Wish I had that on video. And shoes... I have some faux-leather white slip on Vans style shoes that he wore with his previous kit. I even painted the bottom trim black so they would look more like FOTK shoes. They were really big on him when he wore them late last year - so big that he had to wear three pair of socks to keep them on his feet. His feet have grown a lot since then, and more comfy on him now. Should be good enough for trooping. I know that he would love a set of trading cards. Will definitely be getting him a set once he's ready!1 point
-
just right Luke. Reference Photo1 point
-
David Favela 79008 Letter Sha Sha Thank you! You are more than welcome! http://www.whitearmor.net/eib/certificates/79008-eib.png 2871 point
-
Thank you so much!! I am honored to be awarded the title of Expert Infantry and glad to be your first ROTJ TK approval ma'am. I will look over the L3 (Centurion) requirements and go from there. It is so hard to find a ROTJ E-11, but I will do my best. After reviewing the shoulders bells I will round it out a bit more, thanks for that. On the shoulders bridges, the previous CRL stated that rivets were needed to hold it in place so I did not want to do that. I can make that modification for the new L3 on the CRL. I appreciate it very much and thanks to everyone who helped me along the way!!1 point
-
I’d remove the mic tips, and fill the incorrect holes with ABS paste and sand. There’s a “how to” on making ABS paste here: Best of luck!1 point
-
Hello! This is an absolute goldmine: Are there any more images from the LFA out there? Does anyone know exactly what they have? It looks like they have a Sandtrooper, a Hero and one or two stunts, is that correct? Thanks!!1 point
-
Greetings Luke, and welcome to FISD! I would follow Shane’s lead regarding return edges, and here’s a link to Joseph’s thread which he referenced! https://www.whitearmor.net/forum/topic/48166-return-edges-101-ottk/ I look forward to building alongside you, and I am also in the middle of my own ANH Stunt TK build! Sent from my iPhone using Tapatalk1 point
-
Hey Luke, I'll chime in and recommend going piece-by-piece for your return edges. I'm approaching it as you proposed- using fit to determine how much (if any) return edge I keep. I started with around 5mm of return edges for all pieces, and I've been modifying that amount right before I glue pieces together. Joseph has a great resource for return edges in his signature (Return edges 101) that I heavily relied on. Like you, I'm currently working on my Anovos kit from their initial run so I'm happy to share what I've learned over the past few months. Good luck bud!1 point
-
Here are some screen used armor images that may help: Note that there is some of the ridge showing on the front the pieces, but the since the backs do not have those raised areas the cover strips will lat flat against the armor. Both ways you have it are acceptable, and the sizing can be done in the rear join as needed. Bicep/forearm Thigh front Thigh front Top of left calf piece1 point
-
Hi, the first one is better. more screen accurate and for L3. I would recommend to use painter's tape to make the first fitting test. Arms, thighs, shoulders etc. Cheers1 point
-
Congratulations Peter, welcome to the elite1 point
-
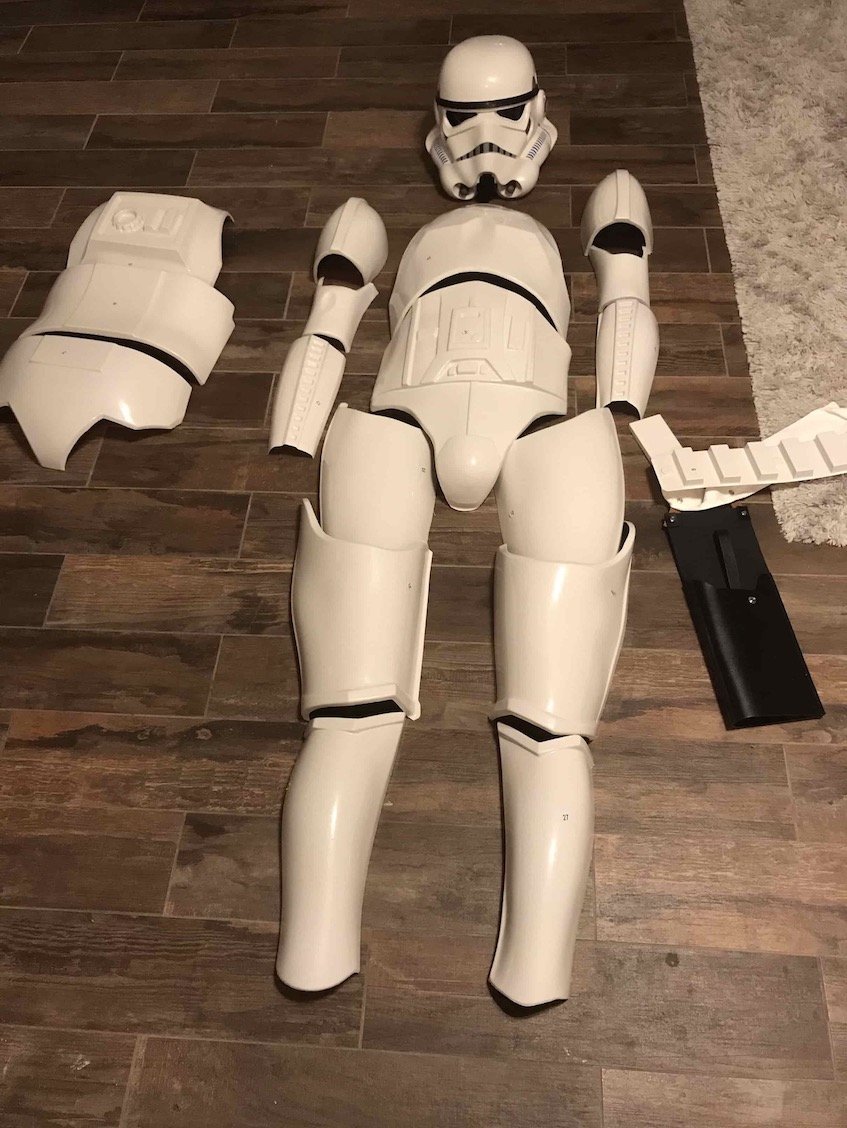
And here's the full armor layout! (Well, minus the smaller pieces )
 1 point
 -
That is probably good enough, the cover strips and glue should force them the rest of the way. Mine weren’t perfect either.1 point
-
Here are the blaster photos since the last ones were not clear enough. Thanks!1 point
-
Some one posted this thought thought I would share it again!! Lol Sent from my iPhone using Tapatalk1 point
-
I finally did it! I sent Jim my down payment on his R1TK armor kit and undersuit!! Now...the wait... I have a pretty good supplies list going, I just need to finish it up and order everything. I do have a few questions/points, if you all wouldn't mind offering some input. - We don't need rivets on the R1TK, right? - I haven't decided on E6000 or PC-7 to adhere parts to their other halves. - I plan on doing mostly snaps to attach parts to each other through small lengths of webbing or elastic. What material can I use in the snap to then E6000 to the armor? I thought about using squares of webbing but that might be too thick to punch through. - I've also considered velcro or elastic for some parts to ease stress and donning. Does anyone use magnetic strips? - I'm going to use fiberglass resin on the interiors, and maybe also apply cloth to certain stressed areas. - I'll spray the interior flat white. - Should I fully paint and finish the exteriors before assembling and strapping? I know I'd have to tape off a lot if I assembled/strapped first, but that might give me easy ways to hang pieces. - Where do you guys put your phone when trooping? What about wallet, or a few cards? I briefly wondered if there was extra space in the abdomen to make a little pocket... @11b30b4 can I get added to the R1TK WIP? Does anyone know how I change my thread's title to "DarthBiscuit's R1TK Build (Jimmiroquai kit)"? I didn't realize that I couldn't just edit it when I created it. I really hope I can get this done before Halloween! I really want to patrol the neighborhood with my kids :-)1 point
-
You got it David!!!. Everything looks shiny and taking care of the details... Waiting for the photos of your first fitting...1 point
-
Torso Assembly Continued Progress-to-date on torso including belt, shoulder bells and bridges, rivets and more Key resources consulted: AJ's AM ANH Stunt build (https://www.whitearmor.net/forum/topic/40831-ajs-of-am-20-build/) LTM's AM TK ANH Stunt build (LTM's AM TK ANH build) TK-32568 EIB Submission (https://www.whitearmor.net/forum/topic/46507-tk-32568-requesting-anh-stunt-eib-status-am-892/) TK-32568 Centurion Submission (https://www.whitearmor.net/forum/topic/46815-tk-32568-requesting-anh-stunt-centurion-status-am-432/) Andrew H, TK-14023, who has helped directly with advice and fittings and material components. Picture of arms with trimmed shoulder bells: Pictures of torso progress: Han snap: Drop box: Holster assembly: Abdomen, belt, and cod: Shoulder bridges and elastic: Painted and affixed ab plates: Rivets: Items for this that remain to be done: Snap attachment for shoulder bells Non-functional rivet in cod Remove butt tab and reinstall snaps Finalize strapping First fitting!1 point