Leaderboard


Popular Content
Showing content with the highest reputation on 04/19/2020 in all areas
-
Hi all, I'm Chris from the wilds of Wiltshire, UK. I've been trooping as a Rebel pilot for a couple of years but have always wanted a TK. I picked up a used Jedi-Robe style TK about a year ago and although i love it, I really but wanted to built my own which was fitted exactly for me. I've started my build with kit from RWA Creations and so far, so good although I'll definately be checking out all the relevant posts on here Look forward to making your acquaintances in the future Cheers!1 point
-
Hello all. I was just approved for basic and I'm really excited to be here. My costume is ANH. I'm in Central Florida and looking forward to getting past this pandemic so I can join in on trooping. I've wanted to be a trooper for a while but didn't really know how or any of the background. The original trilogy came out in theaters when I was kid and I was hooked. The troopers were the coolest. Lately, I would see the TKs at various events or Disney and that was it. But I was kinda pushed over the edge to join by a photo I saw of 3 members ( Vader and 2 troopers) at a local courthouse during a big adoption event. The photo and story did it. I was on a mission. Making the costume was daunting but fun at the same time. It's better because of the effort put into it. Thanks yo everyone in on this site who helped me along the way! I'm 54 and feel like a kid again. Long live the Empire. TK11764 out.1 point
-
Congratulations trooper and welcome to the Centurion ranks1 point
-
Congratulations Thomas...I think your centurion number is 462, @justjoseph63 forgot to put it, jejeje... Regards1 point
-
Hey! You made EI as well!!!! That is great. Good job Jonas.1 point
-
WOW! Congrats!!!! I have been offline due to work, and finally had time to check on your progress. You did an outstanding job. Welcome to the TK ranks. Hopefully when the world calms down your first troop will be amazing.1 point
-
Congratulations Thomas, Welcome to Centurion!!!!1 point
-
Welcome back, Thomas, and thank you for your Centurion application! CRL and Centurion Application Requirements: All required submission photos are present, and GREAT job on your build Trooper We are pleased to announce your armor displays all the necessary requirements as set out in the CRL. On behalf of the Sha Sha and myself, congratulations and welcome to the rank of Centurion! Other-Armor Fit/Assembly: First, I gotta' say BUCKETS OFF to you for the fantastic job you did on those fixes (especially those tube stripes)..... well done! Just a few small strapping items for ya' though to make you look your best. It looks as if your right forearm still wants to turn in for some reason, and I would think about changing the strapping to help prevent this. The "scoop" is designed to sit more toward the front to facilitate bending your arm without getting armor bite. In the second photo, yours is actually sitting in the rear. I see that you are using the 2" wide elastic (or nylon, I can't tell) for the bicep/forearm connection, but I would seriously consider changing the positioning. It will give you a much better look and definitely make it more comfortable to hold your E-11! Reference images There are still small gaps on your ab/kidney connections, but since the top halves look good we are going to suggest just tightening up your belt to even them out. So there you have it, brother. Yet another Centurion level trooper added to make the Florida Garrison, the FISD, the Legion and the Empire proud!1 point
-
That’s a neat nugget of info! Thanks Tony! Although I stick to what I’ve done. Not sure I wanna risk peeling any paint off if I remove my vinyl. But thanks!1 point
-
Nice work, looking good1 point
-
Spent some time on the Anovos helmet today, and think I got it to a place I'm happy with. I knew I'd need to update the ear screws, remove some over spray, add in the outer teeth, and paint the inside of the hovi mic tips based on all the reading I'd done. I decided not to mess with the ear position as just too many things could go wrong and my understanding it this doesn't need to be done to meet Centurion. Here's what I did and the final product: First, updated the ear screws. The ones on the left are the new ones, the ones on the right were what came in the helmet from Anovos (these were repurposed to the TD as mentioned earlier in the thread). Painted them white and good to go: Next up the eyes: First I trimmed them back (forgot a before picture) to clean them up as Anovos had left a lot of extra in there! Next I made templates of each eye using an index card and tracing from the outside. I added about 1/4 inch around the trace line and cut the lens from the supplied Anovos one. Using the Sugru method as described by @justjoseph63 in his "how to" thread, I used white sugru to affix the lenses to the helmet. The sugru seems really strong so I didn't complicate it by adding any screws, etc. as I've seen some others do as this seems like it will hold just fine. Since I'd bought the combo black/white pack of Sugru, I used that to attach the frown as well. Next I replaced the Anovos mic tips. I was going to just paint the inside, but I knew I was eventually going to get the speaker mic tips from @ukswrath so just went ahead and did that now. Super simple. Quick unscrew of the Anovos tips, widened the mounting hole with 1/4 drill bit, and popped the new ones right in. 5 min tops, and they look great. Finally, cleaning up the teeth. This was the part I wasn't looking forward to. I masked each tooth off with painters tape and used a Qtip and isopropyl alcohol and just rubbed gently until it was gone. Had a couple areas to touch up and added the two outside edges to the frown (I actually like it better without them but I suppose accurate is accurate) and now I believe the helmet is complete!1 point
-
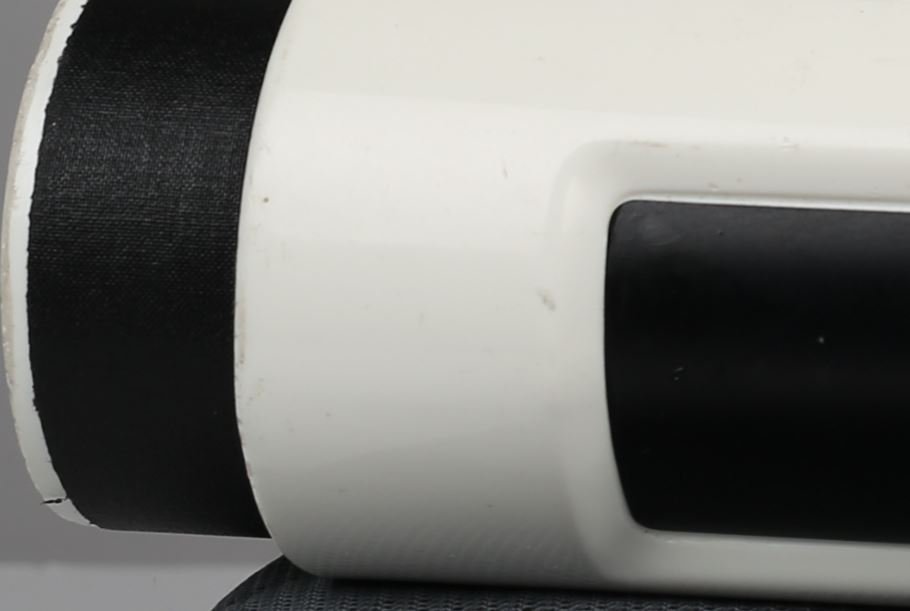
If you're shooting for accuracy here's some info. The TFA cap was draped in what was thought to be gaffer's tape. Here's a movie armor reference photo. Note the difference in material between the center decal and end cap.
 1 point
 -
Beautiful!1 point
-
THERMAL DETONATOR PART 4 So some of my armour came back from the painter's, and I got back to work on those that I can. Completing the TD, I stuck on the 4 vinyl stickers: 2 end caps, 1 to wrap around the left tube, and 1 rectangle piece in the middle. The TD is complete!1 point
-
Got the same answer on a couple of FB groups. Was the answer I sort of expected, but wanted to verify. Thank you so much for your fast reply and the info. You rock, and I appreciate it.1 point
-
That's a black Rubies Stormtrooper costume. From what I've heard, it requires serious rework and modifications to get it to spec and lots of folks here would say that the modification process isn't worth it for the price. I'll let people with more knowledge on the matter give you a more definitive answer though. Edit: I just looked at the link here And a brief blurb here sums up what I mentioned earlier: "Even though the Rubies TK armor is licensed by Lucas Films, it is not acceptable for Legion membership without a LOT of work and putting a LOT more money and time into it. The average price for a Rubies Supreme Stormtrooper Costume is $400USD (305 Euros) to $700USD (535 Euros). But, after you factor in that you will have to purchase a replacement helmet, buy supplies to modify the armor, all this, just to get the Rubies TK armor up to Legion standards. It would be cheaper and easier for you to start with a new armor kit.There have been a few members that have done Rubies with all the upgrades, but afterwards said they spent a lot of time and money and will be looking into a different suit of armor next."1 point
-
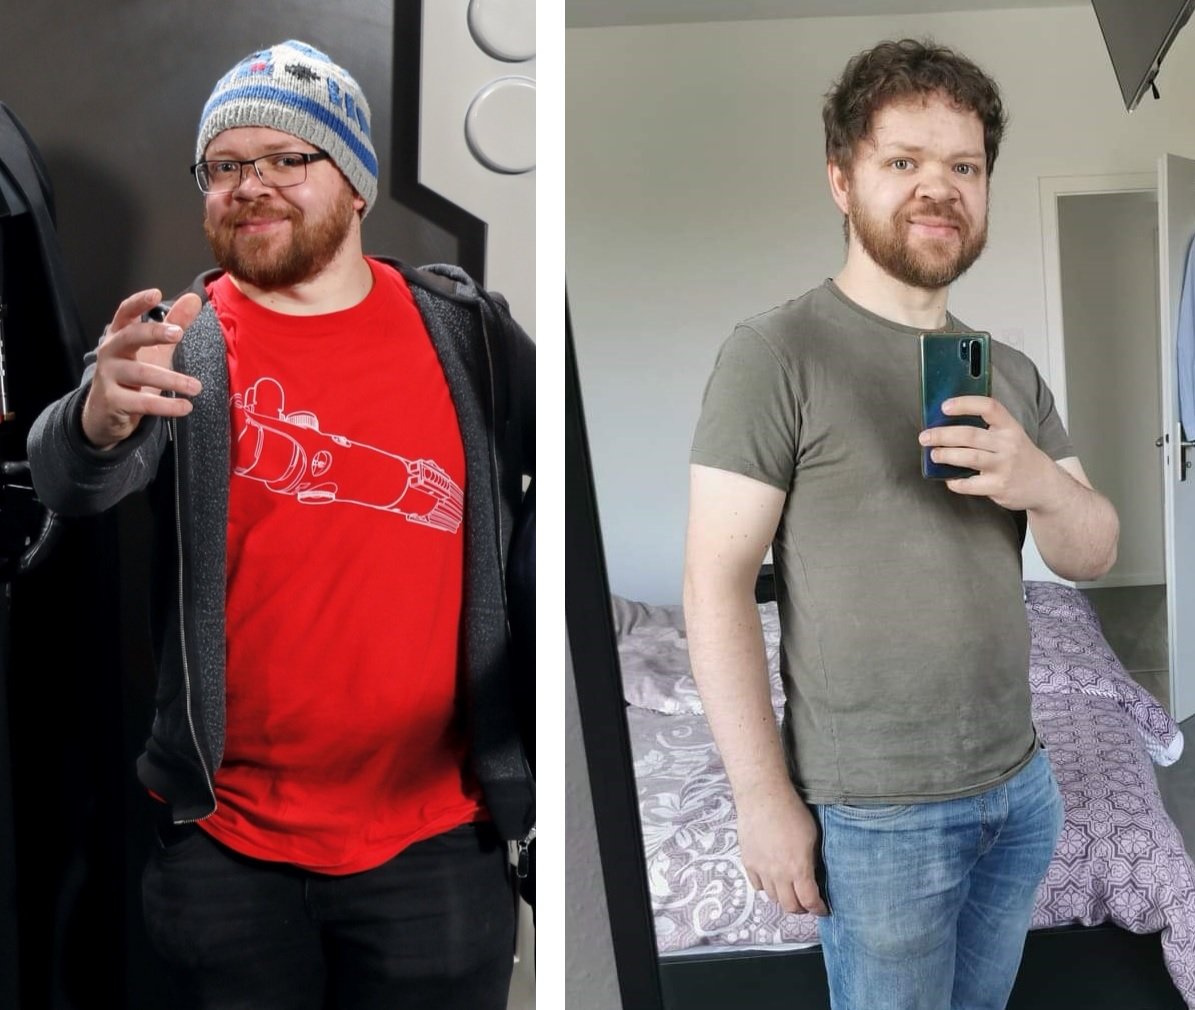
So I was talking to our DL and he encouraged me to post my story here. 5 years ago, I was diagnosed with testicular cancer and went through surgery and three months of chemo therapy. With that therapy came a long time of being pretty much inactive, while eating all sorts of crap just to be able to actually taste something (for instance a normal slice of bread with cheese would taste like mushy cardboard, it still makes me sick thinking about it). And unlike what you'd expect, my appetite was pretty strong! So obviously I gained quite a bit of weight. Being the lazy butt I was, I never felt motivated to get up and do something about it even after I was through with the chemo. In fact it got even worse with me picking up an office job and joining a team with a virtually endless supply of sweets and other treats. So instead of losing weight, I kept going up. The sad peak was just before (and during) our last trip to Disneyland at the end of February this year. I was at 89kg (196lbs) at 173cm (5'8"). Way too much... I still felt okay-ish, but seeing pics of our trip made me realise something needed to change. This was right around the time Corona got serious and counter measures were being taken. Which meant the bus I usually take to get to work was - and still is - not operating that early in the morning, forcing me to walk 3.5km each morning to catch my train. Instead of feeling sour about it, I used this as motivation to do even more. Now I've been doing 15,000 steps on average each day for roughly the past 2 months and simply stopped eating non-stop like a pig. And it shows! For the first time in 5 years, I am actually below 80kg (79.2 for the last couple of days, so around 174lbs), meaning I already lost a whopping 10kg! My goal is to lose a couple more kilos still, but it was an amazing moment kitting up in my classic TK (built to the original RS suit size) for the first time in such a long time and actually fitting into it again (although it was still a tight squeeze... but we're working on that :)) So yeah, this is my little story. Shows that all it takes is determination and a little self discipline and it is entirely possible to get back into TK shape!

 1 point
 -
Hi all Another little update. I wanted to find a way to get a really nice finish for the wrist end of the forearms. So, rather than scissors, Dremel or saw, I decided to literally just sands the whole edge with sand paper. Full details of the process in this 6 minute video; Here’s some finished pictures. I’m really pleased with the end result. [emoji1303][emoji1]1 point
-
Looking good Diana, in addition to what's been mentioned above, the vertical Ab button plate shouldn't have any return edge on it and should be smaller than the raised surface on the Ab plate itself. Here's a reference photo1 point