
Leaderboard


Popular Content
Showing content with the highest reputation on 10/25/2019 in Posts
-
@Krisko720, ANOVOS' old business model served them well at the time. They did Star Trek and Battlestar Galactica stuff for a fairly small clientele, those being much more niche properties. They would announce a product to gauge interest before a single erg was exerted on R&D. They would offer deep discounts on the eventual retail price to an early batch, less to a couple successive tiers, and then use that to fund production. Everyone knew they were in for a wait, and the company was fairly transparent about progress and setbacks. Then they got the Star Wars license and everything went to hell. A lot was involved in what happened after, only some of which we know. Disney and LFL don't like their license-holders being as open about internal practices -- especially involving them -- as ANOVOS had tended to be. Some is known, though... A lot of early prototyping was done with known unlicensed vendors. Then, at some point, they cut ties, took most of the prototypes, and transferred all remaining prototyping and R&D to China. They apparently did not do due-diligence in their hurry to stay on schedule and cut costs. Some combination of shady factories, language barriers, and economies of scale started screwing things up horribly. Their orders were small enough, they kept getting bumped down the schedule for bigger customers. Lackadaisical quality standards saw whole shipments reach the States with cheaper materials than contracted for (the factory pocketing the difference). At least one factory was one that has a record of holding clients' orders hostage. Every time they've had to send something back for re-working or trying to get back on the schedule to re-do a substandard order, that's time and money they couldn't afford. And the same bad business decisions that led them to that point seem to have kept compounding things, to the point a class-action suit was filed and Disney appears to have likely stepped in to whip them into shape. ANOVOS have brought a large part of the manufacturing back States-side and product is starting to ship. For those of us waiting for our FOTKs, the bulk of early production seems to be going to Disney. I've seen about half a dozen people receive theirs on here and Facebook, but I don't know how many people ordered who aren't involved with Star Wars costuming groups, so I don't know what percentage of kits shipped to customers that might be. My takeaway is that it's in Disney's and LFL's interest to prop up ANOVOS and get them back on the rails. If they go under or lose the license, as with Icons, Master Replicas, PropShop, and Museum Replicas, anyone who comes along after them (if anyone even dares pick up such an apparently cursed license) would have to start from scratch. I have hung in because I want to see ANOVOS get their crap straightened out and succeed.4 points
-
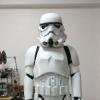
I have removed that video boys thank you for pointing me in the right direction ,the biceps will be corrected today ,i cant believe i made such a simple mistake by the time i got to to the biceps i had been suiting him up for about six hours, between splitting the under Armour and pop riveting everything into place . Yes he is lean as was the previous owner hence the fact i never had it on , if i had i would have got the biceps right, i will drop the head slightly also and re post the finished result ,thank you for your help .ps i cant believe i done that ,i have idolized the Stormtrooper Armour for forty years , this is one of the reasons i joined whitearmour i would appreciate your feedback on my steel e11 blaster the second love of my life .Graeme2 points
-
Good to see someone has taken up the mantel for AM armour and based on what I have read in the above comments, the right person for the job too.2 points
-
Far too early build thread but lets go! My KB kit is coming in early december but today I got my Anovos standard line helmet from BBTS. So excited about this project. I decided to build Jakku version and before my kit arrives is good time to finish F-11D heavy blaster.1 point
-
Resin blaster from Branfuhr Studios.1 point
-
Jamie Kingston UKG / 501st - TK14627 (Cleared) - ANH Stunt TK Casperiser UKG Armourer - CableGuy (Daniel Branton) RWA Armour (2mm ABS Capped), helmet, belt, neck seal RS Propmaster supplied boots, blaster 5' 10" height 12 stone weight Requesting 501st access www.501st.com/members/displaymember.php?userID=30233 thank you Guys - here are some pics of my Stunt ANH TK which has just been cleared with the UKG. I'd really like to explore what i now need to do to get me to EIB next, thank you Edited 6 hours ago by Casperiser1 point
-
Progress: the ab plate Buttons painted and glued. Snaps in place. If you look closely, you can see that the buttons aren’t exactly aligned. They ended up being about 15mm off (up/down). To over come this I used 2” painters tape across the front to mark where I wanted the belt to go. Marking with a pencil where the top of the belt was on the tape, I then took another longer strip that covered both snaps. Using the pencil to mark the location of the snaps (the full circle) I then used the pencil to punch a hole in the center of the tape where it rested on the snap. From there I was able to measure the distances exactly in order to get a good fit on the belt. You can see the displacement between the snaps. The rivets went in no problem after I drilled out the holes. I also used my soldering iron to make space. It smells terrible and you should always wear a mask when doing it, but it made a difference. Also, with the pop rivets, use a washer for extra grip. Next, the boxes. I measured 10 mm for the inner and 12mm for the outer. I based the measurements off of Tony’s AM build and the bill grams, and went in between. To make it easy, I measured the 10 mm for the inner the hard way, with a ruler all the way around. After that, I cut the box out. (All four remnants above) using the cut box, I put my pencil on the 10mm finished inner box and simply spun the other inner box around it. Nice and easy. Then, I used the remnant pieces to give me the added 2mm by placing them directly on top of the 10mm box, plopping my pencil on those, and dragging the two outer boxes around the pencil. Again, very easy and quick. A quick sanding and voila! I used pop rivets to secure the webbing to the back after cutting out the 10” 1/4 length pieces for each. Here it is right before I popped them in I’ll go back and use e6000 later to secure everything once I’m 100% on placement. had to cut a half moon out of the webbing on the straps for the underside in between the belt and plastic. Next I burnt and drilled out the holes for the holster and used Chicago screws to put them in place. So close to done!1 point
-
Hello and welcome, at times you may find a member selling their costume but it does not happen too often, you can also purchase ready to wear armor from a couple of suppliers but you may need to tweak to your size. Keep your eyes on the sales sections, also have a read through the Getting Started section, lots of great helpful info there. Good luck with the journey1 point
-
yes José Luis, Your Badge is waiting for you Sir. Excelente José Luis, ese logro es tuyo !!1 point
-
Hi Sha Sha! I have it!1 point
-
Awesome. Thank you! Looks like I got plenty to do before Centurion. Hopefully later this next year when my wife starts her FemTK I’ll find time to upgrade. Sent from my iPhone using Tapatalk1 point
-
Thank you Darren, Glen, Andrew and Tony!1 point
-
Looking forward to your build Tuomas While you're waiting we encourage you to visit the other completed or on-going build threads for reference. Let us know if there's anything we can do to help1 point
-
Looks like you already have some work to do, get stuck into that F-11D [emoji4] Good luck on your journey to becoming a Stormtrooper. Sent from my iPhone using Tapatalk1 point
-
Thanks buddy. Should be able to start Assembly by tomorrow Sent from my Redmi K20 Pro using Tapatalk1 point
-
Promise the world and supply nothing, it's sad to see this happening again, thanks for the heads up.1 point
-
Great work Graeme, just a few tweaks and he is golden.1 point
-
Another one....sorry to hear this.1 point
-
Progressing fast, the finished product will look amazing.1 point
-
Biceps upside down lower helmet and finally feed him a few spoons of protein and your done1 point
-
Great start, looking forward to seeing those BBB photos and build progress, good luck1 point
-
My build thread is likely going to be very similar to JT's, though I didn't capture as many pictures. Check JT's thread here: Main info: Armor - Back Stage Props Helmet - Anovos (The Last Jedi) Gaskets - GeekyPink Gloves - Endor Props Boots - TK Boots (For now, using ANH boots as they are permitted for Level 1 approval. May get actual FO TK boots down the line) Belt - JAFO I started this thread a bit late. Right now, I have done the initial rough trim of all parts, leaving only 1mm or so of material from the line. My next step is to sand everything down to the finish line and smooth it, then I can start with assembly. Here is JT and all the kits, there were more parts in the room to the right and some sorted kits in the hallway to the left. We basically sorted the pieces and then started sorting them into separate kits for other members to pick up. Took 4 hours, FUN! The first parts I did were the legs. I was able to do all trimming with just lexan scissors. The extra/flashing material is mostly thin, the armor pieces themselves feel durable. I did all the leg pieces in about 2 hours: Next up I did all the arm pieces. I did these the night after the leg pieces, it took another two hours: Finally, just last night, I did all the remaining pieces. Sadly I don't have pictures of this, but I did do a Facebook live stream and the videos are public, so you can check them out over at www.facebook.com/aidanblake ! All told, it took me about 5-6 hours to rough trim all the parts. Next up will be sanding the parts down to a nice smooth edge!1 point
-
I really like the work you did to re position your mannequin. Nice job there. If it’s not too late, for accuracy, you could flip your biceps around as they appear to be on upside down.1 point
-
Sorry to keep coming back to this topic but, I wanted to check and the executioners definitely do have the mobility cut to their forearms too. In fact if pay attention to all the troopers in the background it quite obvious that this cut has become standard for TLJ, and then TROS. But what's nice , is that once you know it's there you can even guess the expanding stripe along the back seam: So here's an interesting piece of trivia if you're doing an executioner and care about deepest accuracy: mobility cut at the front, and expanding stripe at the back. Also here's some more troopers with the mobility cut. I don't know if it is already, but I think this might be something worth mentioning in the TLJ/TROS CRLs. Or at least for the higher levels of accuracy.1 point
-
Dave Conklin of Dave’s Darkside Depot recently completed my AM stunt TK. Not only did he do an absolutely amazing job, he did it with pride and passion. He is one of the nicest people you will ever meet. I am a newly approved 501st member here in the Empire City Garrison in NY. Sad part is Dave moved to Tampa. Sad for me anyway. Dave does incredible work. Trust me, you will love the finished product.1 point
-
They need all the revenue they can access right now. It’s appalling business practice to keep selling when they’re already behind on orders but they’re desperate. Sent from my iPhone using Tapatalk Pro1 point
-
Great to have seen this on a big screen in an empty hall, AMAZING1 point
-
Just finished adding Plastidip to my bucket. LOVE IT! Whomever thought of this was a genius.1 point
-
Word - always great to see a new FOTK!1 point
-
Hey Chris welcome to the FISD. Great to see another FOTK joining the family.1 point
-
I'm on vacation. That's why I won't post the change until Friday1 point
-
Hi Chris, you look fantastic, welcome aboard.1 point
-
Great looking armor! Welcome!1 point
-
Howdy everybody. It has been a long while since I updated this. If you recall, this was a dual build since I was building and Executioner Trooper as well! Well let me tell you that getting the Executioner done was quite the journey. For those that remember, I had a helmet on order from Anovos. I'll let you guess how delivery of that piece turned out...(spoiler alert, it still hasn't been delivered). After cancelling that order, I then turned my focus to getting a painted helmet from Diversity Props in August 2018. Those familiar with DP know how that delivery went (spoiler alert, it never happened). After filing a fraud claim with my bank, I luckily was able to get my money back from that endeavor as well. Take 3...I went back to Anovos, but not in the way you think. Rumors emerged throughout the Facebook Quadrant of TLJ FOTK helmets readily available from Galaxy's Edge at Disneyland. I asked a friend who goes there regularly to pick up up for me. She paid them money and miraculously, a helmet arrived 5 days later. An Anovos helmet even! I had painted the black bells and yoke ages ago so all that was left was the stripe on the helmet. Honestly, it was freaking me out. I put it off for a month. Nevertheless I set to it. The best advice I received from a garrison mate was to use Vinyl pin striping to mask off the curves. It made the best clean straight lines I've ever seen. I highly recommend it. Can be found at any auto parts store. With the helmet taped off, I went to work with Montana Brand primer and shock black gloss spray paint. Things were looking good, until they weren't. I was trying to get it done before Rose City Comic Con, was too impatient and royally goofed up the back of the helmet when applying the matte clear coat. V1 Helmet BAAAAARRRRRFFFFFF!!!!!! I royally screwed up the back. However, this turned out to be a blessing in disguise. Upon further inspection, I realized that my line was off and more angled than it should have been. So I wet sanded the rough part, re-taped the helmet, fixed the line and began anew. V2 Helmet: I was very pleased with V2! All that was left was to apply the decals on the bells. Oh wait that was the HARDEST PART OF ALL! Who knew that applying a flat decal on a round surface was the 9th circle of hell? Nevertheless, I got it done after many revisions. With the helmet and bells completed, all that was left was a photo session with my wife and the costume was submitted. Approval came through this evening. Laser Axe was purchased from Stormtrooper on Weekends. Find him on Facebook. And thus the loop closes on this project. It only took an extra 18 months but I'm very happy with how it turned out. My favorite costume with the least of amount of screen time ever I think. THE END!1 point


.thumb.png.a4d2a6d16ce4c0ce138707572ba1bfe7.png)


