Leaderboard


Popular Content
Showing content with the highest reputation on 10/02/2019 in Posts
-
I just did a search on the vetted vendors list. Dave is already on there so he has already been vetted. https://www.whitearmor.net/forum/topic/11538-the-various-types-of-armor-and-where-to-find-them/ This is his section noted below: Type: AM (Armor Master) Country: USA Contact: [email protected] Kit: ABS. All body armor components including face piece and ear pieces are .090 ABS. The one piece dome/back is formed using .125 ABS, as this piece is formed over a rather deep mold and anything thinner can cause thin regions which will eventually crack or fracture. White .060 ABS blanks included to cut as cover-strips. Availability: Normally 4-6 weeks or less. Assembly: Comes trimmed out of the box, but you will still be required to adjust for proper fit to your body size. Good choice for large troopers, but can be cut down. Comments: Chest and back molds have been updated to address past concerns, and are now acceptable to Centurion level. They are now including a custom, die-cut Imperial cog themed helmet liner for the helmets, mounting velcro included. They're very comfortable and take three minutes to install. Hovis are professionally cast aluminum. Hero helmets are now available.2 points
-
No, that is incorrect! Below is the correct way.2 points
-
Sorry there have not been any updates to post yet. I had issues casting the stock and the end cap without bubbles but think I solved how to do the stock but end cap still needs a bit of tinkering . Also just ordered more resin and silicone to get small parts made. These take time as there are a few with irregular shapes that pose a challenge to cast. My goal is to minimize the seam lines. Hope to have more updates soon for you. Thanks for following this project . Stay tuned !2 points
-
First and foremost... There is no one 'best' armor. There is a 'best' armor for *you* depending on a few factors: 1) Your budget 2) What your body size is (yes, different armors lend themselves for different body types) * 3) How experienced are you at building armor 4) It's not the kit, it's how it's fitted to the wearer that counts * While FISD does not endorse any particular armor maker, below are sellers who have proven themselves time and again in terms of customer service, honesty, and quality. All makes below can be made to be both 501st and FISD acceptable. MATERIALS Armor is made from either HIPS or ABS. HIPS --- Pros: generally less expensive, easier to trim. --- Cons: needs painting or serious polishing to look shiny. Most HIPS will not be as durable as ABS or take the stress of ABS --- Suitability: will hold up fine for regular trooping ABS --- Pros: no need to paint, high durability --- Cons: may lack the detail of HIPS, usually harder to trim --- Suitability: will hold up fine for regular trooping plus take a lot of abuse OTHER TERMS Untrimmed: means the kit comes untrimmed and you'll have to trim the parts before starting assembly. Trimmed: parts are pre-trimmed and you can start assembling right away ANH Derived: traces back to a screen used helmet. Armor came from an incomplete ROTJ suit that was supplemented with parts from a tour suit, with this base being modified to be more ANH accurate in detailing. Parts will need to be butt joined with a finishing strip glued on top. * ON SIZING ANH Derived armor (TE2, AP) was sculpted for a typical UK actor circa 1976, e.g. 5'10" and 165lbs. While good for smaller body types, it has been successfully made to fit people as large as 6'4" 235lbs though requires a bit of shimming to pull this off. 1. If you are taller or larger in frame/girth, you may want to consider AM, RT, or TM armor makes for easier fitting. 2. If you are shorter, while ANH derived armor may lend itself to your size, even FX armor has been made to fit and look good on people as small as 5'6" and 115lbs (and smaller!). 3. RT has upsized his helmet by 4-5% which makes it equivalent to the size of the old FX but is more accurate in appearance. So, while it's true that every kit has a certain ideal body type, every make has been made to fit every body type and still look good. WHO TO AVOID 1. Be aware that this site - http://www.stormtroo...s.com/home.html - is not considered commercially available. It is run by a person selling recast parts, and at a healthy premium over what you can buy direct from vetted sources. You've been warned... 2. Do not buy from e-bay - kits are over-priced, the quality is often dubious, and always recast. 3. Also see this thread: https://www.whitearmor.net/forum/topic/19329-where-what-and-whom-to-avoid-when-buying/ COMMISSION BUILDS Please be aware before purchasing a "commission build" (assembled by any of our vetted sellers listed below) or a completed costume sold by reputable members, does not mean an automatic pass at our higher levels of approval. As with all costumes, the armor will be under the same level of scrutiny as one you assemble yourself. It must fit well and follow correctly the requirements as set out in the current CRL. Please also bare in mind, you could be requested to make modifications and corrections when applying for Expert Infantry and Centurion levels where additional reference materials are used over and above what is written in said CRL's. Some example are sniper plate positioning, rivet placement and the finer details scrutinized at Centurion. VETTED MAKERS While there are many other sources for armor, the list below only contains those who have proven track records of honest business dealings, quality craftsmanship, and that are free from recast debates. You are certainly free to buy where you will, but if you vary this list we strongly encourage that you at least do your due diligence inquiring about the seller's quality and reputation before parting with your money. === ANH DERIVED ARMOR === Type: ATA (Affordable Trooper Armor) Sadly Unavailable until further notice Country: USA Contact: Kit: ABS (HIPS by request), untrimmed, ANH derived Availability Assembly: Armor needs to be trimmed, parts butt joined with finishing strips, HIPS needs to be painted. Comments: The quality of HIPS material is such that it is the most durable of all HIPS armor makes. ABS is a custom made ABS for color, gloss, and durability, so you can order it either way and feel confident. Type: Authenticprops (AP) Country: Canada Contact: [email protected] Kit: .080 gloss white ABS, ANH derived can be ordered Untrimmed, Fully trimmed (ready for assembly) or Fully built Ready to Wear out of the box. All kits include ANH Leather holster, rubber gloves, rubber hand guards, canvas belt, TD metal clips and all correct hardware to build your armor to centurion specs. Helmet is screen derived but cleaned up with a smooth cap and back, The AP helmet includes hovi mic tip replicas, Centurion approved painted look vinyl decals, green acetate lens, rubber brow/neck trim, frown mesh, all correct hardware to assemble helmet. Availability: No known problems obtaining this, usual wait time 4 to 8 weeks Options: UNTRIMMED KIT all parts require trimming/sanding FULLY TRIMMED KIT all parts come perfectly trimmed ready for assembly FULLY BUILT READY TO WEAR out of the box (Custom built to your size) HELMET ONLY (untrimmed, trimmed, fully built) ARMOR ONLY (untrimmed, trimmed, fully built) Assembly: requires cover-strip and butt-joining for assembly like the movie original Comment: AB and Kidney plates have 3" inch extensions to the sides to fit larger waist sizes without the need of shimming, can be easily trimmed down to perfectly fit your waist size or left to original movie size. All kits include ANH style Leather holster, rubber gloves, rubber flexible hand guards, canvas belt, TD metal clips and all correct hardware to build your armor to centurion specs! Type: RS Prop Masters Country: UK Contact: [email protected] or http://www.rspropmasters.com/ Kit: 1.5mm ABS or 1.5mm PVC, untrimmed or ready-to-wear, only 1st Generation cast of an original ANH armor. Comes with all accessories needed for Expert Infantry level build and Centurion ready with very little extra parts needed. Note again, commission builds from RS are not always up to our EI and Centurion level and may require additional work to be approved. Availability: 3-5 days Assembly: Parts are untrimmed and requires cover-strip and butt-joining for assembly. Can be ordered pre-assembled for an additional fee. Options: 1. Helmet + Armour - Kit 2. Armor only - Kit 3. Helmet - Kit 4. Helmet - Fully finished and hand painted 5. Armor + Helmet - Armor trimmed to your specification but not assembled + Fully finished helmet. 6. "Fully loaded" - Accessory package, when bought together with armor. Contains strapping kit, latex handguards, rubber gloves, canvas belt, etc.. All prices are excluding shipping. Comments: The only 1st Generation cast of an original ANH armor. Comes unaltered with all the good and bad that brings. May require more skill to assemble than other kits. Extremely accurate when assembled with care. Armour is more generous than SDS or AP, but not as large as RT-Mod or AM. Type: RWA (RWA Creations) Country: Isle of Wight, UK Contact: Email to [email protected] .. Facebook: RWA Creations Availability: 6 weeks Kit: ANH, ESB untrimmed kit in 1.5mm ABS, 2mm ABS, 2mm Acrylic capped. Black or White. Options: Helmet assembly service or fully finished (excluding padding). Neck seals, Canvas Belts, Aluminium Thermal detonator clips. 2" longer shins available on request. XL parts for taller troopers: See: XL Thighs - https://www.youtube.com/watch?v=rLyH1nb4fPQ, XL Shoulder bells - https://www.youtube.com/watch?v=qySuQk4DI-Q, XL Torso parts - https://www.youtube.com/watch?v=m4W5GQZ-opQ, XL Kidney Section - https://www.youtube.com/watch?v=fOo-aTzPJhY Type: T/MC Country: USA Contact: [email protected] or PM Tray on the FISD boards @Tray Kit: .090 ABS, untrimmed, ANH Derived. Helmet is screen derived. Armor similar to TE2 and AP but with some parts being different and others being modified. The left inner shin is a duplicate of the right outer shin. The arms (Bicep, forearm and shoulders) are the same, there is no unique left and right arm. The helmet comes with resin cast hovi mic tips, which are acceptable for EIB use, and all assembly material excluding paint. Comes with your choice of Smoked gray bubble lenses or flat dark green lenses. This is most comparable to AP with some slight changes. Availability: 3-4 months for delivery and sometimes sooner than that. Assembly: Seams are overlapping joints making it a reasonably easy build, though one can use finishing strips instead. Comments: The armor is ABS, not bright white and glossy like FX. Due to material thickness lines are a little softer than some other makers. Should shine well with Mr Sheen. NOTE: available in black too! Type: WTF (Walt) Country: USA Contact: Walt on FISD Facebook: https://www.facebook.com/groups/612005498911674/user/1145629985/ Facebook Group: https://www.facebook.com/groups/612005498911674 Kit: ABS, untrimmed, ANH derived Availability Current wait times are 6-8 weeks. Assembly: Armor needs to be trimmed, parts butt joined with finishing strips. Comments: No issues with quality or service reported to date. === ANH FAN SCULPT === Type: RT-Mod (RT) / RT-Panda Country: Canada Contact: [email protected] Kit: ABS, close trimmed, fan sculpt. Updated bucks for the majority of the armor and helmet in 2018 to meet Centurion level standards (separate ab button plate, kidney notches, etc). Availability: Currently about 8 month wait. Assembly: Parts are "close trimmed" (a thicker return edge is left on all parts for those seeking more accuracy for strapping brackets etc. Final trimming is far less work than "untrimmed off the buck" armor. Designed to be easy to put together (regarded as one of the easiest kits to assemble as all "halves of lumbs etc. line up to one another without problems). Designed for butt joined limbs with a formed ridge with cover strips. Some parts can be formed without ridges present. Helmet comes as a kit as of 2019. Options: ANH stunt, ESB hand armor Comments: Designed especially for taller/larger body types and has more capacity to fit these troopers (without shims) than most makes of armor. There are 2 sizes of back armor, 3 sizes of thighs, 2 sizes of shins / calves, and the ab / kidney will accommodate approx 40" waist without shims. The thighs are wider and can accomodate a wide range of sizes. Female troopers often order thighs / shins to accommodate wider hips etc. The armor and helmet are sculpted at 4% larger than an original kit. The difference is subtle but makes fitting/sizing much easier for taller/larger troopers (has been worn very easily by troopers from 6' to 6'5"). Type: AM (Armor Master) - Dave’s Darkside Depot Country: USA Contact: [email protected] or https://www.facebook.com/Daves-Darkside-Depot-1188080927989611 Kit: ABS. All body armor components including face piece and ear pieces are .090 ABS. The one piece dome/back is formed using .125 ABS, as this piece is formed over a rather deep mold and anything thinner can cause thin regions which can eventually crack or fracture. White .060 ABS blanks included to cut as cover-strips. TD clips, rubber gloves and black Nomex flight gloves, flexible hand guards and all Centurion level hardware included. Availability: Normally 4-6 weeks or less. Assembly: Comes trimmed out of the box, but you will still be required to adjust for proper fit to your body size. Good choice for large troopers, but can be cut down. Can be ordered completely pre-assembled for an additional fee. Comments: Chest and back molds have been updated to address past concerns, and are now acceptable to Centurion level. They are now including a custom, die-cut Imperial cog themed helmet liner for the helmets, mounting Velcro included. Hovi tips are professionally cast aluminum. Hero helmets are now available. Type: MTK (NOW SOLD by Imperial Surplus) Country: USA Contact: https://imperialsurplus.com/contact-us/ Website: https://imperialsurplus.com/product-category/armor/original-trilogy-armor/ Armor is made of .70 gauge (1.778 mm) satin gloss white ABS and will withstand the rigors of trooping. Kit comes trimmed for shipping and requires final trimming/fitting. Kit comes with: All ABS plastic required for assembly to include helmet, body parts and joining/cover strips. Helmet accessories include lens material, rubber S trim, Hovi tips, helmet decals (choose between ANH, ANH Sandy & ESB versions) screws, rivets, washers and screen mesh for the frown. Gloves This kit does not include: Blaster, under-suit, holster, boots, Velcro or any instructions but many of these items are available at trooperbay.com Kits can be built to Centurion level when following the correct CRL Availability: Kits generally available on request, spare parts also available and on hand. === ROTJ ARMOR === Type: CFO - note this is for ROTJ armor only (ideal for ROTJ, TK Commander, or Incinerator Troopers). Country: UK Contact: PM Sskunky on FISD Kit: ABS or HIPS untrimmed. Kits can come in lite, full, assembled and weathered please inquire for prices and custom orders. ABS is standard and screen accurate. We can make the armour in any colour HIPS with a 25% deposit. Kits come complete with all plastic parts. Helmets come with resin mic tips cast from an original, black rubber trims, decals and lenses all subject to availability and stock. Availability: Kits available at all times with approx 4 week turnaround time. We have a US distributor who will be able to ship kits within the USA. Assembly: Parts are trimmed and designed to be easy to put together - along with RT is the easiest kit to build. Comments: These suits are cast from original therefore there will be warps, lumps, bumps etc. present on the plastic. The original suits were made to fit actors in the region of 5'10" and 180lb.... there is some flexibility as with all armour which is down to assembly. This armour is no way sanitised or idealised, it is a true representation of what is seen on screen in STAR WARS "The Return Of The Jedi". Other Notes: Hand guards O2 canister/detonator detail and end caps, belt, knee belt and shoulder straps are own sculpt. Necessary/minimal sharpening was done to the moulds to attain the correct level of sharpness lost from the original fibreglass moulds obtained from Cameron Oakley. The original shape and contours are intact and the details and edges have been sharpened as documented in various threads on the FISD and other prop forums. === ROGUE ONE (Mandalorian / Obi Wan / Ahsoka / Enoch / Night Trooper) ARMOR === Type: Jimmiroquai Country: PI Contact: email [email protected] Kit: Kits are lightweight flexible fiberglass. Availability: PM to ask, varies Assembly: Fully trimmed and partially assembled, e.g. if it fits out of the box one can go straight to rigging and painting. Comments: No issues with quality or service reported to date. Type: 850 Armor Works Country: USA Contact: FB: https://www.facebook.com/groups/205514516516535/ website: https://850armorworks.com/ email: [email protected] Kit: ABS plastic Availability: PM to ask, varies Assembly: No Comments: No issues with quality or service reported to date. Potentials new options coming once available, tried and tested and feedback garnered from members. Imperial Surplus will have a kit available, combination ABS and Resin Cast CTPG Combo ABS and Resin cast Plus a possible option of 3D files for PYO Keep checking in for further updates === FIRST ORDER TFA / TLJ / TROS === Type: Jimmiroquai Country: PI Contact: email [email protected] Kit: Kits are lightweight flexible fiberglass. Can come with both TFA or TLJ details. Availability: PM to ask, varies Assembly: Untrimmed. Comments: No issues with quality or service reported to date. Type: Imperial Surplus Country: USA Contact: https://imperialsurplus.com/contact-us/ Website: https://imperialsurplus.com/product/first-order-stormtrooper/ Availability: Kits generally available on request, spare parts also available and on hand. Assembly: Untrimmed. Comments: No issues with quality or service reported to date. Type: WTF (Walt) Country: USA Contact: Walt on FISD Facebook: https://www.facebook.com/groups/612005498911674/user/1145629985/ Facebook Group: https://www.facebook.com/groups/612005498911674 Kit: ABS Availability Current wait times are 6-8 weeks. Assembly: Armor needs to be trimmed Comments: No issues with quality or service reported to date. Type: 850 Armor Works Country: USA Contact: FB: https://www.facebook.com/groups/205514516516535/ website: https://850armorworks.com/ email: [email protected] Kit: ABS plastic Availability: PM to ask, varies Assembly: No Comments: No issues with quality or service reported to date. Type: Denuo Novo Country: USA Contact: FB: https://www.facebook.com/Denuo_Novo website: https://www.denuonovo.com/collections/new-star-wars email: [email protected] Kit: ABS plastic Availability: PM to ask, varies Pre orders, pre built, spare parts and kit form available. Assembly: YES Comments: No issues with quality or service reported to date. First Order TK armor full vendors list available. HERE === PHASMA === Type: Jimmiroquai Country: PI Contact: email [email protected] Kit: Kits are lightweight flexible fiberglass. Can come with both TFA or TLJ details. Availability: PM to ask, varies Assembly: Untrimmed. Comments: No issues with quality or service reported to date. Type: Thorsson & Associates Workshop Country: PI Contact: Facebook https://www.facebook.com/profile/100061258101660/ Website https://tandaworkshop.com/ Build https://protagonist4hire.blogspot.com/2019/03/building-captain-phasma-part-3-rigging.html Kit: Kits are fiberglass Availability: DM to ask, varies Assembly: Untrimmed. Comments: None to date === NO LONGER MADE === Type: TE2 Country: USA Contact: HDPblues on FISD Kit: HIPS, untrimmed, ANH derived Availability: None, since a long time. Best to look elsewhere. Assembly: Armor needs to be trimmed, parts butt joined with finishing strips, then painted. Comments: Helmet is considered very screen accurate. While he rarely makes armor anymore, he's a solid buy if you find any. Type: FX Availability: No longer made. Do not buy this armor - we list it only for posterity in case you pick up a suit second hand from a current Legion member. Kit: ABS, trimmed, fan sculpt. Comments: The armor can be made to be FISD EI acceptable for about $50 and an afternoon of work. The helmet is not acceptable by any Detachment's program, and many GML's are no longer allowing it to be accepted at the Legion level. Type: Older/Original AM (1.0) NE Country: USA Contact: [email protected] Kit: .090 gauge ABS - trimmed - Fan sculpt Availability: N/A Assembly: Butt joining required for the legs. Arms can be overlapped but trimming those overlaps off and butt joining is recommended. Comes trimmed out of the box, but you will still be required to trim for proper fit to your body size. Comments: An updated version of the older AM kits with a more accurate helmet and some other accessories. Best suited for the larger troopers who can have problems fitting into screen-sized kits. Comes in full or "lite" kits. Lite kits come without helmet, ABS cement or polish.1 point
-
Might as well get the ball rolling even though I don't have all the pictures yet. INFORMATION: 1. First/last name Jennifer Foreman 2. Future Garrison/Squad/Outpost or local area Golden Gate 3. Armor maker RS (except for left shin - ATA) 4. Helmet maker ATA 5. Cloth belt maker SELF 6. Neck seal maker SELF 7. Boot maker Miko Lotti dyed white 9. Blaster maker (if applicable None yet - hopefully soon 10. Gasket maker (if applicable) N/A 11. Height (optional) 5' 3" 12. weight (optional) 125 13. TK type (ANH Stunt/Hero. ESB, ROTJ. TFA etc.) ANH Stunt 14. Name(s) of any Trooper(s) who significantly helped with your build. Shout-out to Cricket/Christine for fastener help! PHOTOS: 1. Front view (arms down) 2. Back view (arms down) 3. Left side (arms raised) 4. Right side (arms raised) Pending someone to actually take the photos - 5. Ab plate close-up 6. Helmet close-up (front, left and right sides) 7. Detail photos of any parts you have questions on I assume the traps are up to snuff now - 8. Interior strapping (optional)1 point
-
All good I responded to your other comment. Thanks! It will do as first set of First Order armor. Even though this was second hand armor. It will do the job for some troops.1 point
-
There’s a few things that need to be correct for it to work. I’m not sure on all of them but as a minimum I believe it uses emails to match you here and at the legion. So go through all the things like that on both the legion and FISD and ensure they match. If this still doesn’t resolve it before the election then it can be fixed manually by the DL.1 point
-
Hey @Luke starwars, I’ve definitely kept up on some of the ongoing with the armors for FOTKs, even now years after release it seems there’s a very small supply of suppliers for it and there have been many who have run into challenges in providing the armor. This being said definitely check the approved vendors list. Specific to the FOTK from my experience: Of the vendors out there that I know is consistently proven to be most reliable Jimmiroquai is the one that seems to fit that. (That’s my armor by the way) It is fiberglass, so not what everyone always wants. There’s KB props that offers kits, however I’m not sure on how long it may take, most of those who have recently purchased from this vendor say 4 weeks. There are a few others who are emerging with kits however I’d recommend verifying them on the approved vendors list first as again a lot of struggles some members have had come from reasons as to why some are and some are not on that list.1 point
-
Noticed you are the same height as me. Im interested to see how this turns out, as it seems to be fitting you well so far. This armor seemed to me to fit guys our height better than some of the others out there. Keep up the good work!1 point
-
Ok everyone. I can confirm that Dave is a stand up guy and is the new vendor for AM armor. The getting started thread was updated a while back. He is the game in town and no one should have any worries. Dave is a former Empire City Garrison member and one of the best. He is currently now in the Florida Garrison and took over the AM sales. He’s top notch and vetted.1 point
-
I asked my shiny brothers and sisters for good vibes and well wishes over the weekend, and apparently it worked! I got a ton done at my Build Party on Saturday, and even did more work on Sunday! It’s a miracle! I decided that I have to have her ready for the chromer/painter by the end of the first week of October- he needs as much time with it as possible, and I just have to get it done. I’m down to fiddly, tedious stuff, so I just needed to sit down and do it, because with a nose to the grindstone, it actually wouldn’t take that long. In our terms- in costuming terms not that long, not in normal people terms. The work pictured here is over three days. About six hours on Saturday, about three hours on Sunday morning, and three hours on Tuesday night (sidelined by a bad day at work and a migraine on Monday). Some re-gluing/extra gluing of the ab boxes, a few were a bit loose (hard to glue): I sanded down the wrist guards, but I apparently forgot to take a photo of it. If I remember I’ll add it later. Seriously- invest in a belt sander. Even the one from Harbor Freight. It’s amazing. Cut out the chest opening and glued the greeblie onto the back. I was debating, but I was right in the end: it looks way better with the deeper recess. I had a bit of trouble with the Dremel getting into the corners, but I think I’ll just touch it up a bit with the epoxy. From a distance of even two feet you really can’t tell now. I also added the chest greeblies, as you can see. I hit them all with a couple of coats of Rustoleum 2x Primer- it filled in most of the little bubbles in the resin, and the final coats of paint of chroming will take care of the rest, if anyone but me can even see them now (I kinda doubt it). The weather is cooling down (thank god), but it was just warm enough in the sun to get them to set. There’s a lot going on here. Ankle spats are getting their inner strip (can’t be fully closed, else you’d never get them on), thighs are being prepped for greeblie attachment, shins are also prepped for the same, gorilla Tusken mask looking utterly creepy in the corner, my TK bin in the background for two new TKs building theirs to look at for reference, my weakness, Red Vines, placed strategically close to me while working. Build party madness, I love it! Shin ammo packs (no idea what they actually are, I’m calling them ammo packs, because they remind me of the thigh ammo packs on TKs). The shin greeblies seem to attach pretty easily, but the thighs had more of a curve to them, and the greeblies were straight. I used the same technique I did for the V inner strip attachment bending- two sets of paint sticks on either side, proposed bend in the middle, heat gun (always moving), careful bending, cooling, then repeat for all four. It worked surprisingly well, I was kind of afraid it wasn’t going to work at all. I got a lot of stuff sanded down and edges polished up, as well. You really can’t tell in photos, but it’s pretty obvious in person. Forearm greeblies are gluing: Bicep greeblies are gluing: Kitty break! I was hosting the build party and working majority of Saturday, so I didn’t get to spend much time inside with her. She missed me, clearly. (She does that on her own, incidentally, she loves to lounge on my shoulder and be carried around the house, too). I made it up to her later that night when she crashed out in my lap and we watched BBC Sherlock together. Next up, thigh holster attachment and greeblies! That holster is a pain in the butt, not gonna lie. It became clear it’s pretty much a three-step process, once you’re ready to actually attach and assemble. Due to the curve of the thigh, and the small edge for attachment of the base and weight of the resin piece, I’m going to use bolts for extra support. I’ve been hording screws, brackets, and hardware for years now- every time I had something with extra hardware, it went into the bin (I really am a Jawa at heart, apparently). It took about fifteen minutes, but I was able to dig out a pair of matching length bolts and washers. I drilled a hole through the base, then marked it on the resin piece, drilled a bit there, and then used the base upside-down to mark and drill the corresponding holes in the thigh. The holes in the resin piece are really just for an extra support and gluing, not for actual screwing in. The washers give the nuts a bigger purchase base on the inside so they won’t pull through. Here’s the real start of the three-step attachment process: Bolts through the thigh, giving the washers some glue for extra purchase. You really need at least four hands to work on this part. Once that glue is dry enough (normally 48 hours, but since I’m gluing the whole thing again I’m going to work with it again in 24), then I’ll glue on the base, give it about 24 hours, then glue the resin holster on, and give it all a final 48. I also hand sanded down the middle of the base just a bit, to take it from a total straight line to a bit of a curve in the middle so it wouldn’t be fighting the attachment to the curve on the ends. Then attaching it! It was so easy, worked just like I planned! No. Not at all. It was a disaster. I didn’t put enough glue on both washers apparently so only the inner ones stuck, so the screws and top washers just slid right out and I needed six hands again to hold them in place. I could get one end through all the parts then the other would pop out, or I just got glue everywhere. I have glue all over me, all over the thigh, all over the holster parts, I have smudges from paint from the interior of the helmet all over me and now the thigh. My c-clamps aren’t deep enough to reach in on either side to hold it, and it’s too slick to get a purchase while using paint stir sticks as an extender/way to even out pressure. My regular clamps also aren’t long enough. Putting it on the table and weighting the inside didn’t work because it’s too slick and it just rolled all over the place. But it’s done! So good concept, just needed some better execution. More glue on both washers, perhaps the base of the screw, and bigger/deeper c-clamps. If I were earlier in the build (and day) I would have just gone to Home Depot and/or Harbor Freight and found what I needed and added more glue and set it aside. But it’s 8 pm on Tuesday night, I have work in the morning, haven’t eaten dinner yet, and this thing has to be done by Friday. I had a moment of panic when I thought I had the thighs flipped. I kept looking at the knee curve and thinking I had it right, but what if I didn’t. So I pulled out Izzy’s FOTK… his are exactly the same shape on both the front and the back. I’m thinking this is another KB kit quirk- kinda like the top of one of the thighs being straight across, with no curve/cut out for a human butt whatsoever. The higher curve has to go to the front because it accommodates for the knee plate and the space where you see gasket around the top and bottom of said knee plate. I had it right. But, I slipped them on, and walking that back bit was just not curved enough for comfortable walking. Since Izzy’s is very obviously curved on both sides, and the CRL is sort of ambiguous (the thigh, knee plate and shin are pretty close together in the full body photo and the individuals don’t really give you a solid view), I just decided to trim the backs up a bit. Proposed curve to trim: Left: before trim, Right: after trim (unconsciously throwing the Live Long and Prosper, apparently): That littlest bit of trim and curve made a world of difference- I can walk with no pinching at all, and the gasket should protect to a degree against that, too. Also, I think it looks a little better being more uniform. I picked up some Gorilla Glue epoxy to fill in some spaces and gaps. I was originally going to use Bondo, but: I hate Bondo. It’s goopy. It’s messy. Its stench is legendary. It sets way to quick no matter how little hardener you put in. I don’t know what I’m doing and half the time end up making more work for myself in clean up. I hate Bondo. Plus, for the areas I was working with, having the putty consistency was going to be much easier and better suited for placement and smoothing. I picked Gorilla over JB Weld because the packaging specifically mentioned sanding. I’m pretty sure they both could be sanded after hardening, from what I could tell they were basically identical just different brands. Gorilla did say a work time of ten minutes, while JB was 25. I kinda wanted 25, but I also figured 10 was better than Bondo’s 1 – 4 minutes if you’re lucky. It gets harder to work with and less pliable towards the end, but it doesn’t lock up and become a brick like Bondo, so I’m calling that a win, too. I hate Bondo, in case you couldn’t tell. I had sanded down the back/yoke connection to make it more even. All I had to do was fill in the valley with the putty and smooth out the corner. The putty worked just like it was supposed to and was pretty easy to work with. I always try and wear gloves at first, but it never work and they rip and I end up taking them off halfway through. It turned out pretty good! I’m very happy with it. I’ll sand it to make it smooth once it’s cured, but I think it will disappear once chromed/painted. Lastly I spray painted the inside of the helmet black: It looks cool, it looks better than white, when kids (and short adults) look up they see darkness inside the helmet, not a prop made of fiberglass, and also the dark interior lets you get away with a less-dark lens, which is optimal for vision. To Do List for the Phasma Phinish Line! Before the end of the week: One last round of fine sanding, where needed (pretty much done, but there’s always that one spot you missed) Dust, wipe down, and remove any remaining excess glue (it will move from the garage to living inside once this is done) Helmet clean up – touch up some of the grooves, a light wet sand across the whole thing, a bit of clean up in the mouth/nose area. It came pretty close to ready out of the box. Before the premiere: Acetone 3D print lines from blasters Paint blasters Or at least the F-11D, the SE-44C is, after all, TLJ, and just a fun addition. But I plan do just do everything on them at once, to make it easy and not repeat steps unnecessarily. I also already have the quicksilver baton (also TLJ) so it’s not like I’m going to be short on things to occupy my hands. Whenever I get around to it: Battle damage to prop helmet Paint prop helmet It’s now a prop, after all. The end… is in sight. It’s actually quite anti-climatic and it doesn’t feel done in any way, but my to-do list is dwindling rapidly. I guess it’s all fine-tuning, mostly, so you don’t see as much of a difference in the many piles of white plastic parts scattered all over the garage. I wanted to prep the strapping and stuff now, so it would just be an install job when I got it back from chroming, but I’m not going to have time. And honestly it won’t take me that long anyway- I’ve done a whole lot of strapping now and I think I can knock it out in an evening or two, plus glue dry time. It looks like she’s gonna be done by the premiere!!!1 point
-
Ha! Iiiiiits baaaaaack....... thanks guys. Had a brain fart last night. Straight line across. Thanks.1 point
-
I know Dave very well and he is a good friend of mine. I was the first one he met at a 501st event and I got him hooked. I helped Dave build his first set or armor, and then he blew right be me and kept going. I now go to him for help with my armor builds. He is not one of those EBAY sellers, and is on Facebook. He sells the AM armor, packs, does commissioned builds (I have seen him at work at his house) and other items. You cannot go wrong working with him.1 point
-
They sell AM armor so the product is legit. You can look up information about AM armor using the link Q provided1 point
-
Stay off Ebay, lots of great info in the Getting Started section in regards to armor, research is the key to this hobby1 point
-
Good luck with approval1 point
-
You have Done !!! Congratulations trooper1 point
-
Great job! Took your time and got it right. [emoji106] Sent from my SM-G955U1 using Tapatalk1 point
-
Alright, here we go. We call our dog Ma Bookie, or Bookie for short. Lineage: In the extended cut of A New Hope, there is a scene where Han is confronted by Jaba the Hutt in a hanger bay, yep the scene where Boba Fett is standing to the side. In Huttanese, Jabba says "Han ma bookie" which translates to "Han my boy", hence Ma bookie, my boy or just Boy Consequently, now every time my wife or I see a Labradoodle ( our dogs breed) we call them all Bookies lol1 point
-
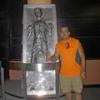
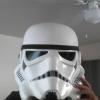
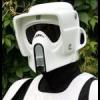
Howdy everybody. It has been a long while since I updated this. If you recall, this was a dual build since I was building and Executioner Trooper as well! Well let me tell you that getting the Executioner done was quite the journey. For those that remember, I had a helmet on order from Anovos. I'll let you guess how delivery of that piece turned out...(spoiler alert, it still hasn't been delivered). After cancelling that order, I then turned my focus to getting a painted helmet from Diversity Props in August 2018. Those familiar with DP know how that delivery went (spoiler alert, it never happened). After filing a fraud claim with my bank, I luckily was able to get my money back from that endeavor as well. Take 3...I went back to Anovos, but not in the way you think. Rumors emerged throughout the Facebook Quadrant of TLJ FOTK helmets readily available from Galaxy's Edge at Disneyland. I asked a friend who goes there regularly to pick up up for me. She paid them money and miraculously, a helmet arrived 5 days later. An Anovos helmet even! I had painted the black bells and yoke ages ago so all that was left was the stripe on the helmet. Honestly, it was freaking me out. I put it off for a month. Nevertheless I set to it. The best advice I received from a garrison mate was to use Vinyl pin striping to mask off the curves. It made the best clean straight lines I've ever seen. I highly recommend it. Can be found at any auto parts store. With the helmet taped off, I went to work with Montana Brand primer and shock black gloss spray paint. Things were looking good, until they weren't. I was trying to get it done before Rose City Comic Con, was too impatient and royally goofed up the back of the helmet when applying the matte clear coat. V1 Helmet BAAAAARRRRRFFFFFF!!!!!! I royally screwed up the back. However, this turned out to be a blessing in disguise. Upon further inspection, I realized that my line was off and more angled than it should have been. So I wet sanded the rough part, re-taped the helmet, fixed the line and began anew. V2 Helmet: I was very pleased with V2! All that was left was to apply the decals on the bells. Oh wait that was the HARDEST PART OF ALL! Who knew that applying a flat decal on a round surface was the 9th circle of hell? Nevertheless, I got it done after many revisions. With the helmet and bells completed, all that was left was a photo session with my wife and the costume was submitted. Approval came through this evening. Laser Axe was purchased from Stormtrooper on Weekends. Find him on Facebook. And thus the loop closes on this project. It only took an extra 18 months but I'm very happy with how it turned out. My favorite costume with the least of amount of screen time ever I think. THE END!1 point
-
Have a look through some of the TFA build threads, you'll find a lot of different makes there1 point
-
Hi Luke, welcome to FISD I would recommend to take a look into this section: Good luck, cheers1 point
-
TM ANH Hero. They don't get much better than this1 point
-
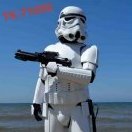
Been a while, but just figured I’d share a quick update. I’ve been approved and now have my TKID! Glad to be trooping!1 point
-
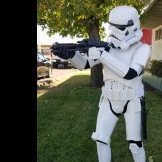
Got temp approval for a troop, so heres the first picture. the harness holding the thighs up tends to sag after time, so im going to adjust that a bit.1 point
-
Great thread Boss!1 point
-
Wow! Super helpful! Thanks Daetrin! Truely a Trooper helping WannaBeTroopers!1 point
-
I found the lack of trimming lines on the TM to be an advantage. It gives you quite a lot of leeway for trimming to size. There's quite a lot of allowance to trim outside the natural (invisible) line of the parts (for extra girth). Equally you can trim quite a way inside that same natural line to make slimmer-fitting parts. I found it a joy to work with.1 point
-
I was thinking the same thing. Plus I wouldn't say that TM is tricky to assemble, since the pieces line up perfectly, the only thing that might be "tricky" is the absence of trimming lines. AP is much more tricky since the pieces don't line up properly and some heavy tweaking is required for a perfect build.1 point
-
Wouldn't all the armor except for TM be ROTJ derived? I was under the impression that all the suits that were available right (with obvious exceptions) now were cast from the suit that TE's cohort pulled from a trash can at Elstree Studios, which was a beaten up ROTJ suit.1 point
-
novus polish is the best!1 point
-
Great great great, this is the thread i've always been waiting for, amazingly informative, thank you so much for putting this up!1 point
-
Very informative. Can I just add that you really shouldn't use Mr Sheen on your armor as it does contain amonia which will in time yellow AbS. Best to find a polish without this in it.1 point
-
Wow, you are making it way too easy for the newbie-newbies. This newbie did a lot of digging and cloak & dagger research to learn all this.1 point