
Leaderboard


Popular Content
Showing content with the highest reputation on 09/30/2019 in Posts
-
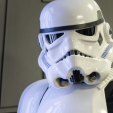
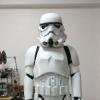
11B30B4’s Black Series Helmet Mod Given that many of the pics from some of the BS mod threads are no longer accessible I have decided to post this thread to hopefully help others looking to do this mod. It should be noted that I have a full set of ROTK armor from Jimmiroquai along with his helmet and I am convinced that his helmet is a near copy (ahem) of the Black Series helmet. Regardless, using Jimms helmet as a reference of what the finished product should look like helped me a good bit. My complete ROTK build can be found here: https://www.whitearmor.net/forum/topic/44463-11b30b4’s-rotk-build/ Jimmiroquai and several other companies as well as a few members here on FISD are selling ROTK helmets and anyone having trouble deciding to buy a helmet or modifying a BS should seriously consider buying a helmet if they are not comfortable with the work required to complete this modification. The following modifications were performed to this helmet to ensure it met level 3 FISD and 501st approval. 1- Cover and blend the rear battery box and speaker openings. 2- Lower the brow trim so that gap between brow and eyes is approximately 1/8”. 3- Extend the jawline of the helmet to allow for proper placement and exposed gap of Vocoder. 4- Fabricate replacement Vocoder. 5- Replaced the Hovi Mics Ok, for this modification I used the following: BS ROTK helmet Apoxie Sculpt 2 part epoxy putty PC-7 2 part epoxy putty (I put that $h!t on everything) CA Super Glue CA Glue Accelerator Flex Seal Black liquid rubber 3mm Sentra .09mm High Impact Poly Styrene (HIPS) Various needle files Dremel with lots of accessories Heat gun Bondo Automotive glazing putty Black breathable fabric French Blue breathable fabric Correct Hovi mics Dark Grey plastic window screen mesh for frown Painter’s masking tape Various small clamps. 5/8” U-shape rubber seal Rust Oleum 2X grey primer Rust Oleum 2x White Gloss spray paint 5” section of 2” x 4” Petroleum Jelly Baking soda 100 grit sandpaper 150 grit sandpaper 220 grit sandpaper Airbrush Grey airbrush paint Black airbrush paint Step 1 Disassembly Disassemble the helmet completely and remove all the electronics. Step 2 Chop shop First, using a knife and then a sanding drum on the dremel, I removed the rubber neck seal on the front half of the helmet. Next, I cut out the Vocoder with the Dremel. You can also see I filled in the Hovi mic holes with PC-7. The neck seal on the back is not molded into the plastic and can be removed by hand. Next, I cut out part of the rear insert so that adding an actual neck seal once the helmet is assembled won’t be an issue. Step 3 extending the jaw line First, I cut a piece of HIPS to fill the Vocoder gap. I used a heat gun to shape it then glued it in place with superglue. The superglue is used to just hold it in place until we can weld it in place with PC-7. Once the rubber neck seal is removed from the inside and outside of the front half, you will have a nice trench on the inside edge to rest the HIPS in. I made a pattern with a sheet of paper of how I wanted the extended jaw line to look then cut pattern out of HIPS. I then used the heat gun to shape the piece and then super glued it in place. Once the inside was glued in place, I taped on the original paper pattern to the outside and traced the original jaw line then cut it off the pattern. Next I cut another piece of HIPS, heated and shaped it then superglued it to the first piece and used clamps to hold them in place. Repeat this process for the other side. It should be noted that doing this modification will cause (at least in my case) the bottom of the helmet to hit the shoulder straps and chest plate of the armor. With some 150 grit sandpaper rough up the HIPS, front jaw line, and Vocoder sides to allow the PC-7 to make a good bond. Next, mix up some PC-7 and apply it to the front jaw line/ Vocoder area and the inside of the helmet. With wet fingers smooth the PC-7 out and sculpt the jaw line area. Do not worry about extending the seams on the sides from the mask part to the face. We will use a file to sculpt it later. The PC-7 will need 24 hours to cure. Step 4 Vocoder There are a few ways to do this mod. I could have simply made a mold and re-cast the Vocoder that came with my Jimmiroquai helmet but that would have been re-casting, something I do not choose to do, so I decided to make a Vocoder from scratch. First, I made a sculpted surface that would support the sculpted vocoder. I made the “rest” surface out of a piece of 2 x 4. Next, I mixed up some Apoxie Sculpt and then rolled 7 pieces approximately 3/16” in diameter. I laid the pieces on the rest and pressed them into each other to make sure they would all be bonded into one piece. Wet fingers and some sculpting tools may help. Once I had the Vocoder shaped, I removed it from the rest and covered the rest with petroleum jelly to prevent the Apoxie Sculpt from adhering to the wood then placed the Vocoder back on the rest and let it sit for 24 hours. Step 5 Ear Cap Button Once all the electronics have been removed, I super glued the ear bump button inside the ear cap and then applied a layer of PC-7 on the inside to fuse the ear bumps to the ear cap. Step 6 Battery box and speaker openings After all the electronics have been removed, I filled the inside of the battery box with PC-7 then super glued the battery box cap on. I used PC-7 on the inside of the speaker openings and pressed it through to the outside. With wet fingers I smoothed the speaker openings on the outside. Initially, I used PC-7 on the outside seam of the battery box; however, I forgot to rough up the surrounding plastic with 150 grit sandpaper so even after the PC-had cured, it pealed off. I later realized that for this thin seam, the best option would be to fill the seam with superglue and apply baking soda over the super glue. The baking soda will cause the superglue to instantly solidify and the mixture of the baking soda and super glue is basically plastic. This can be sanded and painted. However, the mixture is slightly porous and will require some glazing putty later. In this picture I had not removed the PC-7 around the battery box yet. Step 6 cutting vents (optional) So, like my Jimmiroquai helmet, I wanted to vent this helmet as much as possible. On the inside of the helmet, there are some structural supports that lay on top of the areas I want to vent. In some places I removed the supports and, in some areas, I cut around and reinforced the supports. On the dome I added a piece of HIPS for the insert to rest on. I used a Dremel with a very small diamond wheel point bit (#7134) to rough cut out all the vent holes on the side tubes, tear traps, and rear. I had to clean the melted plastic off the bit between cutting each vent line. Once the vents were rough cut, I finished them with needle files. Step 7 Brow Trim The brow trim has a rubber seal that is molded into the plastic so again I used a knife and then a Dremel with a sanding drum to remove the rubber trim. You will notice that the plastic is not flat once the rubber is removed. This is not an issue because we will be incasing the existing plastic brow with sentra. First I cut a strip of 3/16” wide piece of sentra and then super glued this strip under the existing brow. Next, using the Dremel and sanding drum I ground down the existing brow trim to be even with the sentra. Next I cut a piece of sentra 5/8” wide and super glued it over the brow and even with the bottom strip of sentra. Next, I filled any gaps with super glue and baking soda. Lastly, I sanded the top of the brow to be even with the top of the front half of the helmet. Step 8 Sanding Sanding is a process, if you just go at it with 100 grit sandpaper and not crisscross your strokes you will end up with sanding lines. You should tackle every part of sanding starting with 100 grit and alternate your strokes then move up in grit to 220 grit alternating every stroke. I would suggest you not apply a lot of pressure, and wet sanding is way more effective. Do not go any finer than 220 grit or your paint may not stick to the plastic. If you are truly looking for that automotive finish you will want to use automotive primer and paints and sand between each layer of paint and clear coats; however, for this helmet I will be using spray paint so I will not be going that crazy with sanding. Four my purpose, I simply want to even out most of the modifications I performed. After I get to the 220 grit, I spay a layer of primer on to expose any issues. In some of these pictures, I circle the problem areas with a sharpie to re sand or fill with Bondo or glazing putty. Also be advised that there is a molded seam on both sides of the front half (outlined in red) of the helmet that you will want to sand away. You will want to sand all of the external parts of the helmet to make sure the paint will stick. I forgot to mention that I used a needle file to extend and define the seam from the chin section to the edge of the neck opening. Step 9 Priming and painting Once everything is sanded, wash all the parts with warm water and a few drops of dish washing detergent. Rinse the parts and let them hang dry. Once they are completely dry, hang then and apply the primer per the directions on the can. An hours later apply the white gloss per the directions on the can and let the parts cure for 48 hours. After I painted the parts I noticed a few issues. The battery box had a small issue (yellow circle) as well as one place that I did sand away a super glue drip (yellow circle) but I guess I did not do a good enough job. These are not big issues for me since I will be making a sandtrooper with this helmet but someone striving for TK level 3 may want to address these issues. Sand, fill sand again, and repaint. Next, I sanded and primed the Vocoder. I sprayed the Vocoder with flex seal, I think the paint on flex seal would have turned out better. In all honestly, the Vocoder on my Jimmiroquai helmet is painted semigloss black and not rubberized. This is how far I got this past weekend. This week I hope to finish the helmet. Thanks for the interest.3 points
-
Hi Brian and thank you for your Centurion application - let´s get to it! CRL and Centurion Application Requirements All required photos are now in and, after review, we are pleased to welcome you to Centurion! On behalf of the DO team and myself, many congratulations! Other-Armor Fit/Assembly In this area we discuss areas that could benefit from additional improvement. Note that we consider both text (CRL) and pictures (screen caps/reference images) when reviewing submissions. We only have a couple of things to mention and they are all minor and very easy to amend if wanting to. A simple dressing issue keeping the pieces alligned. Just an accuracy issue, if that´s your thing - certainly is ours, would be to use rivets for the holster. Dressing issue #2 keeping the thighs at an even hight. Final thing to mention is to add some paint back on the D-ring. And that´s it! You have earned the rank of Centurion - enjoy it2 points
-
Hey everyone! It has been a little while, but progress has been made. First off, sniper knee is completed. Next, I will show a small belt tutorial, as I have almost completed it, I just need to finish trimming the screw covers. First, mark and drill the holes on the plastic belt. Make sure these holes are centered. After that, center the plastic belt on the canvas belt. Make sure you align the corners of the plastic belt to the canvas belt. Next, mark the holes with a pencil. Then, punch the holes with a hole punch. Insert the screws with this side facing out, so that you can take the plastic belt off the canvas belt if need be. Screw in, and then this part is done. Next, cut the elastic for the drop boxes. Leave a little extra as you can always cut it off. Align the two ends, and use a hole punch. Then, for this build, I am using Chicago screws for the drop boxes as well. What I did, was sandwich the inner drop box with the two elastic ends. After that, put the outer box on over the inner box. And, done! All that's left is to put the covers on. Here is the mannequin, looking very cool. And that is pretty much it. Until next time2 points
-
Looking at the photo of the armour and the CRL, I don't see the issue? None of them extend past the base of the button to my eye?2 points
-
Okay so it is possible to sue this company interesting ! Man I wish I had money to spend to sue them I would love to do that Sent from my iPhone using Tapatalk2 points
-
Hi, everybody! Thanks for taking a look at my submission! Name: Brendan May 501st TKID: TK-61596 FISD Forum Name: MakeNoiseMan Garrison: Canadian Garrison, Vindicator Squad Mandatory Information Armor = Authentic Props Helmet = Authentic Props Blaster = Quest Design Canada Optional Height = 5'10" Weight = 195lbs Boots = Imperial Boots Canvas belt = Authentic Props Hand Plates = Authentic Props Electronics= Ukswrath's Hearing Assist/iComm + Aker amp/Henry's Helmet Fans Neck Seal = Geeky Pink Gaskets Holster = Authentic Props Link to EIB application: On to the photos! FULL BODY Front Back Left side Right side ARMOUR DETAILS Ab/kidney attachment, left side Ab/kidney attachment, right side Butt/kidney, not fixed Hand plates Hand plates, flexible Shoulder bridges, front Shoulder bridges, back Back/chest connection, left side Back/chest connection, right side Thigh pack attachment, left side Thigh pack attachment, right side Knee plate Knee plate, left side Knee plate, right side Belt/drop boxes, back Left drop box, back Right drop box, back Cod/butt attachment Cod rivet Butt snaps Interior strapping Kidney plate notch, left side Kidney plate notch, right side Wrist end of forearms Boots, left side Boots, right side Boots, back HELMET DETAILS Front Back Left side Right side Hovi-mic tip detail Left hovi-mic tip Right hovi-mic tip Lens colour, back-lit S-trim *Note: In this photo, the S-trim is on backwards. I have fixed this, but the S-trim is glued on now so I am hoping this older photo will suffice. Current S-trim (glued on) BLASTER DETAILS Left side Right side D-ring ACCESSORIES DETAILS Neck seal, front Neck seal, back Thermal detonator, front Thermal detonator, back Thermal detonator, screws Holster attachment Thanks for your time! If you need any more photos, please let me know, I'll be happy to provide them.1 point
-
Hooray! BBB day arrived last week, super fast from Mark in Canada but I had to go out of town for work right afterward and really didn't get a chance to look at it until this weekend. I went with the untrimmed kit. I've been reading lots of other AP builds here, but feel I still have a lot to learn. Really appreciate all the great builds people have posted. Look forward to standing on the shoulders of giants as I dive into this. For any fellow Russian Ural sidecar drivers, the BBB fits nicely into the hack!: Lots to do! Daunting, but also exciting! I have lots of the tools I need already--plus a few more on the way. Does anyone have versatile rivet guns they really like that they care to recommend? I had a cheap one, but lost it in a move. Would like to get a good one I can get a lot of mileage out of. Still need to get some boots. I see TKBoots.com are no longer around, and ImperialBoots.com bills their boots as "narrow". I have super wide paddle feet, usually wear a EE width boot. Anyone with wide feet have experience finding comfy boots?1 point
-
Hi Adam, Great to know you're starting you build. Feel free to ask all you need and take a look into the build threads section: https://www.whitearmor.net/forum/forum/80-anh-build-threads/ Good Luck and Welcome.1 point
-
Congrats on BBB day! AP armour is great stuff. I hardly used speed rivets. I mostly stuck to snaps, split rivets, and a few single cap rivets. Good luck on your build!1 point
-
Looks great! Good luck!1 point
-
Personal preference, but I like those better for Sandy hip pouches, and this style (also about $30) for HWT. Just me. That style is usually more expensive for whatever reason though, so give em a shot and see what the quality is like! Will probably look better with some proper fake "magazine" inserts, just like these do...1 point
-
Lots of progress to report. Should bridges, kidney shimming, shimming the thighs, arm fitting, and MORE! Shoulder Bridges: Having previously managed to get the bridges into a nice shape It was time to attach them to the Chest plate. Having read the various threads on the difficulty of attaching the bridges to the chest pate due to the lack of a solid surface underneath the bridge, I cut a series of small slivers of ABS from scrap to fill in the gaps. After fitting them to the proper space, I glued the scraps to the underside the bridges to give them more surface area. Measuring 55mm from the top of the chest/shoulder ridge, as in Tony's AM build, I smeared the E6000 all over the bottom of the bridge and put them in place. Next, I grabbed the clamps and locked them in place. In the background you can see the back plate. To make sure I had the bridges in the proper position, I held up the back and chest plate together and made adjustments to the positioning of the shoulder bridges while the glue was wet. Once satisfied, I put this off to the side to work on my next project. Fitting the Kidney Shim and making return edge for it: As you may recall, I needed a pretty significant Kidney Shim in order to get the armor to fit. 5" on both sides. Even after that, I needed to add an additional shim to the bottom of the shim in order to properly meet requirements. The biggest issue with the shim was that the shim plates splayed outward badly.... \___/ ... I needed to reign them in to get the proper shape (___) . Again, due to the size of the shim, and ... cough cough... me...., I couldn't fit it in my pot for a bath bend, so that left me with no choice but to grab the heat gun and try to bend it with direct heat. Having gained some confidence using the heat gun with the back of the thighs and the bicep hooks, I used direct heat from the high setting of the heat gun to bend the shims back toward the front of my body. I'll try to post a final photo of the result, but they turned out great. Three rules for the heat gun: 1) wear heat resistant gloves 2) ONLY heat the inside of the ABS (the non-shiny part) 3) Check it CONSTANTLY for pliability. With the armor bent properly, I set to making a return edge for the top of the shim. To do this, I used a foot long 2x4 remnant to shield the rest of the armor from the heat and to give an edge to bend the ABS. As you can see, it worked well at the start, so I kept it going. I'll need to heat up the inside one more time to bend the top back toward the ab plate again, but over all I'm very happy with the result. THE ARMS FIT! Feeling confident, I test fit the right arm. I'm excited. I may do a long bicep hook, but I may not. I'll see how it wears. Shimming the back of the thighs: With the kidney cooling off and the the check plate drying, I turned my attention to the last MAJOR issue with my build, the thighs. I haven't been able to post a photo of it before because it's impossible to hold the thigh in place and get a good enough photo of the back of my thigh, but I'm looking at a 5" gap at the top of the thighs and an inch or so at the bottom. The other problem was that I'm running out of spare ABS to make shims. The kidney shims ate a lot of the spare ABS. So to make due, I had to get creative. Measuring the additional space I'd need with my wife's reluctant help, I added an additional 1/2 inch and made a triangle style sheet with the appropriate dimensions. The only real issue with this set up was that I'm getting the same "side" for each cut. Instead of ][ I'm getting [[ . But, even with that, I'll get a straight mesh point in the middle that I can work with. So in order to make it fit, I needed to clean up the back of the thighs and get as straight an edge as possible to work with. Clamps, a ruler, and a knife combined to give me that. Score and snap. With the extra off, I grad some 100 grit sand paper to get the edge nice and smooth. I cleared up both sides of each thigh, and then used the preset lines and a clamped down ruler to score and snap my shims: The biggest issue I faced was that I wasn't working with enough ABS to get a FULL length shim on either thigh. Taking that into consideration, I tried to get the shim from the top to the raised bottom edge. I'll heat treat glue and shim a "raised bump" underneath the shim for continuity and filler once I'm happy with the fit. As this was a straight edge and going to be ABS pasted over, I used CA glue to set the shim. Painter's tape helped set the location. Nothing's perfect, and the edge will never sit exactly perfectly. So in order to get the shim to set, I used clamps to keep it in place. Once the CA set and the shim wasn't moving, I liberally applied the ABS paste over the seam to help set and harden the shim. On the right thigh shim, I needed to use clamps to keep it in place longer than the right. Once these set a little further, and the fitting is done, I'm going to go along the back side of the shims with CA glue one more time to bond the plastic a little better. No sense in not making this as strong as possible. Right Left I'm waiting for the ABS to harden a little more before going to work on these further. As you can see, there's a little gap at the bottom to fill, but the shim seems to fit the need. Another thing I did was make sure the straight edges were there so that I can add another middle piece IF NECESSARY upon final fitting. The 20mm cover strip would easily hide those sins if I need to use them. Another thing you can see is the thigh fang I need to heat up, bend and cut. I set the lines of the shims so that the back of the thigh's raised edges don't cause any problems. Everything lines up. AB Plate Lastly, I measured and marked the ab plate for the split rivets. I looked at Tony's AM thread for the dimensions on the Ab plate split rivet holes. Mine came out different than his. I had them at 20, 80, 140mm. So If you're looking at this for thread for help, measure and get the spots right based on the size and make of your individual armor. I only marked the ab and didn't drill yet. I'm going to match up the Ab and the kidney for sizing before the holes go in. Hopefully that'll be done this week. More to come.1 point
-
Looking good, best of luck.1 point
-
Thanks guys!! Updated with photos of boots.1 point
-
Hi Brendan, I should suggest to add a close photo of your boots to see details astated by the CRL. Good Luck with your approval.1 point
-
Yeah man updates would be very nice;-; This lack of communication from them is so frustrating Sent from my CLT-AL00 using Tapatalk1 point
-
Did my best to drill my holes as close as possible to the reference photo of an original screen used detonator: I think it is pretty close. So with having screen accurate screws and the holes drilled on the clips I proceeded to glue the face plate on the PVC pipe. But unfortunately, I put too much glue on the face plate and it oozed out and when I wiped away the glue it started to wipe off the gray paint! 3 layer of gray paint and 3 layers of clear protective coat started to wipe away. I am pretty darn frustrated at myself and I don't know the best way to remedy the situation. I was thinking about just getting a new piece of PVC pipe from home depot or get lots of sandpaper and evenly sand down the clear coat and most of the paint and re spray paint the PVC. I'll figure out something.... Research on the forums point out that hovi mich tips were painted with a black satin black. I gently sprayed a couple of layers of krylon black satin on my tips. They are almost done. Just going to let them fry over night and reinspect them.1 point
-
That’s what the first class action is attempting to do. Sent from my iPhone using Tapatalk Pro1 point
-
Tbh all I would love is just communication and updates. Back when they did the tiered launch for the OT stormtrooper, updates were very prompt. hence I was cool with the wait. For this, the update is almost not seen. Terrible [emoji20] But i'm still holding on nevertheless as if they ever deliver it's a steal.1 point
-
Can this company be sued for this ? I’m just curious if it’s even possible. Sent from my iPhone using Tapatalk1 point
-
Looking good Brendan, good luck with your application1 point
-
http://www.warmachinepaintball.com/e11-blaster/1 point
-
Made some TD clips first try ever. I think they came out ok. Thanks to theswede13 for help on the measurements.1 point
-
If that was in response to my comment, I meant more like ‘randomly triggered’, i.e. from background noise, etc1 point
-
The Odoban absorbers arrived last night. For anyone looking for them they are about the size of a can of chewing tobacco/small hockey puck. They are called "Odoban Solid Odor Absorber". One full day of the absorber being under the helmet on the shelf and I swear there is already a huge difference. I think these are going to do the trick.1 point
-
Thanks to some encouraging feedback, I’ll be offering this type of helmet as commission builds in the not too distant future. As with this build, carefully constructed to emulate the majority of screen used Stunt helmets, sprayed following the originals processes, with hand painted detailing. More details to follow.1 point
-
The knights of Ren, very reminiscent of the Seven Samurai. Be nice to see them have a good bit of screen time.1 point
-
Sent from my iPhone using Tapatalk Pro1 point
-
TD 95050 can you please enable my account? I'm trying to order my first race shirt. Thanks in advance guys. Angelo TD95050 Imperial Sands Garrison1 point
-
I am thinking of modeling the TK laser sword in 3D, then shelling the inside to fit Darth Vader Force fx innards. Then cast it in resin, attach some greeblies, then add in the FX parts to complete. If it works, I might make kits available. Sent from my XT1254 using Tapatalk1 point


.thumb.webp.27f7939d37871f319ff836257d4a3668.webp)