Leaderboard


Popular Content
Showing content with the highest reputation on 09/08/2019 in Posts
-
Just reached the first marker, 5 assisted EIB now,3 points
-
Hi all, As we’re all sharing helmet pics (WIPs, clearance etc.), I thought I’d share a little photography tip for anyone that wants to give it a go; As many of us use smart phones to quickly snap out progress, holding the camera too close to the subject will cause some distortion, leading the the helmet looking “droopy”. Try taking a couple of steps back and zooming in - this will look much closer to how the human eye sees it. :-)2 points
-
Thanks again for your advice. I seriously appreciate the help.2 points
-
Thanks guys!! Really, thank you! Sent from my iPhone using Tapatalk2 points
-
As Dan mentioned it's a suggestion. FISD is not about prop replication, so no your belt should not hold you back from any current level of approval.2 points
-
Hey Mike. Small LOL on this one. The original logo was gold lettering. What you are seeing is the "ghost glue" leftover that won't come off. Also, when I took the picture I stupidly tucked in my neck seal for some reason and didn't realize the mistake until I was out of the armour. I've attached a pick of me in the undersuit top with the neck seal properly placed. Here is the link to my build thread, page 3. Scroll down a couple pics. Pic of neck seal over the logo. Please excuse the rough edges of the seal. I was in a hurry for a troop and didn't have time to finish the sewing. Please let me know if you need anything else. Thanks again.1 point
-
I would think the helmet liners were installed in the uk as the came from a climbing helmet made in Wales uk. They were re-strapped by the costume dept with the black webbing you see in the liner. They were also used in the uk filmed scenes. Sent from my iPhone using Tapatalk1 point
-
Finally got time to do some trimming. The new 2 piece KB forearms are a bit different than most of what I’ve seen before. Obviously got a lot of work to do before glueing but wanted to share. I do t see anything on the crl about return edges so will reduce them significantly. They may end up more boxy than I’d have liked, but we’ll see. I had to redo my ANHTK arms a few times before I was happy with them too.1 point
-
Hi again Brian I know you are eager to get this wrapped up, I was the same for my reviews Please give me a couple of days1 point
-
Looks good, nice work1 point
-
Hello! ShaSha Thanks for all the feedback, I am in the process of fixing the TD clips and height. meanwhile here are the other images requested! If you need anything else let me know. Frank thanks for the support Thanks!1 point
-
Thank you for all your tips. You along with the others giving advice and inputs is giving me lots of help and confidence.1 point
-
I am going to do biceps next but I decided to try and get part of the thermal detonator out of the way. Found this to use as a reference: So far trying to cut just a smidge over 3/4 of an inch to account for sanding.1 point
-
So I pretty much removed the return edge at the very front part and wanted to see how it all fit before I removed the entire bottom return edge. I think it turned out okay. Yes the bottom sides have a bit of a return edge but i like the fact that they are helping close up the gap. Its only E6000 so I can always mess with it again Most of the gap is gone now Here is how the legs look all put together: Besides a strapping system on the thighs, the legs are done1 point
-
1 point
-
Hi Brian, No - as I mentioned right at the beginning, it might be mentioned as a ‘suggestion’ but should not prevent you from Centurion (in my opinion). Hope I haven’t panicked you - it was purely meant as an observation and as a future accuracy upgrade, IF you wanted to. :-) Regarding size, you’ve fitted the armour to yourself really well. That’s the most important thing and you look great. :-)1 point
-
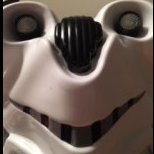
Hey all. Been off for a bit modding armour and the helmet. Unfortunately I'm still having serious feedback issues to the point I may have to cancel a troop tomorrow. Tony, hope you can help. Here is the new set-up. I went through a few trials and errors before I finally got very frustrated. Will explain all my troubleshooting: Moved iComm and Aker to chest plate freeing up room in helmet. Installed speaker in chest. Moved Hearing assist components in helmet. The 9V battery box is now under the mouth decorative piece. Hovi speakers not connected Purchased Bluetooth (BT) and installed into iComm: constant static from wireless signal coming through the speaker. You can see the BT antenna wrapped in Velcro padding at top of IComm When I went to jiggle the antenna the static stopped. My hand stopped the static signal to speaker, but allowed me to continue talking Made a "tin foil" shield and wrapped around antenna. Then wrapped this with black Velcro. No more static but could still talk through speaker Discovered there is quite a bit of delay when using BT mic. The signal cuts in and out while I talk, and I get static bursts in middle of my conversation. Put on my hearing assist earphones, and I could now hear the BT static in earphones fairly loud. I covered the BT transmitter (not the mic) in the helmet with my hand and static stopped. I made another tin foil / velcro cover for the transmitter, but this didn't stop static. No feed back with BT mic, just static Removed all BT components. Reorganized chest components. Placed the iComm mic back in helmet with mic right against my lips. With hearing assist on and Aker at about 1/3 to 1/2 power (hard to tell), I put on the bucket and started talking, instant loud ear damaging feedback. I reached into chest and turned down Aker, feedback was gone, but I could barely hear my voice out of speaker to the point of it being useless. Slowly turned up Aker and after minimal dial turn the feedback was there. Even on lower setting you could tell the feedback was just about to start. Took bucket off and talked. Feedback was gone, but returned once dial was turned up higher (maybe above 1/2) Turned off hearing assist and tried step 7 and 8 again. Same results. Took off chest plate and placed it on floor to determine if the closeness of mic to speaker was issue. Bucket was put back on and steps 7 to 9 tried. Same results. Removed mouth decorative piece. I put approx. 1" thick piece of dense foam padding (about 2" square) in bucket frown area where mic would be. Put on helmet and mic was pressed into foam tightly between helmet and my lips. This improved the feedback tolerance somewhat, but it came back as the Aker was turned up. Took two extra mini mic foam covers from my motorcycle mic and placed over supplied mic. Put on my black head cover over everything and made sure the mic was between trapped against my lips. Still got feedback to some degree wearing the helmet. I haven't tried with just the Hovi mics Sooooo, not sure what to do. The purchased Bluetooth wireless Xiaokoa Mic Installed iComm components and speaker, plus Bluetooth receiver in chest plate. You can just see the BT antenna sticking out of the top of iComm. Tin foil and Velcro hat (to keep alien signals from warping my thoughts...) Blue tooth components removed Slightly modified helmet interior. Top padding adjusted Nose / mouth piece slightly modded to sit higher towards eyes. I want to rebuild this out of sturdier plastic but ran out of time Blue button panels will be built out of sturdier plastic, but ran out of time. Thinner 10mm minimal (super minimal blowing!) output fans replace originally supplied TK product fans. 2 Original TK product fans still in helmet but repositioned. Mylar silver strapping is decorative to replicate "real" helmet Still want to build the "snail shell" type of exterior for the silver fans as seen in the "real stormtrooper helmet" picture, but have to find a good way to do it. Back side of bucket with hearing assist module at bottom right. Fan buttons are to left and right at top of corrugated black tubing.1 point
-
Hi Brian, Apologies if I’ve confused the issue. Link above updated. Just to clarify, you don’t have to change your belt. The CRL is not this specific. This was just a point of interest for you and any other prospective troopers that there is a visual difference between this belt and screen used. As Daniel (theSwede) mentioned, this will not cause you issues for clearance, but could be a nice upgrade if you choose to do so down the line. Best wishes Dan1 point
-
It’s not - the belt is a major part of the costume and very visible unlike inner strapping methods. This is also for the higher levels of approval. The inner support in itself is not an issue. The issue with these belt is the fact that they don’t look the part. They are however still allowed. The belt is also a major part of the costume and not a specific detail of sorts. To clarify: with the changes to the CRL it was also pointed out that the text is only one part of the requirements, as it has been saying in the CRL ever since I joined a few years back. (And probably longer) Quote: Text descriptions are only one part of the guideline. GML's and costumers must consider both text and pictures (CRL and Reference) when reviewing the costume.1 point
-
Looking great. You could trim the ends of your shoulder straps but should not stop you from getting your number. Sent from my iPhone using Tapatalk1 point
-
A block of wood with sandpaper wrapped around is a good way to get jagged lines straighter. You may find wrapping tape around the pieces tightly they may come together a bit more. If you are still left with a gap cover strips will sort that out. With shins it's a great idea to add inside cover strips as they are opened and closed a lot so some extra strength is a great idea.1 point
-
So the pictures have been sent. Hopefully I'll be able to share my numbers with you soon!!! Here are some of the pics. We'll see! [emoji51][emoji16][emoji2957] Sent from my Pixel 3 XL using Tapatalk1 point
-
should leave a few mm of edge on each side none on front of big tab and rear big tab should be completely trimmed off, the movie original had no big tab on the rear. Mark (AP)1 point
-
The helmets I have seen are all in private collections and they all have the climbing liners. Considering the amount of work needed to install the liners, I doubt the costume department would go to the trouble of fitting them after a much more simple (and comfortable) foam liner. The liners were readily available back then and were fitted when produced. Here is an unfinished production helmet. Going back to the shoulder bridges., they were riveted to the chest plate in ROTJ. They had Velcro glued to the inside of the bridges and Velcro tabs glued to the top of the back plate for them to fasten to. I guess they learned from the ESB MKII armour that Velcro on both side was not good enough. In fact, the whole strapping system they used on the ESB MKII armour was not really practical and they used a more simple set-up in the ROTJ armour.1 point
-
Nice job on everything Mario, it looks amazing. Don’t get discouraged I know it’s a tough call since the CRL states “little to no gap” but since the TD does hang low you might be able to get those a millimeter or two over. Make sure you secure it with some glue if your using the same TD, I’d hate to see the holes being so close have an impact on holding the screw in. Really impressive! Sent from my iPhone using Tapatalk
 1 point
 -
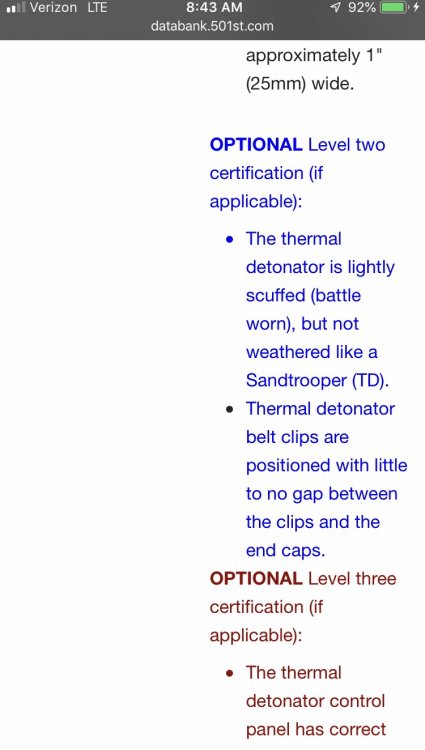
Hi Mario! Thank you so much for your application. You will be my very first TK Commander review! Unfortunately before we can proceed, you will need to make some corrections with your Thermal Detonator. The L2 CRL states: Thermal detonator belt clips are positioned with little to no gap between the clips and the end caps. As you can see, with your TD, there are visible gaps between the clips and the end caps, so yours will need to be repositioned. While you're modifying the clips, I'd also suggest you adjust the positioning of your TD, as it is sitting very low on your belt; normally they sit at about the same level as the belt. Reference Image: Can you also include these additional photos: * Closeup of shoulder straps (front and back) * Closeup of your hand plates * Closeup of belt * Closeup of boots * Interior strapping Thank you! -Sha Sha1 point
-
1 point
-
Thanks for clarifying...I appreciate that. Guess I need to get some more Armorwhite gel then as I've used up the last of my bottle a few weeks back.1 point
-
No, I am actually not saying that at all. All plastic will yellow and nothing can stop it. You can restore the white with ArmorWhite, but its not permanent. From time to time you will have to re apply the solution to keep your old armor white. Look at the armor in the Lucasfilm archives. Its all yellow. Look at your old computer from back in the day... its yellow. That's why all computers are BLACK now, lol... All ABS plastic turns yellow over time. Does not matter if its in the sun or not, it will still yellow. The sun and heat of any kind will quicken the yellowing however. Sooooo if you troop alot then your armor will turn yellow faster. Warm parts of your body will also cause the armor to turn yellow. A UV additive can be added to the plastic to fight off yellowing, but it doubles the cost pf the plastic. So the armor prices would be much higher as a result. PVC or Kydex would be a better plastic for armor. Kydex is what Lucasfilm used for the SE armor. Its still white. Kydex pricing is insane however... PVC is not glossy nor is Kydex... The struggle continues.....1 point
-
That’s correct. You can do as Q suggested as well. Removing all is screen accurate (in most cases as they didn’t seem too particular in getting everything down to point) and it helps when forcing the Sniper knee into submission.1 point
-
Either is fine, I actually just cut a notch out in that front section so it helps sit central on the cover strip when it's drying. I found using some E6000 just behind the front of the plate and also on the ends, I did rough both areas with a little course sandpaper first to allow some more adhesion. You really need some pressure to hold those back corners, many don't like stay there while drying, also wrapping painters tape tightly around can help hold in place. I usually use 6 or more clamps as well.1 point
-
Thank you Tino. I have to study the weathering technics Weight of the baby : 2 kg !1 point
-
Are you sure you don't mean 24-26 years? LOL1 point