Leaderboard


Popular Content
Showing content with the highest reputation on 09/05/2019 in all areas
-
4 points
-
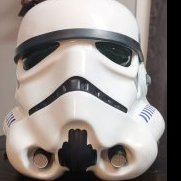
Hi again Ivaylo and thank you for your EIB application. In this review I will ensure that your armor follows the requirements set out in the CRL L2 Expert Infantry Badge and also point out what I can to prepare you for Centurion, should you choose to apply. I hope you do! Let´s get started shall we! CRL and EIB Application Requirements: All required submission photos have been posted and I am very pleased to announce your armor displays all the necessary elements to qualify for ANH Stunt Expert Infantry. On behalf of myself and the entire D.O.Team, Congratulations! Other-Armor Fit/Assembly: In this section we review observations made by your fellow troopers and ourselves. Some observations may lead to suggestions to improve the overall look of your armor. Note that we consider both text (CRL) and pictures (screen caps/reference images) when reviewing submissions As we navigate through this review we are going to start from the top and work our way down. Starting with the button plates the smaller could be trimmed a bit more and we just want to mention that the corners were straight and not rounded and your buttons, although within boundries, are a tad big when compared to screen used armor in case screen accuracy is your thing, it sure is ours Moving on to the belt we recommend a light shave to stay sharp on Patrols. Another of those small things is that the TD clips just like the ab buttons were cut straight and the screws were placed more at the ends, that would also keep the clips more flush to the tube itself. Here we recommend to lower the right thigh to keep the gaps even. Centurion Requirements: In this section we prepare you for Centurion. More photos may be requested in the future that allow us to make better decisions on possible adjustment etc. If there are any areas of concern they will be discussed here. Because Centurion photos show much more detail than EIB, items pertaining to Centurion might be seen there and not here. We try to point out all we can from what is seen but the final accuracy is the responsibility of the trooper. Below you will find areas that will need to be adressed for a future succesfull Centurion Application. Starting with the helmet and the brow we usually leave it as a suggestion but yours is actually going below the eye sockets in the middle and need to be raised for a Stunt-look. However if a lower brow is what you prefer we don´t request you place it as indicated by the blue line but atleast keep it above the "eye-line". Next up we have the shoulders and by removing more of the lower return edge you should be able to close that gap more. The right shoulder bell also look to be slightly rotated to the front so we advise you do some trouble shooting, could be as easy as a simple dressing issue. Here we can se that the kidney overlaps the ab at the bottom and causes a gap at the top that needs to be closed. Some work with the strapping should have it sorted in no time. Moving on to the belt it should be raised just a tad for a clean Centurion look. A dab of glue should keep those dropboxes in the correct position - at the ends of the ammobelt. Last we have the sniper knee and the way this is trimmed is just to far from the originals to pass the Centurion level, It can´t be saved by trimming so we´re sorry but it needs to be replaced. And that´s it, apart from that sniper knee it´s a pretty straight forward road to Centurion. Congratulations again on beeing Expert Infantry2 points
-
Alrighty then! Erick you have done a nice job with your build. I did receive your PM on the ECG forum but I like to do my TK responding here at my real TK home. So listen, I know Glen has been giving you advice all along during your build. Well here he is giving you amazing advice again. I can tell you he is certainly pushing you towards the higher levels of approval and you should no doubt go all of the way. However, I would like to touch on a couple of his points that he made that I would like to see done before you submit to us. Could you address the excess paint on the ab buttons, the excess plastic on the cod and finally the bend in the plastic cover of the belt. For the ab buttons you should be able to put some paint thinner on a q-tip and take some off pretty easily. On the cod just take some sandpaper and sand that off a little more. Finally the belt cover maybe you could use a heat gun or hair dryer to try and bend it a little more on the ends? Specifically the left side. These shouldn't take too much time and then you should be ready to go for our eyes! Honestly have worse looking sets of armor been approved for basic then yours? Absolutely. But you have done such a nice job building yours that I don't to do a disservice to you on these minor fixes that will make your armor really look amazing for basic approval. So that is why I am going to ask you to do them. Finally, I highly encourage you to work on all of Glen's recommendations because after basic approval you should be able to go EIB very shortly soon after with a few tweaks. When you submit, please include Photos of all sides of your helmet, all sides of your E-11, all sides of you dressed in your armor, an "action shot", and then a bucket off photo. I can't wait to see your submission. Thank you for making the GML job easy.2 points
-
Yeah this sucks. But it's nice to know you always have something you can sit on2 points
-
A lot of people use either large hardware type tubs with wheels or just suitcases, I have both types but find the suitcase to be an easier one to get around with, helmet is in a separate in a helmet bag. I do have a towel I wrap around the armor inside the case and that's about it. I was caught out with my 150ltr Stanley crate, went to an event we had to climb 3 sets of stairs, was hard work lugging that up Most pieces of a OTTK will fit inside each other if you build the clamshell way, so it all compacts down quite well. But with my First Order armor as it's painted and I have separate fabric pouches I've made for every pieces so even when pieces fit inside they have cloth in between, saves the paint You'll find a few threads about transporting options around, here is how I pack mine https://www.whitearmor.net/forum/topic/22787-how-to-pack-up-and-carry-your-armor/ https://www.whitearmor.net/forum/topic/47673-storing-and-transporting-armour/ https://www.whitearmor.net/forum/topic/34962-tk-armor-transportation/ https://www.whitearmor.net/forum/topic/33505-my-transport-bin/ https://www.whitearmor.net/forum/topic/9945-armor-transport/2 points
-
Another thing to keep in mind when deciding on a purchase is to think about accuracy and longevity which is more important or are you happy for just a little of both. I know some armor is great for a few troops a year but others if you troop hard will crack pretty quickly, but I'm talking about 50 or more troops a year Mine for instance is ATA, one of the thickest armors but not one of the most accurate, but it's lasted 7 years and I've just swapped it out for another set of ATA as it was getting pretty scratched just from everyday wear and tear (oh and a couple of cracks in the backplate from heavy handed luggage handlers) Going through some of the build threads of different types of armor is a good idea, most are in the header of members builds, you can compare some of those images to those in the gallery section and that should give you a better idea of what you will be getting. Also think about your size and what size the armor with fit, again going through the build threads will help you there. We all get excited when start this journey but it does pay to do what your doing and do the research, I'm sure you'll be happy which ever armor you decide on .2 points
-
Hi Niclas, The original suits were not acrylic capped so, personally, I favour the 1.5mm ABS (non-capped) as it’s closer in appearance to the originals. 2mm is also less detailed due to the thicker plastic. As in, the smaller details don’t “pull” as well. RWA has an amazing reputation for service and quality. The helmet and armour is not quite as accurate as TM but this is reflected in the very good pricing. I have RWA armour myself and can highly recommend the service and value. RWA does not offer a Hero helmet so do bear that in mind. Hope that helps a little.2 points
-
I've said it before but here we go again, very nice build. A few tweaks you could address mainly for higher levels: Belt could sit higher at the back and lower at the front, just wants to sit just under the last ab button, yours appears to sit on top of the button. TD could come down a touch too. Belt ends usually end either under the TD or just next too so you could trim off a tad. You could also have less elastic on the drop boxes, only need a few mm's to allow movement, it will help them stay in line with the end of the belt. Also for your approval shots don't have the blaster in the holster, although the holster looks great it does look a little floppy with blaster in Try make sure your thighs rotate to the front fully, although it could be a bit hard with your cod being so close, you may be able to bring the ab/cod up a tweak more. Kidney sides are open a little, some tighter strapping or maybe some strips of ABS behind to stop it opening Buttons could have a touch less paint Could also straighten a few of your black lines on your helmet (cheeks) with a permanent marker, easy to use than shaky hand paint as I found Also noticed the left side of your plastic belt appears to be sticking out a little, you may want to bend it a little so it doesn't catch on your arms There is still some excess material you could trim off the sides of the cod Great fix on the shoulder straps Nice looking boots BTW you might want to trim the lower cover strips and use some fine sandpaper to finish so they don't dig into your boots. I would also suggest maybe trimming the bottoms of your shins so they come down a little more, or bring your ab/cod and thighs up, you can see in the above image your shin is under the knee ammo plate and it will catch. Adding some foam in places to hold pieces forward can also help. If you could also bring in your shoulder bells a little more, I know they like that for L3 Great work, I'd address the belt right now and the others before EIB. Good luck, hope to see you approved very soon2 points
-
Tandy's snaps didn't used to be branded. That actually changed about 2 years ago. Before that, they were plain. Old vs new: I'd feel fine using the Anovos snaps for these purposes. If any of them fails, replace it in the future, no big deal. Labeled vs. unlabeled makes no difference even for Centurion purposes. If someone's face is close enough to the Han snap (let alone the crotch strap LOL) to make out the lettering, we have other issues. You need a set of snap setting tools to install snaps. They're simple and inexpensive. You can buy them from Tandy or random Chinese ones online elsewhere. Personally, I bought a kit from Tandy that included a number of snaps and the setting tools. I paid less at the time (several years ago now) than the $15 they're asking now: https://www.amazon.com/gp/product/B003W0IIJK/ I patched the back of my belt, after cutting out the Anovos buttton covers. Spare plastic works perfectly. (doesn't even have to match exactly since you can't see it from the front anyway)2 points
-
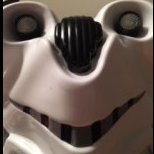
Thank you for the suggestions. The bicep was rotated and I can reshoot pictures with it correct. The frown was completely stripped by me then entirely repainted. If it is too far up on a few teeth I will have to try some white paint. Small brush and shaky hands are a bad combo, LOL. I'll get the mike tip edges touched up.2 points
-
Two people started Hyperfirm, and parted ways long ago. Hyperfirm continued in business until it closed up about a year ago, for reasons involving the sole remaining owner that have nothing to do with the quality of their blasters. The other original Hyperfirm guy, who had left, opened Praetorian Blasters after their split, but didn't do much until about 2-3 years ago, when they resurfaced and started selling high quality blasters... better detail than Hyperfirm, frankly. More money, too. Noticably lighter than Hyperfirm, which makes them great for trooping. (Hyperfirm had a nice satisfying weight, but for long troops, the lighter the better) They've become a lot more popular since Hyperfirm closed up, being the sole remaining high quality option. Praetorian is the best bet out there, IMO, for trooping, today. There's a UK-based company called ShearTech that is popular for our UK brothers, although IMO the detail is not as high as Praetorian, from what I've seen. If you want a high detail shelf queen, you can build a resin kit (beautiful detail, and inexpensive from places like DoopyDoos), but resin is fairly fragile and one drop that lands wrong can shatter it or break big chunks off. There are people who troop with them, but I personally never would. There's also the all metal kit from FieldMarshall which is a lot more money, but absolutely gorgeous. Metal, so far more durable than resin, but it's not an all steel legit Sterling submachine gun conversion, so it could dent or deform badly if dropped wrong. And much heavier than any of the rubber or resin blasters discussed. (although nowhere near as heavy as the 12lb+ Sterling conversions!) I wouldn't bother with the Hasbro conversion anymore. They were popular when they first came out, but there are a lot of details that are wrong (which is why they're explicitly called out for higher levels) and we have better options today. The Rubies blaster is stupid cheap, and great for the money, but other than an extreme budget choice while saving for a better option, I'm not a fan. (I do keep one in my bin as an emergency backup / loaner).1 point
-
I have read through all the CRL's extensively and noticed the differences, the file in the Google drive was exactly what I was looking for, thank you very much!1 point
-
No you don't need to repost your updates here if you don't want, it's just nice to do so to show others your improvements. GML's can ask for minor adjustments even though you have been given info here, this pre approval is just a way to iron out some tweaks before you submit to your GML, it is they who have the final say You will also need to fill out a 501st application (if you haven't already) you can find that here http://www.501st.com/members/join_form.php and also pick out 5 combinations of numbers for your TKID Good luck and hope to see those numbers soon1 point
-
Here you go, please let me know if there’s anything else.1 point
-
Hi Daniel, Really appreciate the detailed analysis and practical guidance. Thank you for your time and efforts. Will start working on these. Take care!1 point
-
It will look alot better if you do. Your cover strips look a bit long at the top and just to mention the original suits snipped/rounded the corners - keep up the great work1 point
-
Hey Niclas and welcome to FISD You can´t go wrong with either RS or TM both are great! RS has the advantage of beeing made of an original screen used suit, not all the parts though as it wasn´t complete but the most important piece was present - the helmet. TM is by far the best fan sculpt so it´s basicly down to personal preference. My advice is going with 1.5mm as it´s more flexible and screen accurate, I like screen accuracy I have two TM´s, a Hero and a Stunt and an RS suit which I used for my Sandtrooper and an extra RS helmet I built as a Stunt replica so I have experience with both and just love them1 point
-
Submit your application to [email protected]1 point
-
Excellent thanks so much!!!!1 point
-
Depends on what you want, what you're gonna use it for, and your budget! I've had a couple, so I can share some thoughts. Rubie's Rebels mod is definitely the cheapest - you can find them for like $15 on eBay and they're plastic so they're pretty indestructible for trooping. They're easy to paint black and weather with some Rub n Buff. For funsies, I went the extra mile and added some power cells off of Shapeways, modded the end cap to have a functioning D-ring, drilled out some of the vent holes on the barrel, flattened the T-tracks out a bit, and added a couple screws here and there. I probably spent $30-40 on it. It's very lightweight so I mostly use it as a secondary blaster - either holstered or on the side of my HWT pack when I carry my DLT-19. Great intro blaster and a fun little project. Resin blasters from most manufacturers are going to be much more accurate looking, still not too heavy, but not super durable. I have one from MadScientist back when the Force Forum was a thing (LOL) and broke the shucks out of it trooping. Pieces would crack or fall off regularly and one time, it got super hot in my garage and the whole thing bent and warped slightly. Other than maybe for a display piece, I won't be buying resin again. The accuracy isn't worth the problems. Rubber blasters are my current favorites. I have an older (but not OLD) Hyperfirm DLT-19 and E-11 and I love them. They're a bit pricey, but hands down the best thing for trooping, in my opinion. They get decently accurate and detailed, hold up to a ton of abuse, and aren't too heavy either. Praetorian isn't the exact same people as Hyperfirm, but the two companies have some kind of ties, yea. Their quality has improved slightly since Hyperfirm went under as well. If you can afford it, Praetorian has my standing recommendation. I've never worried about it bending - even my long DLT. The weight is very reasonable considering how sturdy they are, but not light.1 point
-
Hehe...I did already trim it then thought about the paint....LOL1 point
-
Memory was bumped up on our Apache and it looks like we're stable for now. Thanks for the patience folks.1 point
-
I am considering a Praetorian E11 Blaster. How easily do they bend? Are they extremely light?1 point
-
Will be happy to helpout / discuss stuff where I can [emoji106] Sent from my iPhone using Tapatalk1 point
-
RWA is a super nice guy, he does an incredible amount for good causes. However, if you are set on a Hero then a TM in 1.5mm ABS would be my choice.1 point
-
Don’t get discouraged. I’m 6’3 200lbs and using the standard Anovos kit. Built for Centurion level and finally getting around to applying for EIB. I didn’t have to shim anything. The biggest thing is spacing things like thighs and shins and arms to make the gaps look proportional.1 point
-
Great build, feedback posted, good luck with approval, hope you have some good news soon1 point
-
Getting there!1 point
-
As of right now, my pre approval request is in!!! Let's see how this goes. Thank you all so much for the help! Sent from my Pixel 3 XL using Tapatalk1 point
-
Excellent clarification by Kalani - so we're on the same page, I was saying that the POPPER snaps are fine (and I believe more "accurate") to attach the canvas belt to the ab panel. But that's IT. All of the visible snaps are "Line 24" (at the posterior tab and Han snap on the ab). Tandy are good quality, but I actually prefer the cheaper ones that aren't branded on the snap for my visible snaps And as for the canvas belt... depends on the size of your crate and how you store it! My car, and therefor crate, are tiny, so I like to be able to remove the plastic ammo belt from the canvas and roll it up to minimize its footprint. Like Kalani said, do not press sharp folds into it - it can and will crack the plastic insert, which was my concern.1 point
-
would say a fair amount of the assembly is very similar to the legacy Era Trooper, Again one of kevins kits so perhaps have a look a this thread/wip it might kick you off in the right direction https://www.whitearmor.net/forum/topic/44182-legacy-fem-trooper-version-a-tj_fem-wip/1 point
-
Since I'm so close to being done with my build and I really can't do anything till my boots get here, I decided to do a little work on a custom case for my armor. I know most of you use the huskey locking case but i had this in my garage for years. I repurposed it and it's now an imperial transport trunk. Looks official right!!?? I even have the proper amount of propaganda on it too!!! Sent from my SM-N960U using Tapatalk1 point
-
I'm new to this forum and a just getting started on getting parts together for my ANH E11 build. This may be of interest but Helston Gunsmiths in the UK (helstongunsmiths.com) are selling genuine Sterling magazines for £8.50 ($10-11?) plus shipping (£4.50 in the UK). I think that's cheap - another place I found wanted £20. I've just received mine and it's just great! Obviously it'll need shortening but if I mess up, a replacement is inexpensive.1 point