Leaderboard


Popular Content
Showing content with the highest reputation on 07/22/2019 in Posts
-
Staying in character while in armor has always interested me. After watching videos of the Stormtroopers at Disney's Galaxy's Edge, I decided to start compiling an array of sayings and responses for different scenarios and I would like to share them with you! SPECIFIC RESPONSES: Citizen: Can I get a picture with you!? Stormtrooper: Affirmative. Proceed with holoscan. Citizen: Thank you! Stormtrooper: All for the glory of the Empire/First Order! Citizen: Your armor is awesome! Stormtrooper: It's made to Imperial specifications. Citizen: How long did it take you to make that? Stormtrooper: About ____ standard months. Citizen: (Waves hand) You don't need to see my identification, or These aren't the droids you're looking for. Stormtrooper: This must not be the Jedi we're looking for. PUBLIC INTERACTION If you see members of the public staring at you in awe or excitement: The Empire/First Order recognizes your loyalty! Your allegiance is noted. The Rebels/Resistance will fall under the might of the Empire/First Order! Careful Citizens! Rebel activity has been reported in this sector! If you see a child dressed as Darth Vader, or Kylo Ren. (Salute them) Lord Vader/Ren! If you see someone with a lightsaber: That's a lightsaber! We'll assume you're a collector. ONLY a collector. CONVERSATIONS WITH OTHER TROOPERS: Stormtrooper#1: I could sure go for a cup of caf right now! Stormtrooper#2: Affirmative! Stormtrooper#1: I heard that Lord Vader/Ren might be making an appearance today! Stormtrooper#2 That seems unlikely. Stormtrooper#1: Have you heard about the new T-16's? Stormtrooper#2: Yeah, some of the other guys were telling me about it! They said it was quite a thing to see! ANNOUNCEMENTS: Stormtrooper: Citizens! We have been ordered to re-position, and are vacating these premises! Stormtrooper: Rebel activity has been reported in this area! If you see anything, then report it immediately! Remember to use discretion when interacting with the public. If they seem annoyed, or disinterested, then then don't continue to harass them. And If a child seems frightened of you, then break character and try to sound cheerful. Maybe even lift up your bucket, so they can see it's a real person under there! I'll update this with more phrases and responses as I come up with them. Feel free to post any of your own ideas!3 points
-
Thanks for the info...I have another question, but will require a picture first. I'll take some and follow up2 points
-
Alright, first almost-complete armor test (missing a few bits where the glue was still setting). I still need to trim the upper abdomen sides a bit, as they will be exposed. For the most part, it seems to look fine, though I think I will need to trim the upper thighs a bit more as well. A snap came loose on the codpiece (hence it's crookedness), so I will be adding another set for support. The velcro worked well, though I had to be a bit careful detaching it and there is a very small gap where the halves overlap. I will have to see how durable it is after wearing it for a while, though it currently seems sturdy.2 points
-
Nice work Dan and this is why I tell people to research2 points
-
Ok guys it's official TK37512 reporting as active. Now just clean it up before my first troop.2 points
-
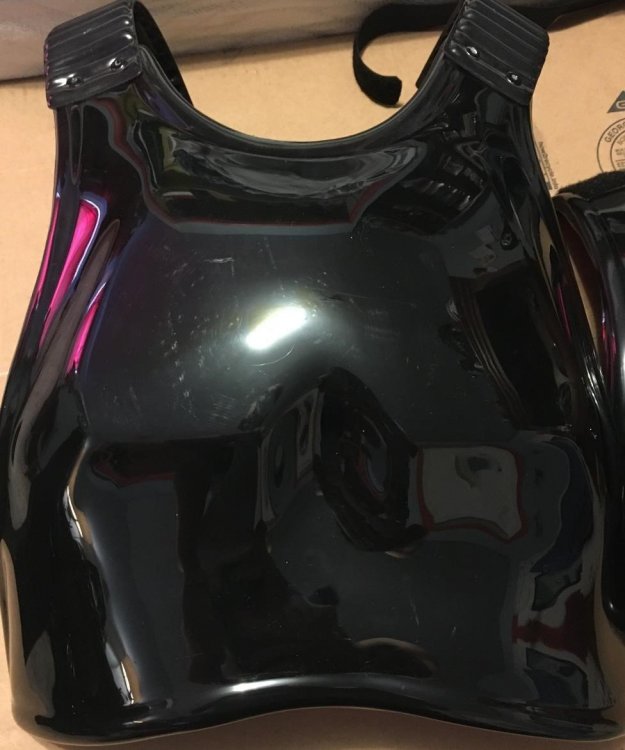
So just to preface this, I’m not expecting to troop in this any time soon if at all. See I managed to snag this suit not only on a whim…, but also the exponentially cheap (it was ridiculous at how little I nabbed it for) and I always kind of wanted one even if I was just going to mangle it. I already have a TIE reserve and so this simply isn’t the primary. My intention was intending to go for the Clones but I just stumbled onto this and without seeing another seller whose asking price wasn’t a kidney and my first born child, I thought “why not?” and just got it. So it got here within a day and I frankly don’t see much wrong with it outside of what I've already known about like the button plate being upside down, the heretical rivets on the shoulder straps, etc. I'm going to frankly take this piece by piece as to not overwhelm myself but also make some progress as incremental as it may be. I'm in no hurry to finish it and I already have an approved suit so I'm just going to take my time. I just figured since ROTJ is used in most builds and this has the most resemblance to it I'm probably in the right ballpark to do this. Lets begin; 7/20/2019 I cut off the stock fabric strapping seeing as it's not very good and I could see this snapping at some point. I'm not going to bother with the chest today seeing as I have work soon. I'd like to know if I could just cut the part with the rivet holes off. It seems like that's more of a hassle in refilling it than it's worth and I could use that epoxy sculpt on other things like refilling the holes on the chest plate. I also feel like the detail on the pectoral region is a little soft. Maybe it's just me but I feel something is up with it. It wouldn't be difficult to correct if it is though and probably no more than a few hours of work to make that sharper.
 1 point
 -
SDCC Costume Display Video1 point
-
Name: Tuomas Kiiveri Forum name: Wyrkk 501st TK ID: 20037 Armor = RS Propmaster Helmet= RS Propmaster Blaster= RS Propmaster E-11 ANH Height = 178cm Weight = 77kg Boots = Imperial Boots Canvas belt = RS Propmaster Hand Plates = RS Propmasters latex Neck Seal = Trooperbay Holster = RS Propmasters Thank you.1 point
-
Paint fry, have to remember that term. Sounds like something that happens to your brain when you paint in a non vented area lol1 point
-
Awesome - I´ll update the status to "In review1 point
-
Ah! I knew that I forgot something! Here:1 point
-
Chatted with him. He's taking orders and I placed an order for an ANH rubber E11. Looking forward to take the road to the higher levels1 point
-
Just above the knee would be a good reference point to start with. Depends on hight and spacing with cod and shins. Depends on the overall look, a taller Trooper might need some gap but preferably there’s minimal gap. A good rule of thumb is that if you are a taller Trooper you adjust the shoulder strapping and keeping the torso pieces butted up. In general no, the top of the sniperplate is required though and top of the shins would be recomended to leave atleast a few mm. If you’re using the brackets then the torso pieces would need to have them, also leaving them on those areas helps in keeping the armor from overlapping. In general the suits looks better leaving a few mm. With that said there are exceptions such as the wrist ends of the forearms, inner elbow, lower bicep, inner thighs, cod area and lower posterior plate that benefits from having the majority removed. Apart from wrist and inner elbow were all can be removed from the get-go I would suggest to keep some in the other areas and trim more if needed. Going over the EIB/Centurion applications is great even though not going for those levels as is shows good examples on how the armor should look and fit on a person. If you posted some pictures of your current state it would help us help you1 point
-
Thank you Mario. Fingers crossed. Appreciate all of your support brother.1 point
-
Looks Great Ardeshir!! Good Luck .1 point
-
Cool bunch of great people here. And yeah I'm a transplant but both my daughters were born here1 point
-
Hi , Tuomas, looking great !! good luck with your application.1 point
-
Nice job so far, Eric! Something you could think about before gluing the other side of the forearms together is that there is quite a bit of return edge on both ends, and they look a little ragged. Removing it all is not a requirement for Basic approval, but I would suggest trimming them down (before gluing) for 2 reasons: 1. If you will be (hopefully) aiming for level 2 or above, removing all the return edges from the wrist side will be necessary. If you glue it first, when you go to trim them down the openings will be a lot wider. Too wide in most cases. 2. Removing them (at least at the top) will help prevent "armor bite", which is when the edges cut into you while you bend your arms (which will be a LOT). I am including some photos of screen used armor to give you a better idea of what I mean. Reference images Reference images Some folks like the look of return edges, which give the armor a "thicker" look, but depending on the particular piece these can be an issue for some. For instance, trimming all the edge off of the bottom of the shoulder bells will allow them to ride closer to the bicep. Keep up the great work and keep those photos coming!1 point
-
1mm is very thin but that doesn't mean it's fragile or cheap if you use a good grade of ABS. People approach me and specifically ask for 1mm ABS because they want that super-flexible armour. Getting into that position wasn't easy, trust me. It's not a case of what you sit on but how the armour reacts when you try to sit down. Using a flexible ABS allows the armour to bend much more than rigid .80 gauge, especially when using the original strapping system that is prone to cracking where the brackets attach. My armour did not suffer from any cracking while sitting down, Flexible ABS can take more stress but that doesn't mean it's unbreakable - just more resistant.1 point
-
Ok so I started this build last month and took a break to work on my E-11 let me.say first I have talked to some amazing people over the past few weeks and love how it's been going. So I will be adding over the next few days all the photos I took along the way . I have been sharing on the AM build group on FB and with members of the FB academy for my local group. Again amazing people still don't know why it took me this long In life to jump in. Now I have built Armor for fantasy RPGs and some cosplay before so getting out old tolls from the 90s is warming to my soul. Brown box day April 20 YAY ... Now next was getting few more tools ... Then we'll got to start somewhere after watching all the videos that a brain can handle. So we cut teeth. And we'll the saga keeps getting better ...next a few helmet photos of progression as I built And not 100% done yet make a few additional changes and started to paint Ok more toys to add to the helmet ...how much can we fit?? Now we love on to a few other orders that came in along the way Boots ... DroopyDoo kit (this starts a obsession and will be another part to this post ;).... Anyway this is to keep record off very first build started April 20 2019 and can't wait ...I leave you with my first Thermal Detonator straps .... Oh and a hello to everyone ...1 point
-
Wow, thanks for the information, Andrew. I had no idea paint could be so complex! Before applying this latest gloss coat I did lightly sand some of the worst affected areas - this certainly helped to smooth it out a little. Now, the top coat is much more even and the appearance is better. Very few obvious pimples now. Thanks again for the tips and advise. It’s always appreciated. :-)1 point
-
The popper snap which was used on the screen armor is by no means required at any level of approval, line 24 (silver) is perfectly acceptable. As Daniel mentioned you might as well use it if you install a line 24 snap. As for the elastic strapping from Anovos it should work though it's not very durable.1 point
-
Thanks for posting Dan, it brings clarity to confusing topic I hear from so many builders.1 point
-
Quick preventive note. I noticed this new blaster reuses few parts from the First Order weaponry we already know, some of them I have modeled and shared. So just to be clear I don't want to see any of those parts scavenged on your 3D model. To be more specific, I'm thinking of the Glock frame w/ handgrips, and whole visor section from the SE44C.1 point
-
She was about 38” tall when we started over a year ago. It was big on her and still kind of is now at 42” She’s built kind of shorter-limbed and stocky, so actually she’s just getting to the point that she has some mobility in her arms and legs, as there is finally getting some space in the joints. That said, to make it fit originally I had to cut out the knee plates and the flared section on the bottom of the shins. I saved them to add back later if her legs grow. The chest, I did cut it so it overlaps the abs and can creep up as she grows. There is a lot of room for growth. Don’t worry! Sent from my iPhone using Tapatalk1 point
-
I’ve cut the rail. Not a laser cut but very satisfied. I’ve made a screw thread in the Hengtler and fixed it on the rail. The result is better than the first try. As mentioned in the FISD e11 reference “ The top of the counter should be aligned with the centerline of the scope. The Hengstler logo should be aligned with the front foot of the scope.” Time to assemble the blaster and to show you some pictures !1 point
-
That’s what Disney does for their park FOTKs.1 point
-
I personally think the pattern is alright, but there might be a loss of that "3D detail" of the resin compared to the frown. This make take a bit more work, but you could remove the resin in that area, and replace it with an 3D print, in which the hexagons are not filled in. Then you could put the cloth behind it, or just use a black mesh. Good luck!1 point
-
The stock
.jpg.813f6cc2876388c3abe6add1891bfe4b.jpg) 1 point
1 point -
I got a little better with the cover strips. Turned out all I had to do was make a whole lot of cuts against a ruler (as a guide) instead of a few hard cuts which made me loose stability. So the front cover strip on the left thigh is dried and secure. I was nervous doing the back part......making sure it aligned and the hardest part was eyeballing the middle of the back for the cover strip. I decided to do my best and make out the middle, cut out the excess plastic and butt the ends together. Now I am just waiting for it to dry and hoping if it all ends well I can do the same thing on the right thigh. If this back cover strip sticks together well then the only thing left to do for this thigh is sand down/even the return edge and add snaps to attach to a belt.1 point
-
Okay, so I went back to my left thigh to try and to and make the front ridge/cover strip area closer to a 20mm width instead of 25mm. To help me make a better cut the second time around I cut a 10mm strip of tape and put it on the ridge to act as a guide. It seems to have worked and I did the same thing to the other side. Now the join up pretty well. And the width is just a little over 20mm Heres how the thigh looks on me: I think I have it sized pretty well. It's fitted but not too tight. I can easily stick a finger anywhere on the top portion of the thigh and two fingers with minimal effort. The only potential issue I see is not having enough plastic on the back to meet at the middle. In the back section of the thigh, there is plenty of overlap at the bottom but as it nears the top it gets pretty close to the edges. From the looks of it, it seems like it will work. Placing a damaged cover strip in the overlap area, it is able to cover where both ends meet and it looks to be right at the middle. Any comments are appreciated. I also got my imperial boots.1 point
-
More stuff coming this weekend, I've been a little distracted with life, biggest thing was finding out I'm going to be a dad after trying for a couple of years and also getting promoted to the next rank for my job (now I can stay at my job long enough to retire. Yay job security).1 point
-
UPDATE: First place! Sent from my iPhone using Tapatalk1 point
-
Don’t be too worried - It’s really not that bad. With the stencils carefully applied, then applying light coats, then tidy any bleed with a toothpick. Stencil applied: Before and after toothpick corrections: Hope that helps a little. :-)1 point