Leaderboard


Popular Content
Showing content with the highest reputation on 05/02/2019 in all areas
-
Hi all, As many of you may be aware, I am in the process of moving to South Carolina. Unfortunately, a series of events have caused me to be incommunicado for the last 6 days due to no internet access, so my apologies to those who have PM'd or emailed me in that time. I will get back to you, I promise, and I appreciate your patience! We leave Georgia this morning and will be in our new home by this afternoon , but we will need to get settled for a bit. I will have full internet access (AT LAST) and will be back in business by this time tomorrow and will begin my replies. Again, thanks for bearing with me. Moving is hell, but not being able to go online or check email is worse.3 points
-
You got this, brother. :-)2 points
-
My first pieces done.2 points
-
This site is your instructions. Hardest part to understand is "one size fits all" and "its wonky". Most of what you are going through has already been experienced by other troopers, make sure to check out other AM builds (each suit maker - AP, WTF, AM, etc... have their own issues) and keep asking questions. For this lid, go with the measurement on the right side (it looks correct) and make the left side match as close as possible. Making the ears match on the slant will be a little challenge, but if you want l3 go ahead and bite the bullet now. Use screws and nuts to hold the face to back of lid as you might need to reposition a few times. Mine looks like swiss cheese under the ears. For a strap, I did not do that. Instead I did the hard hat liner from trooperbay and could not be happier. I tried the foam pads, but for me the lid was either pressing a little too much or wobbled from side to side.2 points
-
Thanks @Dracotrooper and @Mupfel While it does suck that it broke, its better that it broke now than after its all assembled and painted. I was able to craft a new support rod, but this time, I bought a 1x1x12 bar of Aluminum. Unfortunately, it came in a 4 pack, so not sure what i'm going to do with the rest of it, but that is a problem for another day. I cut off the 2 new ends that I needed with a reciprocating saw and compared them to the reference piece. A little more cutting to get the ends to their proper size. For the small end, I only drilled part of the way through since there is only a small hole on the outside. For the large end, I drilled 2 holes, one going all the way through, and another slightly bigger for the rod to sit in. I didn't want the rod to go all the way through to the other side. Once everything was fit together, some JB Weld to make it permanent. Once dried, I started on drilling out the necessary holes, but I didn't pay attention to which side I was drilling through, I accidentally drilled through from the top to the bottom... Oops. I'll just fill that with some resin later. Once drilled, back over to the belt sander for some shaping. With all the holes drilled, I used a cutting disc and grinding bit to clean up the locking pin channel. And now back to where I was before... Next up was the folding stock. I used a Dremel scroll saw to cut off the resin buttstock piece. I sanded off the rest of the buttstock with the belt sander. With the outside all cleaned up, time to work on the inside. Using my old wax routing bit made this part a breeze, it cuts right through the resin. Clean up the channel with some hand files and sand paper. Once I had the folding stock cleaned up, I did a test fit of the resin stock, aluminum arm and reference buttstock. I left out the internals of the arm, just making sure the everything fit. Looking good so far. Well, thats it for now. I'm currently working on re-creating the two end pieces of the buttstock and how to attach the folding stock to the main barrel and I'll have to drill out the holes on the resin folding stock. More to come. Brett2 points
-
OK, future Troopers, many of you have asked about how to set snaps for your armor connections, so I thought I'd whip up a little tutorial. Please note that the example that I am making is based on using the "double snap" connection system (see last photo). I highly recommend this method, especially on the back/kidney, kidney/butt, and ab/kidney connections, as it provides an extra layer of confidence. Yes, it costs a bit more to do due to the extra snaps involved, but you can be sure that no matter what happens, you will NEVER have a piece come loose or fall off on a troop. Some builders may have used others, but after countless troops I have experienced no problems. So here we go.... Materials needed: 1. Hammer 2. Soldering (woodburning) iron. (Available at home improvement and craft stores. WELL worth the $10-$12.00 investment). NOTE: The tip of this thing gets CRAZY hot, so be very careful where you set it. Many come with multiple tips, but I suggest the pointed one. 3. Snap setting kit. (Available at all craft stores). Please note that I am showing both sides of the base... more on that later. Convex side Concave side 4. For this purpose, I am using 2 inch (5cm) wide black nylon and 1 inch (2cm) black nylon. The 1 inch strips will be attached directly to your armor. I suggest using E-6000 glue and clamps for this. 5. Snaps, of course! Don't "cheap-out" when buying these. The cheap ones come undone very easily and are garbage. For this tutorial, I am labeling the 4 parts as such: STEP ONE Cut the 2 inch strapping to about 4 inches long** (or as needed) for the particular connection. Cut the 1 inch nylon into 2 inch lengths as seen below. **NOTE: The actual length will depend on there you are using them, i.e. the kidney to posterior plate connections will be shorter. Just be sure there are no gaps, and that the 1 inch wide base pieces are in the correct position before attaching them. Example: The ends will be a bit ragged and will fray. Use the soldering tool to seal them. Again, using the soldering gun, make 4 holes in the 2 inch wide nylon as seen below. Be careful not to make them too large (just larger than the shaft of the snap base) or the snap may eventually pull out. Take one of the 1 inch wide nylon pieces and slide it up under one end of the 2 inch wide piece, even with the end. Once it is lined up, use the soldering iron to make holes in the 1 inch wide piece. This will assure that the holes for the snaps line up correctly. (VERY important)! You should end up with this: Repeat for other side, but be sure not to get the sides mixed up, as one set of holes may be farther apart. Insert one of the male bases into one of the holes in the 2 inch wide piece. Flip it over and place one of the male snaps on the post. Place the base in the concave side of the snap setting kit base. Place the striking rod in the center (straight up and down) and strike it several times firmly with the hammer. The inside shaft should be sufficiently widened to keep the top from coming off. There... your snap is set! NOTE: Do not attempt to do this step on a regular table. You need a hard surface, and a heavy duty workbench or concrete surface works best. Repeat this step for the remaining 3 holes. Now onto the 1 inch wide strips.. Insert one of the female bases into one of the holes, then (as above) place one of the female snaps on top. Place the female snap base into the convex side of the snap setting base. Again, using the striking rod, give it a few good whacks. (Getting the hang of this now)? This is what you should have at this point (only one end shown) CONGRATULATIONS, you have one strap completed! Now that you realize how easy this is and have it down to a science, repeat as necessary. NOTES 1. For added security, the double snap system can be applied to other areas as well, including shoulder bridge attachments and bicep to shoulder bridge, (example below) This is especially good for those who wear packs (HWT, Sandie, Spacetrooper). 2. Snaps set in elastic (as seen above) can pull out over time with repeated use. For added strength I recommend doubling the elastic over before attaching the snaps. 3. Be sure to use the female base on all the straps that will be glued to your armor. The reason being is that the bottoms are flat, insuring a tight seal. 4. Some folks set the female snaps in ABS instead of nylon when gluing them to the armor. There is absolutely nothing wrong with this, it's just a different way of accomplishing the same goal. The reason I use nylon is that I find it conforms to the curved parts of the armor better, and gives a larger surface area for the glue to adhere to. 5. Some use CA (super) glue to attach the 1 inch nylon to their armor. I have found that it can get brittle and break off or even cause warping on ABS due to the heat it puts off while drying. E-6000 needs to be clamped and takes more time, but trust me, it's worth the wait. 6. When gluing the 1 inch nylon to your armor, do NOT keep the 2 inch wide nylon attached with the snaps. Some of the glue may seep through the hole in the snap and glue the whole connection together. Not a good thing. If you should have any questions, just ask here or PM me, and best of luck on your build! Photo 1 (Double snap system.. note clamps). SHOUT OUTS: Gary jr. ( @flashpoint0214 ) The guy who introduced me to the double snap system! Jeremy (Copper) who supplied the nice clean photo of the double snap system.1 point
-
Hey everybody. After 3+ years my Anovos kit is pretty much toast. Time to move up! I put in my order for a jimi R0TK kit last week. I got the full kit with bucket and undersuit. This will be my first time working with fiberglass. Fingers crossed my learning curve is good. Here is my plan so far: I'm ordering boots and gloves from IB (Next wave is Friday!) I've read the threads about their glove quality. Has this improved at all? I can sew so I'm not 100% opposed to fixing reinforcing them, I'm just hoping they fixed the problem I'm planning to do all the trimming, sanding and prep myself. I have a buddy that works for a body shop so, I'm hoping to have the paint professionally done. Has anyone else done this? If so, did you find a paint code/color that worked well? Also, I'm thinking about using the clear 3m material that is used for screen protectors and clear car bras for the areas that are most susceptible to scratches. I'm thinking, chest, under arms and in between the thighs at least. Has anyone else tried this? Finally, I love my Hyperfirm E-11. Since that is not an option for the R1 E-11 what is available now? Thanks for any input. I'm super excited about this build. Guy TK-102681 point
-
Name; Wayne Winfield Username; Waynocerous TK32945 UK Garrison Armour; RWA 1.5mm Helmet; RWA Blaster; Doopydoos and T-Jays finishing kit Height; 5’8” Weight 174lbs Boots; Imperial Boots Belt; RWA Hand plates; ISD latex Neck seal; ISD Holster; ISD EIB request thread; https://www.whitearmor.net/forum/topic/44575-tk32945-requesting-anh-stunt-eib-status-rwa-823/# cdn.com/20190502/8e0245d93ea61a7eff7b2361e99b0368.jpg[/img] Many thanks for yr consideration [emoji4] Sent from my iPhone using Tapatalk1 point
-
The family of Peter Mayhew, with deep love and sadness, regrets to share the news that Peter has passed away. He left us the evening of April 30, 2019 with his family by his side in his North Texas home. Peter was the man behind the mask of Chewbacca in the original Star Wars trilogy, episode 3 of the prequels, and the New Trilogy. He fought his way back from being wheelchair-bound to stand tall and portray Chewbacca once more in Star Wars: The Force Awakens. He also consulted on The Last Jedi in an attempt to teach his successor. He put his heart and soul into the role of Chewbacca and it showed in every frame of the films from his knock kneed running, firing his bowcaster from the hip, his bright blue eyes, down to each subtle movement of his head and mouth. But, to him, the Star Wars family meant so much more to him than a role in a film. The relationships that began then grew into the friends and family that he would love for decades to come. As the films released and became more well-known he had his eyes opened to the possibilities of what he could achieve with his role in the Star Wars universe. For more than 30 years Peter travelled all over the world spending time with his fans and friends. Peter developed lifelong friendships with the other cast members and his fans while on the convention circuit touching the lives of millions. As he realized over the years the impact he could have, he became heavily involved with the 501st legion, Wounded Warriors, Make-a-Wish, and other non-profit organizations. To this end, he established the Peter Mayhew Foundation, supporting everything from individuals and families in crisis situations to food and supplies for children of Venezuela during their recent road to freedom. He not only provided funds but became personally involved with each individual, family and cause he supported. As he grew older he continued to “soldier on” as he put it and was completely in his element around his fans and supporters. He grew great strength from the energy of his family, friends and the fans he knew and loved. He is survived by his wife Angie and three children. His kindness, generosity and care will live on in the Peter Mayhew Foundation with Angie taking the helm as his voice. There will be a memorial service for friends and family held on June 29th and in early December in Los Angeles there will be a memorial for fans set up with his family in attendance, personal effects, and collection at EmpireConLA. For additional information, information on the memorials or to offer condolences email [email protected] Rather than gifts and flowers the family asks that you consider donating to the foundation so that they can continue his efforts to help the community. You can donate at http://petermayhewfoundation.org/make-a-donation.php BUCKETS OFF1 point
-
Thanks Dan...hoping so [emoji51] Sent from my iPhone using Tapatalk1 point
-
Fine set of armor! Goodluck on your EIB application!1 point
-
Thank you! No just need to move my drop boxes. Hopefully that will be easier. Sent from my SM-G955U using Tapatalk1 point
-
You're good. A little high but it shouldn't hold you back from approval. Movie armor1 point
-
The ear screws will sort that1 point
-
Thank you for the assist! I’ll give the hard hat liner a try. It worked well in my old FX bucket. Sent from my iPhone using Tapatalk1 point
-
For me personally I view the originals as meant for just shooting the movie (short periods of wearing the suits). The way they put them together is just not practical for real world wearing and doing multiple troops. Just learned this past troop that you should be prepared to fix almost anything on a moments notice in the field, stuff just separates or breaks due to whatever. The ability to quickly fix it for the troop is what will allow you to have a great time putting smiles on faces.1 point
-
Looks good If it were me I would open up the eyes and ”teeth” a bit more, you have great reference at hand with that RS1 point
-
For me it was / is a good help to browse several building threads within this forum. Just take some time and go through it, you will see, a lot of solutions will be discovered... Gesendet von iPhone mit Tapatalk1 point
-
First of all: Congrats on your BBB day! Yes, each part is at the correct position. For the power cylinders on top, you can choose from aligning them parallel to the main receiver tube, or the magazine. You might want to have a look at the FISD E-11 Blaster Reference. That will answer this question and give you additional inspiration for your build. In the chapter #32 Downloads you will find the whole content as printable PDF.1 point
-
Hi Tino, Yeah, it’s probably not worth all this work as it may never be used, but it’s more of a challenge to overcome. As for the holes, I think so, it will still have the solid sides to support any weight. If not, I could probably line the inside with thin aluminum sheets to act as the supports. Brett Sent from my iPhone using Tapatalk1 point
-
Wow Brett - I am out of words. You definitely went the extra mile on your operational folding stock. Haven't seen anything like this before. Would that resin piece still be solid enough when you replicate the drill holes?1 point
-
I finished prototyping and coding the electronics. I'm using a Arduino Mega 2560 to develop with, but will switch to a Arduino Mini Pro once I am ready size down and install. The blaster will have 3 fire modes, as controlled from the 3 way selector switch from T-Jay's kit. The fire modes are Regular and Stun which are 1 shot per click and Automatic, which is 1 shot every .5 seconds while holding down the trigger. The shot capacity is currently set to 20, and is visualized by the LED bar graph, once all shots are fired, an empty ammo sound is played and can be reloaded which is temporarily controlled by a simple button. Each time the blaster is fired, a vibratory motor will engage to simulate weapon feedback. There is an additional mode controlled by a second button that will switch the blaster from a blaster to a stereo and play music. Currently, only the Imperial March is available, but more can be added in the future. In music mode, the music is stopped and started via the trigger button. Finally, there is a potentiometer that will control the master sound volume from 0 to 25 (The max volume of the audio is 30, but to prevent damage to the smaller speakers, I am capping it at 25). Obviously we won't know the shot count of the blaster from ANH, so I have to use resources like https://starwars.fandom.com/wiki/E-11_blaster_rifle, https://starwars.fandom.com/wiki/E-11_blaster_rifle/Legends or the many incarnations of games this weapon appeared in. 100 shots seems like the average, so I will probably go with that once the blaster is finished. Rate of fire for the blaster is around 300 RPM, which works out to 5 shots a second or 1 shot every .2 seconds. I still have to tweak, clean up and comment the code, so once I do that, and update the shot count and rate of fire, I will commit the code to Github and make it available to anyone. And here is the demo. More to come. Brett1 point
-
RWA kit ?1 point
-
Yep, read it years ago, i'll try to find it.1 point
-
Ok. Progress. Frown is cut out and rough filed. I will clean up eyes and frown in the daylight tomorrow with some 400 grit paper. Then I can install lenses and frown mesh. I’ve just primed ab buttons. Then can paint buttons and get them installed on ab plate. I’ve also made a decision on how I am going to harness my torso pieces. That will be installed tomorrow. Tune in for post with pics. Sent from my iPhone using Tapatalk1 point
-
New left and right Sent from my SM-G955U using Tapatalk1 point
-
Thank you Sven! Hot water bath worked perfectly. I put shins in the water with painters tape. Tape did all the work! I trimmed my sniper knee plate maybe slightly too much but I think this is okay.1 point
-
Mind sharing it?1 point
-
Yeah just use bolts. Much easier/safer. AP's kits actually come with bolts for that part.1 point
-
The box arrived yesterday! Everything is in great shape. No cracks anywhere. I took some photos for my ANH brother's showing some of the differences. I'm meeting with my painter friend tonight to go over prep procedures. I'm super excited to get going.
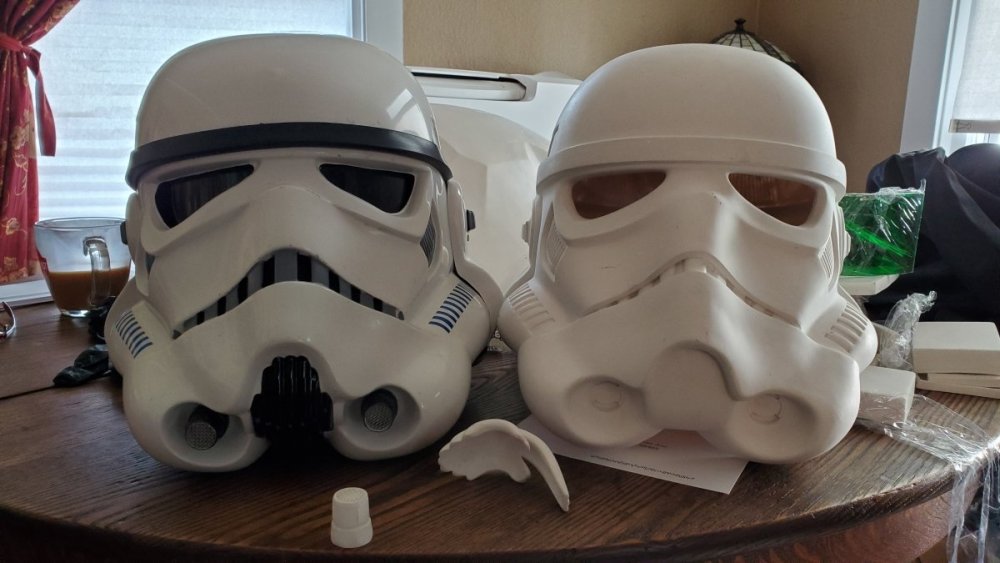 1 point
 -
If you are nervous to use rivets, just use a screw and nut. No one will see it as the ears will cover it, and if you need to adjust it's easy. Just get a short screw so you don't scrape your head putting it on/off.1 point
-
Just an update on my 2nd attempt, remember how my 1st attempt was just hilarious Sent from my SM-G965U using Tapatalk1 point