Leaderboard


Popular Content
Showing content with the highest reputation on 05/01/2019 in all areas
-
Arrived in the mail today!5 points
-
Sent from my iPhone using Tapatalk
 3 points
 -
Very nice, here's mine3 points
-
Hi all, As many of you may be aware, I am in the process of moving to South Carolina. Unfortunately, a series of events have caused me to be incommunicado for the last 6 days due to no internet access, so my apologies to those who have PM'd or emailed me in that time. I will get back to you, I promise, and I appreciate your patience! We leave Georgia this morning and will be in our new home by this afternoon , but we will need to get settled for a bit. I will have full internet access (AT LAST) and will be back in business by this time tomorrow and will begin my replies. Again, thanks for bearing with me. Moving is hell, but not being able to go online or check email is worse.2 points
-
So this update took longer than I expected. It was a quite a bit of trial and error trying to build the functioning part of the folding stock, and I still haven't finished. I picked up some parts of a real folding stock so I can take measurements and understand how it works. Here are my blueprints with all the measurements. I first tried to create a mold of the parts using Blue Stuff (which is really cool moldable plastic) and then pour a liquid resin in, however, that did not lead to the desired result. I couldn't get the accurate enough detail, it wasn't until later I realized I wasn't heating the Blue Stuff enough. Since that didn't worked, I used on to using Brown Stuff (similar to Green Stuff, but with better adhesion to metal). So I formed rough shapes of the locking pin and inner rod. I used my belt sander to first square of the edges, then as it moved, I rotated the peice to round it off. Once I had the exact diameter and it fit in the rod, I moved on to carving out the notch. For the locking pin, I used my wax files to carve the necessary shape. Here is the final result compared with the original. Once I had the locking pin done, I could use my drill press to drill the hole into the inner rod. I made the hole a little bigger than I needed so I can install a support rod that the locking pin would sit in. Next I moved on to forming the lever piece. I scribed the shape based off the measurements, then used some powered chalk to make the lines more visible. My flex shaft has an attachment to turn it into a mini router table, so I used it to make a rough shape of the piece, then finished with my files. Once these pieces were done, I moved onto the main rod. I cut the rod to size, then used Brown Stuff to mold a rough shape of the ends onto it. A little trip over to the disc sander and I had the ends squared off. Once squared, I could start drilling the holes for the rods and the locking pin. I picked up a box a springs from the hardware store and was able to find 2 springs that fit, however, I went with the longer tapered one as the short one has too much resistance. With that, I had all the pieces I needed to assemble the arm. But alas, my plan was not successful, during a dry fit run, the bottom of the end broke off. I'm having some issues with photobucket at the moment, so I'll break this update into smaller posts.2 points
-
But what screws do we have to use to secure it? Sent from my iPhone using Tapatalk2 points
-
My armour has arrived!2 points
-
I'm going to post in the CRL discussion that this should be a new requirement for Centurion2 points
-
OK, future Troopers, many of you have asked about how to set snaps for your armor connections, so I thought I'd whip up a little tutorial. Please note that the example that I am making is based on using the "double snap" connection system (see last photo). I highly recommend this method, especially on the back/kidney, kidney/butt, and ab/kidney connections, as it provides an extra layer of confidence. Yes, it costs a bit more to do due to the extra snaps involved, but you can be sure that no matter what happens, you will NEVER have a piece come loose or fall off on a troop. Some builders may have used others, but after countless troops I have experienced no problems. So here we go.... Materials needed: 1. Hammer 2. Soldering (woodburning) iron. (Available at home improvement and craft stores. WELL worth the $10-$12.00 investment). NOTE: The tip of this thing gets CRAZY hot, so be very careful where you set it. Many come with multiple tips, but I suggest the pointed one. 3. Snap setting kit. (Available at all craft stores). Please note that I am showing both sides of the base... more on that later. Convex side Concave side 4. For this purpose, I am using 2 inch (5cm) wide black nylon and 1 inch (2cm) black nylon. The 1 inch strips will be attached directly to your armor. I suggest using E-6000 glue and clamps for this. 5. Snaps, of course! Don't "cheap-out" when buying these. The cheap ones come undone very easily and are garbage. For this tutorial, I am labeling the 4 parts as such: STEP ONE Cut the 2 inch strapping to about 4 inches long** (or as needed) for the particular connection. Cut the 1 inch nylon into 2 inch lengths as seen below. **NOTE: The actual length will depend on there you are using them, i.e. the kidney to posterior plate connections will be shorter. Just be sure there are no gaps, and that the 1 inch wide base pieces are in the correct position before attaching them. Example: The ends will be a bit ragged and will fray. Use the soldering tool to seal them. Again, using the soldering gun, make 4 holes in the 2 inch wide nylon as seen below. Be careful not to make them too large (just larger than the shaft of the snap base) or the snap may eventually pull out. Take one of the 1 inch wide nylon pieces and slide it up under one end of the 2 inch wide piece, even with the end. Once it is lined up, use the soldering iron to make holes in the 1 inch wide piece. This will assure that the holes for the snaps line up correctly. (VERY important)! You should end up with this: Repeat for other side, but be sure not to get the sides mixed up, as one set of holes may be farther apart. Insert one of the male bases into one of the holes in the 2 inch wide piece. Flip it over and place one of the male snaps on the post. Place the base in the concave side of the snap setting kit base. Place the striking rod in the center (straight up and down) and strike it several times firmly with the hammer. The inside shaft should be sufficiently widened to keep the top from coming off. There... your snap is set! NOTE: Do not attempt to do this step on a regular table. You need a hard surface, and a heavy duty workbench or concrete surface works best. Repeat this step for the remaining 3 holes. Now onto the 1 inch wide strips.. Insert one of the female bases into one of the holes, then (as above) place one of the female snaps on top. Place the female snap base into the convex side of the snap setting base. Again, using the striking rod, give it a few good whacks. (Getting the hang of this now)? This is what you should have at this point (only one end shown) CONGRATULATIONS, you have one strap completed! Now that you realize how easy this is and have it down to a science, repeat as necessary. NOTES 1. For added security, the double snap system can be applied to other areas as well, including shoulder bridge attachments and bicep to shoulder bridge, (example below) This is especially good for those who wear packs (HWT, Sandie, Spacetrooper). 2. Snaps set in elastic (as seen above) can pull out over time with repeated use. For added strength I recommend doubling the elastic over before attaching the snaps. 3. Be sure to use the female base on all the straps that will be glued to your armor. The reason being is that the bottoms are flat, insuring a tight seal. 4. Some folks set the female snaps in ABS instead of nylon when gluing them to the armor. There is absolutely nothing wrong with this, it's just a different way of accomplishing the same goal. The reason I use nylon is that I find it conforms to the curved parts of the armor better, and gives a larger surface area for the glue to adhere to. 5. Some use CA (super) glue to attach the 1 inch nylon to their armor. I have found that it can get brittle and break off or even cause warping on ABS due to the heat it puts off while drying. E-6000 needs to be clamped and takes more time, but trust me, it's worth the wait. 6. When gluing the 1 inch nylon to your armor, do NOT keep the 2 inch wide nylon attached with the snaps. Some of the glue may seep through the hole in the snap and glue the whole connection together. Not a good thing. If you should have any questions, just ask here or PM me, and best of luck on your build! Photo 1 (Double snap system.. note clamps). SHOUT OUTS: Gary jr. ( @flashpoint0214 ) The guy who introduced me to the double snap system! Jeremy (Copper) who supplied the nice clean photo of the double snap system.1 point
-
Great work1 point
-
The bucket looks fantastic! Great job!1 point
-
Looks great Pam! Very detailed rendering!1 point
-
Hopefully i can get more done this bank holiday weekend as I got my BBB today!1 point
-
That will work. Great job1 point
-
Looks good so far , do you have any photos from the side?1 point
-
Interesting - how do you know?1 point
-
Walts trooper Factory (WTF) just posted on their facebook group that they now offer a larger chest plate1 point
-
Request sent. Much thanks!1 point
-
Yeah just use bolts. Much easier/safer. AP's kits actually come with bolts for that part.1 point
-
One of the widest. RT-Mod also1 point
-
Baking soda is a good easy abrasive in place of automotive polishes. I have also had good luck with pumice-based soaps like Gojit or Fast Orange. https://www.homedepot.com/p/Fast-Orange-0-5-gal-64-oz-Fast-Orange-25217/2048025151 point
-
oh yeah i do and i plan to1 point
-
Thank you Pretzel. You been extremely helpful.1 point
-
Oh! Good to know! I love carrying a BFG while trooping. You know the saying... Speak softly and carry a BFG. More lid work today. I decided to remove some additional thickness off the right ear even though it was fitting fairly well. I was able to reduce the small gap in the front as well. I would prefer to get the front half of the curved part of the ears thinner, but after looking at things a while, I don't want to risk mucking things up. They're fine as they are. Worked on the left ear as well. Worked really hard to get the screws lined up with the angles of the traps. This was a super P.I.T.A.! Which is why I don't want to try to change the thickness of the ears at this point. It's all good enough! Once I was done with the ears, on went the frown. A bit of gloss grey, some clean up with thinner, and I'm calling it a day for now. And if anyone sees something "off", please feel free to let me know!1 point
-
Just hang in there, Joseph is in the middle of a move and he will have you sorted as soon as he can1 point
-
The box arrived yesterday! Everything is in great shape. No cracks anywhere. I took some photos for my ANH brother's showing some of the differences. I'm meeting with my painter friend tonight to go over prep procedures. I'm super excited to get going.
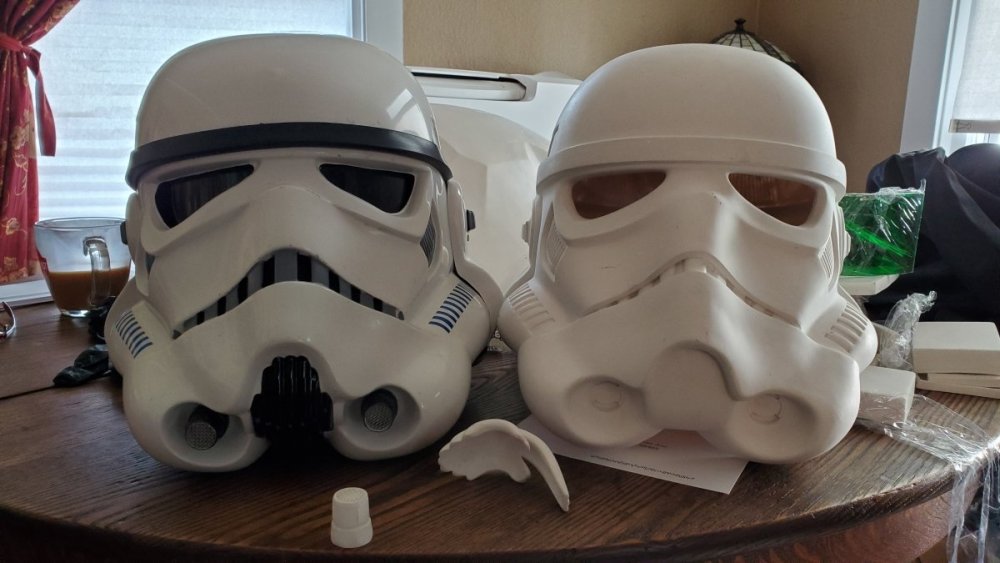 1 point
 -
If you are nervous to use rivets, just use a screw and nut. No one will see it as the ears will cover it, and if you need to adjust it's easy. Just get a short screw so you don't scrape your head putting it on/off.1 point
-
Wow.... Haven't seen that. But I think pouring water over it was the problem. I put the whole shin in the, in my case boiling water for about 20 seconds. While it was in the water it was taped with painters tape. After that I took it out and twisted it gently against the current direction. While cooling it down with lukewarm water in the shower. Gesendet von meinem ONEPLUS A6013 mit Tapatalk1 point
-
Borrowed a giant stock pot from a friend. Worked perfectly for the hot water bath on the thighs1 point
-
You can always remove more as needed. Much harder to put back on.1 point
-
I'll be picking up a shiny new Anovos OT TK kit soon from a local Wampa Clan merc, and I decided to build it as one of these Force Unleashed troopers. I have a pretty good handle on how TFU and ROTJ troopers are put together, so this one should be a walk in the park. Kashyyyk Trooper: Phase III Stormtrooper: Both armor sets are identical, so I will have two costumes from one armor kit and two helmets. A Hasbro Black Series helmet will be used for the KTK. For the $26 I spent on it (due to a non-working speaker which I was gonna tear out anyway), it will serve as a good base and a fun project. I filled in the tube stripes, battery compartment, and speaker holes with ABS slurry. I also started extending the bottom of the neck opening with some plastic "for sale" signs and more thick ABS slurry. It's kind of rough right now, but it'll look flawless and seamless once sanded down. The vocoder is also pretty tiny on this helmet, so I chopped off the bottom part of it and replaced the void with... you guessed it -- ABS slurry. Going to put down a few more coats of that before I sand it smooth. The frown is also gone. Filled in with slurry almost to the point where you can't even tell it was there. It's completely different on this helmet so I'm going to carve out a new one. Just a couple progress shots to show what general direction this helmet is headed in. I will need to carve out the sunk-in details on the back of the helmet and work material back in to get that 3D look - there, and on the faceplate where some holes are already carved out. The black marking under the lens will also have to be sunk in a little bit and painted 1138 grey. Once assembled back together, the seam between the cap and the back will be filled in and the whole helmet will be sprayed a khaki color and masked off for paint chips.1 point