Leaderboard


Popular Content
Showing content with the highest reputation on 07/02/2018 in all areas
-
Looking good mate! No it's time to change that avatar picture! [emoji14] Good job! Sent from my LG-M470 using Tapatalk4 points
-
Bulldog Props Resin 1943 M38 Telescope Review I contacted Brian Hall owner of Bulldog Props in Japan through his Bulldog Props Facebook page on May 9th 2018. I was familiar with his products from his post here in FISD and on RPF. I knew Brian made resin cast versions of the 1942 M38 scopes used on E-11s in the OT; however, these were not just a cast of the outside of the scope (like DoopyDoo’s). These were a complete reconstruction of the entire scope in resin parts. The scope can be completely assembled and disassembled and the price is less than $50.00 shipped. Anyway, I contacted Brian on May 9th inquiring about him making a 1943 version like the ones used in Rogue One. In our conversation Brian pointed out that they used the 1943 resin scope made by DoopyDoos for the film. I found his honesty and candor refreshing and asked him if he could make a version of his 1942 into a 1943. He advised me that he could not alter the 1942 model but he did have a 1943 scope and would be happy to attempt to cast it. Casting these small parts is very tricky given the level of detail in the threads and how the parts fit together. Timeline: 05/09/18 Contacted Brian with request 05/12/18 Disassembly began on the original scope 05/27/18 Mold Making 06/05/18 Molding 06/08/18 Mold Complete 06/09/18 First Casting 06/17/18 Completed and shipped 06/25/18 Received and reviewed After receiving the package sooner than I had expected, I examined it and determined the packaging was well protected and professional. Once I removed the outer wrapping and bubble wrap I expected a simple box with the scope inside wrapped in bubble wrap since this was the first cast and not a production item. I was surprised with the presentation. I recalled Brian testing out ideas on how to package the 1942s and M19s on RPF and I thought his advertisement sheets and packaging were first rate. Well, not only did I get the scope which looks awesome but also two sets of instructions on different types of paper. These were not an extra set of instructions from a 1942 scope but a 1943 specific instruction sheet. Apparently Brian is all set to produce and sell these 1943 scopes. All the small parts were packaged and wrapped in protection then neatly secured in the shipping box under the scope. Brian put some serious thought into how he would package these scopes and parts. Once I unwrapped everything I discovered just how detailed the scope was and how much time and work Brian put into this. All the parts are a resin plastic that is slightly flexible and less rigidly shatterable if that makes any sense? In other words, I do not think it would shatter if dropped and you are more likely to scratch and dent it than you are to crack it. For anyone who 3D prints, its more like ABS than it is PLA. This is also a pleasant surprise for me because I was concerned just how fragile this scope would be to drops and trooping. All my concerns are now set aside for basic trooping. Anyway, the lenses are crystal clear and two of them are convexed on one side. The screws are all machine thread and look to be near perfect matches for the original screws in the original scope. So what to expect from a resin cast scope. The small thin parts (like the locking rings) are brittle and cannot take a lot of force. They don’t just break like a rigid plastic would, instead the plastic will deform and peel away like nylon would if you forced it with a tool. Once Brian finished making the first scope, Brian notified me that one small ring not screw into one of the lens subassemblies properly but that it would most likely not be needed. Brian even included a few extra rings in case I damaged some in the assembly process. This is obviously one area where actual metal parts win out but it was not the goal of this product and I did not want a metal version of the scope. Regardless, this is the first version of this product and I do not know if Brian will make an attempt to address this issue. Even if he does not, I am very happy with the results. Next, due to the molding and casting process, most of the screw holes need to be drilled out. For this you will need some very small bits (which you can get at harbor freight or in Dremel kits). Brian notes this in the instruction sheet and suggests using a bit that is slightly smaller than the screw. The only difficult part in drilling these is making sure they line up properly with the parts. There are a few screws that pass through two or more parts and must be aligned properly. Once you get one drilled, the rest are fairly simple. Lastly, the prism cell is a cast part and does not have any reflectivity, so actually looking through the scope is not possible unless I alter the prism. This is because the objective lens is not aligned with the eye piece. I will toy around with some mirror vinyl when I have time and see if this works but to be honest I wanted this scope to add a reticle and LEDs and possibly the small micro display made by Trooper Amps. Looking through the scope was never my intention. So far the only issues I have found are the two things that Brian told me about before I agreed to purchase the scope. There is a small bubble defect in the Eyepiece Mounting Plate which is an internal part and will not be seen and does not affect the scope in any way. The other issue is the Ocular Lens Retaining Ring not screwing in properly. So to address the Ocular lens subassembly I put a piece of aluminum tube on my lathe and machined it to fit inside the subassembly. This is necessary because the actual lens from the original scope is thicker than the one furnished by Brian. Once I milled the sleeve (yellow arrow), I cut it to fit inside the subassembly and then screwed in the retaining ring. It will only screw in three or four threads but that is all that is needed to hold the sleeve and lens in place. After that I finished assembly and I am very pleased with the results. So I wanted to also compare this scope to other options available. For a 1943 scope like the ones used in Rogue One and Solo, there are only three other options that I am aware of: 1. DoopyDoos resin cast scope which is only the outside of the scope. I believe it is solid and most of the builds I have seen, people have drilled out the scope to add lenses. It sells for 9.99 British Pounds or $13.08. This is not including shipping to the US. Also keep in mind that it would still need to be sanded before painting. 2. An actual 1943 M38 Sherman Tank Sight Scope if you can find one for sale goes for about $185.00. 3. A 3D print of the scope, I found one version on Shapeways for $32.00 and I do not know if that includes shipping. With some time I could probably find a free version of the model but like this paid version, it is just the outside body like the DoopyDoos; however, it is hollow and modifying it would be less work in my opinion than the DoopyDoos. Also keep in mind that it would still need to be sanded before painting. The other available M38 scopes out there are 1942 versions like the ones used in the OT. There are some really nice options for the 1942 versions made in brass and aluminum ranging from $169.99 for the brass version, $105.00 for a hybrid version of aluminum and brass parts, or 79.00 for the all-aluminum version. All of these are completely assemble and disassemble capable; however, I have not found a 1943 version of these and there are enough differences that for a Rogue One or Solo build, you really need the 1943 version. Overall, I am very impressed and pleased with this product. Personally I feel for the price and the detail, you cannot beat this option. Last month I asked Brian to make something new. Something he was not already making and had no way of knowing if it would sell. This scope was a special request to fit my needs and Brian achieved this. I appreciate his willingness and professionalism. I recommend this product and doing business with Bulldog Props. I have been in contact with Brian and we have discussed many of the things I have mentioned here. I also suggested that he make a video and post it showing the assembly for those people who are not as mechanically inclined as he or I am. Brian has been very receptive and open in our conversations.2 points
-
Jeff, I am speechless. That review is truly amazing and I cannot thank you enough. Thank you for spending the time to put together the most detailed and helpful review I have ever read. Your feedback and observations are epic and deserve a true trooper high five for that. I am so glad you reached out to me for the scope and your request got me back into making scopes again with enthusiasm. Nothing pleases me more than to hear your satisfaction with what you got and paid for. I hope to make good on your suggestions as they are great ideas that will serve others well when they get a kit. Such a great documented review with all the pics too. Love seeing the finished product as well. I made so many of the kits in pieces but rarely find time to build them myself so its nice to see them ready to go on a blaster. Thank you a billion!!!!! This review will be linked from my BulldogProps page. Super helpful. Cheers Jeff!!!!!2 points
-
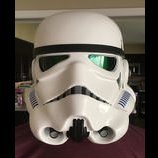
Slow but steady progress. Finished the paint on my helmet today: Obviously I need to go back and clean up the edges with thinner on the tube stripes, but I'm pleased with how it turned out. Trooperbay's stencils are quite good. I had a little trouble curving it to fit the shape of the helmet, but after cutting it in a few places along the bottom edge I got it to stick down more-or-less flat. You can see I also added a bit of gray for the 5th tooth on each side. I don't know if that was necessary but I noticed a number of AP ANH Stunt builders applying for Centurion with that part painted. I figure it can't hurt. I need to touch that up with some thinner also but it's not bad. I touched up the traps and tears since my last post too. Fiddly work, but having been a miniature painter for decades it wasn't very difficult. I also got the ab plates painted: I just free handed them. Hopefully they are good enough. Held at arms length they look fine to me. I don't think anyone is going to look at them as close as the above pic allows. : ) Oh, yeah! Lest I forget, you may notice I also did a little dry-brush with some white on the hovi mic tips. You can see it on the first pic if you zoom in. So, again, no questions really. Just checking in with my progress. Comments are welcome and encouraged. If you see any errors please don't hesitate to say so. I'm aiming for Centurion status so any helpful suggestions are most welcome.2 points
-
I've been asked by more than one Imperial Cadet recently if I would make a post that details the steps involved in becoming a Stormtrooper. Here it is, and here are the steps: 1. Find the First Imperial Stormtrooper Detachment website/forums at www.whitearmor.net. You are reading this so, CONGRATULATIONS! You are well on your way! 2. Begin researching the available armor kits in the Getting Started section so that you can make an informed purchase, research is your best friend throughout this process: http://www.whitearmor.net/forum/forum/38-getting-started-read-this-first/ 3. Contact your chosen armor vendor and begin waiting patiently for Big Brown Box Day. 4. While you're waiting, begin collecting your accessories for the build, and additionally required items like an E-11, boots, canvas belt, tools, snaps, etc. There is plenty more, but remember step #2. 5. Big Brown Box Day! (take pictures, this will be a day long remembered!) 6. Start your build thread at FISD here: http://www.whitearmor.net/forum/forum/31-costuming-and-builds-501st/. Take pictures, take a deep breath, measure twice, cut once, ask questions before you do something you'll be unhappy about later, all mistakes (within reason) are fixable. 7. Complete the build of your High Quality Imperial Stormtrooper costume, and rejoice. It's about to get technical. 8. Ensure that you are 18 years old, and visit the 501st Legion website's Join Us page: http://www.501st.com/members/join_how.php 9. You will need to make a decision about what you'd like your TKID to be. You'll have to list five choices in your order of preference. Available numbers can be found here: http://www.501st.com/members/search_avail_ids.php 10. Fill out and submit the application found here: http://www.501st.com/members/join_form.php 11. Take your submission pictures and submit them to your Garrison Membership Liaison (GML). A list of the Garrisons can be found here: http://www.501st.com/members/displayUnits.phpIf you don't know who your GML is/or how to contact him or her, this list will assist you with that process. Photo's required: Full length, Front, Side, Back, Side, Action and Helmet off. 12. After you submit your pictures to the GML, he or she will contact you (be patient) to let you know if your costume is accepted, if you need to make alterations, or whether you need to re-take any photos. 13. If you need to make alterations or re-take pictures, submit them in the same manner in which you submitted the first ones. 14. When your costume is accepted by the GML, he or she will forward your pictures to the Legion Membership Office for approval and assignment of your TKID. When your costume is accepted, all you can do is wait for an email from the 501st Legion to arrive, confirming your TKID assignment. Congratulations, and welcome to the 501st Legion, and again, be patient. 15. When you have received your assigned TKID, you have one more important step to complete, and that is to request Legion Access here at the FISD. You do that using this thread: http://www.whitearmor.net/forum/topic/16-501st-trooper-status-requests-include-link-to-your-501st-profile-in-your-request/In your request post, include your newly assigned TKID, and a link to your Legion profile page.1 point
-
Pass!........................ ..NEXT!! Great job! Definitely a pass no problem. When you go for EIB Joseph will say tuck that belt a little higher and get them drop boxes out to edge of plastic belt. I won't say it! Well done Future Trooper!1 point
-
Flipping great build thread dude, Jim's V5 looks great! I'd recommend you to figure out fan/mic/padding/electronics placements before you plastidip the inside of the helmet, then put those velcro patches in and mask them before spraying. This is so the velcro will stick well to the material instead of the plastidip which can be peeled off. Although i've heard many just velcroing straight on to plastidip and having no problems, it can be something you can consider doing Thigh knee-side cut looks good, most of us do it anyway (and to the back). You should also consider trimming the thigh shape (towards the cod) to make it more accurate and also more comfortable. Jim's thighs seem to be very "symmetrical", if that makes sense. I think ANOVOS gets it pretty bang on. You won't get 100% exactly like the screen used with Jim's kit though. I should've cut more on mine since my thighs rub against my cod leaving nasty marks Also are you planning to plastidip the entire insides of the armor? If it is because of the itching you only have to sand the insides with 120grit and 220grit then wash. That's what I did and I have had exactly zero itching since.1 point
-
I've found out it is only the left shin that is a problem, right one has plenty of space. Without the extra material overlap from dry-fitting, another hot water bath, and classic TK boots (they seem narrower than FOTK ones) I think canon measurements will work fine. So i'm gonna go for that and hopefully it works out Trimming/fitting continues while I at the same time try to figure out where to source different stuff. Right now scratching my head a bit trying to find some pipe for my TD, in the right size and color1 point
-
If you take a look at the display photos that would be a yes. Here a link to the FOTK gallery.1 point
-
Ukswrath, sanding has got to be the most monotonous part of this build. I had a lot of sanding to do when I built my Mandalorian armor but nowhere near this amount. Mostly because the finish of this armor is required to be sleek and shiny. Thumpy, thank you for the suggestion. I will look into the Sky Trooper and see what all is involved. After all, you guys know that once you build one costume, that is never the end, rather, only the beginning of your collection. Brian (Bulldog Props), you are most welcome. You deserve recognition for the awesome product you make. It will most likely be sometime in early 2019 before I get around to building the new Rogue One E-11 and adding the 1943 M38. I still need to source the Hengstler and power cells but I am slowly collecting all the necessary parts. I will post the build here and/or in the Rogue One E-11 thread. Updates, Well I did sand all the remaining parts but the once-over was not enough for all the parts. The thighs are giving me a real hard time. Here they are sanded and at first glance, they look good but a closer inspection reveals numerous issues. Because of all the issues I found with them, I re-coated them with primer and now you can clearly see the problem. While I waited for the primer to cure, I finished sanding the remaining parts. Here is what is ready for masking and painting. So the parts remaining are the two thigh pieces and the thermal detonator. I glazed the larger pinholes in the thighs and will sand them again. As you can see in this picture (yellow arrow) there are large areas on both sides of the thighs that are look very rough. The feel smooth but the primer brings them out. I am hoping that the next sanding will smooth some of this out and then the three layers of automotive primer will bring it all together when I actually start painting. I cannot sand them any finer than 220 grit or the primer and paint will not adhere properly. The thermal detonator is a completely different issue. There is a seam that runs along it lengthwise where Jim must have made it in two parts and sealed it together. The seam is very thin and I have sanded through it in a few areas. I have backed the inside of the seam with PC-7 and then glazed the outside but it need to set for 24 hours before I can sand on it. I may be obsessing a bit and seeing issues that will be covered by primer and paint but I would hate to paint everything and then realize I needed to redo these parts. So, my garrison has a racing shirt run that ends on July 22nd. I really wanted to finish this build in time to get approved and order the shirt but I do not think I will make the cut off. I also do not want to rush anything and end up with a less than centurion level set of armor. Adding to this time constraint is the fact that I will lose a whole week in July due to work. I am not a happy camper but I will persevere. I plan on finishing the sanding tonight and clean up my workshop and begin construction on the paint booth. I will need to get creative on how I will hang everything inside the booth but I have a few ideas on that front. The saga continues… Thanks for the interest.1 point
-
Great, thanks! I'm not approved yet and I havent got lots of fotos, but here's a rather nice picture of me (TM, right) and my girlfriend (RS left) taken at the made in japan con yesterday I'll send some more soon!
 1 point
 -
Great work! You should not have any problems reshaping them if you go a little bit a time! Sent from my LG-M470 using Tapatalk1 point
-
Looking good Daniel1 point
-
Nice work Kyle1 point
-
Drilled a hole in the back of the Hyperfirm E-11 for the D-ring Than inserted one side of the link in and then got the other side in and slide it back There is a slight bend in the back due to the ring pushing this. Is that an issue? I would imagine we would want it as straight as possible.1 point
-
Finally a visual update this time, and no new questions so far I went over the helmet again to fit the lens more properly and also to correct the way I painted the vocoder, thanks to @justjoseph63 for pointing that out again! And also yesterday I cut all the cover strips which was quite a tough work. It might have just been my lack of appropriate tools, but I ended up marking the widths of the strips and then went over the ABS, first with a needle, then with a razor knife. This worked pretty well but I still slipped a couple of times. Well whatever - just gotta use the other side of the strip for the front then This was before : And this is after: And also, yesterday the first cover strip was glued: Just a small step for the armor, but a big step for me Next update will probably follow on Friday or Saturday, don't go anywhere Freddy1 point
-
Lovely work all round. [emoji1303][emoji1]1 point
-
Submission Photos: I'm very happy with how it all turned out. As you can see in the rear photo, the belt still rides up a little bit and I am working on a fix for that. That didn't stop me from getting approved however. I've been on active duty for the First Order since May 14th! A BIG HUGE GINORMOUS thank you to all who helped me along the way! I hope this thread will help future builders in some way. Hit me up in this thread or via PM with any questions. I have added a table of contents to the OP for easier navigation and still have to finish my Executioner pieces. So I'm not done yet! I'll update with progress on those at a later date after I finish them. For now I am enjoying the fruits of my labor and resting for a bit!1 point
-
Alright, Today's update. Was busy with the legs this weekend and came out successful in resizing them! I used the Sintra I purchased and heated it up in the oven. I did this because I found out that using hot water melts it too much too fast so my first attempt turned the Sintra into a glob of plastic. So I removed the racks from my oven and turned it on to 450 degrees. After this I held each slice of Sintra under the heating coils for a minute or so. Enough to see it start bending, but not to the point that it melted. This allowed me to place it along the back of my thighs and calves to shape with the armor. Once shaped I measured (with my wife's help) the distance between the top of my thighs and bottom of my thighs, the opening of the armor to know what to mark off for gluing and what would be in the opening. After this I let the Sintra cool and then sanded it down with 100 grit sandpaper (to roughen it up for glue and holding the Apoxie Sculpt) After cooling and marking where to glue I took some Loctite (well different brand same material) Epoxy Glue and then spread that over the glue area. I used clamps on the ends to hold in place and magnets in between to press the pieces together for maximum effectiveness. I let this glue set and harden overnight. Ended up going to the In-law's place this weekend, but had to keep working on this. So I took the legs with me. I worked on the Apoxie Sculpt part up there. Simple enough. Follow the instructions on the containers and then just fill in the openings for seamless connection. / Want a general video? Here you go! https://i.imgur.com/NJWBG9P.mp4 Let all the parts sit for 24 hours and then sanded using 100 grit on my Dremel tool. Now take note that the dremel is super crazy and can be easily uncontrollable and you could knick other areas and leave nasty scuffs. I learned this with the visor area of my helmet and had to Apoxie Sculpt spots as well. But thankfully I learned and this time I sanded down most all the bumps and areas so now I will just need to manauly sand the entire pieces with 100 grit, 220 grit and 320 grit. I today spent time doing that and then filling in the areas of most flex and risk with fiberglass. For those who haven't worked with fiberglass, I hadn't either lol. But it was simple enough. Mix the fiberglass resin with some drops of the hardener (see the container instructions) and then spread over the area you will be using it on. After that dab your pre-cut strips of fiberglass cloth over the resin. Use a dabbing motion with the brush as that will push air pockets out and soak the fiberglass. If you need you can dip and add more resin where needed. Finally now that this is done I was with a more solid yoke and was able to strengthen the aerator port on the helmet as well. Finally I sanded down the areas needing it on the helmet, the apoxie sculpt parts. Final work: Washing off the residue of sanding: When I returned home I figured what the heck. I should get the tee nuts in place for the visor so I can soon get the Plastidip going. I had to use my Dremel cutting bit to cut the side of one of them off to fit above where the visor will sit. Using more Epoxie glue I placed them in the best locations i could find and then held the side ones on for the night with magnets: Tomorrow I should be able to find mark on the visor where to screw, drill those holes, test fit, and then get ready to plastidip the helmet and upper body parts. Of course I'm going to have to fit magnets to the ab plate for the TD and then to the chest plate. and test fit things prior to plastidip on those parts. Big update. but it was also a big weekend to knock out some of the craziest parts of the build. So glad I finished the shimming of the leg pieces as that was the scariest part for me never having done this before. They fit perfect now and I'm much relieved that's past me.1 point
-
Jeff, I am speechless. That review is truly amazing and I cannot thank you enough. Thank you for spending the time to put together the most detailed and helpful review I have ever read. Your feedback and observations are epic and deserve a true trooper high five for that. I am so glad you reached out to me for the scope and your request got me back into making scopes again with enthusiasm. Nothing pleases me more than to hear your satisfaction with what you got and paid for. I hope to make good on your suggestions as they are great ideas that will serve others well when they get a kit. Such a great documented review with all the pics too. Love seeing the finished product as well. I made so many of the kits in pieces but rarely find time to build them myself so its nice to see them ready to go on a blaster. Thank you a billion!!!!! Your armor build is inspiring as well. I really want to go R1 now.1 point
-
Looking nice Darrell, great job on the free hand paint work Note: remove ALL the return edge on the vertical ab button plate. Edit: 4 button plate to be exact1 point
-
What else do you do for your 5 year old's Star Wars Lego Birthday Party . . . Pool Noodle Light Sabers !!!!1 point
-
Very clean lines, nice work1 point
-
Good choice, and hold off on the gluing. As easy as they to scratch (being a high point on the armor when lying down) the Ab button plates are the very last thing to install, IMHO. Also, make sure they are trimmed correctly before installing. Can't tell you how many applicants are asked to correct the size. Keep up the good work.1 point
-
Paul had the best answer to this, Jonah: Matt Gauthier (TE) "Matt was banned from this board for repeated flame wars, but even worse for repeatedly taking our members money and not delivering. He has at least twice documented "sold his molds", once to a 501st member, and then recast the sold molds to make new product. You can send him money if you want to take a large risk of not getting anything, and of supporting someone who has screwed numerous 501st members by lying to them. That said, you are certainly free to send them money, however its buyer beware and you can't say you weren't warned..."1 point
-
PM sent1 point
-
Decided to paint the inside of the helmet flat black. It was simple enough to mask everything off and spray the inside with some Krylon plastic paint. I may touch up around the eyes and teeth with some Humbrol black satin and a brush, but that would be more for my sense of perfectionism than anything else. Next I need to reassemble the helmet, paint the tube stripes, reinstall the mesh and lenses, and reinstall the mic tips. I think I'm going to buy one of those helmet padding kits from Amazon to get the fit correct. I'll deal with fans and electronics further down the road. It's possible the helmet could be (more-or-less) finished by this weekend! (I've a feeling "more-or-less finished" is going to be a general descriptor for this kit even when it's "done"!) So, no questions today; just sharing my progress. Thanks all for the comments and likes. I appreciate this community! It's helpful to have the encouragement and support.1 point
-
Blaster coming along nicely1 point
-
Thank you for this!1 point
-
Haha, yeah, you wouldn't be the first one to think it was a rather ambitious decision to go with Phasma as my first build, but to be completely honest with you, I'm not feeling nearly as intimidated by it as I thought I would. At the moment, anyway. Might be a different story once I actually get my BBB full of armor parts, lol. Still, I'm looking forward to it! And I've always got people here and on the Captain Phasma Costumers FB group to help steer me in the right direction1 point
-
Hi Ted I've been doing kits for about 9 months now ,also parts to upgrade other makers that have certain parts missing . Only thing I've still to do is try to send a complete kit overseas as there may be trouble with customs allowing replica weapons. If you want to have a look at what's involved in putting one together ,there's a basic assembly video on YouTube under , Tigtec Dlt19 assembly,1 point