Leaderboard


Popular Content
Showing content with the highest reputation on 06/25/2018 in Posts
-
Well, not much happening with the build this week. I managed to get all the holes drilled for the original bracket strapping system and tested some of the connections. I also did some more minor reshaping of some return edges with the always scary heat gun. Drilling holes. Glued 3 button plate. Glued rivet covers on belt. And started painting a bunch of screws and rivets white. Sent from my iPhone using Tapatalk3 points
-
A bit more progress on painting the helmet today... Right tear: Right trap: Left trap: Left tear: Can see on this one that I will need to do a little touch up with gray. But that is it as far as I'm concerned! I used the templates from TrooperBay and they worked very well. The left tear was most difficult to fit, but overall these worked excellently...unless you all say otherwise that is. I also finished the ears: Free handed and I'm completely satisfied with how they turned out. Now a question. My AP kit came with decals for the tube stripes. I also have a template from TrooperBay that I can use. The template I bought is very uniform and straight. The decal has a less uniform appearance. Here's a side-by-side: Decal on the left, template right. I'm interested in opinions on which is better. I'm building ANH Stunt, if that makes any difference. I'm leaning towards the template because I like the idea of having everything painted, but I welcome others opinions. Any difference as far as Centurion approval goes?3 points
-
BBB day has arrived! ...about four weeks ago. Didn't have a chance to post anything earlier. Better late than never! P.S. Bear with me while I try and figure out this picture uploading process.
 2 points
 -
I think this is an easy pass for basic as well! Maybe you could heat your shoulder bridges to curve down a little more or move the elastics even further down? They are not quite following the curve of the back plate in your photos. Think everything else has been covered. Looking good!2 points
-
You could offer some boxes to makers of resin blaster kits (like Phoenix Props or DoopyDoo's) because a trigger guard from resin is either thin and fragile, or thick and inaccurate.2 points
-
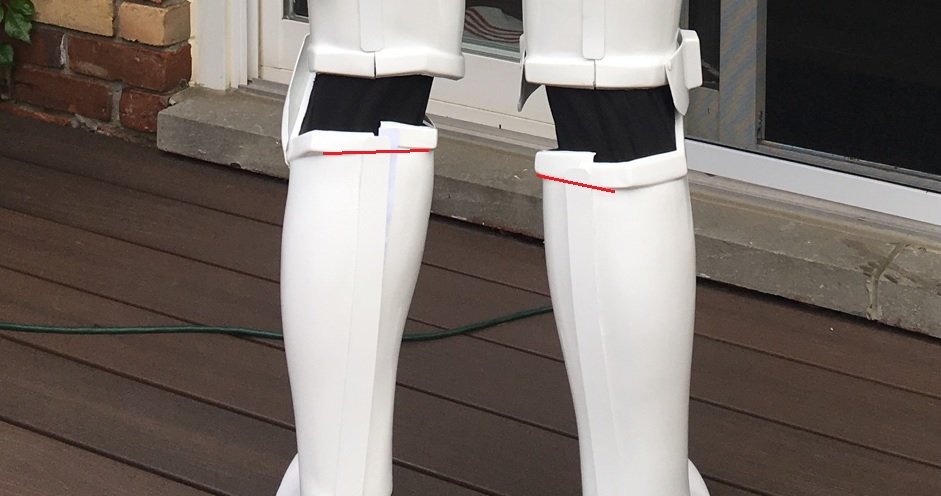
Hello Robert, great looking armor you have! I'd say you should get basic approval easily. They will, however, ask you to provide a shot of you in armor without the helmet on. I also notice that it looks like you are aiming for EI and Centurion, which is great! The one thing I can tell from the pictures is the cover strips on your calf armor is a bit too long. They shouldn't overlap the upper ledge.
 2 points
 -
Looking very nice! The only thing I noticed was your left forearm was sitting a little high. That said, easy pass.2 points
-
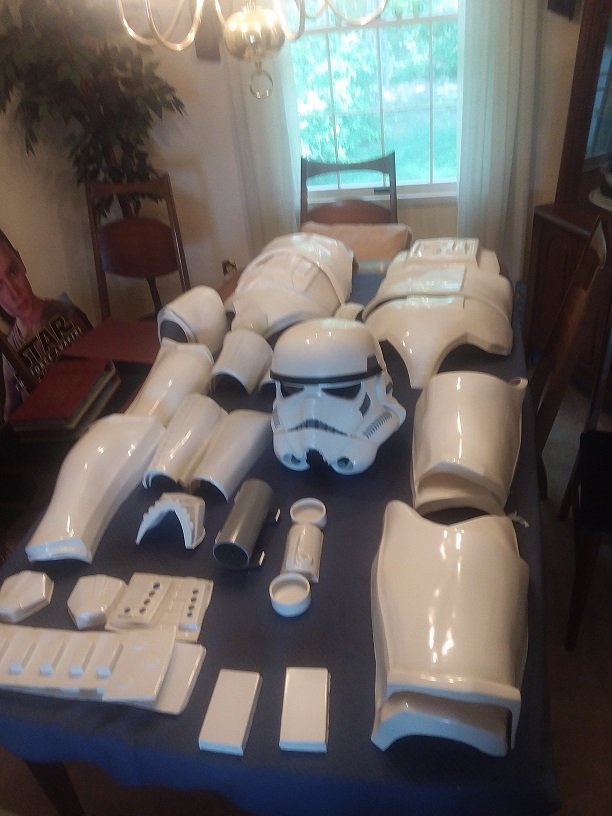
so last photos of helmet , im done with it for a bit, moving onto the armor, this is what its current state is atm.2 points
-
Thought I should share an update here today: helmet paint will be finished tomorrow, and I have decided to move away from the original bracket strapping and do a button strapping instead which seems to be quite popular with essentially every legion member I have ever talked to, so yeah.. onto some more trimming and glueing, and then I can finally go into strapping more which will be the final step on my way to becoming a trooper2 points
-
I use a 2" wide nylon web belt for my garter system. I modified it for easy on/off/adjustments by adding some Flat Dual Adjustable Side Release Buckles to the ends. The belt is wide enough and stiff that it doesn't slide down much and stays put. It is very comfortable as well!2 points
-
Hi bros I did this. I hope you like it!! Imperial cheers from Barcelona!!1 point
-
Name: Robert Rabey Future Garrison: Canadian Garrison Armor Maker: AP Helmet Maker: AP Cloth Belt Maker: AP Neck Seal Maker: Darmans Props Boot Maker: Imperial Boots Height: 5’ 10” Weight: 175 lbs TK Type: (ANH Stunt) I had no direct help (in person) with this build, but would like to gratefully acknowledge the support, encouragement, and helpful build threads of the following members (to name but a few): Willeywonka, Wook1138, Neb Sgird, gmrhodes13, TheSwede, Lucnak, Hollow-bodies, FencingCorvetteTrooper, CableGuy, Pretzel, CoatHanger, JenEcho, Suspend, ABS80, Ukswrath. Thank you for for your time and consideration! Rob1 point
-
Congratulations on starting your build! Very exciting. I was the same ... my ATA kit sat in a box for 3 years until about January 1st of this year. For your thigh tops, a return edge isn't required at all...it's all about comfort and certainly none at would be really comfortable. It's personal preference, but if, like me, you want to keep a tiny bit I wouldn't go with any more than that...or it'll dig into you--especially with already having big legs and a snug fit there. Mine look like it's about .5mm at the front and back and 0 on the sides...again personal preference, not telling you to do that. You look like you have close to 1cm all the way around...that's gonna cause you some pain and hassle. Also, be very very careful with that iron! I've read more horror than success stories! LOL For the shimming, I'm going to let people who have experience with that make the comments. None here.1 point
-
Agreed, nice painting!1 point
-
Happy day indeed!1 point
-
or some comparable fabric paint. I used this type of paint for a rubber clone belt years ago.1 point
-
You may also look for an "All in one" type suspender system. this is where the shoulder straps are adjustable, but the belt is connected to the suspenders, your not clipping something on to the belt and hoping it says in place. then just make straps with loops in them, and slide them on the belt, the belt should "click" together in the front to keep the whole thing secure. I am thinking I will use the suspenders and clip them to the back of the belt, and the top of the abs, that way it will keep my belt up, and the abs in place, all in one. I will anticipate some issue though and try and plan for that. we shall see. I will hope to do tons of trail and error prior to my first troop (once approved). I am super excited though as I have just submitted my photos for Tie Reserve and will be able to relax about being approved while I work on my TK. but the submission was just made so I expect to be a while. But funny enough once I submitted my photos, it boosted me to want to get the TK done.1 point
-
Devolver, no problem. I wanted to get a list going anyways, so now it is done. Updates… So sanding……………………………………………………… Yep sanding, and here is what this stuff looks like after a 220 sand job. Note the areas where the primer is still on the part. Most of the time this is because I cannot get into those areas very well with the sandpaper. Other times it means that the primer is sitting on a depression on the surface. This is one of the reasons you apply primer, it shows you the faults. So in this case I run my finger over the surface and if I can feel the depression then I will fill it in with glazing putty. If I cannot feel the depression then I don’t worry about it since the surface looked fairly uniform when the primer was applied. In case you are wondering, the white bottle in the picture is the Evercoat brand glazing putty. You can get it online or a local automotive paint supply store like PPG paints. So most of the time I apply the glaze directly to a part that been primed and I can see holes or imperfections. In most of these armor parts, the seam where I adhered two parts together is a major area of concern. Also anywhere the cracks have become a problem needs to be addressed. Even after sanding, I may detect flaws in a part such as the depression areas. I normally circle these areas and when I have enough issues to warrant the mixing of glaze, I mix it and apply it. One lower leg done and one to go. Still waiting to be sanded. And, Das ist alles für heute, thanks for the interest.1 point
-
Looking good! That sniper knee is looking well and pretty straight from the front - good job!1 point
-
well this all happened pretty quick in the end, Tracey's now cleared and done her first troop with the UK garrison at the UK's national space center. Even helped out Warwick Davis at one point will take the time over the next fews day to update all the pics on the thread so they work and make sure i haven't missed any parts of the build. might even try and and add a table of contents at the start. will get her to sign in and introduce herself properly now and start a troop diary but prior to that here a quick few pics TK13570 signing in with a bang instagram tj_fem1 point
-
I totally agree with T-Jay! Sent from my iPhone using Tapatalk1 point
-
Pre-congratulations on your L1 approval! Onto L2 and beyond!1 point
-
Overall a GREAT job on that armor, Robert! You should have no major issues getting basic approval, and I think I see a Centurion badge in your future should you (hopefully) consider that option! Awesome work on those ab/kidney connections and belt placement, btw. A few small items I would suggest for future reference are: 1. Make sure the knot in the white elastic on your shoulder bridges is on the inside. 2. Fix the back of the calves as Asa noted. Although it won't affect approval at any level, you should think about removing the return edges on the tops of your calves in the front. The reasons being is that those sharp edges can (and will) tear holes in your undersuit, and they can cause serious chafing on longer troops...trust me, lol. (It's also screen accurate). It looks as if you will have the room to do this without the tops becoming too loose. Reference image1 point
-
Great work! I love TKC's1 point
-
I'll keep it as it is then and see if i trim it based on how it feels to wear. I am guessing that trim is mostly for movement and comfort. No need to put ABS and paste it if I end up haning to cut it away. But as long as it looks good for approval I will reinforce it with a coverstrip on the top and bottom of the inside.1 point
-
Little more progress. Got the chest pretty much trimmed completely. And started trimming the shoulders. Can’t decide if I should remove all of the return edge from the shoulder or not. Also painted my ab buttons. Two coats seem to be enough but I may try to sand lightly with 1000 grit then and add another layer of paint to see if they smooth out a bit. Hard to tell from the picture but the paint is quite uneven. Sent from my iPhone using Tapatalk1 point
-
I asked, and still do ask some pretty odd questions. It’s all good. As for foam.... I went to a local craft shop (Joanne’s) and got seat padding. They have different thicknesses, just glue or Velcro it where you need it. Sent from my iPhone using Tapatalk1 point
-
Lovin the added detail inside the folding stock window. Going that extra mile!1 point
-
Unfortunately not now. Sent from my VK815 using Tapatalk1 point
-
Hi Jon, welcome back and thank you for your Centurion application, so let's get you approved, shall we? CRL and Centurion Application Requirements: All submission photos are present. Your armor displays all the necessary elements to qualify for Centurion, so on behalf of Tony and myself I would like to say congratulations, Trooper! Other-Armor Fit/Assembly: Thank you for taking care of all the various issues, Jon. Making all of those changes wasn't easy I'm sure, but you really took the advice to heart and did an amazing job. Incredible work on moving those rivets and glad to see that you found replacements for the ABS belt button covers. Hopefully you will have inspired those in the same position to follow your example of "never give up"! Now get out there and make your Garrison proud!1 point
-
You can also trim the back of the thigh for movement if you wish, that's canon also.
 1 point
 -
Belt connections made and cod to butt connections complete. Good to know that I can get rid of that butt tab later on if needed for comfort. Sent from my iPhone using Tapatalk1 point
-
It is my esteemed privilege to congratulate and welcome you to the 501st Legion Badlands Garrison TK -17997! Beautiful work Trooper!1 point
-
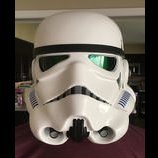
Thanks for the pointers, I didn't get a huge amount of time today, but minus the internal padding the helmet is done1 point
-
No such thing as a dumb question here. We've all been at the beginning and had to ask or figure things out on our own. So ask away Basically you just need soft foam and then glue some to the inside where needed to make a tighter fit to keep pieces from shifting out of place while you are trooping. If you browse the EIB/Centurion request threads you will see some troopers with foam in the forearms. The easiest method for me was to use insulation foam that already has adhesive on one side. Usually found in hardware stores to insulate window and door frames. Also, don't be afraid to post progress pictures. That will give all of us a better idea of what's going on and where you are at in your build so that we can offer tips or suggestions along the way.1 point
-
Looking wonderfully ‘ANH’ to me [emoji1303][emoji1303][emoji1303]1 point
-
I have my thighs strapped to the ab, and it pulls the ab plate down after a bit of trooping. Made the ab come down too far and there was a gap at the chest so I’m currently reworking it. I did it because I too have the issue with the belt slipping. I used suspenders with the belt but the belt tends to get crumpled up and once it slipped out of the suspender. I’m thinking maybe a thicker belt with the suspenders. Sent from my iPhone using Tapatalk1 point
-
Tonight's tiny project - painting pan head screws (yay! found them). These will replace the dome headed ones currently on my TD. Plan is to get everything done and pics submitted for EIB (and Centurion?) before the end of July. Can I use my original submission pics and then add on the additional pics? Or, is it preferable to take all new pics? Looking forward to my first armour party tomorrow! Hoping to get some hands on advice on how to pad my shins/thighs because man, you wouldn't believe the bruises I've got from armour bites. Another question - has anyone strapped their thighs directly to their ab, rather than using a belt/garter system? My belt keeps slipping down while I troop - I guess suspenders would hold it up, but I was thinking that using elastic and snaps right on the inside of the ab might be more convenient?1 point
-
Round 2! I have ordered a new brow piece. How's it look? Took more off the teeth and eyes. Sent from my SM-G955U using Tapatalk1 point
-
I will soon. Just stay tunned1 point
-
Turns out not that great, to my surprise I might ad.....it was raining that day and I took the pics outside and there were "rain-drops" pretty much all over...easy fix by dabbing it with a sponge but weren`t expecting that.....I had an efx helmet that I did the same to and had a hard (well...) time removing the weathering and using warm water alone didn`t cut it so based on that I thought it would hold up better (different hair spray might play a part).....but still not planning on adding a top coat, although I´m not planning on removing the weathering I still want the option. Solution - going heavier with the hairspray and see how that holds up1 point
-
Standing by for GML-approval Okey...I’m moving around a bit1 point
-
First test fitting of all the completed parts together Very excited to be this close to completion, but I still have some adjustments to make before I can submit the pre-approval pics (which I’ll definitely be taking in better lighting!) My belt needs to come up a touch, and one of the shoulder bells needs to come in a bit, and I need to add some foam and/or Velcro to the sniper knee calf to get it to stay straight. Think my thigh garters need to be raised a little too.1 point
-
The AM may not be as accurate as others armors yet, if those others don't fit you correctly what's the difference right? AM is quality armor, not to mention fans won't have a clue or care about the difference. Armors like AM and RT-mod are perfect for larger troopers, plenty of which now proudly wear the EIB and Centurion badge. Keep up the good work Brian.1 point
-
On to snaps and belt. First off - Belt: I used the standard measurements (various builds and the Billhags diagrams) for placing the snaps on the ab on my first build - the left side of the ab calls for 59mm from the return edge as shown below. this is way too much for this armor. I went with 40mm instead and it worked perfect. The right side stays the same - 28mm. Usual measurements By the way, taping the anvil to the back side of the armor works great for setting these snaps. Also reaming out the holes helps the snaps (male base) to sit flush. The left belt snap (tandy line 24) and two snaps for the posterior. Right ab to kidney connection snap and the right belt snap. Once I've centered by belt to the armor, I taped it in place. I took a sharpie marker and marked up the snaps on the armor - then I pressed the belt to the snaps to leave an impression of the marker on the belt. The belt is level and placed just below (but touching) the center button panel. This leaves nice marks where the snaps should go. I did this process twice - just to be sure. Belt in place. I still need to trim and glue on the rivet covers. I used Tandy small single cap rivets to attach canvas belt to ABS ammo pack. The docking bay 94 captain actually has a low fitting belt - it looks like is has fallen down post-weathering. I will need to reposition this belt for SWAT application - but I am told that I need to have the belt here for basic approval. I find it weird that something good enough for L3 approval is not good enough for basic. Oh well. anyway, I was going to install another set of snaps to allow me to easily adjust this in the future - but I forgot and put on the ammo pack before adding the snaps. Sent from my iPhone using Tapatalk1 point
-
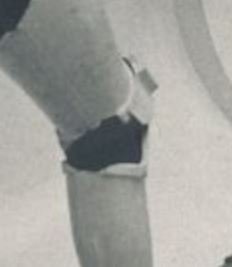
I fixed the sniper knee plate. I had to bring it up about 1 inch. Thank you MEPD. Sent from my iPhone using Tapatalk1 point
-
Sniper knee plate. A lot easier than a TK knee (for the AP kit at least). Added some pieces of plastic to the back and glued into place. I hope it is enough to hold. The shin is curved and the plate is flat, so I piled on the E6000 and will hope for the best. Reference Also trimmed this guy. Reference pic Sent from my iPhone using Tapatalk1 point
-
Hello; I am ID-41466, from the Georgia Garrison, and excited and very nervous about building my first kit! I will be making A New Hope Stormtrooper, which I purchased from Walt's Trooper Factory. I have no idea what I am doing, so I would be most appreciative of help from anybody who is available!! I am a shorty, so I will be doing a lot of trimming, and I have already watched most of Cricket's threads. I would also like to reach the Expert Infantry and then Centurion Levels. Thank you so much for your time and patience!1 point
-
Been trooping in my pack quite a bit lately, loving it and getting lots of thumbs up from other troopers!1 point