
Leaderboard


Popular Content
Showing content with the highest reputation on 06/19/2018 in Posts
-
Yea so my wife told me I can’t read your posts anymore because it makes me want to spend more money. Other then that it looks awesome. Sent from my iPhone using Tapatalk3 points
-
Thanks guys! Paranoid assembly Sent fra min SM-G960F via Tapatalk2 points
-
Update… And the sanding continues. So as you can guess, sanding, sanding, and even more sanding. Ok lets start with the lower leg armor. I have found a few cracks in the lip of the top of each armor. These cracks appear to be due to the opening and closing of the armor to put it on. If you recall, the lower leg armor was a two part set for each leg and I made a permanent weld on the forward side of the armor. The back seam of the armor was open and would be closed with Velcro as per the CRLs; however, the flexing of the sealed side has experienced stress and is not cracking. These cracks are not deep but I do not want them to get any worse. So I backed them and filled them with PC-7. And once I fixed the lower legs, I inspected and found similar seams on almost all the two part sections. Biceps and lower legs curing. Before someone asks, the mesh you can see inside the armor is metal mesh that I rolled and placed inside the armor to hold the armor open for painting and to provide a place to hang the armor from. Next I sprayed a coat of automotive primer on everything that was sanded to uncover issues that need correcting. So once all this is cured, more sanding and filling. And these are the parts that still need to be sanded. And that is it for now. Thanks for the interest.2 points
-
Another suit - another video2 points
-
There aren't many examples up of people having printed Germain's fantastic SE-44 so now that mine is 99% complete I thought I'd stick up a few pics of the finished product. I haven't attached the holster bolts or plate as I want to wait until I get my armour (Anovos will ship it one day... right? Only been waiting two years so far) and I've till got a small piece to glue on under the sight. Anyway - on to the pics. I didn't take many build progress pics (regretably) but suffice to say there was much sanding and filling and sanding and filling and sanding and filling.... you get the idea1 point
-
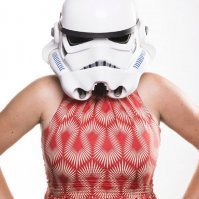
Hi! My name is Laura and working on an ANH Hero TK. I’ve been a huge fan of Star Wars since I was a little girl and was lucky enough to be able to work for Disney when they’ve purchased Lucasfilm a few years ago. While working on the campaigns I've met the lovely people from the Dutch Garrison and before I knew it I was dreaming of creating my own costume. Back in January I was finally able to purchase my kit from TM. I was so happy when my BBB arrived! Thank you so much Paul for this awesome kit! I'm almost afraid to touch it, let alone putting scissors into it. Where to begin and what to do?? I'm 1.75- so probably need to do some trimming, also to make it nicely fit on a female body - The total TM Hero kit including holster Now, a few months in, a few armor parties with members of the DG later, almost losing my fingertips with cutting and a seriously inflamed finger, most of the armor parts are clean of plastic waste. I'm pretty sure with the fitting lots of re-cutting must be done, so let's wait for that. Bucket: Haven’t touched the bucket yet, first want to make sure everything is going into the right direction and I know my utensils the best way possible – don’t want to screw up that handsome face. Currently doing lots of research what's the best way to start - spending hours and hours on this board, so happy with all the advice. Think I feel confident to start this week by taking out the eyes and teeth. Whoop whoop! 2 pairs of ears: Neckseal: Will be created by a friend who did this for more builds. Shoulder Bells: Currently working on the sizing. For now I've left 6mm return edge on all sides - will make them smaller if needed. Biceps: Currently working on the sizing - my biceps arent that big, so have removed 0.5cm on all sides. Not happy yet, but before cutting too much plastic/, I first want to see them together with the rest of the armor. For now I've left 6mm return edge on all sides - will make them smaller if needed. Forearms: Currently working on the sizing - I've removed 1cm in length and width. They still might be a bit too long, but same thing as for the biceps, lets first see everything on before gluing. For now I've left 6mm return edge on the elbowside - will make them smaller if needed - and none at the wrists. Coverstrips: For the forearms and biceps I'm going for the 15mm and the legs 20mm. Hand plates: In the kit was the plastic version - need to swap those to the latex ones. Gloves: The rubber ones (Trooperbay) and the Nomex flight gloves (Ebay) Chest and shoulder straps: All waste plastic has been removed, haven't touched the straps yet. Need some help first with the fitting. Back: All waste plastic has been removed. Need some help first with the fitting. Undersuit: My undersuit is from stormtrooper undersuit, went for the size that was a little bit bigger than my own measurement, but closer than sizing down. Ab: All waste plastic has been removed. Need some help first with the fitting. Kidney: All waste plastic has been removed, except for the corners. Need some help first with the fitting. Hope the kidney will show a minimal gap while lining up with the ab. Might need to go to the gym more often to make sure it fits. Haha. Butt: All waste plastic has been removed, except for the corners. Think it will fit perfect, so will leave it for now. Belt: Need to start with the assembly. Thermal Detonator: Need to start with the assembly. Thighs: All waste plastic has been removed - time for fitting! Lower leg armor: All waste plastic has been removed - time for fitting! Sniper plate: Haven't touched this one yet. Will come to it when assembling the legs Boots: From Imperial Boots: ordered them 1 size bigger and they fit perfectly. although its quite a challenge to get my feet in there. Holster: Ordered this one from TM together with the kit. And lots of extra stuff i will need in the nearby future: (of course not everything is in the picture - but we'll get there once building the armor. Fortunate to have 2 little ones watching me with every step of the journey: they just love the waste plastic...and no they are not allowed to play with it. Next days, weeks will be though, but I'm sooo excited! Keep you posted on the progress! Happy to hear feedback! X Laura1 point
-
I just ordered my third DD E-11 resin kit a little over a week ago, and for the first time I actually received an email stating that it had been sent, along with a tracking number, WOW! I know in the past that DD has not had the best reputation for communications (to say the least), and shipping times to the U.S. could take up to 8 weeks or more, but it seems they have changed their tune for the better, happy to say. On a side note, I also ordered another one of Tino's awesome E-11 finishing kits which (of course) arrived in less than a week!1 point
-
Newly approved and excited to help any and all TKs1 point
-
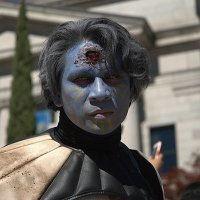
Hi! I've been a very dirty Sandtrooper for a year now. I can finally wear a clean armour! As seen in the pic, I am a TLJ FOTK.1 point
-
I second wook,on checking out crickets build. I'm in the middle of my first build as well, and it can be daunting, but it's totally doable. I did build my helmet a couple of years back, though. Ears and teeth are nerve-wracking!. I also agree you can lose a little more in the eyes, and I think a little in the teeth as well. You're almost there. I found a needle file kit was invaluable. I also think you could trim the ears a little more as well. So far so good. There is a really helpful community on this forum, so you're taking all the right steps. Slow and steady wins the race. Sent from my HTC One M9 using Tapatalk PS edit: When talking about the ears, I referring to trimming the curve some more, not really the caps.1 point
-
Coming along nicely Paul, keep up the stellar work.1 point
-
Better more than less! Sent from my LG-M470 using Tapatalk1 point
-
I won’t lie, yes it is. That feeling is normal. Remember to do lots of research, measure 3 or 4 times, trim pieces on the large side, and use E6000. Nearly all mistakes can be fixed. Post pics and ask questions and you’ll do fine. Sent from my iPhone using Tapatalk1 point
-
Bucket Inside now Black !!! Also Got a 3D printer Blaster Kit Now to actually get these thing built !!!1 point
-
Also, check out this build. https://www.whitearmor.net/forum/topic/41502-crickets-wtf-hero-build-even-more-tk-for-the-vertically-challenged/ Good luck on your build! Bucket looks good. I would trim a bit more from the eyes, but that is just me. Sent from my iPhone using Tapatalk1 point
-
The measurement I referd to in Cricket’s build were given to her by Rob at RS propmasters so that would be the size of the screen used bell however Tony makes a valid point - having no cutlines the RS bells gives the opportunity to go bigger if needs be, atleast to a point. I could/should have been more clear about that. On a sidenote I put my TM bells inside the RS ones and drew a line hence they got a bit bigger and that was all that I needed and if memory serves, Cricket ended up trimning them more as they were to big for her frame but don’t quote me on that....as Tony said we are all different1 point
-
Doing great work so far! Keep it up!1 point
-
cut the front of the lower legs today and did a trial fitting. They are quite snug, I still intend to remove a bit of the return edge at the top and clean out the last mm at the bottom. That will hopefully give me enough playing room to get them right. The shoes btw are 20 euro, brown chelsea boots from Aldi Painted by hand. Non of that fancy boots for me just yet. Working on a bit tighter budget than I did for my First Order TI. Going to have to figure out how to get the back aligned properly, at least at the top. Still need to clean up the soles of my shoes a bit, remove some of the paint that I got on them. As I am 182cm the length of the lower legs is close to perfect for me, by the feel of it. I haven't removed the pull-edge from the back sides yet, quite worried I am not going to have enough material to play with in the end. So first planning to get the front coverplates on, align the back properly and glue them together properly. Intending to close the back with industrial velcro as I have used copious amounts of on my TI costumes (but then obviously for TK in white).1 point
-
Thanks! Gonna look that one up! got a mate from Dutch Garrison coming by this weekend, he promised to take his TM bells with him. So that will help with lines as well.1 point
-
Looking good! The only thing I could suggest with the drop boxes is that they don't need to be moveable. I secured mine via snaps to keep them aligned with the ends. As for the application photos, your GML should contact you with the list of shots they want. You already have the basic idea taking the photos for this post. Just will need to include one of you with the helmet off. Good luck!1 point
-
The reason we ask to look at the back of the waist belt is to confirm how the holster is attached and if we need to make recommendation in other areas also. Correct, interior (unseen) connections are not taken into account during approvals.1 point
-
Haaa! Awesome!! Happy b-day to you both and - killer deadpool pose1 point
-
The CRL does not seem to mention anything about what holds the canvas and plactic belts together, so I think you should be fine.1 point
-
Factory fresh off the Blastech assembly line for death star deployment! Congratulations for reaching the finish line with such stellar detail [emoji6] Sent from my SM-G390W using Tapatalk1 point
-
Yea, it's really up to you. For the thighs, it's usually way more comforyable if you have no (or almost none) return edge because, over time on some longer troops, the return edges can start digging in your thigh and/or knee. I removed most return edge from the top of my thighs and left a small one st the bottom. For the shins, it's a bit different. I'd suggest removing the return edge at the bottom if you have any... It will allow you to get that more slender fit you want. As for the top, I left a little one on mine - a few millimeters. It sometimes dig in my knee too but it's not really bad and I personnally think it looks better if there is a small one. Hope this helps... And once again, it's pretty much all up to you; trying to find balance between long wearability and look. ^^ Sent from my LG-M470 using Tapatalk1 point
-
Cool party - you even got some snowtrooper ! ;P Oh and happy birthday mate! Sent from my LG-M470 using Tapatalk1 point
-
Stunning!! I really like the subtle weathering. As Tino said, the small details make all the difference and you've ended up with a top notch blaster.1 point
-
Looks like a fun party. Happy birthday. Perfect Deadpool pose. Sent from my iPhone using Tapatalk1 point
-
Congratulations on finishing your first E-11 blaster, Kevin. Just re-read your thread and got to say, you went the extra-mile on so many parts of this build. Beside of that, the Hengstler counter is outstanding, the scope is fully hollowed/drilled through and has lenses. And your trigger group with the aluminum covers is one of the best I have ever seen! I really love it. Take good care of this beautyful blaster. I wish you a lot of fun with it while trooping.1 point
-
I disagree, as someone with a FOTK from Anovos I know they can produce it, BUT when it comes to changes they have made and what ever happens between themselves and their manufacturer in China who knows when they will deliver. I think the problem is they just don't give realistic shipping times, if they know there is going to be an issue with manufacture or stages of what happens after the prototype stage then don't give a false date. They ask a lot of money for their products and I believe they are of good quality but unfortunately they just don't deliver with shipping expectations. The shipping issue will no doubt stop a lot of people from purchasing, it is hurting them as a company and I'm sure they can't be that naive to think everyone will still keep waiting until one day they can actually deliver. I really wonder how many have pulled out of their FOTK orders, already seen some other costumes they where going to offer pulled because of low interest .1 point
-
Making good progress, and with feline help I see. Good luck with your build it is nice to see another Hero, and as has been said, call out if you need any help.1 point
-
Congratulations! Can you cover my shift!1 point
-
Yeah he’s just about done with mine I heard just this weekend!1 point
-
It might be an idea to check out a few other build threads and see how much return you like the look of. As the others said, it’s more of a personal preference. The screen used suits are a little battered but still give a good idea of how they were on screen. :-)1 point
-
Return edge amount is entirely up to you, except for specific areas like the sniper knee which will need it.1 point
-
I remembered seeing you did it already sorry I wasn’t specific enough, was focusing on the question at hand. Personally I found it uncomfortable. Not sure if it was a size thing as I’m 240 pounds or what but in test fittings around the house it bothered me and I figured if it did then it would when I was trooping for 4 hours. With that said I think it helps make the armor look thicker but I also think it’s an extra seam that could start to crack. Sent from my iPhone using Tapatalk1 point
-
Ukswrath, thank you for the compliment. Updates, Ok so I took a few shots of the undershirt to show what I did. In this picture you can see the inside of the back along the zipper. The material I used is a breathable black stretch fabric. I also reinforced the mesh then applied the zipper to aid in smoothing the zipper section. In this picture you can see the outside of the back along the zipper. You can see how far down the material goes. Ok so we tested the back cover plate and notice how it does not wrap around the curve of the back. There is a gap between the plate and the back of the abdomen armor. Big Deal, you were correct. I needed to modify the glued in styrene to allow for the curve. Once I did this and used some Velcro to hold the cover plate in place, it looked much better. Thank you for the suggestion. So I got more sanding done over the weekend but not a lot of sanding (Father’s Day). Anywho, I also snapped a closer picture of my friends Clone Trooper shoulder strap. Here you can see the silicone and/or rubber shoulder strap. I think this would be a great option for the ROTK but until I build the Jedah crystal pack and see how heavy it is and if it interferes with the shoulder straps, there is no way for me to know if I need to make a version of these for the ROTK. Well, that is it for the update. Thanks for the interest.1 point
-
Holy smokes you're busting that kit out lol1 point
-
Good progress mate!1 point
-
Wow that went really fast. You make it look easy. Sent from my iPhone using Tapatalk1 point
-
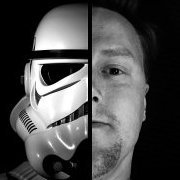
Hi everyone. So, around 1 year ago (June 2017) I started a project to revive my 12 year old Shepperton Design Studios Stunt lid. The years has taken their toll on my once beloved TK lid so I did my research, ended up finding the videos of TK4510/ Mike / Trooperbay and decided to strip down, spray and hand paint my old lid. Well, this REALLY got me interested in Stormtroopers again and, thanks to doing plenty of research on FISD on how to respray my lid, got me hooked on the whole armour idea. Right, back to the subject at hand.... I came across Mike’s videos again on YouTube, one of which was weathering a Sandie helmet. Based upon this I ordered some Fullers Earth and a Revell weathering set. Following Mike’s excellent video, essentially the process is done with hairspray > earth flicked on with paintbrush > brush off excess earth > repeat. This, mixed with brush dabbing, sponge dabbing, sandpaper in places etc hopefully leading to a realistic, dirty/used look. Firstly, I started by painting over the vertical black stripes in the traps and tears, then improving the frown paint by extending it beyond the un-drilled 5th hole. I also took the opportunity to raise the brow. As this isn’t my trooping lid, I simply cut an additional upward curve in the cap. Time to throw some dirt at this thing!! After fogging the front of the lid with hairspray, I started to flick Fullers Earth at the lid to give a general covering. After letting the hairspray dry for a bit, it was then time to brush of the loose earth. Essentially, the process is then repeated and repeated, mixing in different shades of earth at different times, and focusing in areas where dirt would naturally build up over time. Next round: Now, at this stage I decided to do another round of hairspray and darker earth, then attempted some wet sponge dabbing..... I went a bit heavy!!! Well - as it was heavier than I had planned, and my first attempt, I decided to have another go. I took the lid out to the garden and literally washed off all of the weathering with the hose! I started the process again and was a lot more careful with damp paper towels his time. Here’s some picture from along the way. And now for the finished lid. Overall, I’m really pleased with how it turned out. I set out to make a naturally dirty looking sandie, hence using Fullers Earth and weathering powder, to get a textured look, and am pleased with the results. Hopefully to photos do it justice. Enough from me - thanks for reading. Dan :-)1 point
-
Looks great! About how long from when you ordered did it take for the kit to ship? I recently ordered mine, so I’m using the interim to finish ordering the other bits.1 point
-
1 point
-
For anyone wondering what the various logos, bars, and titles to the left of posts is all about, this is the thread for you! User Ranks Found above the avatar, rank is determined either by post count or other criteria: Private: 0-24 posts Corporal: 25-49 posts Sergeant: 50-99 posts Lieutenant: 100-149 posts Captain: 150-199 posts Major: 250-499 posts Colonel: 500-999 posts Commander: 1000-1499 posts General: 1500-1999 posts Field Marshall: 2000-2999 posts Grand Moff: 3000+ posts Expert Infantry: Users who have received an EIB Award Centurion: Users who have been granted Centurion Status There are also special ranks given to Command Staff and Extended Staff, such as Detachment Leader, Deployment Officer, Combat Photographer, Hall of Fame Curator, etc. Achievement and Service Awards The FISD Achievement Award is granted for exemplary service to, or outstanding achievement for, FISD. Tradition holds that persons currently serving on staff cannot be granted Achievement Medals (or else it can become too self-serving). Thus, if you see a staff member with an Achievement Medal, they've all earned them prior to joining staff. To date only two people have ever earned a second medal, and no one has ever earned a third. Award Levels FISD Achievement Award (1st Award) FISD Achievement Award (2nd Award) ... FISD Achievement Award (6th Award) (and so on) The FISD Service Award is granted to recognize the contributions of Command Staff for their commitment to keeping the detachment running. Each award represents a full year of service. Additional awards are denoted by a star (1 Gold Star = 5 Silver Stars, 1 Silver Star = 5 Bronze Stars, etc.). A frame denotes fifteen years of service, with additional stars for further years. Award Levels FISD Service Award (1st Award) FISD Service Award (2nd Award) FISD Service Award (9th Award) FISD Service Award (10th Award) ... FISD Service Award (16th Award) (and so on) 3D Contributor Award This program, as with others, is an optional Detachment-only award incentive. It recognizes members who have gone above and beyond in contributing to our 3D forum section. The Silver award can be earned numerous times over the years. The Gold award is given to those that have contributed at such an astounding level that it is deemed appropriate. All awards are given at the discretion of Command Staff. Award Levels Silver 3D Contributor Award Gold 3D Contributor Award For more information please refer to this thread. Attaché Outstanding Achievement Award This award is bestowed to those who consistently exemplify the meaning of an Imperial Attaché and have gone above-and-beyond in helping their fellow troopers for at least one full year: For more information and a list of recipients please refer to this thread. FISD Master Armorer The FISD Master Armorer program is an optional, detachment only incentive award to recognize individuals who have directly helped another 501st stormtrooper to achieve Expert Infantry status. Some people spend countless hours helping others, and want to reward their results as well as incentivizing new people to help as well. Award Levels FISD Armorer (5+ "wins") FISD Senior Armorer (15+ "wins") FISD Master Armorer (25+ "wins") Centurion Badge These are awarded to those who have reached the highest levels of costume approval for FISD. These are awarded only once, to the person, regardless of costumes: Expert Infantry Badge (EIB) These are awarded per costume, thus a person can have more than one EIB award. Stars (like the awards above) indicate multiple awards, and appear above the EI badge (1 Blue Star = 5 Gold Stars, 1 Gold Star = 5 Silver Stars). Award Levels Expert Infantry Badge (1st Award) Expert Infantry Badge (2nd Award) Expert Infantry Badge (3rd Award) Expert Infantry Badge (4th Award) Expert Infantry Badge (5th Award) Expert Infantry Badge (6th Award) Expert Infantry Badge (7th Award) Expert Infantry Badge (8th Award) Expert Infantry Badge (9th Award) Expert Infantry Badge (10th Award) Expert Infantry Badge (11th Award) Expert Infantry Badge (12th Award) Expert Infantry Badge (13th Award) Expert Infantry Badge (14th Award) NOTE If you are approved with a "2nd Version" of a particular costume that you are already approved with you do not receive an additional award, there is only 1 award issued for each costume version ie: only 1 x Hero, 1 x Stunt, 1 x HWT, 1 x ESB, 1 x TFA and so on. If you have a second/additional version costume approved you will see "2nd Version" and [APPROVED] added to the thread title, no additional profile stars For more information on the Expert Infantry and Centurion programs, please refer to this thread. EIB and Centurion requirements can be found in the corresponding costume CRLs (as Level 2 and 3), additional information on how to apply is available here for EIB and here for Centurion.1 point
-
Some news1 point


.thumb.jpg.94b4530d0ee2f5b042747b027d82c5c9.jpg)