Leaderboard


Popular Content
Showing content with the highest reputation on 11/24/2017 in all areas
-
Hi all, What a day- my blaster AND armour all got cleared for service today. I’m officially a 501st Imperial Stormtrooper. :-) Although I might do some little bits down the line, I think my blaster is pretty much done for now. It’s been a thoroughly enjoyable project, and my huge thanks to out to the wonderful contributors to my thread, specifically Tino, Jesse, Chris and Brian. Of course, I appreciate everyone’s input along the way. Cheers guys. :-) Sent from my iPhone using Tapatalk3 points
-
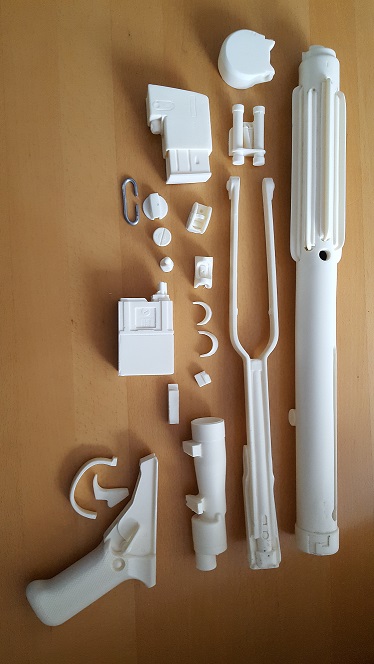
In June I decided to pull the trigger on my first set of TK armor. I knew that the 501st existed, but that was about the extent of my knowledge. I knew if I was going to build stormtrooper armor, that I wanted to do it right. So I thought I would do some research and see what I was getting into. I found the FISD site and started to read - nausea and fear were my initial responses to seeing the amount of info and detail that goes into building a TK to 501 standards. But then I remembered that nothing worth doing is going to be easy. And more importantly, once the kids are in bed and I have a hour or two to myself, I need something to do other than sit in front of the TV and drink Guinness. That, and the amazing resources and on this site along with the enthusiastic members of the FISD convinced me that this is totally doable. So here is my first build - and following the advice of many, I'm going to aim for Centurion. I've done some home renovations and know that doing it right the first time is easier than going in later and upgrading. Anyway, BBB day finally came. I ended up getting a set from Authentic Props. I originally ordered a set from Anovos and eventually cancelled (I won't go into that rant - but I will say if you are new and looking to buy your first set of armor - my advice is to avoid ANOVOS). Well, on a happier note... Yes!!! Everything was well packed and in good shape. Thanks, Mark! I ordered the trimmed kit with accessory package (belt, holster, gloves, latex hand guards, and TD clips). His kit includes all the parts needed for the helmet (green lens, screws, brow, trim (regular, not S-trim), decals, frown mesh). He also includes all the split rivets and a few snaps as required for approval. Everything is here! Parts for the TD and other bits. TD screws (painted black already), hovi mics, and assorted rivets, screws, and snaps. Anyway, gotta go Christmas shopping for the kids. Black Friday - yuck.2 points
-
I hope everyone had a great Thanksgiving, for those who celebrate it! For everyone else, I hope your day was super too!2 points
-
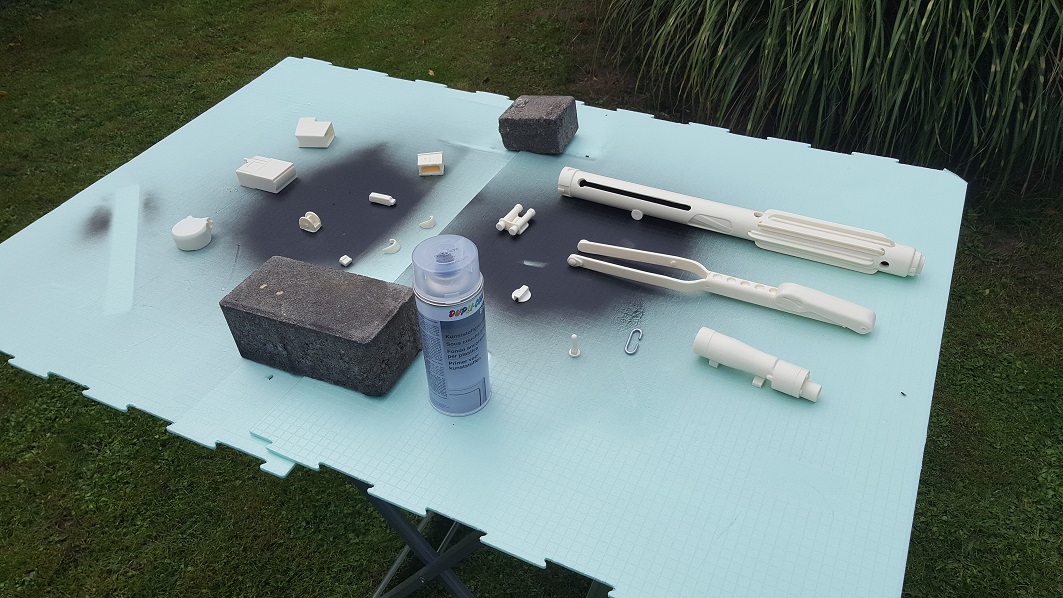
Alrighty, first update in a long time... If only I could study psychotherapy for Ewoks or something cute, humans are just waaay too complicated The first couple of images I'm gonna put up here are from when I received my kit and when I started to spray paint the single parts (first person I asked about crafting was my dad who apparently has never built an E11 before, so I've got most of the blaster parts painted already). Hopefully this won't cause too much trouble, but I'll see about that later. I decided to use the FISD Blaster Reference as a step-by-step instruction, but I'm also gonna look at Dan's (CableGuys's) build as I find it really easy to follow due to the ton of pictures (cheers for that, and congrats on your beautiful work! BlasTech would be proud!). First up on the menu therefore will be the Receiver Tube, bit of drilling should get me heated up for the rest of the blaster!

 2 points
 -
I agree that precising the nature of the black should be left to Level 3 and not Basic. And like Darren said, I'd be much surprised if it was gaffer tape. Best to leave it until more info comes out. Even though I don't think there will be many shots on the thermal detonators, and even more close-ups, in the film.2 points
-
So, here is what I'm hearing: 1. Remove butt join requirement for L3 for biceps & thighs. 2. Actually mandate overlap for L3 (as that is what they did) Is that right? Also, I'd like to finalize these ASAP as MEPD is in the last bits of completing the sandtrooper version of this kit, and the L2/L3 should match (yes, I'm the editor).2 points
-
Yep! Forgot about them.1 point
-
I honestly think we should just take down the ANOVOS version from this guide. They still haven't delivered one and there's no clarity on when that will happen. Calling them a "resource" when you can't reliably get one is probably not helpful. I'd prefer to focus on options you can get. Still waiting on Phoenix Props too. Right now Jimmi, Backstage Props, and KB Props are the only vendors I know who have actually delivered products.1 point
-
Great news, congratulations trooper1 point
-
That’s great news Stephen/TK14655 I am glad to hear that all the hard work eventually pays off. im hoping that I’m not that far off myself. matt1 point
-
Correct, you will get your 501st profile when numbers are issued. Won't be long, hang in there1 point
-
Many thanks, Q. If I read correctly, I think I can only register my 501st profile once I have my TK ID. In which case, happy to wait. (Just an eager beaver). :-) Thanks Q. Dan Sent from my iPhone using Tapatalk1 point
-
Well done again, Daniel. And yep, get your EIB application up here before you have a UKG brand to deal with!1 point
-
Still here? Get on with it lad! (As much as I joke doing it before branding is easier as there’s no decal to worry about) Congratulations on the clear.1 point
-
That`s the spirit1 point
-
Wohoo! Many congratz1 point
-
1 point
-
Cheers mate. Thanks for your input along the way. Have fun on Sunday. :-) Sent from my iPhone using Tapatalk1 point
-
1 point
-
Congrats Dan, very well deserved! You've done a superb job on the kit and blaster! [emoji106] Sent from my Moto G (4) using Tapatalk1 point
-
I thought about it, and you can bevel the edges yourself with a belt sander, or even just sandpaper. I want to keep them as it is as it is a very distinguishing part of the costume, and also that I am confident where there is a need, a vendor will find a way. Bet you once this is baked people will start selling ANH conversion cover strip kits. FYI, I'm will make any last changes as needed this weekend, and after that will leave it alone. MEPD needs to have these baked too, and once we start actually seeing EI/Centurion applicants we can decide to make any adjustments next year.1 point
-
Thanks, JC. Great tip. I might give that a go before replacing with ABS. Many thanks, Dan :-)1 point
-
Thanks for the wishes. I’m grateful for time off that I’m spending with family.1 point
-
Thanks Mate, that build seems such a long time ago... Am loving all the great new tweaks and build techniques in all the latest builds!1 point
-
Thanks Chris - I think you may be right. I'm trying to remember how that got added (might just be copy/paste from ANH). Maybe Glen (eagle eyes) or one of the DO's can chime in too.1 point
-
Hi all. So, greenstuff around the trigger guard is now painted, satin black. I’ve started working on the bolt colouring. I’m reasonably pleased with it but will take another look tonight. Point of interest - the ‘fake’ part of the bolt that sits next to the cocking handle is made using MDF (wood). Annoyingly, the surface is quite porous/absorbent. This makes it hard to have a consistent appearance with the resin and ABS parts in the ejection port. As such, it’s very likely that I’ll remove the top couple of millimetres of MDF and replace with two strips of 1mm ABS. This should allow more consistency. :-) I’ve put this in for UKG blaster clearance. If it clears, I’ll submit for armour clearance too. :-) Sent from my iPhone using Tapatalk1 point
-
The bicep was clearly overlap, with the cover strip moulded into the outer side. For centurion I feel this should be the mandated construction. Forearm is overalap also. The bottom cover is moulded in the top one appears to be a separate piece added on later. Reference: Rear bicep: Rogue One Stormtrooper Reference CE 2016 by Christopher Pearson, on Flickr Front bicep, front forearm: Rogue One Stormtrooper Reference CE 2016 by Christopher Pearson, on Flickr Rear forearm: Rogue One Stormtrooper Reference CE 2016 by Christopher Pearson, on Flickr You'll probably want to click through to view at full resolution.1 point
-
Your bracket placements are fine. Attaching them to a return edge is ideal but since you barely have any on your WTF armour, attaching them to the face of your armour is your only option. Paint the screw heads white and you're good to go1 point
-
My costume has been cleared, I’m now a really chuffed TK14655 I can not thank you all enough for your help, advice, support and encouragement throughout my build thread and particular thanks to Christine aka Cricket, Frank aka Fragarock and the armourers on the UKG..... you have all enabled a dream to come true A big thanks to all of you [emoji4] Sent from my iPhone using Tapatalk1 point
-
Many thanks, Bryn. I've just refreshed my memory of your build - it really looks superb. I'll try to get my ejection port/bolt colouring as good as yours. :-) Cheers, Dan1 point
-
Great work on those shims! and..you are good to go for centurion, keep it up1 point
-
I had trouble closing my right side ab gap too. Yours doesnt look bad at all. On mine i put two elastic straps and snap between the kidney and the ab to pull them tighter. I have one at the top and one at the bottom of the kidney piece. Not pretty but it does the job. Sent from my SM-G935V using Tapatalk1 point