Leaderboard


Popular Content
Showing content with the highest reputation on 11/20/2017 in Posts
-
Well, I’ve had quite a productive evening. Grip is coming on with the gloss. Not all spots have gone but it’s looking better. And the below pictures say the rest really. Started some light weathering and have quite a few parts fitted. Hopefully can add a few more parts tomorrow. Nearly there. :-) Sent from my iPhone using Tapatalk2 points
-
I added some weathering to my armour recently. I think it looks pretty good2 points
-
Sucessfully busted off the reciever tube from the stock... was built to last fer sure.. Grinded and beat the hell out the bolt.. silughtly bent the stock in the process.. but not too bad [emoji3]2 points
-
Hi all, Been away this weekend so very minimal progress I’m afraid. My grip is now wearing a fetching coat of gloss black. "IMAGES REMOVED BY CABLEGUY due to attachment isue" The front of the grip has not taken perfectly, however I believe further coats should fill the little dips. Next up, time for a Matt black coat for the barrel and t-tracks. Off with the t-track masking and here we go. In combination with a couple of other parts, it’s really taking shape. Hengstler counter is also coming on, however I’m out of Matt black paint again. Just for anyone keeping count, thats 2 x 150ml cans used so far. Very nearly “trooper time”! :-) Sent from my iPhone using Tapatalk2 points
-
Today was my BBB Day and I'm really excited! However, it wasn't a traditional BBB Day because the kit I ordered directly from Anovos last December (2016) has been delayed twice. While I continue to wait for it, I was lucky enough to grab a "new in box" kit from a 501st member who had purchased two and didn't need the second one. So we struck a deal, and we met up this morning to make the hand off. So here it is: I rifled through the box already and took a really quick look at the contents. I'll do a proper inventory next. I have to say, while the wait and delays have left me very frustrated at Anovos as a company, the kit looks really nice so far. I'm going for Centurion out of the box and will be referencing all the fantastic builds here at the FISD. I have been preparing for this moment. I've read a lot here, watched build videos on youtube, and I've bought supplies/materials to complete the kit. Looking forward to trimming. -Dana1 point
-
TK85421 Requesting TFA EIB (Anovos) Name: Glen Rhodes Height: 180 cm Weight: 74 kg FISD Name: gmrhodes13 Legion ID#: 85421 Profile Page: 501st Profile Garrison: Desert Scorpion Build Information Armor Maker: Anovos Helmet Maker: Anovos Boots: Imperial Boots Gloves Imperial Boots Electronics: Aker Neck Seal: Anovos Blaster: JJ's resin Shoulder tab1 point
-
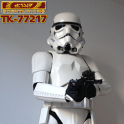
Personal Information Name: Patrick Robertz Height: 180 cm Weight: 78 kg FISD Name: Schmetterhemd Legion ID#: 77217 Profile Page: 501st Profile Page - TK-77217 Garrison: German Garrison / White Shadows Squad Build Information Armor Maker: TM (Troopermaster) (self assembled) Helmet Maker: TM (Troopermaster) (assembled by TM) Blaster Type: E-11 (Doopy-Doo's Full Resin Kit) with T-Jay's help and Completion Set Boots: Imperial Boots Canvas Belt & Holster: TM (Troopermaster) (assembled by TM) Hand Plates: JustJoseph63 Electronics: Aker (not assembled yet) Neck Seal: Darman's Props If something is missing, please let me know. Full Body Front: Back: Left : Left Arm Raised: Left Side Detail: Right: Right Arm Raised: Right Side Detail: Armor Details Abdomen Details: Action Shot: Cod and Butt Plate Attachment: Interior Strapping: Helmet Details Front: Left Side: Right side: Back: Hovi Tip Details: Lens Color: Blaster Details Left: Right: D-Ring: Accessory Details Neck Seal: Thermal Detonator Back: Thermal Detonator Front: Holster Attachment Front: Holster Attachment Back: Edit: Changed text color to "automatic"1 point
-
Yes I received the notice as well! However I can't get my tracking to work. Oh well I guess it'll be a surprise! More good news! Saturday was my BBB Day! Since KB Props is local there was no shipping and hence no need for a real big box. So here it is! Everything spread out! I didn't get the Phasma boots parts. I'm going to message KB a bit later for them, However I'm going to do both parts in case it turns out one way or the other. I also received a new helmet from him as well! Here it is with the old helmet. Both Helmets together. A comparison of the two helmets. I'm excited to get to work on my armor! I'll start on the Handplates and forearms soon!1 point
-
So under the shoulder bells, just about where the FO Insignia is, there is a single snap pad. I ran a strap from the bell to the biceps. Just helps keep them up.1 point
-
No the lenses aren't in on that picture, bad angle. But the info you added is perfect! I'm ordering a lens strip from Trooperbay. And thanks for that thread link! I think I'm going to keep the lenses in place using the putty method. Thanks again buddy!!!1 point
-
LOL "Executed" hahah!!! i see the pun Matt - Looks great man!!!! great work!1 point
-
It's air bubbles in the cheap resin they use. Better materials and or process would fix it but then it wouldn't be a cheap kit anymore. The fix here would be to filler primer, fill and sand them before the gloss coat. It's hard work but that's about all you can do.1 point
-
Thank you, chaps. Good to know it's not just me doing something wrong. I've already reduced the appearance of the 'spots' by applying a slightly thicker coat. To get the glossy, reflective finish for my old SDS TK lid, I had to spray gloss white right up to the point where the paint was just about to run, but obviously stop before that point. I applied the same method to the grip last night and will try again this evening. Thank you, Brian. That's very kind. I have the same feeling - incredibly excited to be nearly finished and be able to apply for 501st clearance, but a little sad at the same time that I won't have this to work on. However, I really fancy a pipe build next. I might do a bit of a Tino and start a collection, then a weapons locker, etc... :-) Best wishes, Dan :-)1 point
-
Thanks for the kind words bro, it's always nice to be appreciated1 point
-
Oh ears....the nightmare Sent from my Moto G (4) using Tapatalk1 point
-
Looking sharp Glen!1 point
-
Looks like someone is headed for their FOURTH Centurion badge! Looks awesome, brother... incredible job!!1 point
-
I had similar problems with painting the doopy counter and grip too. I tried filling them with epoxy watered down enough to fill each one but they are so darn tiny. It sorta works but it takes time to sand it all back down to a smooth finish. The paint spray particles are too thick to sink into the holes so they never get filled in. Sanding the surface until it gets past the tiny holes is another option but found it only uncovered more holes below. Sorry, Wish I had a better solution. Blaster is is looking great though. Exciting to see it painted but sad your build is coming closer to the end. Amazing work.1 point
-
That is an idea. Usually what they do is use elastic attached to the ab and to the chest. That way there's still freedom of movement. However if it was just directly done to the ab, then restrictions apply.1 point
-
You are waisting no time, don't you?! Good luck, mate. Keeping fingers crossed for you...1 point
-
That is something I examined on almost every DoopyDoo's E-11 grip piece here. In my case additional paint coats did not solve the issue. Maybe an expert for resin can tell us more about this effect...1 point
-
I second that! Great job1 point
-
Well here we go. All of the TFA EIB fun is about to begin. Looks awesome Glen.1 point
-
Freshly approved, already submitted my EIB application, and scheduled my first troop! Even found some droids!1 point
-
Nice shot of the laser ax blade overlap1 point
-
They go like this, if you want the screen-accurate look (top is left arm)Some use snaps, I just glued them in movie-wise Trooper on the right RS suit (right arm)1 point
-
Looking good1 point
-
Sweet! thanks dude, I hadn't came across that guide yet. I still need to separate the connection receiver tube from the folding stock... procrastinating that mess.. Seen some where they just drill a hole in the resin to attach it or like the guide make a new tube. Just hoping if the resin breaks it won't damage too much ... hmmm...1 point
-
Great Pictures and best of luck on approval...here´s to soon beeing a TK1 point
-
Trial assembly and placement for electronics.1 point
-
Setting the placement on the scope rail.1 point
-
Hi all, Just a little update for anyone that’s been following. I’ve not disappeared; just been finishing off my E-11. I’m now into the latter stages of painting and will hopefully be complete within a couple of days. I can then finally apply for clearance with the UKG, then EIB followed by Centurion. Regarding EIB and Centurion, looking at many other applications, I’m very hopeful that my complete kit is already ticking all of the boxes. Of course, only time will tell, however if anyone has spotted any concerns, please let me know. :-) Many thanks, Dan :-) Sent from my iPhone using Tapatalk1 point
-
Nope,not a hijacking. Your Tramp is simply amazing. I will be buying your blast fx and scope reticle to put in Chris’s (Fieldmarshall) kit when it is in production. I had the pleasure of visiting Chris at his shop in South Carolina. Super nice dude. The work you did with Brian (bullhdogProps) on fitting the scope OLED in the hollow resin M38. Wow!!!! I was following the progress. I am glad to support you and your products.1 point
-
As for your magazines, you can check out Robert's offerings, aka swpropman. He is on e-bay: NEW! Star Wars Stormtrooper E11 Blaster-1 1/2 Wave Hollow Magazine Replica-L2A3 and also from his website: The Stormtrooper Blaster Project I heard he's moving away from e-bay sales and prefers orders from his website, which I think leverages his ties with Etsy. He offers hollow, black plastic, replica magazines among other Blaster parts. I like it hollow as I plan to fit in electronics and plan to purchase from him sometime in the future. Hope this helps Stefan, another option for you, cheers!1 point
-
Here's a GIF of me with my TK Boots while I wait for my kit: Argh! Someone on Facebook is selling an Anovos kit for almost half what I paid, and with soft goods! I need to learn to be more patient.1 point
-
Hello everyone! Today, I proceeded with the End Cap Clip. As Doopydoos comes with a static resin piece, I opted to mash together two separate sources. I used Suitecase Props T-piece along with Tino's aluminum u-channel from his completion set. Here is the original piece Here is the combo of the two separately sourced pieces. Here are some comparison pictures: I decided I wanted the u-channel a bit shorter so I took out my trusty Cobalt hacksaw blade and took off around 2mm. In my estimation, it now looked more proportional against the T-piece. I also rounded off the edges of the u-channel following SMG references (FISD E-11 Blaster Reference: PDF Document Photo Compendium) Here, I would then, following SMG references as well, imprint knurling patterns using green stuff to the bottom of the T-piece. Following, I would use a curved aluminum piece to lever the T-piece for press functionality. 1 /16 " drill bit used to create hole in aluminum piece and on T-piece. A nail was scavenged to get at its head for insert and keep the aluminum piece in place. Initial attempt using JB Weld was unsuccessful. Used Tino's powerful CA glue did the trick. This aluminum strip styled after SMG references as well. I then proceeded to create the two support holes for the pin. Piloted using 1 / 16 " then to 5 / 64 " for the actual hole size. Since I didn't not have a 5 / 64 " pin, I had to shave it down from the 1 / 8 " solid brass rod I had. I inserted the rod to my drill and held it up against my square file. For anyone attempting this, please use ear protection. I found it necessary to examine the filing process closely therefore, putting myself close to the drill motor. Done! I will proceed to add a bit of E-6000 to keep the pin in place. I had thinned out the pin a tad too much. Also, if I ever have to disassemble, I can heat it and get the pin out. Thanks for checking in once again! Have a terrific day!1 point
-
Thank you Dan for pointing Paul in my direction. He already contacted me and I will ship his completion set tomorrow...1 point
-
Hiya, I’m not aware of a list, myself, but personally I ordered Tino’s (T-Jay) completion kit. It includes all of the main screws and parts to replace the resin ones. If you’re looking to source for yourself, I’d still recommend checking out Tino’s build and the E-11 reference thread. :-) Sent from my iPhone using Tapatalk1 point