michael.trunko[TK] Posted October 30, 2023 Report Posted October 30, 2023 1. Michael Trunko 2. TK12331 3. michael.trunko (forum name) https://www.501st.com/members/displaymember.php?userID=37262&costumeID=124 4. Ohio Garrison Armor/Helmet Maker: Dave’s Darkside Depot Blaster: RubberBlastersEtc Neckseal: DarmansProps Handguards, Canvas Belt, Holster, Electronics: Dave’s Darkside Depot Kit EIB Photo link: https://imgur.com/a/vsYviZ3 Quote
gmrhodes13[Staff] Posted October 30, 2023 Report Posted October 30, 2023 Nice work trooper Your images are of a very small size/resolution 640 x 480 PHOTO GUIDELINES Photo size- At least 800 X 600 (preferably 1280 X 960) Good lighting A neutral (solid) background color is suggested, more info in this thread A couple of pics the DO's like to see Close-up of ab/kidney rivets Left sniper knee plate close up Right sniper knee plate close up Front sniper knee plate close up Left thigh ammo pack rivet close up inside and out Right thigh ammo pack rivet close up inside and out 1 Quote
Chemi[Staff] Posted October 30, 2023 Report Posted October 30, 2023 Hi Michael. Thanks for your EIB request. One of us will be with you soon. In the meantime, as Glen says, you could replace the photos with higher resolution ones, as the ones you have posted do not allow us to see all the details of your armor.(They are too pixelated when zoomed in). In addition to the photos Glen has told you about, I would need a more frontal photo of the teeth area. Example: And as a last favor, there is something we need you to correct as well, as it is a requirement for level 1. L1.- The white control panel raised ribbed pad faces the rear, with the controls/round washer style detail closest to the right end cap. I think it will be enough to "unroll" the detonator a little bit from its clips (besides, the detonator will be a little bit lower at the canvas belt height, which is its ideal position). Reference Images Thanks!!! Quote
michael.trunko[TK] Posted October 31, 2023 Author Report Posted October 31, 2023 Good evening, Thank you for getting back to me so quickly. I had an issue trying to load the pictures. I was being limited to the size & amount of data. In addition, I kept getting a red deny box when trying to use the url option to load pictures. I have all the pictures on Imgur - https://imgur.com/a/vsYviZ3 I’ve included the requested pics within the Imgur link. Any tips or tricks on how to upload the pics directly on the forum post would be appreciated. Thank you for your time & patience, Mike Quote
Chemi[Staff] Posted October 31, 2023 Report Posted October 31, 2023 hace 2 horas, michael.trunko dijo: Good evening, Thank you for getting back to me so quickly. I had an issue trying to load the pictures. I was being limited to the size & amount of data. In addition, I kept getting a red deny box when trying to use the url option to load pictures. I have all the pictures on Imgur - https://imgur.com/a/vsYviZ3 I’ve included the requested pics within the Imgur link. Any tips or tricks on how to upload the pics directly on the forum post would be appreciated. Thank you for your time & patience, Mike Quote
gmrhodes13[Staff] Posted October 31, 2023 Report Posted October 31, 2023 Can be as simple as right click on the image in Imgur, select copy then paste into your thread, or use the "Direct Link" option Quote
michael.trunko[TK] Posted November 1, 2023 Author Report Posted November 1, 2023 Thanks for the tip. It was easy. The pictures have all been redone via the Imgur direct link. Again, thank you for your time & patience. Mike TK12331 1 Quote
Chemi[Staff] Posted November 1, 2023 Report Posted November 1, 2023 Hello again, Michael. As we were starting with your review, we noticed that your gloves do not meet the requirements for level 1. The CRL for level 1 states: -L1: Black in color, made of either rubber, nomex, leather, or leather-like material, with no visible straps or logos/designs. The fingers are enclosed. You may be able to remove it with acetone (I did that with both of mine). However, sometimes acetone can damage the glove. I recommend that you test on a less visible area of the glove first. Let us know when you have it fixed and we can "move along" with your request. Thanks! Quote
michael.trunko[TK] Posted November 2, 2023 Author Report Posted November 2, 2023 Good evening, Gloves have been taken care of concerning the logo/design. Magic eraser did the trick! I’ll replace the pics in the original post with my new pics. I did use my nomex gloves for my level 1 approval. New EIB gloves: 2 Quote
justjoseph63[Staff] Posted November 4, 2023 Report Posted November 4, 2023 Quick tip: Some "Goof-Off" stain remover and a few paper towels will get rid of the writing on the rubber gloves. Takes about 4 minutes to do both. One thing that jumped out was the connection in your forearm piece. One has an interior cover strip but the other one could use one as well, as there seems to be quite a gap. (Just a little added insurance so that it doesn't pop apart at some point). Quote
Chemi[Staff] Posted November 4, 2023 Report Posted November 4, 2023 Hello Michael. We noticed that you haven't posted an action photo. So you need to put your armor back on, grab your blaster and show us your best side. Quote
gmrhodes13[Staff] Posted November 4, 2023 Report Posted November 4, 2023 13 minutes ago, Chemi said: Hello Michael. We noticed that you haven't posted an action photo. So you need to put your armor back on, grab your blaster and show us your best side. He must have edited it out by accident, as I download a copy for the EI honor gallery, oh just noticed it's in his Imgur link at the top 1 Quote
Chemi[Staff] Posted November 4, 2023 Report Posted November 4, 2023 Ok. Thanks Glen!!! I will edit the first thread and include it. 1 Quote
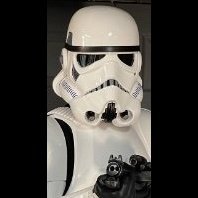
Chemi[Staff] Posted November 5, 2023 Report Posted November 5, 2023 Hi Michael, and thank you for your EIB application! CRL and EIB Application Requirements: All required photos have been submitted, and on behalf of the entire D.O. staff we are pleased to welcome you to the rank of Expert Infantry. Congratulations! Other-Armor Fit/Assembly; In this area we review observations made by your fellow troopers and the DO team. Some observations may lead to suggestions to improve the overall look of your armor, and please keep in mind that we consider both text (CRL) and pictures (screen caps/reference images) when reviewing submissions. Well, first of all, thank you for the work you've done to improve your armor. As usual, let's start with the helmet. -L3.:Ideally, placement of ears (and screws) should closely follow the rear angle of the trap above them. This is a very common issue that we always add as a suggestion, as it will only be a "L3 requirement" when the helmet looks "weird" or "ugly".In your case, both ears are very close to their ideal position. Reference images -If you want, to be more screen accurate, you can trim the brow a little bit. Take care not to cut too much. Reference images -Maybe it's the position of your head for the pic, but we can see too much of the inside of your helmet. If not, you may be able to remove some padding so that the helmet covers part of that gap. Reference image -Your right forearm is slightly higher than your left forearm. A little adjustment in the straps and it's done. Reference images -The same applies to your thighs. I recommend you to raise your right thigh and you will avoid the problem with the drop boxes that we include in the next point. Reference images -One of the drop boxes overlaps one of your thighs. As we have mentioned, raise your thigh a little, and you will avoid the overlap. Reference images The kidney armor protrudes. Adjusting the straps should do the trick. Reference images - For accuracy, you can trim the small ab buttons panel. Reference images ********************************************************************************************************************************************************* Centurion Requirements: In this section we prepare you for our highest tier of approval. Because Centurion photos must show more detail than EIB, items pertaining to Level 3 might be seen there and not here and additional photos may be required. We try to point out all that we can from what we are able to clearly see, but the final accuracy is the responsibility of the trooper. We start with the helmet as well. -It appears that the tube stripes on the right side, are too far away from the cheek in the area next to the ear. The CRL states that Ideally, the tube stripes are positioned approximately a pencil width from the side of the cheek. In this case, we believe that it is necessary to move the tube stripes, as it is too evident (unless it is an optical effect of the photo)... Right side Left side Reference image L3.: There should be a minimal gap between the shoulder armor and the chest/back plates. We think you can trim the shoulder strap a bit, so your armor will look great... Reference images -It is very, very little, but you can move the belt, so that its position is 100x100 screen accurate. L3.: The top of the ABS ammo belt should sit at or just above the bottom of the central and vertical abdomen button panels. Reference images L3.:Drop boxes are vertically aligned with the end of the ammo belt with minimal gap between belt and box. You can prevent them from moving with a drop of glue on the inside of the nylon strap (between the nylon strap and the canvas belt), or by moving a little the screw you have to hold them in place. Reference images -And last but not least , there is some gap between the kidney armor and the abdomen. In some photos it appears to be OK, but in others it does not. You can probably fix it easily by tightening the belt a little. Reference images -Your posterior armor is not aligned with the kidney armor. We recommend that you use the famous V tabs to align them perfectly (with a heat gun or something similar you bend ABS plastic strips into a V shape. You only glue one side and the other side is free to allow movement). -The detonator caps are too wide. The gap between the white panel and the caps should be wider. We believe that if you trim the caps(and move the clips), you will solve both problems. Reference images Nothing more to add, , Michael. Congratulations on your new badge! Don't forget to request your EIB Certificate HERE Quote
gmrhodes13[Staff] Posted November 5, 2023 Report Posted November 5, 2023 Congratulations trooper and welcome to the Espert Infantry ranks and the Expert Infantry Honor Gallery Looking forward to seeing you at Centurion Also I just noticed your forearms appear to have velcro on them, these are normally glued shut. DO's may comment on this in your Centurion application (if you apply, which you should ) Quote
Sly11[Admin] Posted November 5, 2023 Report Posted November 5, 2023 Congratulations Michael, welcome to the rank of Expert Infantry! Quote
Crampeat[TK] Posted November 5, 2023 Report Posted November 5, 2023 Congratulations, Michael! Welcome to the ranks! Quote
michael.trunko[TK] Posted November 6, 2023 Author Report Posted November 6, 2023 Very honored and excited to be a part of the EIB! I appreciate all the help and suggestions to make my approval possible. In addition, I'm thankful for all suggestions to address in preparation for the L3 process. With gratitude, Mike 3 Quote
TKSpartan[Staff] Posted November 6, 2023 Report Posted November 6, 2023 Congratulations!! Welcome to EIB ranks!! Quote
MaskedVengeance[Staff] Posted November 6, 2023 Report Posted November 6, 2023 Congrats Michael! Well done, sir! See you at L3 soon! 1 Quote
Doggydoc[Staff] Posted November 6, 2023 Report Posted November 6, 2023 Congratulations Michael 1 Quote
giskard8[Staff] Posted November 6, 2023 Report Posted November 6, 2023 Congratulations Trooper! 1 Quote
MintImperial[TK] Posted November 7, 2023 Report Posted November 7, 2023 Well done, trooper. Not much more effort and you’ll be shooting at the highest level. Quote

Recommended Posts
Join the conversation
You can post now and register later. If you have an account, sign in now to post with your account.