CallMeMrTibbles
-
Posts
695 -
Joined
-
Last visited
-
Days Won
8
Content Type
Profiles
Forums
Gallery
Articles
Everything posted by CallMeMrTibbles
-
 Can you post a close up of your handguards. Cant see clearly, but look like you have 4 sets of double stitching and it should be 5. (If you think the stitching at the knuckles would be too tight I believe it's OK to add the detail to the handguards, but not actually stitch to the gloves, but check with one of the DOs). For your butt plate you may find that Glen's technique of v tabs would help bring it in, as well as preventing any 'trooper butt'. Heat a scrap of ABS and bend into this shape: Glue roughly in this location, but only glue on one end and leave the other end floating. I glue to the butt plate and get a good result. I believe Glen glues to the kidney plate.
 -
Now I've used it on a couple of troops there is a delay, but it's only noticeable on my own voice; when others are talking I didn't even realise. You notice it for a few minutes, but then I just kinda forgot about it. Its a small thing to me for the convenience of going wireless.
-
TK 19632 requesting ANH EIB status RWA (1031)
CallMeMrTibbles replied to Goggytalks's topic in Request Expert Infantry Status
Looking really sharp Colin. Good luck with your application -
Really great 'how to' for the abs paste. Don't be surprised if people are referred back here to see how it's done
-
Greetings from Ohio River Valley.
CallMeMrTibbles replied to FireMist's topic in New Member Introductions
Hi Darylee, Welcome to the forum! Good luck to you both with all of your builds -
Fraying canvas belt
CallMeMrTibbles replied to CallMeMrTibbles's topic in Boots, Soft Parts, and other Accessories
Yes mate. More than enough. How I did it... Trim off only the worst of the fraying. No need to go mad. Apply to the back face and the edge, not the front face. Smooth it gently along the edge, just to work it in a bit. Smooth it on the back face in the direction of the fibres (from centre to edge of belt), again, just to work it in. Leave 5 to 10 minutes (until it starts to go tacky) then pinch the front and back faces together between finger and thumb (not hard, just to bring them togther). Then run your finger along the edge to smooth it down and give a nice finish. Leave over night. I didn't do the whole belt in one go. I did over the course of a few days in stages. It made the belt a little less floppy, bit in a good way. Rich [emoji106] -
CoolHandLAZ's Anovos ANH Stunt TK Build (FIRST BUILD!)
CallMeMrTibbles replied to CoolHandLAZ's topic in ANH Build Threads
Awesome news! Good work, and well deserved. Looking forward to troop reports and your EIB submission [emoji106] -
Greetings from Northamptonshire UK
CallMeMrTibbles replied to Goggytalks's topic in New Member Introductions
Learn a new thing every day! -
Greetings from Northamptonshire UK
CallMeMrTibbles replied to Goggytalks's topic in New Member Introductions
Too much time at home means I can jump into the forums pretty quickly [emoji1] And re higher levels... As soon as you've got your basic clearance from UKG you can get your EIB application started. You don't need to wait for any of your induction. That's exactly the process I followed. Looking forward to seeing your EIB thread! [emoji106] -
Greetings from Northamptonshire UK
CallMeMrTibbles replied to Goggytalks's topic in New Member Introductions
Colin, Hadn't realised you're in Northampton. I'm only one county away in Cambridgeshire. Looking forward to meeting you at a troop. Rich -
Fraying canvas belt
CallMeMrTibbles replied to CallMeMrTibbles's topic in Boots, Soft Parts, and other Accessories
Awesome mate. Really happy it worked out -
Tat2trooper TX Anovos build thread
CallMeMrTibbles replied to tat2trooper's topic in Other 501st Costumes
Looks amazing mate -
Cool fix. Have you left it detachable for transport?
-
Fraying canvas belt
CallMeMrTibbles replied to CallMeMrTibbles's topic in Boots, Soft Parts, and other Accessories
Be cool to see how it turns out for you [emoji106] -
TIP: NOTE ON HWT PACK SPECS:
CallMeMrTibbles replied to justjoseph63's topic in Heavy Weapons Trooper
Great. Thanks Joseph -
TIP: NOTE ON HWT PACK SPECS:
CallMeMrTibbles replied to justjoseph63's topic in Heavy Weapons Trooper
Just checking, is the info in Joseph's original post here still correct? -
Thanks for these links mate. Popped here to get the info before starting my pack build. Hopefully can get that pan you mentioned in the UK(?)
-
Also, nice gloves. Stitched directly to the gloves? (It's my next upgrade to my esb tk)
-
And good day to you sir It's been said I get around a bit! Gotcha re the blaster. Sounds like you know what you're doing
-
Gotta love an ESB TK. Nice work! Have you got a pic of the other side of your blaster? Looks from the action shot like you may have an ANH version(?) Can't remember if UKG armourers are concerned about that for basic clearance, but it'll be an issue at higher levels.
-
Hi Spike, I'm 6'4", and I feel your pain. I'm a little lighter at around 210lbs, although I was 260lbs when I started my armour build. I got my armour from RWA (in the UK), but I did build it myself. I ordered their XL armour, and at its biggest size it would completely swamp me at 260lbs. There's a company in the UK called Trooper Stuff... https://www.facebook.com/TrooperStuff/ ...that build commission suits using RWA armour, so that's a possible source for you. Pretty sure they ship worldwide, but best check with them. Be aware that even ordering a fully commissioned suit may require some final work by you to get it to fit exactly right. Don't be put off or worried by that though. Regardless of how handy or experienced you are (or not!) there's a lot of people here (and in your local garrison) that want to help you achieve your goal. You just have to ask. All the best mate. Rich
-
Looks great! Really good work
-
Hopefully I can join the 501st
CallMeMrTibbles replied to Troopermike888's topic in Getting Started - Read this First!
Hi Michael, Good to have you here. Looking forward to seeing your build once you get started -
Velleman MK136 Super Stereo Ear
CallMeMrTibbles replied to xSCDx's topic in Electronics for Helmets / Blasters
But does it have a fancy blue led?? If only I'd asked first! Thanks Andrew -
Velleman MK136 Super Stereo Ear
CallMeMrTibbles replied to xSCDx's topic in Electronics for Helmets / Blasters
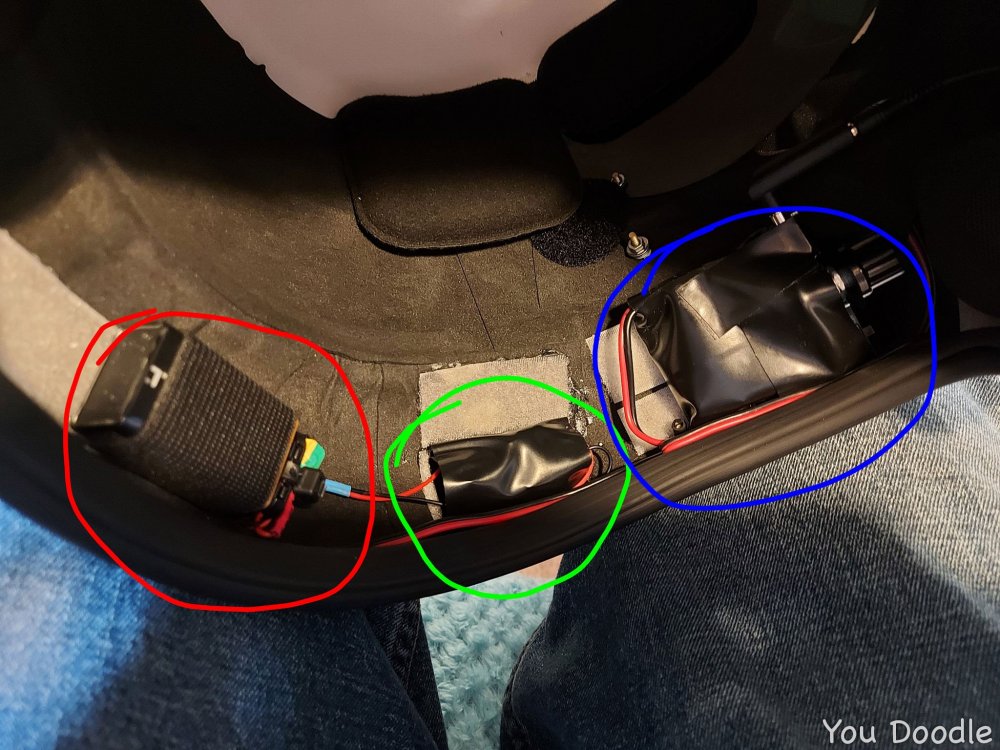
Wandering off thread, but still mk136 related... Just replaced the 3x1.5V batteries with a 9V pp3 and a dc/dc convertor. Here's the convertor I've used https://www.amazon.co.uk/dp/B08PNV2GXT/ref=cm_sw_r_apan_glt_fabc_N962KEEDXJ9FZYH558TY?_encoding=UTF8&psc=1 Circled in red is the 9v pp3. Used CA / superglue to make a loop of elastic, and glued some Velcro to it to secure inside the lid (really easy to swap out the battery, just slide out of the elastic). Soldered a small switch to the battery connector. MK136 has a power switch but the dc/dc convertor doesn't and might slowly drain power. In green is the dc to dc convertor. The input and output range is pretty wide, and adjustable. Before fitting to the helmet wire up the 9V battery connector to the input then adjust the pot so that you measure 4.5V at the output. I wrapped it loosely in black electrical tape so it didn't scratch my head or short on anything. Takes up very little space, and has a nice blue power indicator LED. In blue is the MK136. Standard stuff. I leave it turned on there now, and control power with the switch at the battery. I fitted a knob to the volume, which makes it much easier to adjust while wearing the helmet and rubber gloves.