gmrhodes13
-
Posts
31,219 -
Joined
-
Last visited
-
Days Won
1,070
Content Type
Profiles
Forums
Gallery
Articles
Everything posted by gmrhodes13
-
Looks good to me. I used some scrap pieces of ABS on the top and bottoms of the snap plates to hold them down flush, then clamp, I don't bother clamping the actual snap. Note some in the past have had issues with a reaction between the snap and E6000 which can cause heat so try to keep the glue away from the actual snap, I've not experienced it myself but doesn't hurt to be cautious .
-
You can either sand or cut both are acceptable although cut on an angle is more screen accurate
-

Dead Post Links & Broken Photos, How You Can Help
gmrhodes13 replied to Sly11's topic in Forum Help & Support
Armory Assembly, Mods, and Painting Page 18 Completed - gmrhodes13 Page 17 Completed - gmrhodes13 Page 16 Completed - gmrhodes13 -
Dead Post Links & Broken Photos, How You Can Help
gmrhodes13 replied to Sly11's topic in Forum Help & Support
Armory Assembly, Mods, and Painting Page 21 Completed - gmrhodes13 Page 20 Completed - gmrhodes13 Page 19 Completed - gmrhodes13 -
AM Armor 2.0 ANH Build (1st time TK Builder)
gmrhodes13 replied to Darth Atlast's topic in ANH Build Threads
Another great AM build thread to follow is Tony's -
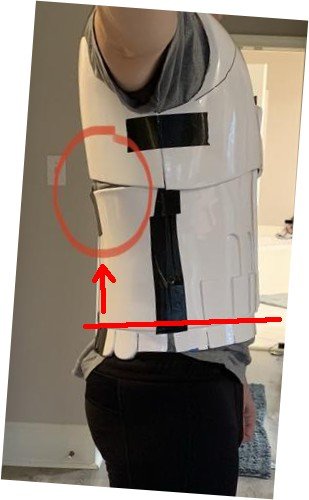
Unfortunately not able to get to my FOTK case at the moment for measurements. One issue is the ab is not sitting straight along your sides, it drops towards the back I've rotated your image a little so you are not leaning back as much. If you brought the back up so it's straight on the sides you should just about be covered. I would however look at adding your belt and cod then seeing if you could move the whole ab section up at all, really depends where your cod is sitting.
-
Dead Post Links & Broken Photos, How You Can Help
gmrhodes13 replied to Sly11's topic in Forum Help & Support
Armory Assembly, Mods, and Painting Page 24 Completed - gmrhodes13 Page 23 Completed - gmrhodes13 Page 22 Completed - gmrhodes13 -
WTF TK ANH Stunt Build thread - newbie needs help
gmrhodes13 replied to cnsf's topic in ANH Build Threads
I found a small rectangle brush gave me the best outcome, I found it easier to control on the outsides, but what ever works for you. If you wanted you could go around the outsides with a toothpick and scrape away any excess, using a flat piece of scrap ABS plastic works as well. -
Should be straight at the wrist
-
Dead Post Links & Broken Photos, How You Can Help
gmrhodes13 replied to Sly11's topic in Forum Help & Support
Armory Assembly, Mods, and Painting Page 27 Completed - gmrhodes13 Page 26 Completed - gmrhodes13 Page 25 Completed - gmrhodes13 -
WIP New Build - ANH STUNT STORMTROOPER
gmrhodes13 replied to Blastoderm's topic in ANH Build Threads
Hello and welcome aboard, here are a few build threads for the shorter trooper https://www.whitearmor.net/forum/topic/38416-crickets-rs-stunt-build-for-the-vertically-challenged/ https://www.whitearmor.net/forum/topic/38842-fragarocks-rs-stunt-build-not-to-scale/ https://www.whitearmor.net/forum/topic/42868-sha-shas-wtf-anh-stunt-build-complete/ There are also a lot of AP build threads, just check the titles of the build area threads, most with have makers initials in the title. Good luck with the build -
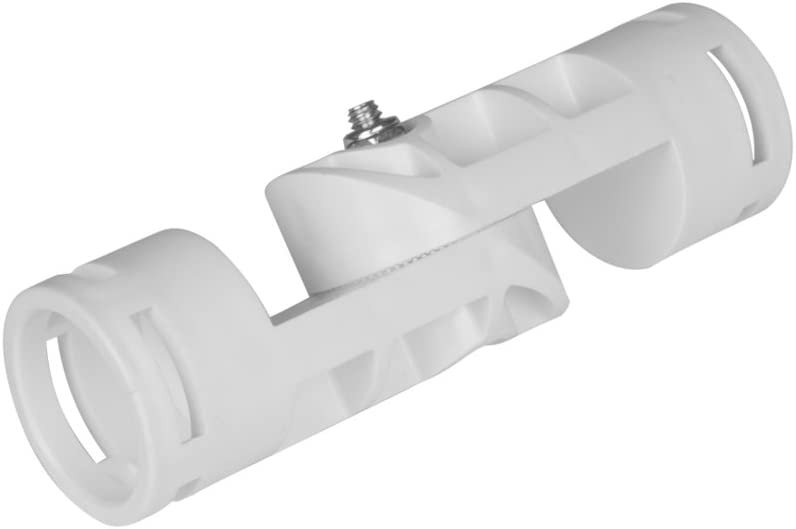
A few options, purchase one from a store, sometimes the sell off older mannequins, local sales groups sometimes offer them for sale, they can be a little expensive if you are looking at new. Make a duck tape mannequin Make a pipe mannequin or or You can also purchase adjustable joints for pipe mannequins https://www.amazon.com.au/Adjustable-Joint-Fitting-2-5cm-Elbow/dp/B00C7WST34
-
Congratulations trooper and welcome to the EI ranks
-
Searching for Australian made armour for trooper
gmrhodes13 replied to Rudsy's topic in New Member Introductions
Hello and welcome aboard, you've already been given best advise but also take a look at this thread, full of helpful info -
Slight misalignment in left ribbed shoulder strap
gmrhodes13 replied to RageQuit's topic in Assembly, Mods, and Painting
I find using double snaps helps to prevent any sideways movement. Normally strapping is a little wider between the chest and backplate than what you have, and some times it's doubled over to give extra strength, again reducing the sideways movement. At the end of the day what ever works for you, there are so many ways to do strapping. FYI elastic strapping between the chest and backplate should be white, so bare that in mind if going for higher level approval Chest and back shall be connected with a white fabric or preferably elastic strap at the shoulders. As seen in the images from screen used armor below, this ideally must be approximately 2 inches (48 mm) wide. One other tip is to offset the attachment from the shoulder bells to the shoulder straps and not have them centered, this helps pull the shoulder bells inwards at the front when moving your arms .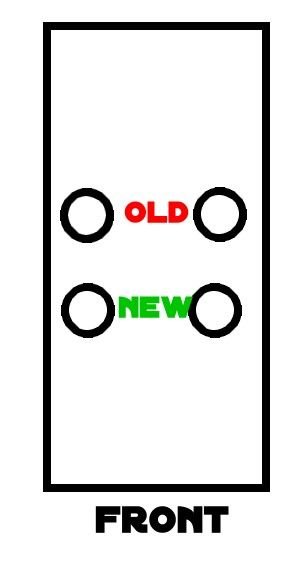
-
Dead Post Links & Broken Photos, How You Can Help
gmrhodes13 replied to Sly11's topic in Forum Help & Support
Armory Assembly, Mods, and Painting Page 30 Completed - gmrhodes13 Page 29 Completed - gmrhodes13 Page 28 Completed - gmrhodes13 -
Helmet brow trim -- where and how to cut it
gmrhodes13 replied to A.J. Hamler's topic in ANH (Stunt and Hero)
No doubt the DO's will chime in when they have time but just to add some images to this thread for others who may be interested, going on past EIB feedback the brow trim is angled cut following the trap. What also comes up quite a lot is the brow trim to stop before or at the end of the trap and not going any further. This is one of those items that we see all different examples of, cut angled, cut straight, stops at the edge of the trap, stops before. Here's just a few images from the DO's used references EIB suggested trimming by DO's Personally I prefer the angled cut at the end of the trap as it's a cleaner look -
Hello and welcome to the forums, looking forward to seeing you kitted up. For anything else Stormtrooper you may need check out this thread
-
Dead Post Links & Broken Photos, How You Can Help
gmrhodes13 replied to Sly11's topic in Forum Help & Support
Armory Assembly, Mods, and Painting Page 35 Completed - gmrhodes13 Page 34 Completed - gmrhodes13 Page 33 Completed - gmrhodes13 Page 32 Completed - gmrhodes13 Page 31 Completed - gmrhodes13 -
Hello and welcome aboard trooper, good luck with the printing
-
Hengstler Counter - Custom TK Number Photoshop File
gmrhodes13 replied to Ebio Amisi's topic in ANH BlasTech E11
Very nice, I've done a few in the past, you can also see some in this thread -
Slight misalignment in left ribbed shoulder strap
gmrhodes13 replied to RageQuit's topic in Assembly, Mods, and Painting
Could you post an image of the front of the straps, a small angle to the strap positioning on the front can make a difference. When I set mine up I now use use a mannequin or if it's too cold in the shed just a small box to hold the chest and ab apart, clip the elastic straps on then you can work out where the straps will sit the best. Once happy with the positions add some painters tape around the front of the straps, remove, rough both surfaces then apply E6000 glue and clamps, then check positioning on the rear. j I also have the elastic loops further back on the shoulder elastic, around the tabs on the backplate which also helps to stop the shoulder straps rotating. If you notice in this image the elastic loops are around the plastic tabs on the backplate As Andrew mentioned at times you may need to use some heat but fortunately the way I've been doing them I've never needed too.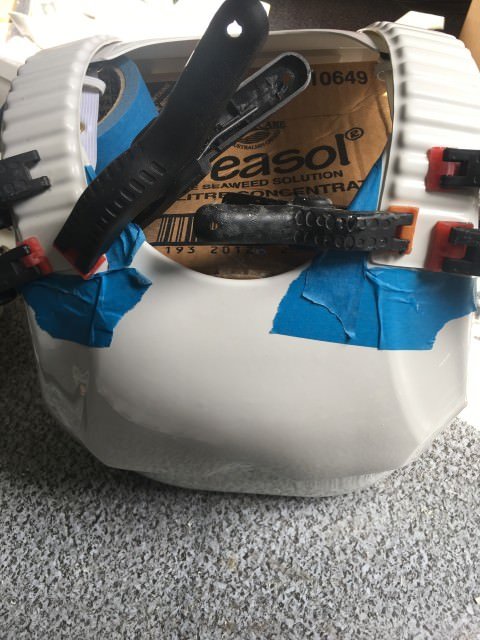
-
WTF TK ANH Stunt Build thread - newbie needs help
gmrhodes13 replied to cnsf's topic in ANH Build Threads
Note paint thinners can be different depending on what type of paint, enamel, acrylic and 2pac and what type of plastic you have, I've seen some horror cases of melted armor plastic in my time just from wiping on ABS. Also there can be differences between countries. Down under I've tried 3 different automotive acetone's to try to make ABS paste but no luck, none of they where strong enough, even nail varnish remover wouldn't work, I ending up getting some industrial acetone which finally did the trick. Definitely would be a good idea to do a test piece with some scrap ABS before using any acetone/thinners -
Where, What and Whom To Avoid When Buying
gmrhodes13 replied to RogueTrooper's topic in Getting Started - Read this First!
Hello and welcome to the forum and Happy New Year, Dave's Darkside Depot (originally known as AM) is on our vetted sellers list but as Steve said it suits the larger trooper, height and width. Here's a great thread full of helpful info to get you on your way