


gmrhodes13
-
Posts
31,206 -
Joined
-
Last visited
-
Days Won
1,069
Content Type
Profiles
Forums
Gallery
Articles
Everything posted by gmrhodes13
-
Denuo Novo details are more aimed towards TLJ than TFA, (although the forearms will need some work) so I would be looking for a TLJ helmet. They are offering Premier Line helmets currently at over $1,000 or budget at $596. https://www.denuonovo.com/products/star-wars-the-last-jedi-first-order-stormtrooper-helmet Personally I'd keep an eye out for sales threads for an Anovos budget helmet, they were around $250-300, they do come up from time to time. Even try Facebook build groups. Conversation on the DN kits here
-
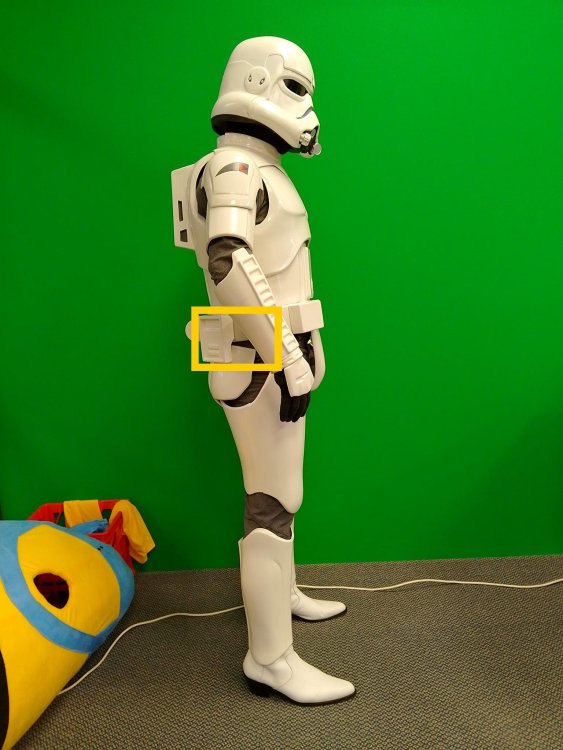
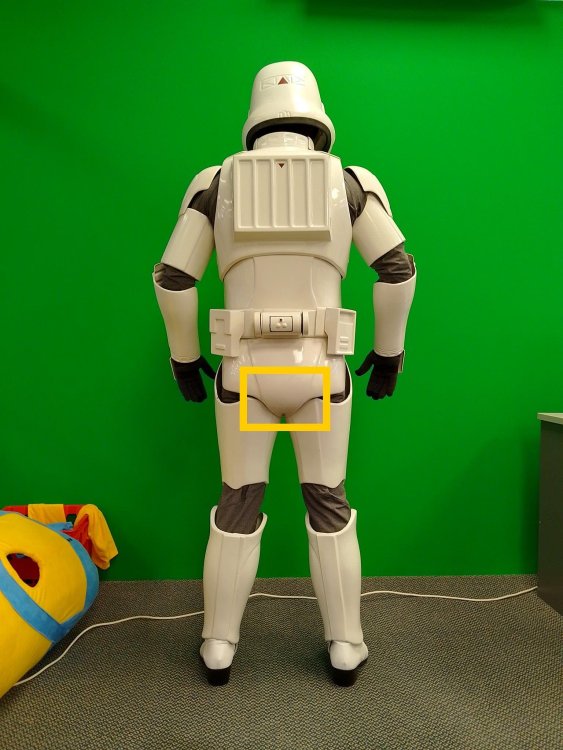
Looking good. I would however try to bring the helmet down a little, remove some padding if youcan. Adding the cod strap with help to prevent your posterior pushing backwards Also should help the gap between the posterior and your thighs, if not you may need to trim them a little so you aren't hitting when you walk.
-
 Congratulations trooper and welcome to the centurion ranks
 -
Pretty much all of the elastic is at different lengths, it's a case of working out the gaps using tape then considering any tightness needed in the elastic to close pieces like AB/Kidney. Many double snap which helps if one snap fails.
-
CountCunning's ROTK Build Thread (Jimmiroquai Kit)
gmrhodes13 replied to CountCunning's topic in Rogue One Build Threads
Having a full length mirror around is very handy, especially if on your own. -
I couldn't see any of the tell-tale tabs on the cod or posterior so I ruled AM out. I did notice the larger ab plate has no return edge moulded in. Example AM cod posterior tabs TD tube is also of the smaller size, ie: ATA, AP/NE (ATA normally lighter grey tube) AM and AP both have some tell tale details in the large ab plate recess on the torso, small circle in lower corner AM AP WTF Compared to the image provided I'm wondering if it's an older recast

-
Tim’s first time build (RS Prop Masters ESB TK)
gmrhodes13 replied to TrickyT81's topic in ESB Build Threads
I normally take off 5mm which is normally enough not to overlap, really depends on your size and how much the elastic has to work, doubling over the elastic here is a good idea. To stop overlapping there are lots of ways, adding slots and tabs can help, I found just adding some bent pieces and gluing behind helped keep them together. Just adding some foam behind the ab or kidney can also help pull out the pieces closing the sides. -
Unfortunately it's trial and error, if you have some scrap you could test shades on that, you only need to mix a small amount as a test. Also remember what you see in person can look different in images so may not be as bad as you think.
-
Photos are a little low on resolution so hard to make out details. One piece that does pop out is the helmet, it's a 3 piece helmet which I have not seen for some years, could be an old NE armor (now AP) This image is from an old NE build, same 3 piece helmet (top left) You can compare other pieces in this build thread I would check with your GML (garrison membership liaison) as to if the helmet will be approvable or not. I would dare say it would be noticed for higher level acceptance here on FISD.
-
RS Prop ANH Stunt Helmet Tear Down Help
gmrhodes13 replied to ARC982106's topic in ANH Build Threads
Don't rush, heat can build up if you drill too fast, nice and slow and make sure not to loose your grip on the rivet as spinning can also cause heat. -
It's really a matter of shading, adding other paint to change the shade, there are many different shades of white depending on what armor.
-
Rivets look a tad big but could be as they are a little close to the corners, more a higher level issue though. Note the rivet is also set in the middle of the ridge.
-
Tim’s first time build (RS Prop Masters ESB TK)
gmrhodes13 replied to TrickyT81's topic in ESB Build Threads
If there is enough post to go through it all then you could add it, some snaps have shorter posts than others. Make sure you seal the ends of the nylon too as it can fray quite a lot. -
Hello and welcome aboard, you may find this useful Well worth having a look through this thread to for other questions you may have
-
I went torso then arms and legs.
-
Tim’s first time build (RS Prop Masters ESB TK)
gmrhodes13 replied to TrickyT81's topic in ESB Build Threads
I found the double method does help a little aligning some pieces but more importantly saved me from missing a troop, one of the shoulder strap snaps pulled through the elastic but having a spare I could still get kitted up. Some don't have any issues with single snaps but it is safer to double up, at least on areas that may take some strain. Soldering the hole definitely helps as it melts the edges so the snaps are less likely to pull though. -
I've had this happen in the past, I used water based acrylic paint only as it was cheap and I could easily shade to the white to match, really thin coats worked our well and you can even dap a wet rag against it to smooth any brush marks, then once completely dry add some clear paint or hair spray to give some shine. You can also use white gloss paint as long as you can get a good match. As it's on the rear it won't be as noticeable to the public. Don't forget you will need to also fill those open ridges, if adding mobility cuts you will still need to fill the top of the ridge.
-
Before top coating I normally light dry sand the primer with 600 grit and wipe down with a tack cloth (available at paint/ auto stores), others use finer sandpaper but this works fine for my use. Really depends on what paint you are using also, I prefer automotive acrylic paint as it is very quick to dry so multiple coats go on quite quickly, and you can go a little heavier, with other enamel based paints you have to dry completely before adding other coats. Another plus with automotive acrylic paint is you can sand and buff in case you get any drips or imperfections. Double check the directions on the can before you do anything, make sure you take not of drying times between coats. There are so many different ways to prep and paint, I'd suggest heading to youtube and checking out some videos. Good luck and may the force be with you.
-
Darkalex ANH stunt build thread - RS Prop Master
gmrhodes13 replied to Darkalex's topic in ANH Build Threads
ABS paste is not difficult to make, use some of your plastic scraps and acetone, leave over night. Great thread on the subject here -
Attention recruit, back on your feet and get trimming
-
Hello and welcome aboard, looking forward to seeing your build If you are a 501st member you can request higher access here
-
You need to add a link to your membership profile, have a read of the first post in this thread
-
Tim’s first time build (RS Prop Masters ESB TK)
gmrhodes13 replied to TrickyT81's topic in ESB Build Threads
As long as they aren't seen from the outside you can use any size. Reason many go for the other types of snaps is they tend to hold on better than the RS, well in my experience anyway. -
SublimeBW's Armor Master's (AM) ANH Stunt Kit - Build Thread
gmrhodes13 replied to SublimeBW's topic in ANH Build Threads
Looking good -
Clamps and magents are the way to go, make small adjustments, I find using bolts rather than rivets helpful as you can adjust the bolts, rivets you are pretty stuck unless you carefully remove them. Although not a requirement DO"s suggest this for ear placement: The "ideal" ear placement is as seen below, where the screws line up with the rear angle of the trap right above it. Because some armorers design their helmets differently or send them pre-assembled this is not always possible to achieve, but it is suggested that you try to get as close as you can. Note: Top ear screws should ideally be located directly below the rear of the trap. A great thread on fitting ears, making the notch on top of the ear can be of great help reducing gaps


