

SublimeBW
-
Posts
113 -
Joined
-
Last visited
-
Days Won
1
About SublimeBW

-
Great info and I will be leveraging this weekend or the next to build out my Velleman kit.
-
 SublimeBW changed their profile photo
 -
SublimeBW's Armor Master's (AM) ANH Stunt Kit - Build Thread
SublimeBW replied to SublimeBW's topic in ANH Build Threads
Before I forget, a BIG thank you to everything that helped me with advice along the way (including my build partner, who is not a part of FISD/501st, just an absolutely solid friend). @gmrhodes13 @Doggydoc @dblcross @TKSpartan & @FN1313, you guys get a special callout for answering multiple questions for me. I trying appreciate it as I hit a real rut when I got into my own head when I dorked up my first set of ears. I am not done yet, I still have the EIB process and my blaster to build, but will likely not make much progress on that until after the holidays. -
SublimeBW's Armor Master's (AM) ANH Stunt Kit - Build Thread
SublimeBW replied to SublimeBW's topic in ANH Build Threads
This is all the fantastic detail stuff I was looking for. I will start looking into it and figure out how to move forward with the EIB approvals (I built with Centurion in mind). -
TK 13723 requesting detachment access https://www.501st.com/members/searchresults.php?searchfield=13723&criteria=tkid
-
SublimeBW's Armor Master's (AM) ANH Stunt Kit - Build Thread
SublimeBW replied to SublimeBW's topic in ANH Build Threads
After having a crazy busy summer, I have finally had time to submit my photos and received my garrison approval and have my official TKID! -
SublimeBW's Armor Master's (AM) ANH Stunt Kit - Build Thread
SublimeBW replied to SublimeBW's topic in ANH Build Threads
My long awaited neck seal has arrived and I will be taking my approval pictures for my local garrison tomorrow then moving on to the next steps here! -
SublimeBW's Armor Master's (AM) ANH Stunt Kit - Build Thread
SublimeBW replied to SublimeBW's topic in ANH Build Threads
Put on my entire suit! It was magical (my wife didn't tell me my armor parts were twisted and my belt cocked). That said, it is time to do some mobility cuts. Any quick tips on the cuts? Should I try to keep it at a minimum or go for a nice sweeping arc across the back and maximize the movement options? -
SublimeBW's Armor Master's (AM) ANH Stunt Kit - Build Thread
SublimeBW replied to SublimeBW's topic in ANH Build Threads
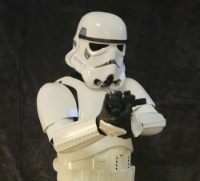
We knocked out the belt today! I believe that is a wrap (for the armor), minus some tidying up. I will get full suit pictures after the covers on the belt cure. Note: the blaster in the picture is not my blaster kit from Troopacola, it is a less expensive one that I got to fill the void in my holster until I get that kit built. Also, excuse the messy garage. -
SublimeBW's Armor Master's (AM) ANH Stunt Kit - Build Thread
SublimeBW replied to SublimeBW's topic in ANH Build Threads
This is fantastic feedback and will get me over the last hump. Greatly appreciated. -
SublimeBW's Armor Master's (AM) ANH Stunt Kit - Build Thread
SublimeBW replied to SublimeBW's topic in ANH Build Threads
I have my belt mostly assembled, just have to figure out the best placement for snaps. I originally went with a diagram that I saw that listed placing a snap 28mm on the right (up 15mm) and 59mm on the left (up 15mm) but that placement doesn't seem right; the belt would set midway up the front buttons, just under the 3rd button. Looking at the CRL, I am seeing the positioning below the button "box" while I see topics directing me to just under or partway up the first button. Is there an official ruling on proper placement? -
SublimeBW's Armor Master's (AM) ANH Stunt Kit - Build Thread
SublimeBW replied to SublimeBW's topic in ANH Build Threads
My belt has arrived (I ended up switching vendors due to delays with my original vendor). Time to wrap this thing up (pun partially intended). -
SublimeBW's Armor Master's (AM) ANH Stunt Kit - Build Thread
SublimeBW replied to SublimeBW's topic in ANH Build Threads
We completed most of the rigging today (I am waiting on a belt from Amazon for the thigh rigging) and it felt really cool (and tricky) to give everything a test fit at once. Sadly, I grabbed the wrong set of under clothes (with white seems, the set came with both white and black) so have that little annoyance in the picture. -
SublimeBW's Armor Master's (AM) ANH Stunt Kit - Build Thread
SublimeBW replied to SublimeBW's topic in ANH Build Threads
In my test runs of the helmet, I found that if I have my microphone close to the center tooth, it picks me up pretty clearly without grabbing noise from the fan. -
SublimeBW's Armor Master's (AM) ANH Stunt Kit - Build Thread
SublimeBW replied to SublimeBW's topic in ANH Build Threads
Cool. I will add some foam (I have some hanging around the house, I think) and give that a go before messing with finding a bracket insert. Thanks for the feedback about the background noise, I didn't consider that. Maybe it is better to get the armor done (pretty much just waiting on my neck seal and belt from Soulart (excludingmy blaster)) before adding more toys to the helmet. Maybe get a troop in and make a decision. -
SublimeBW's Armor Master's (AM) ANH Stunt Kit - Build Thread
SublimeBW replied to SublimeBW's topic in ANH Build Threads
I started putting attempting to figure out putting the electronics in as well as a test fit and was curious what people do able bobble head. I inserted some padding and I like the fit (where my eyes sit in relation to the lenses) but I definitely suffer from bobble head syndrome. 1. Should I add more padding around the sides or maybe find a hard hat bracket for the interior? 2. I have a power source and the IComm, is it better to store that in the back of the helmet (maybe even out the weight) or on the interior of the chest piece? 3. I noticed it is pretty hard to hear in the helmet. Is a hearing assist module worth the cost? If so, what type of headphones do people use with theirs? Interior view Test fit
