Leaderboard


Popular Content
Showing content with the highest reputation on 07/29/2021 in all areas
-
Thank you all so much! This is super helpful for Lvl3, I will get to work2 points
-
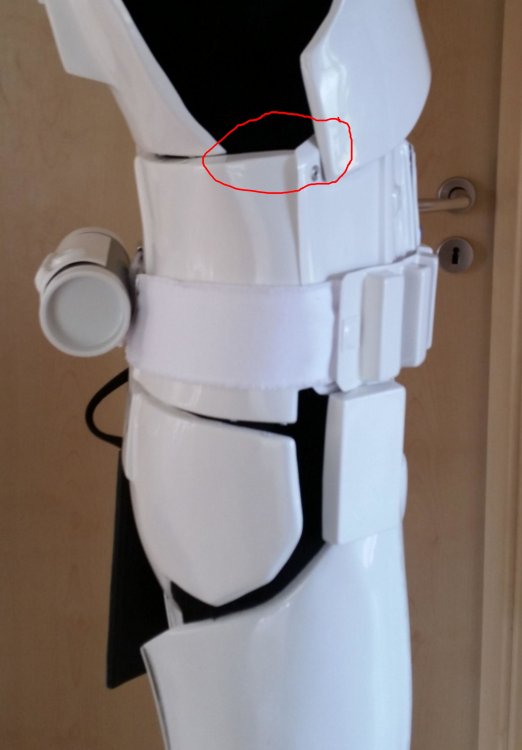
You have a few issues, but you are moving along nicely, Luca! Once you get to meet Tino in person he will be a GREAT help, I promise! It may be the angle of the photo, but without seeing a full length image and not knowing your height/weight I see what may be a potential issue. As per the CRL, "... all costumes are proportional to the wearer in scale, fit and size". Although I can't see the left one, in looking at the photo of the right one below it appears that the rear of your thigh tops might be way too large in circumference and are extending too far back behind the posterior plate. As seen in the reference images they should ideally sit closer in and may need to be reduced. Reference images If this is indeed the case, it's not as hard to do this as you may think. The blue dotted lines below show an example, but it's best to do it in increments until you get the right fit. As for the tops, I would suggest evening them out as seen with the yellow line. Those points WILL cut into you when walking, especially if they sit high. On a side note, if you do decide to reduce the size of the tops, I recommend getting rid of some (if not most) of the return edges, especially in the groin area to prevent chafing. More info on that can be found here. Again, once you and Tino get together he will be able to explain a lot of the nuances that will help, and in the meantime keep posting up lots of photos and asking lots of questions!!2 points
-
Instead of literally shorten it, maybe you could just install additional snaps on that strap to get the same effect and to vary in future. Yes, we'll definitely look over everything when we meet for taking for the approval photos. Also I am curious to see Richard's ideas on improving points, so we can get the best out of your armor. And yes, for the basic approval I would suggest to skip mobility cuts for the moment. You are slightly taller than me, so that should work.2 points
-
Thank you for the detailed review Dan, very useful for our members. Glad you finally received it and as others have mentioned, i hope it serves you well for many years of trooping.2 points
-
WARNING: The following content may be controversial! DISCLAIMER: These are my opinions from years of experience, pure and simple. Over the years I have noticed many future Troopers doing an OT (Original Trilogy) TK ask about return edges before, during (and after) their build... If this is a subject that you are curious about, grab a cup of coffee or a tall glass of frosty blue milk (this is a long post, lol) and read on.... QUESTION: "What are they, what do they do, and should I leave them, trim them down some or remove them"? ANSWER: Return edges are part of the molding process and provide strength in certain areas on the edges of your armor. They also provide a heftier look to some pieces. To help you decide whether or not to keep them is why I started this thread. Here I will attempt to go into a few details about them. Know in advance that as mentioned I personally am NOT a fan of them in many areas for several reasons (listed below). Some people love them and some may disagree with my opinions... many of you may trooped for years with no problems which is AWESOME, but many folks have had issues and questions. 1. In most areas they are not screen accurate- In looking at the screen caps and film used armor photos below you will notice their scarcity. 2. They can (and in many cases will) get very uncomfortable- Many folks like the "thicker" look it gives their armor, but they can cut into you, especially in the area where your arm bends ("armor bite") and the groin area (chafing). As Troopers we do a lot of walking and arm bending carrying a weapon, so keep this in mind. 3. If aiming for higher levels they can cause fitting issues- Examples: A. If you leave them on your forearm openings and glue on the cover strips, they will need to be completely removed at the wrists for Centurion level, making the opening too wide. This can lead to you having to remove the cover strips, reduce the sides of the forearms and re-attach the strips. Quite a pain in the posterior plate to say the least. *** See EXAMPLE 1 below. B. If they are overly thick on the bottoms of your shoulder bells, they can prevent them from lying snug against the biceps. 4. They can cause splits/cracks- Especially on some armor areas. ABS is designed to flex, and in some cases a small amount of return edge is fine, but too much can cause stress on those areas. *** See EXAMPLE 2 below Over time that stress will take it's toll somewhere, and that is usually the return edge. Anovos armor is especially prone to this on the sides of the chest/back plates and neck openings. I suggest shimming these on the rear with ABS strips and E-6000 to prevent it. Let's start with the chest plate: Note how the ones below (including the back plate) have either no or minimal edges with no cracks or splits. Now here is a screen used one with a pretty prominent edge, Notice the stress crack. Now, onto the ab/kidney/back plate: To keep them in line and prevent them from overlapping, it is suggested that you LEAVE a fair amount of the edges on the top/bottoms of the kidney and bottom of the back plate, especially if using the "classic" strapping method. Yes, these can split/crack as well but not normally. Shoulder Bells Trimming off the entire edge on the bottoms is not only screen accurate (first two photos), it allows them to rest close to the bicep (bottom photo). Third photo shows "suggested" trim lines (red) of an untrimmed bicep. My recommendation is the blue line. Biceps/forearms For sheer comfort and a sleeker look, I recommend removing ALL of the top and bottom edges before fitting/gluing them. First, no one sees the tops (covered by the shoulder bell) and the bottoms can cut into your arms (armor bite). Suggested cut lines in red. Again, if you do get armor bite you will have to take them both completely apart, remove the edge and re-fit. Better to think ahead. Some (myself included) like to leave a bit of the return edge on the outside of the top of the forearm for a thicker look. However, I highly suggest removing all from the inside part (the "scoop") where your arm bends. Again, an armor bite issue. This should also be done BEFORE final fitting. Here are some screen used examples: For level 3 (Centurion) all of the return edge on the wrist opening must be removed, including the area inside the "hump" as seen below: Posterior (butt) plate: Again, it is suggested that you leave some of the return edge on the top (and bottom in most cases) to keep it from riding under/over the kidney. Now, the BOTTOM of the posterior plate is where we often find splitting issues. Should you leave some return edge? Sure! BUT(T), when trimming the corners, (see below) be SURE not to give it a sharp angle... this is where the trouble usually starts. Instead, give it a slightly rounded angle (as shown in green). Thigh tops The tops of the thighs are where we see a lot of questions. I recommend removing all the return edges from the entire upper parts, and here is why: As mentioned above, you will be doing a lot of walking. If you have the edges (or at least a large portion of them) intact, the friction and inside facing angles can really chafe the heck out of you, especially on the inside of the groin area. (Ouch). If there are sharp edges/points on the tops (below) these will poke into you. When trimming these, just follow the existing line. Also, if you do your final fitting, glue everything together and find this out afterward, you will have to take the entire thing apart, remove the return edges, trim down the sides and then re-build/glue them back together. The reason is that afterward the opening will be entirely too large and you will have a giant gap all the way around. Not a good look. Easier to do it beforehand, trust me. As seen below, there were no return edges (or at least minimal ones) used in the films. Sniper knee plate The bottom of this piece is an area often not trimmed enough. To allow it to sit flat (or very close to flat) against the top of the calf enough for the glue to adhere properly I suggest removing most if not all of the bottom edge. Note how in the first and third photos how the sniper knee is parallel to the front of the calf. Last up, a photo that best illustrates my point about return edges and how they were not really present in many places on ANH armor. *** Example 1. of what happens when you have to reduce the return edge(s) after attaching cover strips. NOTE: For the example below I am using an ATA bicep (first 3 photos). Be aware that ATA makes the "suggested" cut line on their return edges pretty slim (a GREAT thing in my opinion). As seen on the armor in the 4th photo, if followed, the "suggested" cut line makes the return edges much wider (red line). Top view Bottom view For the purposes of this tutorial, we will assume that the ATA has those wider suggested return edges. Okay, let's say you really like the thicker look the return edges give your armor, so you left them pretty wide during fitting and then glued on the cover strips. Enough to get your arm through with a little extra room. Should be good to go, correct? BUT, you find that after having your arm bent for a while they cut into you (armor bite), so you find you have to reduce or remove most or all of it. No biggie, right? Just break out the Lexan scissors or Dremel and cut away, leaving the cover strips attached. Easy! So you remove it and then you run into the fact that the opening is now enormous. This is not a good look, and can result in the piece(s) jangling around and not being approvable at higher levels (or even Basic depending on your GML). What I am getting at with the above info. is that if you decide to remove them, it's better to do it before final fitting/gluing. Side note: Many biceps have an unusual shape at the tops (in red, below) normally located on the inside. This can be completely removed. Doing this will not affect approval at any level, and is screen accurate. It sits under the shoulder bell so no one sees it anyway! Screen used bicep USELESS TRIVIA: Many have asked about the "thumbprint" that many armorers have on the left bicep (screen used example below). Some think it is so you can tell them apart, but I was speaking with Brian Muir a few years ago (he sculpted the original armor used in ANH) and asked him about it: "To be honest, I have no idea... it was not in my original sculpt, and must have been a mistake in casting". There you have it. *** EXAMPLE 2: What causes cracks/splits: ABS bends pretty well, just as it's designed to. BUT, when there are return edges involved that changes the game. For the below example I used a 2 inch wide strip of ABS with a 1/2 inch "return edge". Looks pretty solid, right? That's because the edge provides stability. Now I am bending it up/in to simulate use over time. (More than it normally gets bent in many cases, but only to prove a point). That stress has got to go somewhere, and it's the return edge that takes it all and gives way, again causing cracks/splits. The red arrow shows a weak area where the stress in concentrated and cracks can form. Even if trimmed off afterward that area will be prone to splitting, so a small shim behind it is suggested. To sum it up, return edges are not meant to bend a lot. I suggest inspecting your armor occasionally to spot any existing/potential cracks/splits so that you can catch them before they get worse. I hope this helps answer any basic questions you may have, and always feel free to ask more detailed ones here or offer differing opinions.1 point
-
Hello Troopers! Let me introduce to you the Hellhounds Props E-11 ANH version. I'd like to share my thoughts on the blaster as well as my experience dealing with Daniel Hellhounds. And let me preface by saying, just wow, I wish I could give this a 10/10 review! I'll get into that.. The Blaster This thing has really blown me away how good it looks there's no doubt about that. Hellhounds boasts a full rubber blaster which is cast from real Sterling machine gun parts and M38 tank scope. Being cast from original parts, the texture on this blaster is truly next level. This would be impossible with a 3d printed blaster! The folded stock is where the metal texture is most apparent and I really hope pictures do this thing justice. Likewise, the scope is also very nicely textured from the original part. Inside the eyepiece it even still looks like machine metal as you can still see the rings left from the mill. On the scope and on several parts of the blaster there are even the original patent numbers, part names, and dates which, to be honest, he's just showing off at this point! Like I said, this blaster is cast in rubber. Mine is also from his newest molds (as of about a month ago, June). Daniel is continuously improving his molds and his casts from what I've seen on his Instagram/what he told me directly. This newer mold came with an even higher level of fidelity especially when it comes to the seam lines. Basically, there are none! The most obvious seam lines are along the handle, but who's going to see that when you're holding it? Nobody that's who. Even when the seams are visible, they are literally paper thin. The rest are strategically hidden under the T-tracks and stock. The only spot where the seam is "bad" (for lack of a better word) is on the front iron sights. The middle here looks more like just extra flash rather than part of the sight. But honestly, this is hardly a problem because it is still mostly hidden by the two sides of the sight. The front end of the barrel was also cast as a separate part which eliminated any seam from previous versions of Daniel's blaster. For seam comparisons here's a link to @Toothdoc's review of the same blaster but with a mold from only a few months before the one I received. https://www.whitearmor.net/forum/topic/50935-hellhounds-props-e-11-anh-and-esb-variants-a-sort-of-review-and-photo-comparison/?tab=comments#comment-717435 The M38 scope on top literally could fool you into thinking it was real, tarnished brass(?) scope. Daniel gave the scope a very subtle coppery paint. So subtle that from some angles it still looks black like the rest of the blaster. As for the rest of the blaster, I believe there is a very subtle amount of silver dry brush. But this is so subtly and perfectly applied that I'm honestly having trouble deciding if there's paint or if it's just the light playing tricks on me. Absolutely the perfect amount of dry brush to fill in around all the beautiful texture. And of course no weathering was done to the T-tracks. He also painted silver details around the selector switch and painted the ejection cover silver (idk if that's what it's called idk much about gun anatomy but you get it right?). There are a couple metal pieces on this blaster as well. These being the aluminum rail that the scope is mounted to and the D-ring. And, I might be wrong, but I believe Daniel also put a rod through the whole blaster for stability. I'm not certain but it just feels like there's something besides rubber in there. Not metal but cast in rubber is the selector switch, which actually moves! Totally unnecessary but I am here for it. This blaster also perfectly fits in my Darman's Props ANH holster. Suggestions for Improvement Honest answer, there is not a lot that I would want changed on this blaster, I'm just being nit-picky. My suggestions here for Daniel are simply that, suggestions. First off, the trigger guard right now is rubber but I feel like it could benefit from being aluminum as well. I'm a little worried that with a finger off the trigger and trying to hold the blaster then the trigger guard might deform or maybe tear off. Likewise, the activation handle is rubber and can wiggle. If it were metal I'd be less concerned about it ripping off if it bent too far. The scope rail did become unglued while it was in transit. Daniel packaged this blaster very well and it didn't require me anymore work than a couple dabs of super glue but maybe something to think about for the next one. On the handle the rubber feels a little bit soft right along the seam. I'm sure this is absolutely nothing to worry about but might just be what happens when things get cast. As stated earlier, the front iron sight didn't come out all the way but this is such a minor spot literally no one is going to notice or care. The silver paint on the ejection cover in particular could have been applied with more care. And lastly, the Hengstler counter might be mounted too low. Someone else probably knows better but I also don't think this takes away from the rest of the blaster. This is truly an incredible looking E-11 and I am extremely happy to have received it. The level of craftsmanship and attention to detail vastly out weigh any of the suggestions for improvement that I have. If anything, my suggestions could make this blaster even better than it already is. Now as to why I will not give my Hellhounds experience a 10/10 I will be as unbiased about this experience as possible and do my best to show both sides because I believe it is important for the community to know what to potentially expect. This blaster took 10 months to reach me. I ordered in September 2020 and it did not arrive until the end of July 2021. I found Hellhounds on Instagram and ordered from him through the Instagram messenger. I had heard lots of good things, had seen his blasters for sale before at Trooperbay, and wanted to get a rubber E-11 instead of a 3d printed one. So in September I messaged Daniel and we got the order set up and I payed in full including the shipping. He quoted me at about 4 weeks which seemed reasonable to me but I was fully aware that it would probably be a few more weeks longer. That's just how this sort of business works right? After 2 months and no communication I sent a message asking for an update. He replied quickly saying it would be shipping the next week. Sounds great. Another couple weeks go by and nothing. It's December and I ask again for an update to which he tells me there's been some Covid in the family. So okay I am more than fine with waiting longer then. I know he's a father and has a few little kids, it's also the holiday season and I'm in no rush so it's totally ok to wait longer. Also just straight up it's Covid, that's going to mess a lot of things up and I completely understand. January rolls around and I send a message to check in but no response comes back. At this point I was still willing to give Daniel the benefit of the doubt that he was still working on my order and just had other things come up, as they do. Come end of May and he posts a Instagram video saying all the E-11s are done and will be shipped in the next two weeks. Of course this gives me a rush of relief because it means I'll finally get my order after all this time. I was wrong. After several unanswered messages sent in June, I come onto here, the FISD, and find @Toothdoc's review of the Hellhounds E-11. And If you read his review you'll notice he ordered two blasters in 2021 and received both by April. And his was not the only customer review that I found. There were more customers that I found here and on Instagram all of whom said they had ordered months after me and only waited 3-4 months to receive their same orders. Previously, I had been more than ok with waiting longer for my order given the state of the world we were/still are in. But hopefully you can understand how my wait time was not making sense. At the end of June I sent an official email to Hellhounds Props explaining my frustration and that he needs to be fair to all his customers. He responds with his phone number to text him directly. He was very apologetic and explains his messaging became unorganized which made his orders unorganized. We sorted out the situation and he assured me that my order would be shipping the next week. It still took longer than a week to ship and ultimately took most of July for the blaster to arrive. I still do not quite understand how my order could have been misplaced like this and taken the amount of time that it did. The reasons are a bit unclear to me but I have the blaster now, it looks great, and can move on from this situation. Maybe my situation was unique in that it took 10 months but from speaking to other customers it sounds like it is a common theme. Not 10 months of waiting but usually 3-4 is what I gathered. And on my end I could have sent follow up messages more often, but still even with the messages I did send it seems like my order shouldn't have been lost in limbo. Conclusion So the question is now, would I do business with Daniel Hellhounds again? If you had asked me that 7 months ago and I had already gotten my order, I would have said absolutely yes. Now I'm not sure I would. I'm still deciding if the price and quality for this blaster was worth such a long wait when it could have been less than half that amount of time. I was very interested in also getting his mando death watch kits which are also full rubber. I'm also very interested to see how his new DLT-19 turns out. But without better communication and following through with when he says he will ship the order, I don't know if I will do business again. I would have rather had bad news than no news. Maybe my experience was unique but maybe it wasn't. If it weren't for this frustrating experience I sincerely would recommend a Hellhounds blaster to anyone who wants a rubber blaster. It's a hard question for me to answer and something for future customers to be aware of before they buy. (photos incoming)1 point
-
Hello everyone - I have been lurking and reading here for a few months and have begun working on my storm trooper armour build. I have relied on advice and guidance provided on this forum to select the vendors from which to purchase the necessary items. So far I have ordered and received: from "stormtrooperundersuit" 1 x undersuit, 1 x balaclava and 1 x neck seal. from "imperialboots" 1 x pair of Classic 421 boots. I am waiting on a complete build of storm trooper armour from "Authentic Props" here in Canada and 1 x E-11 Blaster from "Quest Designs Canada". Can anyone tell me if I am forgetting anything? The storm trooper armour from AP includes: Armor/Helmet kit fully built ready to wear out of the box <-- I expect a few adjustments will need to be made. Leather ANH holster Rubber gloves Rubber flexible hand guards (preinstalled on gloves) Canvas belt Aluminum TD clips (Blaster, boots, black undersuit, neck seal not included) <-- made sure i purchased these separately. Cheers Jeff1 point
-
Congratulations Georgia!! Welcome to Expert Infantry rank1 point
-
Congratulations trooper and welcome to the EI ranks1 point
-
Thanks Bryan. And everybody keep in mind that these iPhone pictures I took might in fact be showing off TOO much detail and saturation in the scope and overall weathering. The gold saturation really varies in all sorts of light conditions as does the silver dry brush. Indoors it looks almost entirely black, outdoors it starts to light up. I do hope he improves customer communication for the future, especially after my situation. Things go wrong and we sorted it out eventually but you never know what might happen.1 point
-
Congratulations, Georgia. Welcome to the EI1 point
-
Dan, what a great and honest review! Nice work, my friend. I think you were more than fair in revealing your story and laying it all out there. I'm sorry you had such a long wait, but your blaster is VERY nice and should serve the Empire well. One thing I've noticed since I've seen several photo layouts of the Hellhounds E-11, is that each one is pretty unique. They are, after all, a sculpt, a paint, a weather job and a work of art. They aren't massed produced and every one the same. The two I have are very similar to yours, (and I see some recent improvements) but different as I would expect. And not at all in a BAD way! Your E-11 appears to have more gold weathering on the scope than mine for one comparative example. I still need to try and get him to send me a Magazine release mechanism for one of mine that didn't come with one, then I'll be happy with both of mine. Thanks for sharing your experiences! I truly hope Hellhounds Props LLC improves some things with customer communication. Except with a similar experience to yours, I'm a happy trooper (wanna be).1 point
-
Congratulations Georgia, welcome to EIB ranks! just a few adjustments and see you in Centurion !!1 point
-
Congratulations!!!! Welcome to the ranks of EIB1 point
-
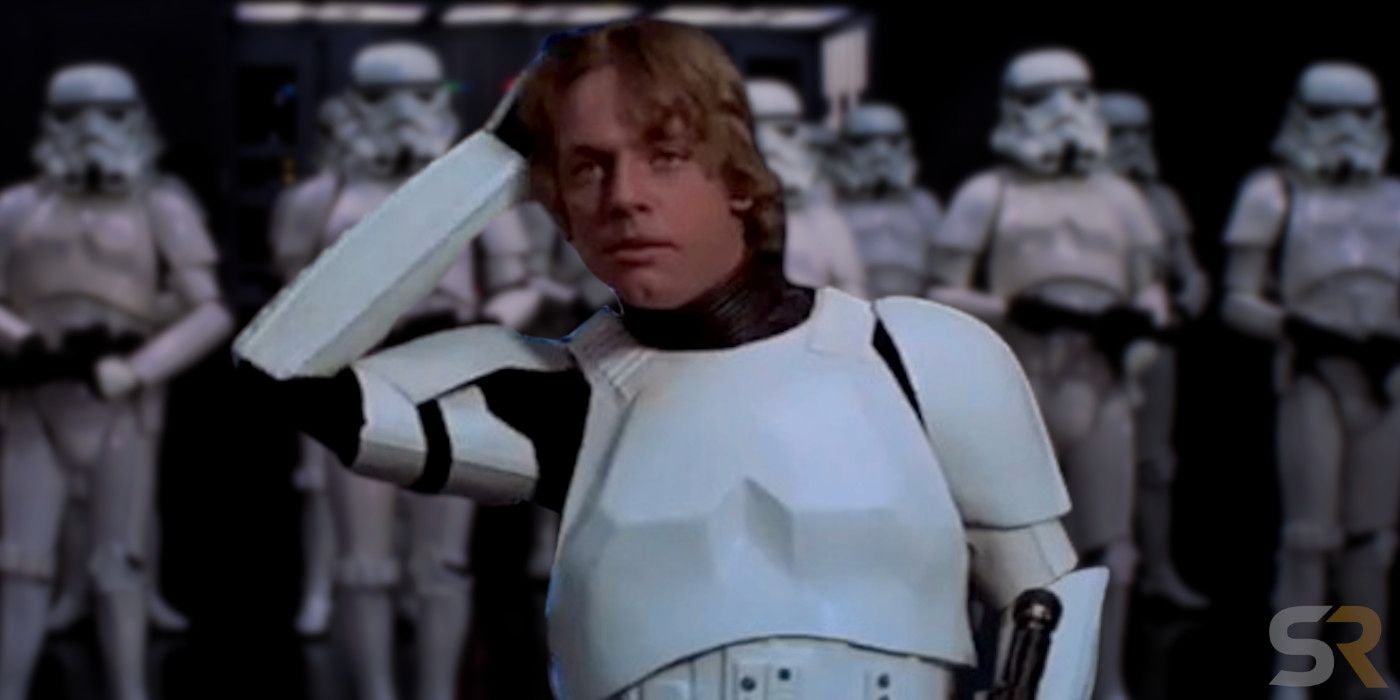
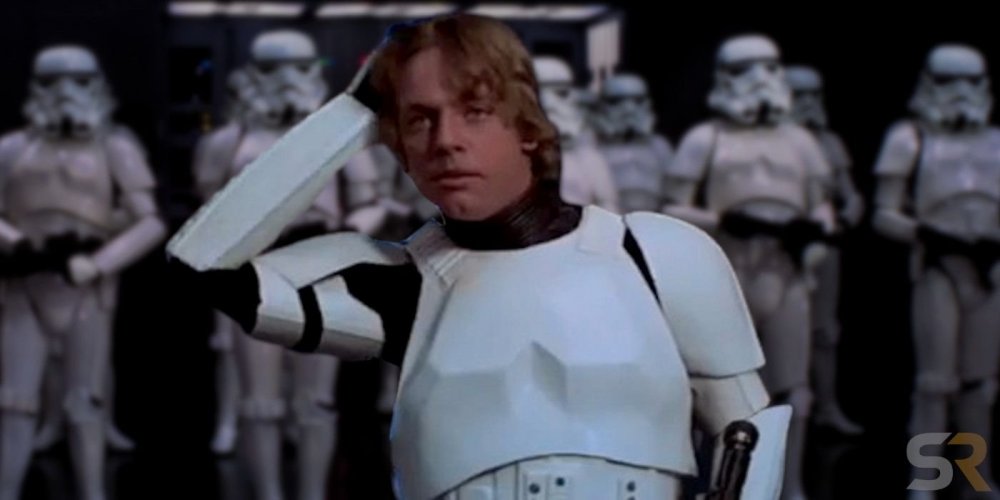
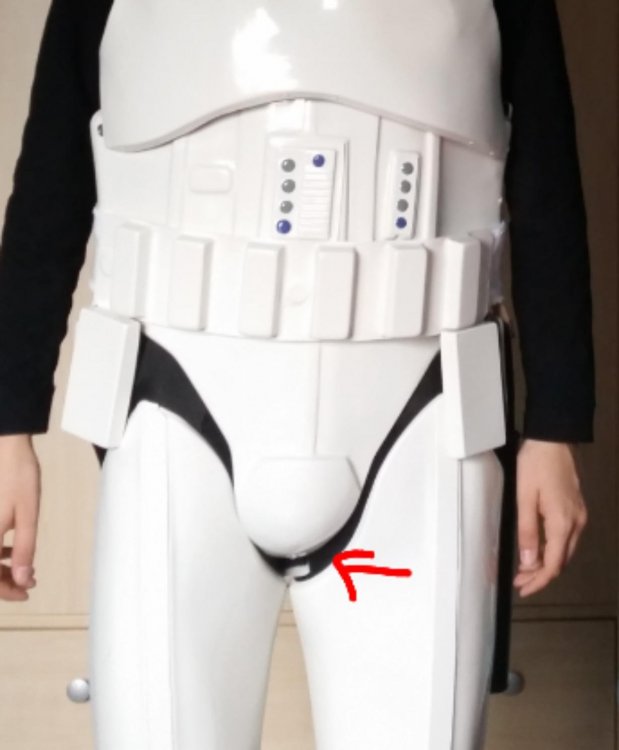
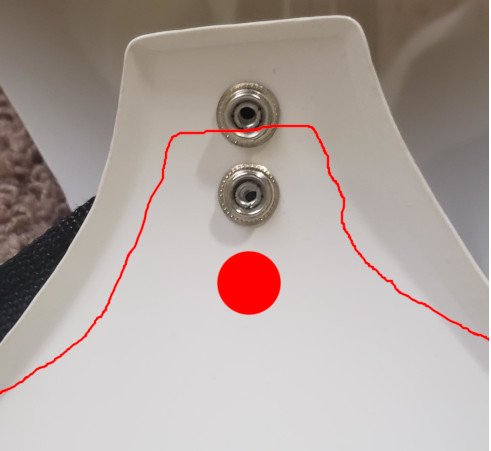
Hi Georgia, and thank you for your EIB application! CRL and EIB Application Requirements: All required photos have been submitted, and on behalf of the entire D.O. staff we are pleased to welcome you to the rank of Expert Infantry. Congratulations! Other-Armor Fit/Assembly; In this area we review observations made by your fellow troopers and the DO team. Some observations may lead to suggestions to improve the overall look of your armour. Note that we consider both text (CRL) and pictures (screen caps/reference images) when reviewing submissions. First of all Georgia, let me tell you that your armor looks great. Congratulations!!! -Starting from the top, ideally , the ear screws should go aligned with the rear edge of the Traps. It is mentioned just for your consideration as it is a more elaborate setting. Reference images - The brow trim, should be a bit shorter. It's very, very, very little, but this way, maybe you won't see those "ridges" from behind the helmet (do it little by little so as not to cut too much). Reference images -For Basic level : Mesh may be used behind the frown to obscure the face of the wearer. Something that characterizes us(Stormtroopers) is that we are anonymous. Children(and "not-so-children" ) in Trooping see their characters with emotion and do not imagine that within that armor there is a fanatic like them. For this reason, we try, by adding a mesh behind the "teeth" of the helmet, to prevent our face from being seen through the holes in them. We are suggesting to add the mesh to your helmet. Reference image -Just a simple strapping issue here. It looks like your left bicep is riding a bit higher than the right one. Raising(the right) a bit, would make a big difference in the overall look. Reference image - Ideally the ab and kidney should sit flush with no gap, but also no overlap. It looks like a simple dressing issue too. Maybe the belt is too tight. Put everything in its correct position first, and then tighten the belt...I'm sure it will hold everything in its correct position. Reference images -Your thighs seem to overlap a bit(cod). To avoid this, and also avoid some armor "bites", you can trim the top a bit, or perhaps lower them. This would also help keep your sniper knee plate (below) from riding underneath. Reference images -Your Sniper plate is sitting a bit under the thigh, maybe you could place some foam to push it forward (maybe, after lowering the thighs (previous point), it is not necessary). Reference images -The angle on the top of the sniper knee plate. It's close, but for a better look we are recommending that you trim it down (to closer match the reference images). Reference images *************************************************** Centurion Requirements; In this section we prepare you for Centurion. Because Centurion photos show more detail than EIB, items pertaining to Centurion might be seen there and not here and additional photos may be required. We try to point out all that we can from what we see, but the final accuracy is the responsibility of the trooper. L-3: Back plate shall have no, or minimal overlap of the kidney plate. We have a challenging issue here but we have confidence that you can do it Georgia!!!. We know that you are only 5 feet 3 inches tall, but your back plate is riding too far over the kidney plate. In this case, some adjustments have to be made, including trimming the lower part of the back plate (here, at FISD, you can find all the help you need). As seen in the reference images, Luke's back plate had to be trimmed because as we all know he was "A little short for a Stormtrooper" and had no return edge in the back (or on the front of the chest) so it could be trimmed and still reach L3. (Note that there were no screws on the bottom of his back plate). Reference images (Luke's armor) -Your Han snap is positioned farther away from the corner than the reference images. You will need to drill out the snap, reposition it, and fill the old hole. Reference images -Kidney rivets are too far from the edge and will have to be moved closer to the return edge, as seen in the reference image. After moving them, you can fill the holes with ABS paste and then sand/polish them. Believe me, seems more difficult than it really is... Reference image L3- Drop boxes are vertically aligned with the end of the ammo belt with minimal gap between belt and box. The outside front edge of the drop box should line up with the end of the ABS belt. Moving them outward and applying a little E-6000 (or similar) to the back of the strap can prevent them from moving. Reference images L3- The corners of the plastic ammo belt shall be trimmed at a 45 degree angle that meets the outer edge of the cloth belt. The left side seems to need just a little trimming to be ok...The right side is perfect!!! Reference images L3- The top of the ABS ammo belt should sit at or just above the bottom of the central and vertical abdomen button panels. It would be necessary to raise your AB belt a bit. One popular fix to this is to add a piece of Velcro to the belt and AB plate to keep it in place.(Very easy fix, Georgia ) Reference images And that's all Georgia. You have a great armor, and we have complete faith that you can address all the issues. I look forward to seeing your submission for Centurion!!!1 point
-
Hadn't realised that you were moving close to T-Jay. That will make everything so much easier for you. My first thought is really just what T-Jay has already said about moving the back sections higher up. From what I can see in your pics it looks like you have enough space in the butt and back sections to do that. You can use masking tape to hold the armour in place when trying different positions, rather than straight away installing new poppers. Will be easier if you have someone that can help you. But, you still want to keep the top of the kidney and ab lined up. So, if your kidney moves up, so should your ab section to maintain that line. If you are able to do that and its still comfortable to wear (I guess around the cod section mostly) then all cool. Your chest plate wouldn't need to move as you would just have more of an overlap of the chest and ab. Mark Hamill famously was pretty small for his armour, and you can see this especially with how close his ab buttons are to his chest plate. My second idea is really only if T-Jays suggestion can't be done for any reason. As you are currently wearing the armour, where the butt and cod meet is very close. I imagine that the end of the butt plate between your legs is already uncomfortable, and it would likely cause even more problems walking around when trooping. You could trim the butt plate shorter at this point (so it doesn't sit so far between your legs) and make maybe make it a little narrower if needed too. In doing this you may need to remove the front most popper and install a new one further back. (Contact RS for a new popper if needed, as not all poppers work together, even if they look the same size) This should stop you from being able to see the butt plate from the front, as well as make everything more comfortable. Obviously once done this can't be reversed, so (as already said) anything that involves cutting plastic should be a last resort. Yes, this would mean there's no return edge where you've done the trimming. My butt has practically no return edge at this point. It's not a requirement for clearance here even at level 3, and actually allows the plastic to flex a little more without cracking. I did shorten and reshape my butt plate in this way a little, even though I'm quite a lot taller. If doing this, drill out the popper first, as you only need to trim back to the hole, not the edge of the popper. When trimming (as I'm sure you already know), slow and steady. Trim a little. Try it. Trim a little more if needed. These are just my ideas to go into the melting pot. My last thought... Even though you have the uncertainty of the move coming up, try not to be tempted to rush to get it finished. Rushing is when mistakes happen (from personal experience!), and even if (absolute worst case) you can't store or work on your armour where you'll be living, there'll be an alternative that lets you carry on with it. Opportunities always present themselves. Really excited to see your post saying you've got approval!
 1 point
 -
The specs day 8 hours use before needing to recharge. Do think I've ever tried running them flat, so not sure how accurate that is. Cool. Interested to see what you end up doing1 point
-
ST-24902 Reporting in and Requesting 501st access https://www.501st.com/members/displaymemberdetails.php?userID=330641 point
-
AM or RT are best for the taller trooper, a few threads of info for you: Boots will a little more difficult for size 16, I would suggest trying to find a pair of Chelsea type boots and recolour white. You could also try Crowprops who do make to order, not sure if he goes up to 16 though https://crowprops.bigcartel.com/product/jhodpur-tk-white-short-boots1 point
-
Yessir. Tried to be as unbiased as possible despite my frustrations. Not bashing Hellhounds(there are reasons for everything) and certainly not criticizing the product, it's just important for other members and future customers to know what they might be in for. And I do hope it serves me well for many years.1 point
-
great looking blaster despite the frustrating waiting time. Enjoy and Troop a lot1 point
-
Yes the wait was disappointing and could have been partly because of Covid but the reason is still unclear to me. There are some air holes here and there you're right, but from a distance they're not even noticeable. And yes there are some mold lines but for the most part they are well hidden. I assume the scope looks so golden in the photos because I took them at 7am today in the sunlight. In person and in less intense light you might not even realize it's painted at all. My first two pictures show a little bit better how subtle the bronze is.1 point
-
A great review, it's just a shame it took so long to get to you, this could have been due to Covid19 but there were some grumbles about Hellhounds as to communication and long shipping times for some time with many thinking they were no longer supplying blasters. Just looking at your photos a few things that could be improved is the air holes in the resin, a few along the right side T tracks, there is also the mold lines on the handle, under and top of barrel and top of front sight, also a bit too much weathering on the sight, should match the rest of the blaster. In saying that all round it does look like a nice blaster, hope you get plenty of trooping out of it.1 point
-
I forgot you mentioned about moving areas. If you haven't already, I recommend contacting (and maybe joining) the new garrison as soon as possible. It will be good to hit the ground running when you've moved, and you may even be able to share a work / storage space with fellow garrison member if the church is disapproving (no promises, but worth looking into). I'll put together something with suggestions. Could be a day or two, but I won't forget to do it1 point
-
And, its finished! Thank you everyone for the likes and kind comments. It's been a lot of fun, and helped keep me centered. Suggestions for the next one gratefully received [emoji16]1 point
-
Death troopers DLT-19D blasters are used by Death troopers. These have added details. The base gun This is a casted variant of the MG-34 RWA. You can tell that it is a casted variant by the holes in the barrel. These are now closed up. Also the side of the blaster where originally bullets would eject from, has a plate in front of it closing that opening.1 point
-
The Bluetooth transmitter turned up today. Works perfectly. Far better than having wires to deal with when putting my helmet on. Here's the link to the transmitter and receiver cable for my in ears monitors. KZ APTX HD Lossless Transmission CSR8675 Bluetooth Module 5.0 Wireless Upgrade Cable Detachable Cord (B PIN) https://www.amazon.co.uk/dp/B07RP8PM8P/ref=cm_sw_r_apan_glt_fabc_5FAHG5EZMADBEXQKYDED TROND Bluetooth V5.0 Transmitter Receiver, 2-in-1 Wireless 3.5mm Audio Adapter, AptX Low Latency, Smart Codec Indicator, 2 Devices Simultaneously, for TV, Home Sound System https://www.amazon.co.uk/dp/B01K8ANDCI/ref=cm_sw_r_apan_glt_fabc_5S1Q87KFJE79YT1MBX70?_encoding=UTF8&psc=11 point
-
1 point
-
TM armour with XL shins. 6'6" 230lbs.1 point