Leaderboard


Popular Content
Showing content with the highest reputation on 06/10/2021 in all areas
-
Hi, Got clearance for my first outfit (esb tk) a week ago, and signed up for my induction troop on July 11th. I'm a 46 year old (never) grown up, living in Cambridgeshire in the UK, working for the NHS, and I've wanted to be a part of the 501st for as long as I've known about it. First got into Star Wars around the time ESB came out (was a little too young in '77), and was an avid figure collector as a kid (really wish I still had them!). Initially couldn't decide on which outfit to build, but certain things led me to the esb tk. I'm vegan, which means for me I don't wear leather or animal products, and this makes certain outfits more difficult. Managed to find some tk suitable synthetic boots (from Asos in the UK), so good to go. I'm 6'4" (193cm) and at the time was at the start of losing quite a lot of weight. Did my research and found that RWA did tk armour in XL, so that seemed a good bet. As the build went on I found that some of the parts were far too big, so swapped some parts out for standard size (back and butt), and some I managed to trim more than expected and make them fit (thighs, shins and forearms). **Best advice I can give for those that may be a bit larger in one or more directions is to speak to the armour supplier before buying. You're not bothering them, and far better to take a bit of time and order the correct stuff at the start** Mostly the build went well. Had a great UK armourer in Dan (CableGuy), and awesome help from several people here (special shout out to Joseph and Mario for help with the sniper knee). Speaking of which, had the usual headache with the sniper knee, and throughout the build I never had enough magnets or clamps. My build took about 4 months, and about halfway through I started showing symptoms of work related stress, which has ended up in needing some time off work. Working on my armour (although stressful in itself at times) has given me something to focus on while at home, and has been pretty therapeutic. Got a little bit more stress at the mo as I managed to break my thermal detonator while upgrading for EIB [emoji2357], so little bit of panic that it's got to be fixed before my induction in a months time, but I'm sure it'll be fine, right!? Rich Sent from my SM-A715F using Tapatalk2 points
-
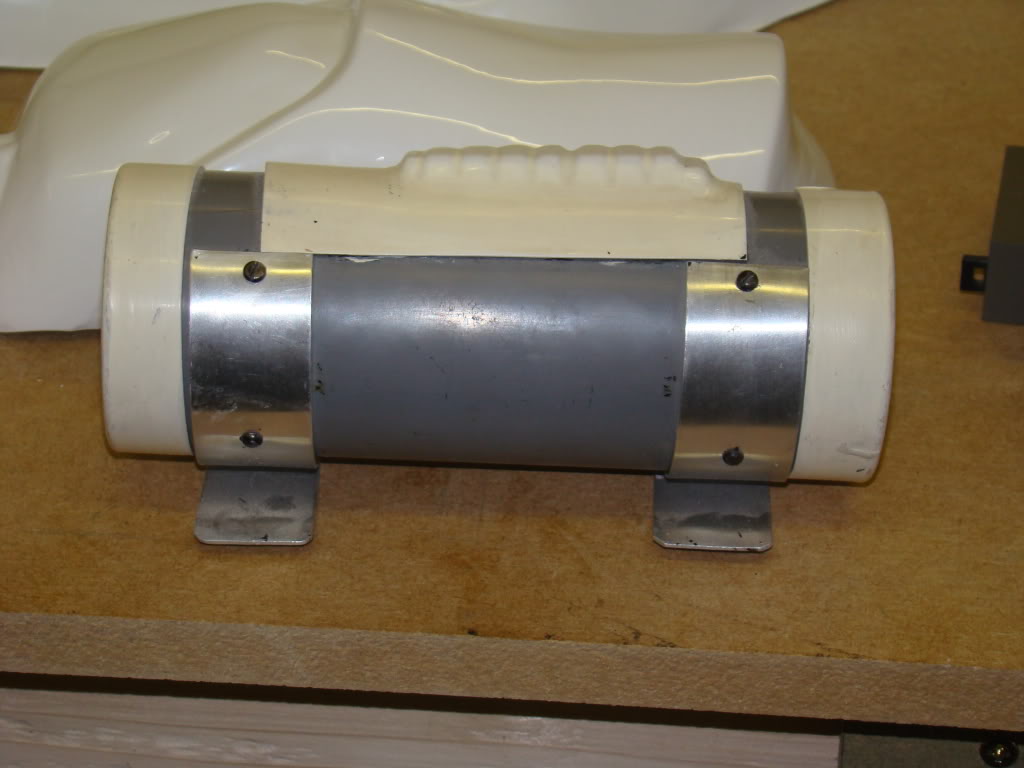
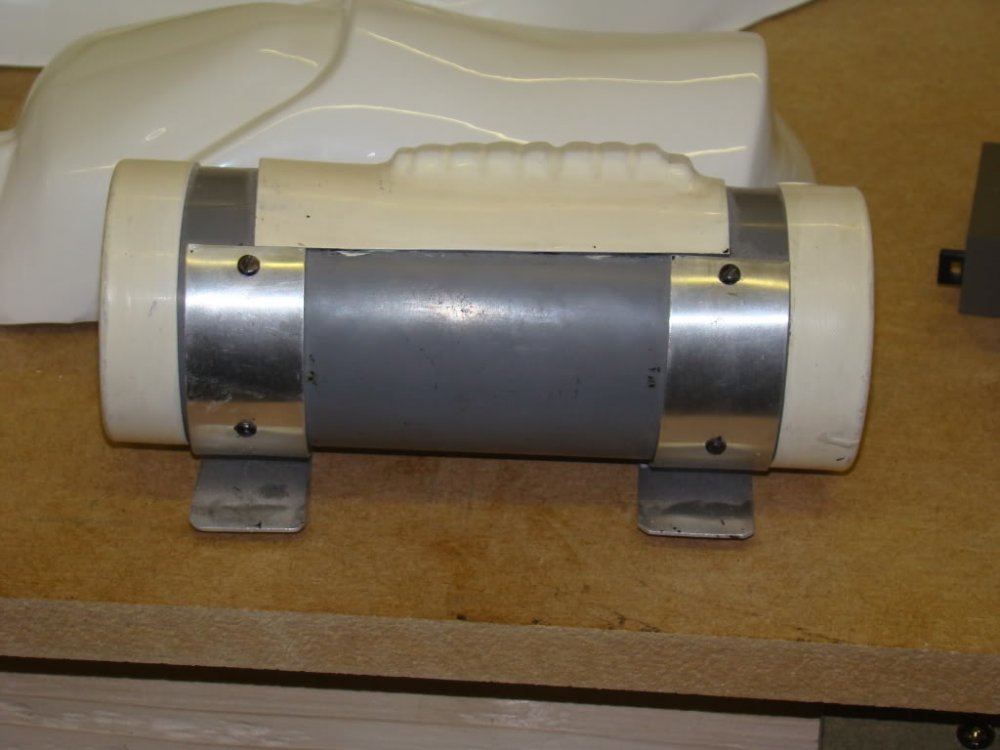
There is no specific measurement, try to emulate references, you can work out from this image the measurement is less than 1/4 or the pipe diameter Here is the gallery for detonator images
 2 points
 -
Congratulations Cody , Welcome to EIB Ranks !! just a few more adjustment and see you in CENTURION2 points
-
Hi Cody, and thank you for your EIB application! CRL and EIB Application Requirements: All required photos have been submitted, and on behalf of the entire D.O. staff we are pleased to welcome you to the rank of Expert Infantry. Congratulations! Other-Armor Fit/Assembly; In this area we review observations made by your fellow troopers and the DO team. Some observations may lead to suggestions to improve the overall look of your armour. Note that we consider both text (CRL) and pictures (screen caps/reference images) when reviewing submissions. -The brow trim is too low. We are suggesting to rise it up a bit. Your brow trim is sitting lower than ideal for a Stunt TK, and looks more like those worn by Hero TKs. Raising it a bit would give you a much more screen accurate appearance Stunt reference images Hero reference images -Also, the brow trim, should be a bit shorter, (do it little by little so as not to cut too much). Reference images -Looking to the right side of Ab section, Ab plate is overlapping the kidney armor. (Adjusting the strapping may solve this issue). Reference images -We suggest you to lower your fore arms so the gaps are a little more even between the wrist and hand plate and the bicep and top of fore arms. -The TD must be centered. If not positioned correctly, the thermal detonator can explode !!! Reference images -Some new paint on the ab/kidney rivets is an easy fix and should take you about 5 minutes. Reference image -Moving down to the belt, we suggest you cut all those hanging threads. The armor will shine more with that haircut. Reference images -We think this rivets are too close to the corner of the ammo belt (too big too). This is not affecting you for level 3 but for a more screen accuracy we notice and let you know it for future adjustments. Reference images Centurion Requirements; In this section we prepare you for Centurion. Because Centurion photos show more detail than EIB, items pertaining to Centurion might be seen there and not here and additional photos may be required. We try to point out all that we can from what we see, but the final accuracy is the responsibility of the trooper. -All the recess area should be painted, in both sides of the helmet. Reference images -We have a challenging issue here, but we have confidence that you can do it!. The tube stripes are too far away from the cheek. As per the CRL, the tube stripes should be "approximately a pencil width" from the cheek. As seen below, yours are bit too far away. Reference images -The plastic shoulder straps need to be held down in the back via a white elastic band to the white fabric that connects/bridges the chest and back piece. Reference images -For Centurion level, the tops of the shoulder bells need to be a lot closer to the shoulder bridges. This is a fairly easy fix by shortening the straps that hold the shoulder bell on. Reference Images -The top of the ABS ammo belt should sit at or just above the bottom of the central and vertical abdomen button panels. Add a piece of Velcro to the belt and AB plate to keep it in place(Easy fix ). Reference images -The buttons on the canvas belt are too close to the edge, and the corners of the plastic ammo belt shall be trimmed at a 45 degree angle that meets the outer edge of the cloth belt. Reference images -Drop boxes are vertically aligned with the end of the ammo belt with minimal gap between belt and box.(see reference images in the previous point). -The belt should be turned a little to the left. Reference images -For L3, the gaps at the bottom of the thighs should be filled or backed with a small square of ABS. Reference images -The Hengslter counter on the blaster is a bit far back compared to screen-used examples. Reference images And that's it, trooper. Congratulations!!! You have a great armor, and we have complete faith that you can address the above issues. After that, I look forward to seeing your submission for Centurion!!! And remember, we are here to help!2 points
-
…forearms’ snaps and elastics attached, ab buttons painted… who knew it’d be more difficult to paint circles on an ab plate than trapezoids, tears and tubes on a helmet…. this is my third try with all of them, fourth try with a few…2 points
-
Ok, cool. Thanks [emoji106] Sent from my SM-A715F using Tapatalk1 point
-
Hi Richard, as Glenn pointed correctly, there's no an specific measured distance mentioned in the crl , however , the reference images shows a good idea of where they should go. I would suggest to mark with some non permanent marker the position you think they would go and compare with the references.1 point
-
Here is the legion's trooper survival guide https://databank.501st.com/databank/TrooperSurvivalGuide1 point
-
ANH (Stunt and Hero) Page 15 Complete gmrhodes13 Page 14 Complete gmrhodes13 Page 13 Complete gmrhodes13 Page 12 Complete gmrhodes13 Page 11 Complete gmrhodes131 point
-
Oh yes, I was wrong with that. So, as you still have a month left, this thread here might be useful for you...1 point
-
[emoji4] Thanks! Sent from my SM-A715F using Tapatalk1 point
-
You’ve been a star, Rhodes. Hopefully I’ll be out trooping with you soon. Sent from The Empire1 point
-
Congratulations and welcome to the ranks trooper1 point
-
Congratulations and welcome to the EI ranks trooper1 point
-
1 point
-
making more e11 sterling flip sights1 point
-
Some names and words up there I haven't stumbled upon before...I have have to look into them. For my build, yes, I think you might be right. And I might just get an OT helmet for display and not mess with it Thanks for the info...I have some more research to do!1 point
-
Thanks guys! Appreciate your help!!1 point
-
Thanks, and thanks again for all the help. Excited to put in for EIB, just desperately waiting on my new td parts [emoji1] Sent from my SM-A715F using Tapatalk1 point
-
A second set of eyes helps everything! I'll get right on these, Thanks!1 point
-
Good luck and a lot of fun on your first troop tomorrow.1 point
-
Looking Great Richard !! And Welcome to the Club of the Shiny White !!! Great story and Yes! being a space man has always a therapeutic retribution not only when building your own kit but when seeing the smiles on the little and no so little ones. Looking forward for your next step to EIB1 point
-
@CableGuy, the main reason for the current size of the gap between my forearm and biceps is the length of my arms… I learned from building (and trooping while wearing) my Sandtrooper, that its biceps have a tendency to slip out from under my shoulder bells from time to time; something I’m experimenting with correcting as much as I can with this new TK build… The majority of my strapping with this current build is elastic fastened with snaps glued into the individual armor pieces, making them less permanent - more adjustable… I knew going into this build that there would be adjustments I’d need to make even up through fitting everything together including the torso, which I’ll be completing/fitting next…. I definitely agree, especially viewing the photos you’ve provided, that my gaps are a little excessive at the moment..! That’s something I’ll be correcting with both the bicep and the forearm strap lengths when I can get into the arms complete with the torso in front of a mirror… Thank you again for the photos and the video link, I very much appreciate the advice and input!! (especially that second behind the scenes pic) - doesn’t make me feel so bad about my biceps occasionally slipping out from under my shoulder bells..!!1 point
-
Hey Richard welcome to the FISD. That's a beautiful set of armor you have there.1 point
-
Hi Shawn and thank you for applying for EIB. Meanwhile one of us is assigned to your review , I'll need you to do me a favor sir. Could you add the missing photos to complete your application according to the following Photo Check List please? Thank you. ** Added to the processing line . **1 point
-
Nice work. :-) Out of interest, I notice you’ve got for a very large gap between the bicep and forearm. Any particular reason? Here’s a typical example, with perhaps 1 or 2cm gap in places; A few with almost no gap when the arms are straight. Here’s some more references and info on the arm alignment, if it’s helpful. :-)1 point
-
Hi Scott, welcome to FISD and congrats for your BBB day and great advances with your ESB TK and your plan to go for higher levels !! . The initial stage is the best time to view the finish line and to plan how to achieve it. With this in mind I would like to make a couple of suggestion to your helmet build. 1- CRL states : Frown is painted black and does not leave the teeth area. In yours, there is a little excess of blac paint that can be removed easily with a toothpick and non acetone remover. 2- CRL States for L2: Ideally, the tube stripes are positioned approximately a pencil width from the side of the cheek. Fall of tube stripe tops ideally lean toward the front. As you can see your Tube Strips a a bit far from the cheeks and the fall of them is on the contrary. Fortunately, for ESB the tube strips are decals, so it's easier to just to take it off and relocate it in the correct position and fall. 3- Finally: Your rigth Hovi Mic tip is a little lower than the left one. In my experience it's just a simple turn the tip a little more to adjust. Here some reference images. Keep up the great work !!1 point
-
Hi Jacob, I'm in the same boat building a KB props FOTK, what I have been done is to check over and over again the FO Build Threads to be sure of the trimming. Keep up the great work !1 point
-
What you have looks great, Alex. Part of the charm of ANH buckets is that were were all a little wonky in one way or another and your gaps are better than a lot of them!. As Glen mentioned, if you can get a tighter fit on the ear screws that would give you a much better look.1 point
-
Looks pretty good to me, you could go further if you want but screen helmets had bigger gaps. Adding a step to the top of the ear helps them come in closer. How to here You can countersink the screws slightly for a nice flat appearance. Nice work
.jpg.48bf93daa5eaf5fab46c5ba482bef131.jpg)
 1 point
 -
Hi Ron! Nice to see MidSouth represented here; I'm just a little south of you outside Chattanooga. As for your DLT-19 question, Justin is right that Praetorian has been unresponsive. If you're looking for a rubber DLT, and have the credits, you might try @Hellhounds via his Instagram Page (linked). He has a DLT in the works, though it isn't complete yet. If you'd like to see an example of his work, below you'll find a link to my photo review of his rubber E-11, and I compare various aspects of it to Praetorian and Hyperfirm, the previous old guard of rubber blasters. Daniel (Hellhounds) makes an amazing product, though they're not cheap, and also take a while to build. But he is certainly dedicated to his craft, which is why it takes so long, and you'd not be disappointed with one of his blasters. FYI Daniel has since updated certain components of his E-11s for more accuracy, including the clearing strip in the bolt and additional greeblies around the magazine.1 point
-
Amazon is also an additional source for elastic and nylon webbing.1 point
-
Me with TR-13927 as Bob.
 1 point
 -
501st I have with appropriate level clearances. TK - ANH Stunt L3 TK - ANH Hero L3 TK - ESB L3 TK - Heavy Weapons Trooper TK - First Order ID - Officer ANH L3, Lt Tanbris L2, Lt Jir L2, Lt Childsen L2, 2nd Lt L2, Lt Com Praji L2, Lt Treidum L2 ID - Warrant ANH L2, ROTJ L3, Maj Hewex L2, Joff L2, Col Dyer L2 DZ - Jawa ANH DZ - Tusken ANH TB - Biker Scout Lancer L2 IC - Crewman ANH L3, ESB L3, ROTJ L3 IC - Mechanical Crew L3 TI - Reserve Pilot IG - Gunner TR - Guard ROTJ IN - Navy Trooper ANH L3, ESB L3, ROTJ L3 IN - Navy Dress Uniform ESB L2, ROTJ L2, Sgt Bean L2 ID - Line Officer - Olive CT - Clone Trooper (Ret) Working on SL - Emperor1 point