
Leaderboard


Popular Content
Showing content with the highest reputation on 12/07/2020 in Posts
-
Many don't heat the armor before drilling, if you go slow and not too much pressure you should be fine drilling the holes, having a support piece of plastic glued behind can help stop cracking. Many of us use E6000 so we don't have issues with the armor, although a I recall a few people have had issues with nickel plated snaps and E6000, I myself have never had any distortion using E6000 and any brand of snap I have purchased With anything it's always best to trial first, glues or heat you need to have a little experience before attacking the armor straight on4 points
-
And thats a touchdown. Thanks a lot.2 points
-
I’ve completed the full armor kit today, with the exception of the belt, I’m going for a full kit dress rehearsal tonight, when I can get some assistance. NOTE: this photo is a mirror image, so the knees are the right way around. Sent from my iPhone using Tapatalk2 points
-
Your return edges look much better now. I have around 4 -5 mm only and in some areas i removed it completely.2 points
-
Ok, so here's the reworked back plate. Thoughts?2 points
-
As Rob would say 'This is not for me'. Watching the tuts, I was like - I can do that! Now each cut frightens me to death. My first ever hard armor build. A RS Propmasters 'Idealized' Stormtrooper. PVC build. I've got a bad feeling about this. :p First shot is thrilling, here I recieved my shipment of beautiful ANH Stormtrooper armor. I couldn't wait to open up the helmet box and marvel.1 point
-
Meh. I just emailed you a couple times. You did all the hard work. LOL Us SDS guys gotta stick together1 point
-
WOW!!!! Can’t believe I missed this. Congrats and amazing work. You should be proud Jonas. Welcome to the upper echelon1 point
-
And to clarify, It’s not needed to get it right to the mm as both the original suits and TD had variations in sizes. Get as close as possible to the measurements and as long as it looks like the reference it’s fine1 point
-
1 point
-
Welcome to FISD!1 point
-
Looks good. Wear them around the house for about an hour carrying your blaster if possible. You want to ensure they don't peel off the gloves.1 point
-
Rather than experimenting blindly with your bell cuts, why not try something easier? The entire suit is made to fit together. For example, the tops of the thighs should follow the lines of the cod. For EIB/Centurion, one of the requirements for the bell/chest relationship is that there is minimal black showing. Take a look again at the reference pic below: For the kits I've built, I figured out how to trim the bell and achieve minimal black space by noting the relationship to the chest plate while it is on the person it is built for. It's easier to do this if you have an assistant, but it can be done when you're on your own (it just takes more time). Put on your torso. Position one bell (with bicep attached) closely on your shoulder so the top of the bell meets the shoulder bridge. You can temporarily attach it with blue tape at the top. You will probably note that the edges of the bell are quite overlapped by the chest and back plates. Using a pencil, follow the edge of the chest and back plates along the bell. This will give you a rough template/guideline for where you need to trim. This trim line is different for every trooper because the edges of the chest and back plates are always unique to each trooper! Remove the bell and trim conservatively. Put the bell back on and resecure it with blue tape. Move your arm forward and back. You'll note areas that are clipping with each other. Using your pencil again, mark these areas where the bell hits the chest/back plate. Remove the bell and trim conservatively. Repeat all the above steps until the top of the bell touches the shoulder bridge, and the edges of the bell and the edges of the chest/back plates no longer significantly interfere with each other. You should end up with shoulder bells that have edges that meet up nicely with the upper torso (think puzzle pieces), but don't have any resistance (for that "minimum black" look!). Hope this helps!1 point
-
Being the highest level of approval, Centurion requires a lot more attention to detail but you are almost there! As Glen mentioned, the paint in a few areas needs a bit of touching up which should take you all of 15 to 20 minutes in total. Looking forward to seeing the final pics so we can get you approved! White Gray Black (all TD screws) Solid black (CRL requirement.1 point
-
The belt is perfect, so I'd leave that alone. Now that the boxes are in the correct position, just dab some glue behind the rear of the straps and you are good to go. To answer a LOT of your questions about the bracket system Tony (ukswrath) has in my opinion the best, most detailed tutorial you can find here on the FISD. Link. It is just one small part of his incredibly detailed build located here.1 point
-
Personally, I’ve never heard of heating the plastic after drilling holes. Although, I’ve only used ABS before, not PVC. As you’ll have seen from the RS videos, it’s not usually necessary - just some careful drilling is usually fine. Don’t forget, the bracket system is totally optional. You can still aim all the way to Centurion without the bracket system, if you wanted. [emoji1303][emoji1303][emoji1303]1 point
-
Nicely done, congratulations and welcome to the ranks.1 point
-
Chrsitine, Mario, and Glen, thank you for your inputs! As of now I am changing up my strapping to make sure the snaps sit my chest more evenly and will be using only 2 elastic straps to hold the chest in place. I really like the idea of implementing adjusters so incase I did mess up with the chest snaps I can just adjust the side that is too long/short. I think the plastic pieces are called "sliders" im snooping around amazon to find some. I also have helmet decals from Trooperbay on they way to assist with my painting of the traps and tube stripes. For the shoulder bells. I have an extra set of bells from Walt.....they are a different shade of white, but I will be using this as to experiment with trimming a more screen accurate "curve". If I mess up at least I have the originals. I wish these bells were the same shape and length of my RS bells, then I could have copied them exactly LOL Heres a rough cut line on how I plan to cut these bells: FRONT: BACK: TOPS: Comparing the bells with my RS bells: Here is a comparison of my current Walts bells compared to the extra bells with the intended marking for cuts. The current bells on my mannequin were just trimmed right at the flashing.....these bells im experimenting with will be cut a little before the flashing and have a curve.1 point
-
Progress on making my own power cylinders: Here is what I have made so far. Aluminum base plate is still not cut to finish yet. My tools for drilling and cutting are very basic so its hard to make these with more precision. More work on these in the next coming weeks. Paper mockup of the base plate. Still need to work on my template but so far it seems sufficient to use. End Caps- 10mm metal fittings. These are used in jewelry making. The walls are too thin when placed onto the 9mm tubing so I need to use some kind of filler or glue. It,s literally a hairline seam to fill. I can use 9.5mm piping so the end caps fit perfectly snug but it somehow doesn't make the end cap stand out enough, looks almost seamless. I used a mini pipe cutter to trim down the caps, sawed off the top end eyelet, drilled a center hole for the 10BA bolts and filed down the sharp edge a touch to make them look more like the original end caps. Ordered some fuses from the UK to try those for the end caps like Playfulwolfcub used. I also bought some locally found stainless steel screw caps that look perfect for the end caps. They need to be trimmed down too and I need to remove the inner threading. Not sure my hobby drill press can do this type of work but I will give it try. Here you can see a side profile of the metal I need to remove.1 point
-
I mean, I have time yet. I still have all the E6000 XP coming up with the arms and legs. This is a beautiful winter long project. Yea I've heard mention of those plastic support strips under the brackets. However with the snaps I was referencing Richie's Youtube video concerning the snaps and glues. It seems like a pretty solid and ingenious idea.1 point
-
Both places carry them. When drilling, I’ll advise then to use a hairdryer. Keep about 8” + away from the plastic. Since you said PVC... also use a small bit and grow the hole with incremental sizes. Sent from my iPhone using Tapatalk1 point
-
So in pulling my ammo knee both sides I marked where hole would be. Making sure both sides are even with each other.1 point
-
Ok, so nobody likes my back plates' trimmed thickness. I'll bring it back to the bench and see if I can shave just a little more off the edges. As for the belt, I am really scared of further having to mod it. I am very near having to replace it entirely and start over. Had I not trimmed a good 1/2" off both sides the drop boxes would be even further away from the ends. I'll take another look at it. So I think your issue was with the left box. Maybe the strap for the beltbox had just moved inward a bit when I flipped it over to take a shot. I will examine it. Back to the back plate, I feel there is supposed to be a difference in thickness of the bottom of the back plate from the top. Probably not as pronounced as I'd initially trimmed it. I'll get on this today as well as trimming some off the bottom edge.1 point
-
Due to changing time commitments, our former detachment executive officer @justjoseph63 has asked to step down from his position. He has graciously offered to continue helping the Deployment Officer team with the Expert Infantry / Centurion programs. Please accompany me in extending the deepest FISD thanks for all of his amazing efforts throughout the year as executive officer. Without his help many of our programs, updates, and merchandise would not have been able to launch! Joseph, you're an absolute gem to work with and FISD is lucky to have you. You're the embodiment of troopers helping troopers I am pleased to announce that the vacancy position will be filled by our very own Brien, aka @Harbinger. Brien has been doing a knock out job as our Merchandise and Branding Officer and has shown quite the knack for organizational skills. Please join me in giving him a big FISD welcome as our new detachment executive officer1 point
-
Overall, you're looking pretty sharp there, trooper! Good work! My suggestion to make your armor look a little bit better would be to bring in those shoulder bells a bit. You've got that "linebacker trooper" look. It's nothing that'll stop you from basic approval, but it might get a mention if you plan on applying for your EIB or Centurion awards. As they are now, they're somewhat square. Note how the shoulder bells on these troopers taper inwards. Bells are usually trimmed with a curve (or swoop) to them, not straight up and down (square). Note the cut lines on the yellowed (screen used) bells here: A little bit of trimming will help bring in the shoulder bells a bit and reduce that linebacker look.1 point
-
hi, looking good . I agree with Glenn, only 2 straps are ok and use Elastic for Chest and back,1 point
-
Nice work, I normally only use two elastic straps behind the ab/chest and these have adjusters on so I can get the heights just right. Normally 2 makes it a little easier to adjust. Here is an example of what most use.
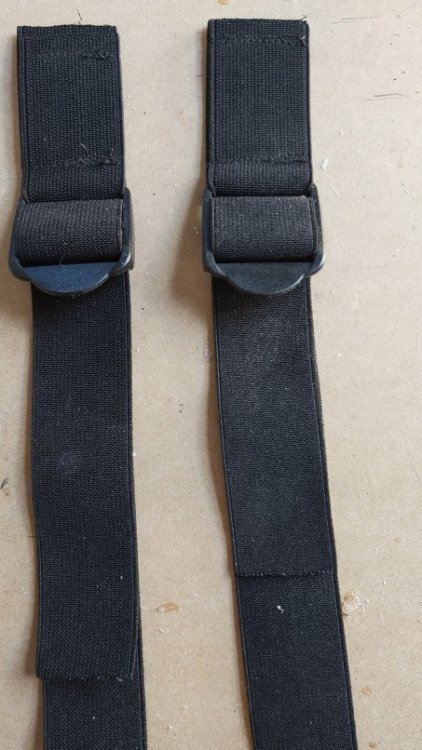
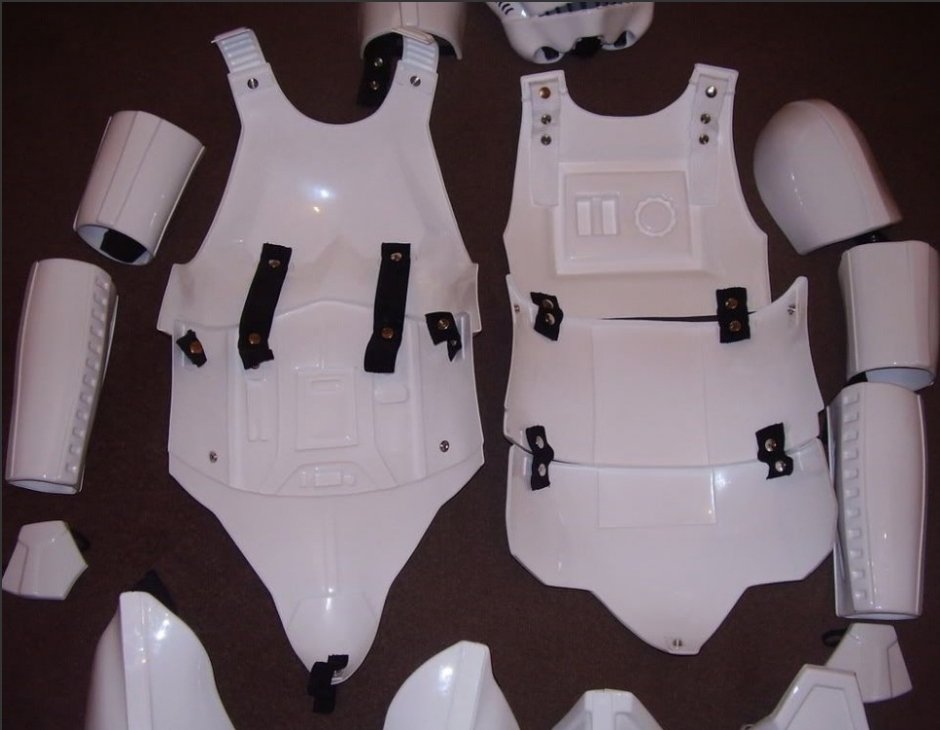 1 point
 -
Will send you a PM when I am home again.1 point


