
Leaderboard


Popular Content
Showing content with the highest reputation on 10/05/2020 in Posts
-
Hello, Everyone! I'm one of the newbies around here and if you've read my introduction bio over on the "NEW GUY" thread, you might remember that I'm on a personal quest to lose some weight and get healthier. The other day I met my first goal and officially hit 25lbs lost! My goal is to get to around 210-215 or so, starting from about 283lbs, just this spring. I'm just under 6' tall and of pretty stocky build. I think if I lose my gut and improve my physique around my chest and back, I can make this white armor stuff look pretty good! All this is just another incentive to hit my goals. I'm committed and excited to continue my journey and thought I'd reward myself for my first 25 lbs by ordering an ARMOR MASTER helmet kit (currently v4.5) from Dave at Dave's Darkside Depot. Dave sent a brown box right away, following my payment and it came pretty quickly. Since this was my very first order and all I've seen of these white plastic pieces was from pictures online, I wasn't sure exactly what I was going to receive. Dave's Darkside Depot came highly recommended by a friendly gentleman I met on Facebook. He told me that AM armor was cut generous enough for a bigger guy if I needed it to be. I had been doing my research and found the RS Propmasters guys in the UK and watched their entire library of build thread videos on YouTube. I just think it would be cool to just go hangout with those guys for a week and be a blast! I learned a lot there and I liked the idea of an authentic reproduction from an actual screen used armor set. But after a few Q&A sessions with my Facebook friend referral source, I thought I'd start giving the AM armor a serious look. I could find a few good threads to read up on, but some were outdated and didn't offer a whole lot of great photos on what this stuff was really like. So I thought I'd dip my toe in the water and take a chance with Dave's Darkside Depot and the Armor Master line and see for myself what all this was about. With this thread, I hope to document and give the beginner a good sense of what exactly this helmet kit is all about with some quality photo documentation. Let me say that I am waaay impressed with what I got from Dave's Darkside Depot. The v4.5 AM helmet is much better than I had hoped for! The quality is there for sure. I can't wait to get the rest of the AM armor (with my continued success in health goals) and work towards acceptance with the 501st, FISD and my local garrison. Hope these photos are helpful! This is my first attempt at attaching photos.3 points
-
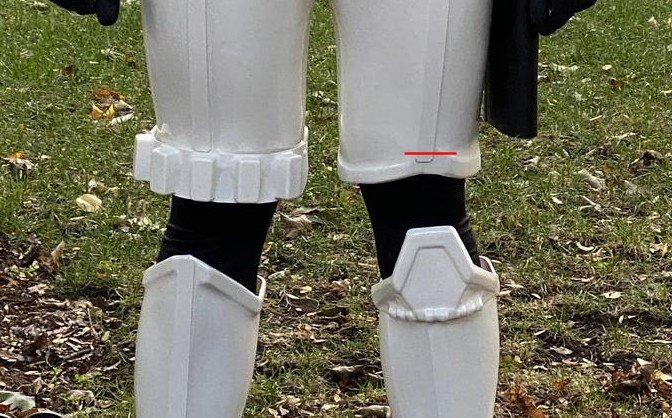
Dan thanks for pointing out the left/right discrepancy for the TD. When I wrote it I don’t know if I was wording it as you would look at the TD or as worn (because as worn, the “D” is on the left and the greeble is on the right). In any case, once someone looks at the picture of the TD they should be able to figure it out. As for the abdomen detail being a different shade of blue or black. I disagree and I believe the image you posted looks darker due to the lighting and the painted area is recessed. In this image (previously posted in the OT vs ROTK comparison thread), it does appear to be darker but again, I believe its due to the painted part being recessed and the lighting. It still looks very blue to me. Further, if it is blue why would they use a different blue than the two blue button greebles? I think we came to an accord on the abdomen colors being Admiral Grey and French Blue. I cannot see LFL using a different blue for the rectangle blue but I do not have any definitive proof. I would prefer the CRL to stand as it was with the rectangle being blue. Just my feeling on this. On a different note ****This does not require any type of CRL change or rewording*** I just wanted to add this to the discussion so that it did not “later” become an issue. The strapping for the thigh armor, we specified: Thigh armor is suspended by a black strap approximately 1” 25mm in width with a plastic side release buckle that is covered by black webbing or elastic that runs down the side seam of the leg. In these image you can see the strapping and the elastic cover over the side release buckle.2 points
-
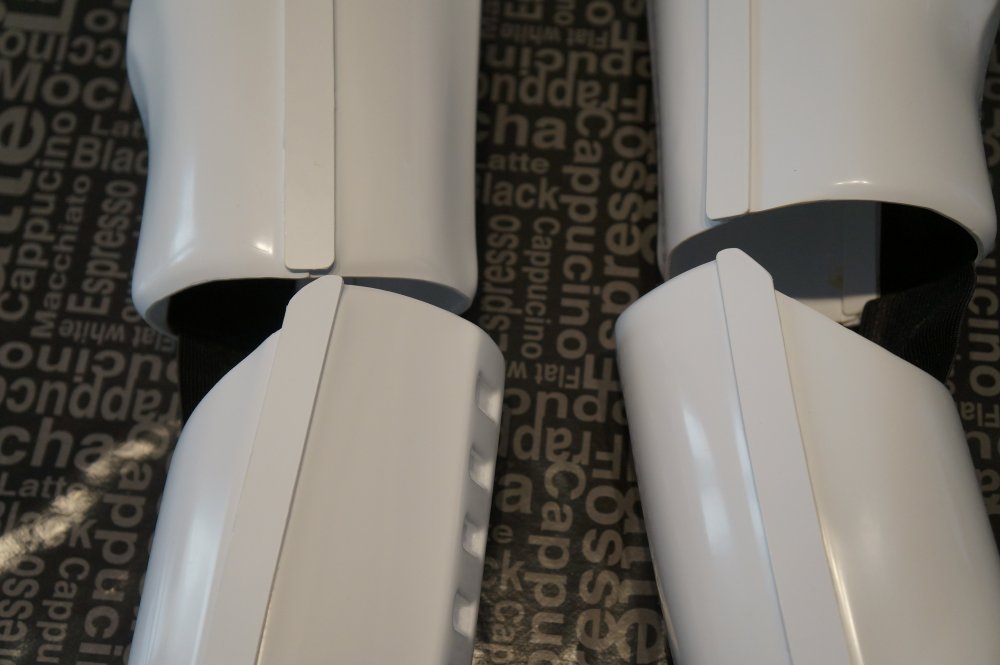
You can also cut the cover strip on an angle across the two halves for comfort so you have no exposed sharp points. that's how I built my AP kit.
 2 points
 -
Great Paul!, fortunately it's just a visual effect. On another note, any comments/tips/suggestions regarding the eyes and teeth on the faceplate? About your question , Teeth look good and certainly you could trim a bit, but be too careful that not pass the gum lines and the eyes you could trim a bit too. here some references , that I imagine you have seen too. Keep on doing an awesome work !!2 points
-
Magnetic calf-closure system: After my initial test of my butted-magnet system, I finally got to completing the shin armor so I could try it out. A note about magnets: they are only really at full strength when exactly touching. Even 1mm apart, and they are at about half strength. So for this to work, the pairs of magnets need to be as close to each other as possible. Because of that, I tried one method on one, and through that process came up with a better method for the second that ensured optimal placement. To begin with, I created a bunch more of my heat-formed "pockets", including a different type for the top and bottom edges (longer rather than wider shape because of how close to the top and bottom edges it would be). I have my 25mm cover strips all ready to use, but because of the nature of mounting these, save the cover strips for after the closure is complete. Even though my armor was pretty close to butted, it needed to be a lot closer for this to work. I started by fine sanding the edges, and a little mild heating to get the edges to meet more flush. The tops will get the mobility cuts, but I waited until after the closures were complete to know what the true edge would look like. Once I had it flush, I taped it closed matched up, and drew my marks. These marks would be on-center for each magnet pair. I started with the top and bottom, and then divided the distance between by 5 (giving me four marks between, for a total of six magnetic closures, 12 magnets in all, per shin). My number was about 63mm between each line. Once marked, I removed the tape. I used some coarse 60-grit sandpaper to roughen the back side behind each mark, where the pockets would be glued. In the right photo, you can see what my pockets would look like. I paired them up to ensure they were similar. A note on glue. I know the Stormtrooper lives and breathes E6000, and for most of the armor, that glue is a great choice. For this process, you will really need speed, and quick results, so CA glue with an accelerator spray is ideal. Because I once was unsure, CA glues (Cyanoacrylate adhesives) are often called "Super Glue" and it's a clear glue that sticks really well to things like plastic, fabric, and... skin. Many people call this "Gorilla Glue" but the problem with that (or any brand) is that Gorilla glue makes about ten products, including wood glue, and an expanding glue, all called "Gorilla Glue". CA glue is the preferred name to ensure people know what to use. Now, for the accelerator spray. Zap-A-Gap makes one, but there are many types. What it is is a spray that you can spritz on a wet bond, and it sets the glue (at least on the edges) in about 3 seconds. No kidding. Like you could take a quarter, glue it to the side of your work bench, spritz the edges, and then let go. In my experience, if you quickly pried it up, the CA glue would be wet underneath for some time, but it would be "clamped" by the already cured edges while the remainder dries. This closure method relies a lot on that rapid dry time. Gluing magnets into the pockets. It is fairly important to keep track of polarity for the magnets, so put them ALL in a line, and use two different colored sharpies to mark each end, so that you have (for example) a blue and red end on each, and every red wants to stick to a blue. On the pockets, mark the "center line" that is where the center of the magnet would be on the seam edge, so you can line it up from the outside. Sand the bottom of each pocket to prep for gluing. Then set out your pockets bottom-side-up (if possible, on a piece of sheet steel like I have, or some other magnetic surface to keep them from sliding or trying to attach each other. Mark them red and blue as well to keep track of what goes where. Drop some CA glue in the bottom of each, and set a magnet in each pocket, aligned toward each other by color, so you have a red side and a blue side (or whatever colors you use). If you have accelerator, you can spritz these and be ready to move to the next step: Note: the following process was what I tried on one calf, and then improved on it, so be sure and read ahead for a much better process for gluing. Start on one side and in order down one "color" set, take each pocket, and add CA glue to the bottom edge, filling in more around the magnet. Mount it in place lined up with the edge line on-center for each magnet, and as perfectly close to flush with the seam edge as you can. This works best when the magnets are just touching. As each is set in place, spritz with CA glue accelerator, and then add a line of glue around the back edge and sides of the pocket, and spritz again. Move up one side, and then down the other, taking care to keep it from shutting before everything is truly cured (I would give it at least 30 minutes to an hour). These magnets are quite powerful, and could likely pop free from un-cured glue. Here is where I found a problem, and a new solution: Once I finally put the sides together, they clicked nicely with a satisfying click. The trouble was, you can see in the first photo, is there were gaps where various pockets were too close together, which then kept the better positioned ones from touching. So I had to go to each joint, and with a small piece of sandpaper wrapped on a bit of plastic, sand them until they met flush. I eventually got it much closer, but it took a lot of fine sanding and trouble to get them to match: My solution for a more precise alignment of the magnets: I realized that the magnets want to be close and perfectly aligned. That's their purpose. So I should use that. So I did as before, and glued one side (like the "red" side), again, as close to the edge as possible. Full CA glue on each, and spritzed with accelerator to lock them in, and then I let that side sit for an hour to fully cure. First, I taped the calf closed as perfectly as I could, with the edges tight together. Then I took the other set of pockets with the magnets glued in, the "blue" side, and put glue on just the back half, away from the seam edge. I didn't want to risk getting any glue on the seam or opposing magnets, and it does spread out a bit. So for now, just glue the back side (pictured). Then I carefully, in order, set the magnets down the side across from their "mates" and the magnets themselves snapped into the perfect spot, touching exactly. If the other side was a little over the line, they would lock in back a little. It aligned them perfectly. As I went, I would place a pocket, then do some CA glue along the back and back corners, a little on the edges (remember, nowhere close to the seam edge), and then spritz with the CA accelerator, locking them in. Once that side was done, I set it aside for a half hour to more fully cure before removing the tape, popping it open, and then gluing the remaining spots, including around the edges up to the seam edge. That one went together much more quickly, and it was nearly perfect. One of the pockets had pried up a little, so had to be clamped and re-glued, but otherwise a much easier method. I then taped the top edge, and now that it was in the final alignment, ground my mobility cuts. And now the moment: Does it work? I tried them on, and they snap right shut around my calves. In the little I have worn them this morning, they seem to work really well. I will say that I expected them to be a little harder to open. I walked around, up and down stairs, and they stay closed, but when I do something extreme with the top edge, like crouching in a kneeling position, the top can spring open. I tried them on before the mobility cuts, and they sprung open more often when bending my knees past 90 degrees. Because of this, I am adding a "fail-safe snap" (popper for the UK folks) on a 1" black nylon strap inside that crosses the top of the seam on either side of the top magnet snapping on one side. The strap will be connected by reaching in from the top after the armor magnetically closes around my calf, that should ensure it never opens without me doing it. I will add pics of that in my next post, but for now it is on E-6000 time. Also I will finally add my rear cover strips, which should help finish these out!2 points
-
Si, por favor Lluis...Nos encantan las fotos Yes, please Lluis ... We love photos2 points
-
Congratulations to our 1000 Expert Infantry With our 1000th EIB and March to 1000 now complete we take a look back to where it all began, bare with me as a lot of information is buried deep down and some has been lost over the years, I'm sure @Daetrin can chime in but this is what I have uncovered. Initially conceived by our detachment founder Paul "Daetrin" TK8020 back in 2006, here is the first outline of the program https://www.whitearmor.net/forum/topic/5-expert-infantryman-badge-eib-program-overview/ In January 2007 a name had to be found https://www.whitearmor.net/forum/topic/560-we-need-a-name-for-deployment/ discussed and a poll went up https://www.whitearmor.net/forum/topic/633-poll-deployent-name/ the winning name being "Mark" (IV, V, VI). This name stuck for a little while but in August 2007 there was another poll https://www.whitearmor.net/forum/topic/1347-deployment-name-poll/ this time it was decided the program would be called "Elite". In March 2009 a new poll went up to come up with a new name https://www.whitearmor.net/forum/topic/6378-changing-elite-to-something-else/page/5/ with now outcome and in the end our detachment founder Paul decided on the name Expert Infantryman https://www.whitearmor.net/forum/topic/6378-changing-elite-to-something-else/?do=findComment&comment=82088 his post below: "In the end I decided to re-brand our program as "Expert Infantry", with Elite troopers becoming Expert Infantryman. This is based on the Expert Infantryman Badge in the U.S. Army - see http://en.wikipedia.org/wiki/Expert_Infantry_Badge for more info." Program name changes Mark 1-5 Elite 6-65 Expert Infantry 66-1000 EIB graphics Now on to some graphics and much of this had been discussed in staff areas, but here are just a few of the early designs It was suggested to keep it more to the military style, here is the military's Expert Infantryman Badge http://en.wikipedia.org/wiki/Expert_Infantry_Badge And from there came And finally Current day Some of the programs to help get the numbers of EIB's on the rise: The Road to 300 https://www.whitearmor.net/forum/topic/18434-the-road-to-300-fisd-eib-that-is-stormtroopers-achieved/ The March to 500 https://www.whitearmor.net/forum/topic/33547-october-2015-newsletter-road-to-500-expert-infantry-badge/ The March to 700 https://www.whitearmor.net/forum/topic/26126-the-march-to-700-expert-infantry-in-2014/ The March to 1000 https://www.whitearmor.net/forum/topic/49177-only-18-spots-left-time-to-step-up/ Previous Deployment Officers: (sorry if anyone was missed, please let me know and I will edit) Paul "Daetrin" TK8020 Scott "Scott M." TK4149 Terrell "SuperTrooper" TK1787 Mason "dashrazor" TK4603 Mathias "Locitus" TK2959 Phil "FunkyTrigger" TK3796 Steve "gazmosis" TK4034 Eric "Darth Aloha" TK9674 (454) Tony "ukswrath" TK10116 Andrew "Sly11" TK11469 Joseph "justjoseph63" TK10963 Dan "CableGuy" TK142911 Sha Sha "shashachu" TK19233 Dan "TheSwede" TK99665 Christine "Cricket" TK10401 Mike "msouza" TK11463 Mario "TKSpartan" TK48117 Chemi "Chemi" TK30173 Some milestones interesting to see how details evolved over the years (just a shame some images are no longer available): 1st 28th April 2007 - Scott "Scott M." TK4149 - FX - https://www.whitearmor.net/forum/topic/884-mark-iv-deployment-request01fx/ 100th 2nd March 2010 - Robert "TKittell" TK7143 - AM armor AP helmet - https://www.whitearmor.net/forum/topic/10128-tk-7143-requesting-eib-status100am/ 200th 28th January 2012 - Graeme "Trooper1972" TK3896 - AM armor TM helmet - https://www.whitearmor.net/forum/topic/18409-tk3896-requesting-eib-status-anh-stunt200am/ 300th 25th January 2013 - Steffen "Minuteman" TK18793 - AM armor TM helmet- https://www.whitearmor.net/forum/topic/22825-tk-18793-requesting-anh-stunt-eib-status-am300/ 500th 21st September 2015 - Brad "68Brick" TK21814 - AP armor AP helmet - https://www.whitearmor.net/forum/topic/32917-tk-21814-requesting-anh-stunt-eib-status-ap500/ 700th 9th March 2017 - Christine "Cricket" TK10401 - RS armor RS helmet - https://www.whitearmor.net/forum/topic/40906-tk-10401-requesting-anh-stunt-eib-status-rs-700/ And big congratulations to our 1000th EIB recipient 1000th 16th September 2020 - Sebastion "Shimo"" TK51337 - Anovos armor Anovos helmet - https://www.whitearmor.net/forum/topic/50022-tk-51337-requesting-first-order-stormtrooper-the-last-jedi-eib-status-anovos-1000/ 1st double digit EIB recipient 10th 13th October 2021 - Glen "gmrhodes13" TK85421 - RS armor ATA helmet - Death Trooper https://www.whitearmor.net/forum/topic/51526-tk-85421-requesting-death-trooper eib status-ata-approved-10/ Multiple EIB Recipients Let's also not forget those who have taken it up to the next level and who are multiple EIB recipients. Additional awards are issued as [APPROVED] 2nd, 3rd, 4th and so on and do not get counted into the total 1000, you can see who has multiple awards by looking at their EIB banner on their forum profile, there are extra stars on top for additional approvals which then change to gold after 5. There are a total of 75 recipients of multiple EIB awards, congratulations to you all 2nd EIB Award Recipients - 59 Dan "R2Dan" TK8527 Carsten "Sidius" TK11672 Derek "DZFireMedic" TK83125 Luis "Rietzer" TK31513 Daniel "Ensi" TK61514 Dennis "NINJAMOVE" TK16112 Christopher "Chewy" TK66402 Rowan "zebedee" TK12111 Jonathan "JLight" TK32627 Randy "magni" TK16127 Andreas "Coil" TK24269 Danny "Ripper_L" TK55550 Kai "TK Goatee" TK71715 Jim "Engineering trooper" TK12638 Robert "RLJ2515" TK10596 Sarah "Alay" TK20466 Mark "humperdingle" TK22700 Dave "PBTrooper" TK10737 Shawn "CrookKnight" TK10204 Ruben "Crusader_6" TK34281 Chris "PhoenixTrooper" TK80806 Andrew "fuumantroop" TK24218 Steve "starsaber25" TK19466 Mike "TK1636" TK1636 Michael "TK-Sharp" TK12169 Joey "vecspeed12" TK9512 Partick "Front-a-Little" TK7961 Carey "C HERM" TK941 Nick "ZeroCool" TK20882 Manny "Tehcaveman" TK10912 Anthony "Redforce" TK10666 Andy "HeloTrooper" TK5224 Hans "Sparrow J" TK5224 BJ "bjsavage7" TK5955 Charles "Clamps" TK25267 T.J. "Hunterhwt" TK7944 Mark "captsafe66" TK4584 Darren "SandFlea" Tk7435 Matt "out0fstep" TK9328 Laurent "Mini Trooper" TK3182 Lou "Darth Voorhees" TK6908 Daniel "DarthChridan" TK7987 Christian "v7sg" TK9539 Vern "TK bondservnt" TK2392 Paul "Daetrin" TK8020 Rich "Rich330" TK6042 Allan "Trooper Q2" TK3066 Brain "tkrestonva" TK2918 Stefan "Turrican" TK1355 Terry "Terry19D" TK2055 Chris "TK-5069" TK5069 Ken "TK88667" TK88667 Jacob "Pistolsheets" TK86267 Jonatan "Nairy" TK23592 Adam "revilimiter" TK89400 Aizenoso "Aizenoso" TK14292 Tim "TrickyT81" TK24881 Dan "Kaiserinthehood" TK80419 3rd EIB Award Recipients - 8 Joseph "justjoseph63" TK10963 Tony "ukswrath" TK10116 Charles 'Templar726" TK72627 Juan "BananoPower22" TK4326 Daniel "Debater2nd" TK2618 Jason "TK-J" TK4625 Thayne "ThayNerd" TK5401 Brett "Cleantrooper" TK9593 4th EIB Award Recipients - 3 Arthur "giskard8" TK39093 Daniel "TheSwede" TK99665 Frank "rhapsodyredd99" RK11038 5th EIB Award Recipient - 1 Justin "TheRascalKing" TK61490 6th EIB Award Recipient - 0 - - - - - - 7th EIB Award Recipient - 2 Todd "Toddo" TK6647 Ardeshir "equuspolo" TK42128 8th EIB Award Recipient - 0 - - - - - 9th EIB Award Recipient - 0 - - - - - 10th EIB Award Recipient - 1 Glen "gmrhodes13" TK85421 NOTE If you are approved with a "2nd Version" of a particular costume that you are already approved with you do not receive an additional award, there is only 1 award issued for each costume version ie: only 1 x Hero, 1 x Stunt, 1 x HWT, 1 x ESB, 1 x TFA and so on. If you have a second/additional version costume approved you will see "2nd Version" and [APPROVED] added to the thread title, no additional profile stars. A full list of all all FISD awards can be found here:
 1 point
 -
Name: Lluís Quinquer 501st ID: 15711 FISD forum name: Quinquer Garrison: Spanish Garrison https://www.501st.com/members/displaymemberdetails.php?userID=32719 Armor = Armour Factory Props Helmet = Armour Factory Props Blaster = Armour Factory Props Boots = Armour Factory Props Canvas belt = Armour Factory Props Hand Plates = Armour Factory Props Electronics= ICOMM Neck Seal = Armour Factory Props Holster = Armour Factory Props FULL BODY ARMOR DETAILS HELMET ACCESSORIES BLASTER1 point
-
1. Name: David Nightingale 2. Garrison: Midwest Garrison 3. Armor/Helmet Maker: DA Props 4. Cloth Belt/Neck Seal: Steph's Imperial Outfitters 5. Boot maker: Imperial Boots 6. Blaster maker: TK11463 7. Height: 6'3" 12. Weight: 215 lbs 13. TK type: ANH Stunt 14. Names of Troopers who significantly helped with your build: Sam Meadows, Das Elkins, Clive Barzilla, Wayne Winfield, TKSpartan, gmrhodes13, Ukswrath, Kalani, Justjoseph63, TheRascalKing, and many, many others. For those I missed putting this together my apologies, I couldn't have done it without you. Front: Left: Right: Back: Poses: Helmet: Gloves: TD: Blaster: Thanks in advance everyone.1 point
-
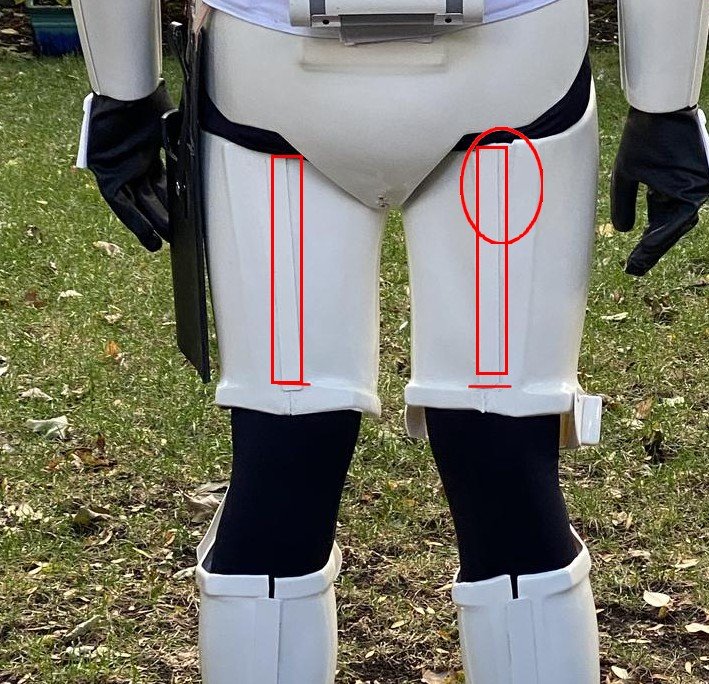
1. Your drop boxes need to align with the ends of the plastic belt A: I’m gluing these down On the interior of the belt so they don’t move. 2. Need to rotate your forearms so the cover strips are facing forward A: User error on that one. Hadn’t out this on in its entirety in a while. 3. You have a big gap around the knees, perhaps playing around with some strapping may help, drop your ab/cod down so your thighs could come down, bring shins up a little A: This is going to be an issue. I’m 6’3”-6’4” with long legs. I can probably Velcro-up the shins a bit onto the boot loops, but getting more length out of the shins is going to be an issue short of shimming the bottom of the shin. Not sure I can drop the cod/chest further. It’s stretched pretty thin as is. I’ll Velcro the shins and see if that helps. If not I’ll have to try to extend them with a shim. Was just a suggest for a better look but you may very well be at your limit for adjustment. 4. Looks like your backplate wants to come further forward as there is a gap between it and your back on the side image A: Are you talking about the left side? I think that’s an issue with the kidney shim being a little too big. I’m going to have take the shim off at the kidney and shorten it by 1/2” on both sides. The kidney plate is bowing and that’s what’s giving the rising impression. 5. Belt is too low at the back, it actually sits higher than the front, so angles upwards backwards A: User error. I’ll note that. 6. Could adjust your shoulder straps on the rear so they sit central to the back plate tabs A: See the kidney/shim issue above. 7. Close gap at top of shins on rear, add some ABS tabs behind so you can't see the black gap A: Easy fix. Thanks. 8. On rear photo your right bicep needs rotating A: User error 9. I probably would have gone with slightly larger cover strips on the rear of the thighs as the ones you have now stand out a lot when looking at the added material, the right one is very noticeable. A: going to bring in the right thigh again. But how wide can I go? This one I would check with your GML (garrison membership liaison) as they will have the ultimate say in your approval. I have seen some very wide coverstrips use before and approved. Looking at your thighs the cover strips appear to be on an angle, adding slightly larger straight cover strips will fill in some of the modified area, I would try 35-40 and have a look from there. On the right back you have an area on the top left which stands out, may be an angle piece, covering that would look better 10. Also the thigh cover strips should stop just short of the lower ridges, you are close but still a little long. A. I’m not following this one. Are you talking about the front of the thighs? 11. Also just watch the gaps on your shoulders to chest, they vary quite a lot through the photos. A: Going to shorten the bell straps to the bridges by an inch. That’ll bring them in.
 1 point
 -
Appreciate the thoughts. Lemme address each: 1. Your drop boxes need to align with the ends of the plastic belt A: I’m gluing these down On the interior of the belt so they don’t move. 2. Need to rotate your forearms so the cover strips are facing forward A: User error on that one. Hadn’t out this on in its entirety in a while. 3. You have a big gap around the knees, perhaps playing around with some strapping may help, drop your ab/cod down so your thighs could come down, bring shins up a little A: This is going to be an issue. I’m 6’3”-6’4” with long legs. I can probably Velcro-up the shins a bit onto the boot loops, but getting more length out of the shins is going to be an issue short of shimming the bottom of the shin. Not sure I can drop the cod/chest further. It’s stretched pretty thin as is. I’ll Velcro the shins and see if that helps. If not I’ll have to try to extend them with a shim. 4. Looks like your backplate wants to come further forward as there is a gap between it and your back on the side image A: Are you talking about the left side? I think that’s an issue with the kidney shim being a little too big. I’m going to have take the shim off at the kidney and shorten it by 1/2” on both sides. The kidney plate is bowing and that’s what’s giving the rising impression. 5. Belt is too low at the back, it actually sits higher than the front, so angles upwards backwards A: User error. I’ll note that. 6. Could adjust your shoulder straps on the rear so they sit central to the back plate tabs A: See the kidney/shim issue above. 7. Close gap at top of shins on rear, add some ABStabs behind so you can't see the black gap A: Easy fix. Thanks. 8. On rear photo your right bicep needs rotating A: User error 9. I probably would have gone with slightly larger cover strips on the rear of the thighs as the ones you have now stand out a lot when looking at the added material, the right one is very noticeable. A: going to bring in the right thigh again. But how wide can I go? 10. Also the thigh cover strips should stop just short of the lower ridges, you are close but still a little long. A. I’m not following this one. Are you talking about the front of the thighs? 11. Also just watch the gaps on your shoulders to chest, they vary quite a lot through the photos. A: Going to shorten the bell straps to the bridges by an inch. That’ll bring them in. Thanks!1 point
-
Thanks Andrew Snaps added to belt, also added one to the center with nylon since there is no middle button cover Button covers applied Drop boxes trimmed, backs and elastic added and glued to belt Shoulder straps test fitted, tape guide to follow and glued in place Strapping applied and tested AB buttons before and after WOW these RS sniper plates are annoying, hopefully the clamps work Harness strapping finished, has home made adjusters on the belt, can be moved along the belt as long as adjust height1 point
-
Hola Lluis, gracias por tu aplicación a EIB. en breve estaré contigo. Hi Lluis, thanks for your EIB app. I'll be with you shortly.1 point
-
Look good to go, you could take a little more off if you really wanted from the teeth just don't cut into the gums, eyes look fine1 point
-
I appreciate you calling out something not looking right, Mario, as I am striving for as much accuracy as possible. The reference photo you attached is indeed the main photo I referenced when building my TD. Since all measurements are approximate, I tried to get as close as possible, measuring twice or more. I did re-check my measurements (photo below) and I'm hoping I'm within acceptable range. Caps are 20mm wide. Total length of TD is about 188mm and gap between caps and panel are about 11-12mm. I also did a dry fit check of my Ukswrath TD clips and they appear to align pretty well? As Glen suggested above, I believe the dimensions look "off" due to the ATA kit requiring a smaller diameter pipe. Again, thanks for keeping me on the straight and narrow path though. On another note, any comments/tips/suggestions regarding the eyes and teeth on the faceplate? I'm thinking I might be able to file more out of the inside corners of the eyes? And I might also be able to file the tops and bottoms of the teeth closer to the gum lines? Or am I good to go? Thanks Troopers!1 point
-
Looking forward to seeing the progress, good luck1 point
-
Agreed. I have hot glue on the nack of the button board and will be mounting that to some elastic on the fingers and planning on wrist strap to also help relieve pressure. Even if that all fails i would still have my mic. Thanks for calling it out as I could have easily missed it.1 point
-
It's the forum at the moment, been glitchy the last few days around this time, deleted extra posts1 point
-
Left and right information now corrected for TD, recess on ab plate now states black not blue.1 point
-
Sorry about that, Tapatalk kept giving errors.1 point
-
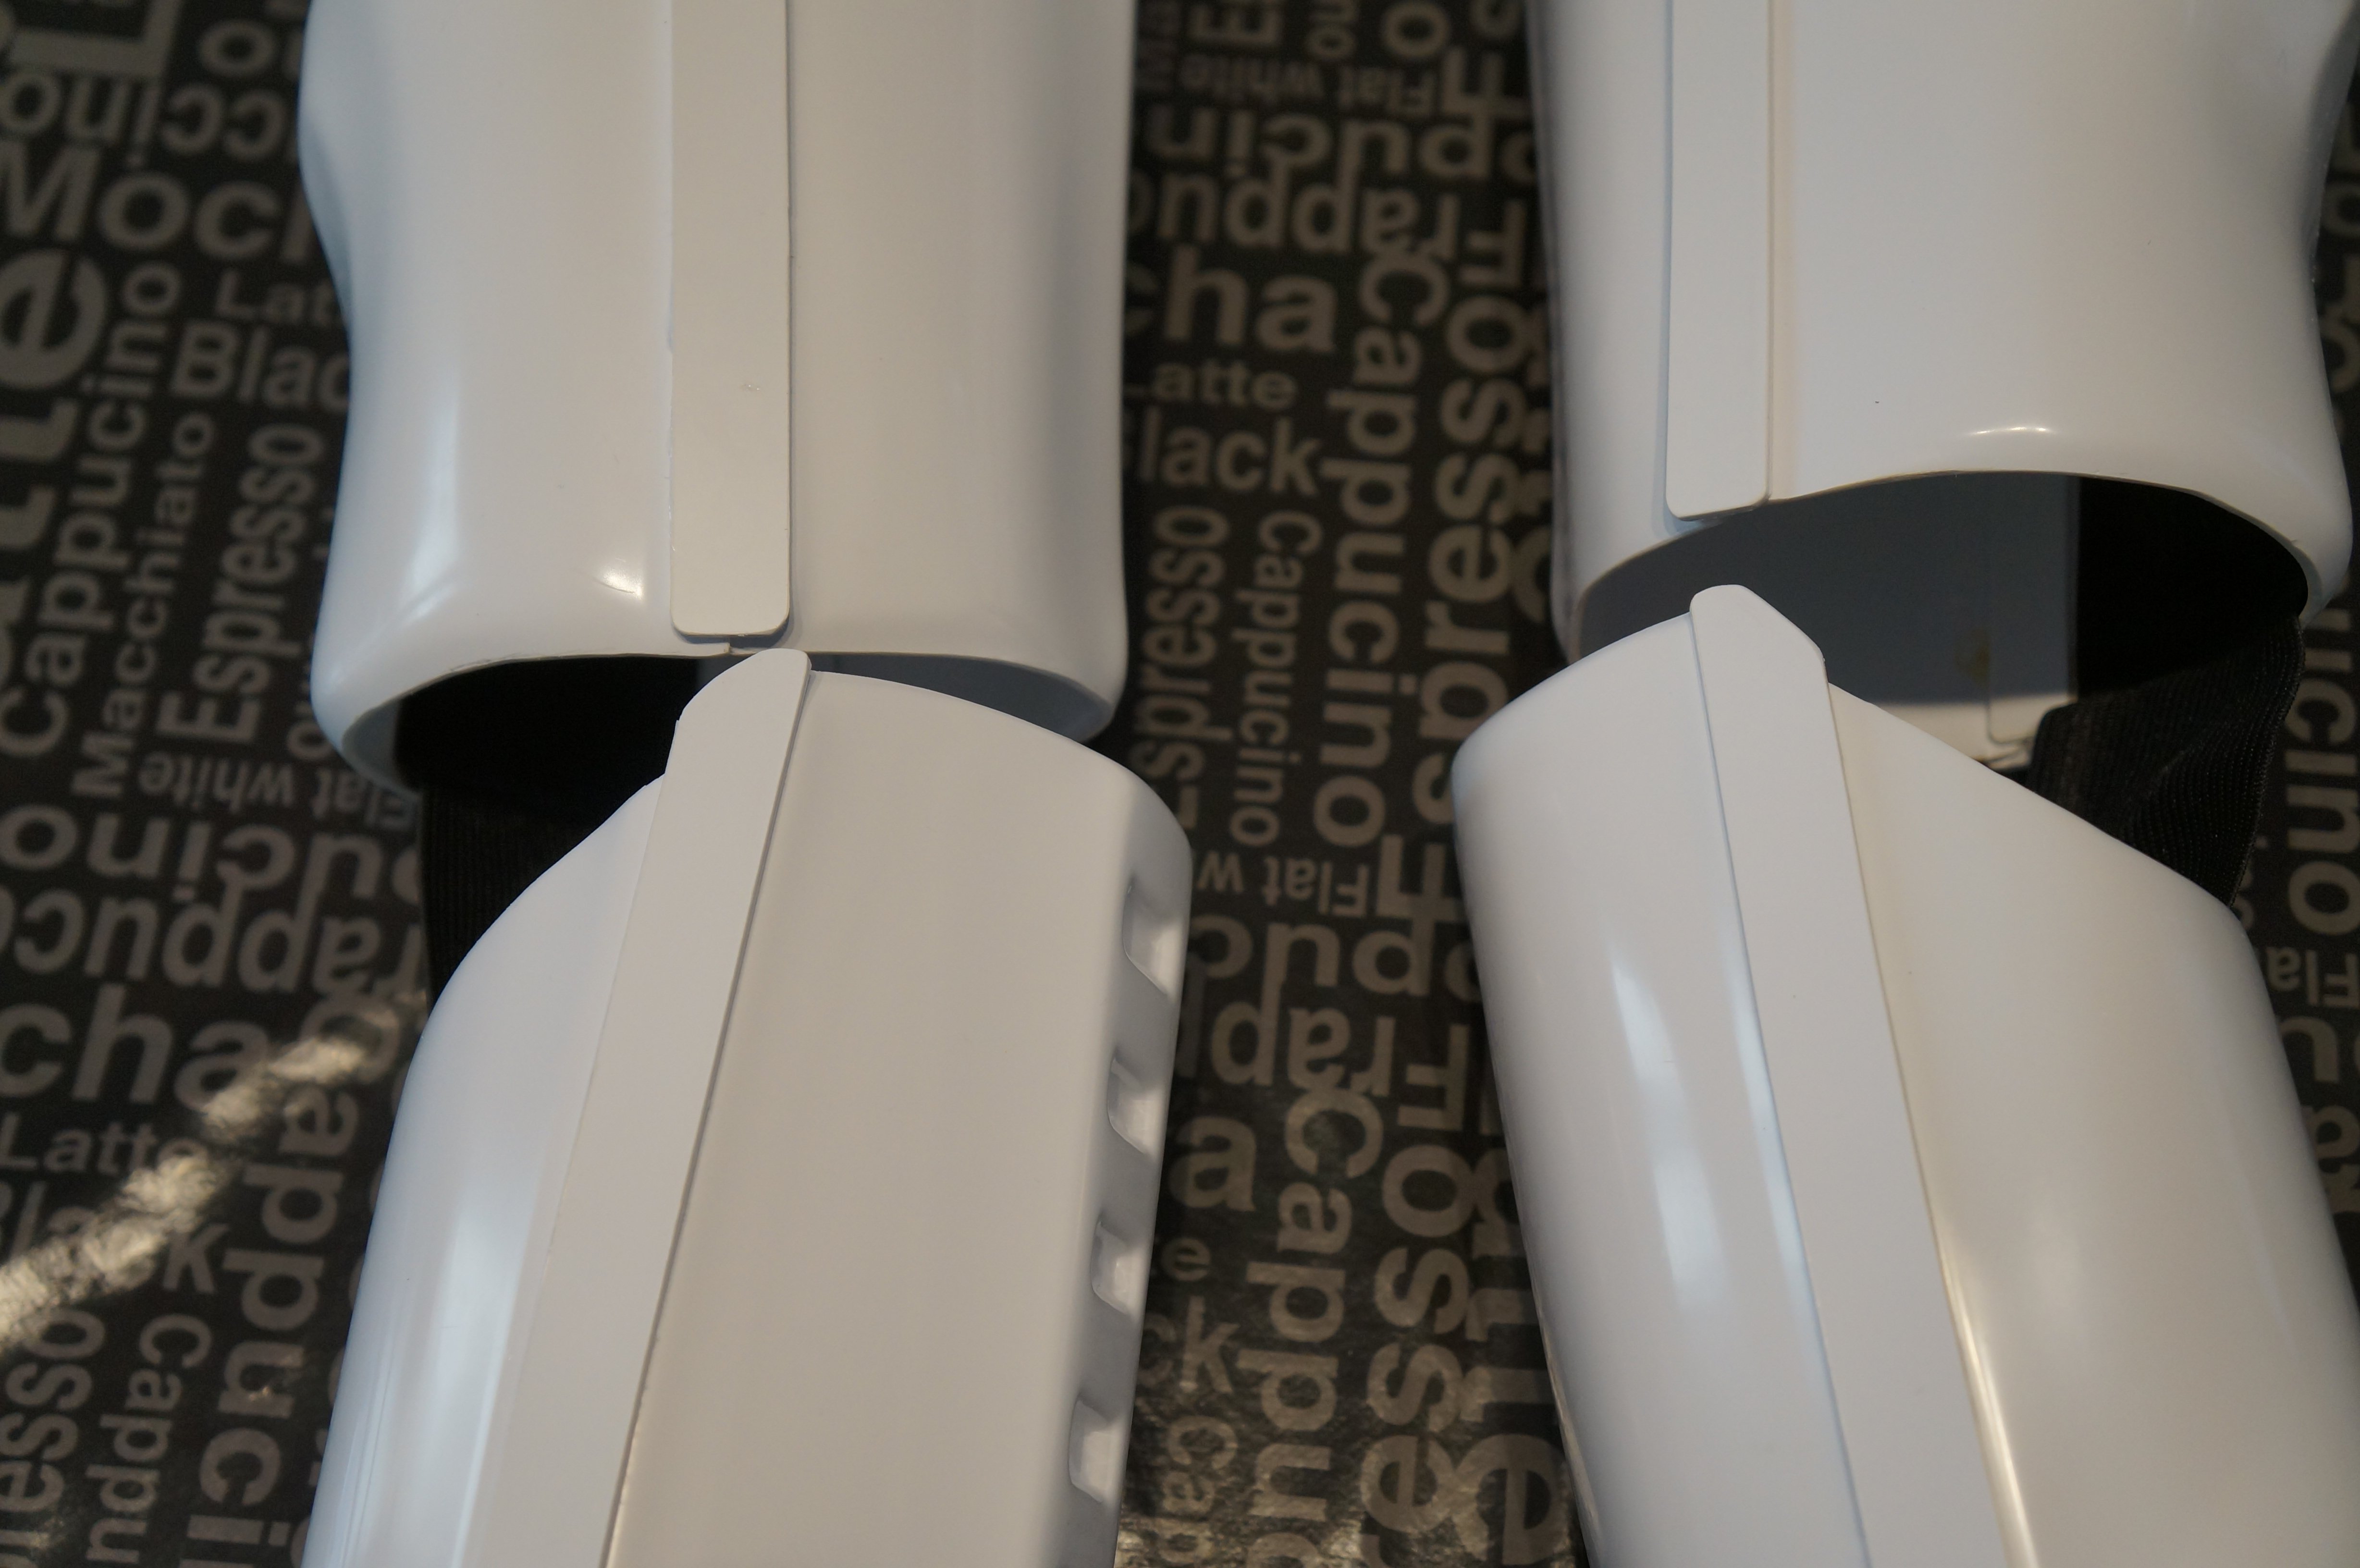
Onto the shins and thighs now. I've already trimmed and sanded the coverstips:- 20mm - Thighs front/back and shins front 25mm - Shins back Now its just the shins and thighs themselves to work on. The shins seem to line up alright. The thighs are a bit more of a challenge. As I have read in build threads that the front left thigh lines up beacuse they are both straight. But the right thigh has a straight half and a curved half. So I was wondering what the protocol is for the coverstrip/ridge exposed underneath. The coverstrip will need to be curved slightly, but with 1 straight half and 1 curved half, how can I conceal as much ridge as possible? I already marked the area for where I believe it lines up best, but does it look correct? Also, the thigh backs both don't meet at the top. If I trim the taller side down would that be taking too much off? If I had to do that it would remove a portion of the return edge, so all of it would have to go. Or can this just be covered over by the coverstrip? I did a very quick test fit and found that because I'm a thin guy, I would need to take the thighs in a bit. This would make the top half even higher and I'd have to remove a lot for the back tops to meet. What's the best thing to do? I'll provided some more images when I do a proper test fit so you can see what I mean.1 point
-
Nice work trooper a few things you may want to adjust Buen trabajo, soldado, algunas cosas que quizás quieras ajustar Your shoulders have a big gap at the front, can you rotate them in a little more and try to bring them in closer at the top Tus hombros tienen un gran espacio en la parte delantera, ¿puedes rotarlos un poco más y tratar de acercarlos en la parte superior? Thighs are hitting your butt plate, also your right thigh back cover strip is angled. Right back shin not completely closed. You also have a big gap between the helmet and neck, could you reduce the padding? Detonator could also come down on the belt Los muslos están golpeando su placa de nalgas, también la tira de la cubierta trasera del muslo derecho está en ángulo. Espinilla trasera derecha no completamente cerrada. También tienes un gran espacio entre el casco y el cuello, ¿podrías reducir el acolchado? El detonador también podría caer en el cinturón. Ab and kidney are overlapping so can't see your side rivets Ab y riñón se superponen, por lo que no puedo ver los remaches laterales Butt plate is pushing outwards La placa de tope está empujando hacia afuera Thigh ammo strip rivets are very close to the corner Los remaches de la tira de munición del muslo están muy cerca de la esquina Could you also post the following images: Close up of your ab/kidney side rivets Front of your sniper plate Inside connectors thigh ammo strip Top right ab "Han" snap Bottom helmet screw Good luck with approval ¿Podrías publicar también las siguientes imágenes? Cierre de los remaches laterales ab / riñón Frente a tu placa de francotirador Conectores interiores tira de munición de muslo Ajuste superior derecho ab "Han" Tornillo inferior del casco Buena suerte con la aprobación1 point
-
And so, Chris comes out of the woodwork once again in his by anualy posting on fisd [emoji23][emoji23] I'm working on a few versions of parts atm, asymmetrical and symmetrical. Fixing up the files of the parts I hadn't done yet, happy with how its coming along. Was remaking some of my clone moulds and decided I'd make a start on some of the parts. Need to go get some white abs to try these as I only have hips atm, might have some stuff to show off soon.1 point
-
Hello and welcome aboard, I haven't seen very much in the way of blueprints, just a few images Some nice images in this thread Also here
 1 point
 -
ATA pipe dimensions are a lot smaller than most other makes so it can make appearance look out of sink compared to screen refernces1 point
-
Looking good !! If I can add some tip. You may want to check the TD caps dimensions. Take a look to the following references: Also check the screws position. Cheers..1 point
-
If I remember tomorrow I’ll try to go to the original and get heavy handed with some sliders and see if that reveals some more detail in the shadows. Looking at the version on Flickr it might be an S trim but that’s entirely based on detail in the shadows on the right side.1 point
-
Hey everyone, so i was just wondering about the helmet trim. I have circled one of the images by Christopher Pearson on Flickr from the Rogue One Stormtrooper Reference CE 2016. I think there is a visible seam which leads me to believe it is a rubber seal similar to that used in ANH builds. Sent from my SM-G930F using Tapatalk1 point


.thumb.png.69856e02550a2e6d07e44a2b1bda020c.png)


.thumb.jpg.8eadc48331a3df147c8d5e71dd9b8a00.jpg)