Leaderboard


Popular Content
Showing content with the highest reputation on 09/20/2020 in all areas
-
Excellent, thanks! I had seen those photos and was considering about shaping in a curve. I will assemble the arms and make a decision after a final fitting. Just want to make sure I don't take off material now and regret it later! Thanks again. Oh, and I have HEAPS of trooper pictures plastered around my work space for inspiration too!4 points
-
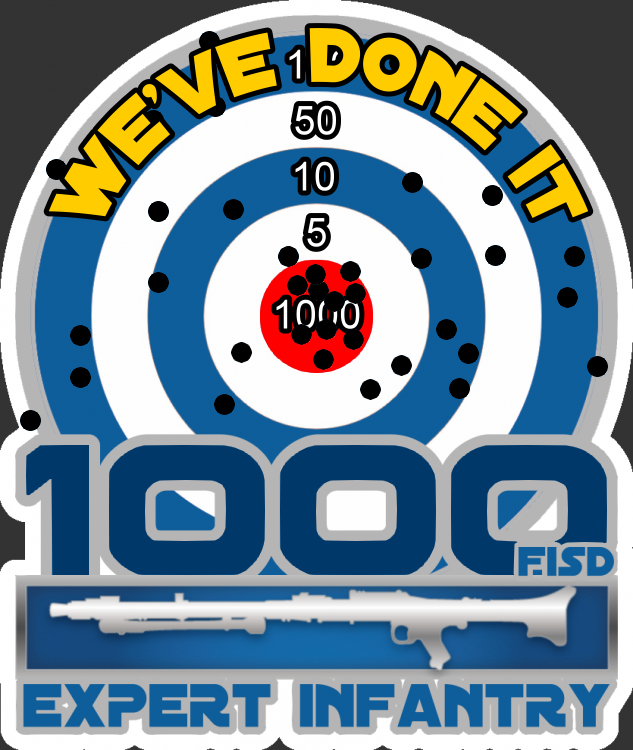
Congratulations to our 1000 Expert Infantry With our 1000th EIB and March to 1000 now complete we take a look back to where it all began, bare with me as a lot of information is buried deep down and some has been lost over the years, I'm sure @Daetrin can chime in but this is what I have uncovered. Initially conceived by our detachment founder Paul "Daetrin" TK8020 back in 2006, here is the first outline of the program https://www.whitearmor.net/forum/topic/5-expert-infantryman-badge-eib-program-overview/ In January 2007 a name had to be found https://www.whitearmor.net/forum/topic/560-we-need-a-name-for-deployment/ discussed and a poll went up https://www.whitearmor.net/forum/topic/633-poll-deployent-name/ the winning name being "Mark" (IV, V, VI). This name stuck for a little while but in August 2007 there was another poll https://www.whitearmor.net/forum/topic/1347-deployment-name-poll/ this time it was decided the program would be called "Elite". In March 2009 a new poll went up to come up with a new name https://www.whitearmor.net/forum/topic/6378-changing-elite-to-something-else/page/5/ with now outcome and in the end our detachment founder Paul decided on the name Expert Infantryman https://www.whitearmor.net/forum/topic/6378-changing-elite-to-something-else/?do=findComment&comment=82088 his post below: "In the end I decided to re-brand our program as "Expert Infantry", with Elite troopers becoming Expert Infantryman. This is based on the Expert Infantryman Badge in the U.S. Army - see http://en.wikipedia.org/wiki/Expert_Infantry_Badge for more info." Program name changes Mark 1-5 Elite 6-65 Expert Infantry 66-1000 EIB graphics Now on to some graphics and much of this had been discussed in staff areas, but here are just a few of the early designs It was suggested to keep it more to the military style, here is the military's Expert Infantryman Badge http://en.wikipedia.org/wiki/Expert_Infantry_Badge And from there came And finally Current day Some of the programs to help get the numbers of EIB's on the rise: The Road to 300 https://www.whitearmor.net/forum/topic/18434-the-road-to-300-fisd-eib-that-is-stormtroopers-achieved/ The March to 500 https://www.whitearmor.net/forum/topic/33547-october-2015-newsletter-road-to-500-expert-infantry-badge/ The March to 700 https://www.whitearmor.net/forum/topic/26126-the-march-to-700-expert-infantry-in-2014/ The March to 1000 https://www.whitearmor.net/forum/topic/49177-only-18-spots-left-time-to-step-up/ Previous Deployment Officers: (sorry if anyone was missed, please let me know and I will edit) Paul "Daetrin" TK8020 Scott "Scott M." TK4149 Terrell "SuperTrooper" TK1787 Mason "dashrazor" TK4603 Mathias "Locitus" TK2959 Phil "FunkyTrigger" TK3796 Steve "gazmosis" TK4034 Eric "Darth Aloha" TK9674 (454) Tony "ukswrath" TK10116 Andrew "Sly11" TK11469 Joseph "justjoseph63" TK10963 Dan "CableGuy" TK142911 Sha Sha "shashachu" TK19233 Dan "TheSwede" TK99665 Christine "Cricket" TK10401 Mike "msouza" TK11463 Mario "TKSpartan" TK48117 Chemi "Chemi" TK30173 Some milestones interesting to see how details evolved over the years (just a shame some images are no longer available): 1st 28th April 2007 - Scott "Scott M." TK4149 - FX - https://www.whitearmor.net/forum/topic/884-mark-iv-deployment-request01fx/ 100th 2nd March 2010 - Robert "TKittell" TK7143 - AM armor AP helmet - https://www.whitearmor.net/forum/topic/10128-tk-7143-requesting-eib-status100am/ 200th 28th January 2012 - Graeme "Trooper1972" TK3896 - AM armor TM helmet - https://www.whitearmor.net/forum/topic/18409-tk3896-requesting-eib-status-anh-stunt200am/ 300th 25th January 2013 - Steffen "Minuteman" TK18793 - AM armor TM helmet- https://www.whitearmor.net/forum/topic/22825-tk-18793-requesting-anh-stunt-eib-status-am300/ 500th 21st September 2015 - Brad "68Brick" TK21814 - AP armor AP helmet - https://www.whitearmor.net/forum/topic/32917-tk-21814-requesting-anh-stunt-eib-status-ap500/ 700th 9th March 2017 - Christine "Cricket" TK10401 - RS armor RS helmet - https://www.whitearmor.net/forum/topic/40906-tk-10401-requesting-anh-stunt-eib-status-rs-700/ And big congratulations to our 1000th EIB recipient 1000th 16th September 2020 - Sebastion "Shimo"" TK51337 - Anovos armor Anovos helmet - https://www.whitearmor.net/forum/topic/50022-tk-51337-requesting-first-order-stormtrooper-the-last-jedi-eib-status-anovos-1000/ 1st double digit EIB recipient 10th 13th October 2021 - Glen "gmrhodes13" TK85421 - RS armor ATA helmet - Death Trooper https://www.whitearmor.net/forum/topic/51526-tk-85421-requesting-death-trooper eib status-ata-approved-10/ Multiple EIB Recipients Let's also not forget those who have taken it up to the next level and who are multiple EIB recipients. Additional awards are issued as [APPROVED] 2nd, 3rd, 4th and so on and do not get counted into the total 1000, you can see who has multiple awards by looking at their EIB banner on their forum profile, there are extra stars on top for additional approvals which then change to gold after 5. There are a total of 75 recipients of multiple EIB awards, congratulations to you all 2nd EIB Award Recipients - 59 Dan "R2Dan" TK8527 Carsten "Sidius" TK11672 Derek "DZFireMedic" TK83125 Luis "Rietzer" TK31513 Daniel "Ensi" TK61514 Dennis "NINJAMOVE" TK16112 Christopher "Chewy" TK66402 Rowan "zebedee" TK12111 Jonathan "JLight" TK32627 Randy "magni" TK16127 Andreas "Coil" TK24269 Danny "Ripper_L" TK55550 Kai "TK Goatee" TK71715 Jim "Engineering trooper" TK12638 Robert "RLJ2515" TK10596 Sarah "Alay" TK20466 Mark "humperdingle" TK22700 Dave "PBTrooper" TK10737 Shawn "CrookKnight" TK10204 Ruben "Crusader_6" TK34281 Chris "PhoenixTrooper" TK80806 Andrew "fuumantroop" TK24218 Steve "starsaber25" TK19466 Mike "TK1636" TK1636 Michael "TK-Sharp" TK12169 Joey "vecspeed12" TK9512 Partick "Front-a-Little" TK7961 Carey "C HERM" TK941 Nick "ZeroCool" TK20882 Manny "Tehcaveman" TK10912 Anthony "Redforce" TK10666 Andy "HeloTrooper" TK5224 Hans "Sparrow J" TK5224 BJ "bjsavage7" TK5955 Charles "Clamps" TK25267 T.J. "Hunterhwt" TK7944 Mark "captsafe66" TK4584 Darren "SandFlea" Tk7435 Matt "out0fstep" TK9328 Laurent "Mini Trooper" TK3182 Lou "Darth Voorhees" TK6908 Daniel "DarthChridan" TK7987 Christian "v7sg" TK9539 Vern "TK bondservnt" TK2392 Paul "Daetrin" TK8020 Rich "Rich330" TK6042 Allan "Trooper Q2" TK3066 Brain "tkrestonva" TK2918 Stefan "Turrican" TK1355 Terry "Terry19D" TK2055 Chris "TK-5069" TK5069 Ken "TK88667" TK88667 Jacob "Pistolsheets" TK86267 Jonatan "Nairy" TK23592 Adam "revilimiter" TK89400 Aizenoso "Aizenoso" TK14292 Tim "TrickyT81" TK24881 Dan "Kaiserinthehood" TK80419 3rd EIB Award Recipients - 8 Joseph "justjoseph63" TK10963 Tony "ukswrath" TK10116 Charles 'Templar726" TK72627 Juan "BananoPower22" TK4326 Daniel "Debater2nd" TK2618 Jason "TK-J" TK4625 Thayne "ThayNerd" TK5401 Brett "Cleantrooper" TK9593 4th EIB Award Recipients - 3 Arthur "giskard8" TK39093 Daniel "TheSwede" TK99665 Frank "rhapsodyredd99" RK11038 5th EIB Award Recipient - 1 Justin "TheRascalKing" TK61490 6th EIB Award Recipient - 0 - - - - - - 7th EIB Award Recipient - 2 Todd "Toddo" TK6647 Ardeshir "equuspolo" TK42128 8th EIB Award Recipient - 0 - - - - - 9th EIB Award Recipient - 0 - - - - - 10th EIB Award Recipient - 1 Glen "gmrhodes13" TK85421 NOTE If you are approved with a "2nd Version" of a particular costume that you are already approved with you do not receive an additional award, there is only 1 award issued for each costume version ie: only 1 x Hero, 1 x Stunt, 1 x HWT, 1 x ESB, 1 x TFA and so on. If you have a second/additional version costume approved you will see "2nd Version" and [APPROVED] added to the thread title, no additional profile stars. A full list of all all FISD awards can be found here:
 3 points
 -
I am indebted to you Glen for chasing down and uncovering all this FISD history. Guys, this is hours and hours of work digging in to the past and reading old and broken forum posts, gleaning out all the little bits and such. I'll try to add a few more thoughts and memories later today. Here are some good questions: 1) Who was the first person to receive an "expert infantry" award from FISD? 2) On the (now broken) EI listing page, what is the significance of the background images? 3) Who was the only person to be approved with an FX helmet? 4) Who was the first ESB EIB? 5) Who was the first Centurion? 6) Why can't you have more than one Centurion award? 7) Why were the colors chosen for the Centurion award? 8) What was the first piece of EI merch ever created? 9) Why are EI coins numbered and why can people only buy one? 10) What FISD costumes has no one ever gotten to EI (or Centurion) OK FISD nerds, let's see what you got!2 points
-
Happy weekend! I'm after a little feedback on shoulder bells. I've sanded the first one to the trim line and it's looking very "screen worthy" in its imperfections. How does it look? Outside view: Inside view:2 points
-
Hi folks! So I've had several questions regarding how I did my helmet lenses and so I thought I'd put a little guide up for anyone that may be interested in the process I used for their own builds. I think it came out rather slick with a neat end look while being solid and easily replaceable. Here is a shot of what this technique looks like when completed from the inside: Materials: Sugru moldable rubber Shade 3 flexible welding visor - https://www.amazon.com/gp/product/B00209I0UG M3x20mm screws and acorn nuts Index cards Pencil Xacto knife Micro ruler Scissors 220 grit sandpaper Drill Dremel and/or belt sander Vise Thin black heat shrink tubing Step 1: Create eye socket templates I don't have a picture of this first step but you see me using mine in later steps. So all you do here is take an index card, ho ld it flush over the eye opening inside the helmet then with a pencil trace the opening from the outside. Make sure it is centered on the index card because you are now going to extend it for overlap margin. With the socket outline traced on the card, using a ruler measure half an inch out from the outline and place a mark, do this many times tracing around the outline so you're basically making the original socket outline half an inch larger on all sides. Then simply draw a new line around this outer outline and cut the template out with a scissor. Make sure you label what eye socket each label pertains to, and store these for future needs even after this project is done in case you want to cut new replacement lenses, switch out colors, etc. Step 2: Shape a rubber mounting surface In this next step you are creating a rubber mounting surface that the lenses will bolt onto and create a flush connection to the eye sockets. Take your Sugru (I used like 5-6 packets per socket) and create a nice think outline around the whole inside of the socket. You'll want to ensure that the rubber around the socket's plastic mold is slightly taller so when you rest a lens onto it is sitting flush on the rubber bed. You have a lot of time to work with the rubber before it starts to set so take your time and get the outline right. Important last step here, after you're happy with the rubber mount take an index card (or two to make it thicker), lay it against the rubber outline and press down lightly to ensure that you have an even surface all around to avoid having an uneven mounting surface outline. Step 3: Cut your mounting bolts I used five bolts per lens, you may want less or more but found that to be a happy place for getting the connection tight. Ok so here you are going to take your M3x20mm (you don't need to use this specific bolt size, can be M4, M2, whatever, just something you're happy with size wise) and cut them so you have a set that will have even height protruding upwards from where you will be mounting them. The gist is you will be adding these bolts to the rubber mold you created in step 2 with more rubber, but first you need to look at where each bolt is going to rest and measure how far over the rubber they are sitting uncut. Since the topography of the helmet here varies, some bolts will be extending quite far, others not so much, and you want an even extension from all bolts. I wanted about 8mm of extension to bolt into so I held a screw in the place it will be mounted, measured how far above the rubber it sticks out to calculate how much I needed to cut (so if it stuck out 13mm I cut 5mm off). Keep track of where these screws are going to be mounted since you measured it for that spot! As I was measuring and cutting, I placed them on my templates at the spot they will be mounted. To cut them down I just put a nut on the screw exposing the amount after the nut equaling how much needed trimmed, then put it on a vise and dremeled that excess off. You may find a cutting solution that works better for you, but I found that easy. Careful handling these little bolts after cutting them, they will be very hot! NOTE: Never cut metal bolts that are already mounted in your helmet, besides making a mess their heat will likely melt the plastic creating a huge problem. Step 4: Mount your bolts Now that you have your rubber mounting surface and your bolts cut for specific locations around the surface, it's time to attach the bolts. Using Sugru again put a nice wad on the bottom of the bolts, then just mold them to the mount at the correct locations where they were measured. Get the attachment between the mount and the bolt nice and tight, use more Sugru liberally and work it in. The one thing to be careful of is to not have any Sugru on the bolt that goes over the height of your mounting rubber from step 2, otherwise the lens will stop bolting in too high and not rest on the flush surface you created. However, being rubber this stuff can very easily be trimmed with a Xacto knife, so you can just snip any excess off to keep your base mount surface flush. After you've finished mounting all your bolts, you may want to double check you didn't get rubber smudges on your helmet and clean it off well, don't worry if you do, it will remove without much effort. Clean your hands thoroughly as well! Now that you have your cool rubber mount with sized bolts, you need to let that rubber set for 24 hours. Step 5: Add mounting points to your templates After you've allowed your rubber to set overnight, you'll be taking your two socket templates and marking where the bolts you mounted relate to it. Simply press the template down onto the bolts to make impressions on the paper where the bolt tips are, then punch through those holes with a pencil. Afterwards, place the paper template into the actual bolts to ensure that all the bolts align right with your template and your template rests nicely into the mounting surface you've created. This is a preview of what your lens will look like when you cut them to the template shape and drill the holes! Step 6: Cut and shape the welding lenses I used a shade 3 welding lens which is flexible and fairly easy to cut, after looking around and trying a few options I found the one linked above in the materials list to be the best for this project. Ok so what you're going to do now is rest your templates onto the lens stock, trace the outline lightly with your Xacto knife (just enough so you can see where you need to cut), then cut out each shape with your scissors. Your cut lens will be a little rough, so curve it more naturally by (carefully) running it down a belt sander or Dremel tool. You just want to make the shape of the lens natural and curve to make the template and avoid any sharp points (your eyes don't like sharp points). After that, take some sandpaper and sand the edges all down nicely so they are nice and smooth. For the last step, place your paper template back onto the cut lens, then with the Xacto knife mark where each hold is going to go. Take your drill and open up each hole, making them plenty big enough for the bolts to go through with some room for flex, but not too large that your acorn nut won't compress down against it. Note that while doing all this, be careful not to scratch the lens surface by a stray cut or tool. Step 7: Mount your lenses Ok almost there! Here you simply need to push the lenses down through the bolts and screw in your acorn nuts to secure the lenses down into place. You may need to bend the lens a bit to get the fit to work, here is where making those holes a little bigger than needed helps. Whatever you do, try to not allow the tops of your bolts to scratch your lens. To hide any excess exposed bolt shaft I cut very small pieces of black heat shrink tube and put them on the bolts then put the acorn nuts back on and screwed down tightly. Conclusion: Ok so this may not be the easiest method of creating and mounting lenses, but the end result is pretty nice (in my opinion), and I like the effect having the acorn bolts gives. You have a well sealed lens over your sockets without any gaps by virtue of the rubber mounting surface and bolts securing them into place. The lenses themselves aren't flimsy and are high quality, plus easily cleaned with mineral spirits if heavily soiled, or just your standard glass wipes. Another plus is you can easily replace them just just unbolting them! I hope this guide helps anyone interested in this type of technique, cheers!1 point
-
Totally agree this needed to be kept in here and not lost in the newsletter. Too much hard work went into it and it;s a fantastic part of the Detachments history in a very readable format. Thanks again Glen.1 point
-
A bit easier here, we only have 3 cases and they are in hotel quarantine, we haven't had community transfer for months so we have a lot more freedom compared to many other places1 point
-
I hate running out of supplies when you are on a roll, luckily enough I have a store close by. At least you have other work you can continue with, which is something.1 point
-
Nice work, a chore to wait for glue to dry1 point
-
Thank you once again Paul, I thought this deserved a place in the EI section so it doesn't get lost in the newsletter. Some great questions you have posted, I won't spoil the fun for everyone by answering them1 point
-
Good morning FISD! I want to resurrect this thread for a few reasons. First, in my ROTK build thread found here https://www.whitearmor.net/forum/topic/49826-the-bigjasonis-rotk-3d-print-build-thread/page/3/?tab=comments#comment-701421 I asked about a CRL for The Mandalorian Remnant Stormtrooper. I asked this question on the 12th, and then found this thread the next day. However, I'm not seeing any kind of answer as to whether or not we can expect a new CRL. Next, when The Mandalorian Season 2 Trailer dropped a few days ago, there was about a 1.5 to 2 second clip that showed some Stormtroopers running down the hall of what people are assuming is a Star Destroyer. Though this flashed up on the screen relatively quickly, it's clear that in season 2 the Stormtroopers are in fact wearing ROTK armor. I'm assuming these are some of Moff Gideon's troopers based off their shininess, but I can't tell if they're wearing OT or RO helmets. I believe these are ROTK helmets, but I'm basing that off of what appears to be an absence of S-trim around the opening of the bucket on the middle TK. Suspicions about the Stormtroopers should be confirmed on October 30th, but if we do indeed see ROTK armor with OT helmet again, can we expect an addition to the CRL for a Remnant Stormtrooper? Or, can we expect something based off of what we saw in season 1? This does seem rather unique; plus, I'd really like to order an OT helmet to go with my ROTK build. Thanks!1 point
-
Sanding isn't even the part that's bothering me right now. What I'd like to end is the redoing coats of gloss white!1 point
-
Gap in thighs filled, internal strips put on both thighs to reinforce. Rivets ready to go for ammo pack, tomorrow. Sent from my SM-A520F using Tapatalk1 point
-
Cool, thanks. The pieces had the return edge trimmed off, so I may just assemble the arm pieces and see how much I have to potentially make a return edge.1 point
-
Some more reference for you, notice how the originals were trimmed with a curve rather than a straight cut on the sides, helps close the gap to the chest/back. original to the left Just som Trooper-glory to keep you going1 point
-
Cool. Return edge is not specified in the CRL (apart from wrist end of the forearm) so this part is more personal preference. Me personally, I like a little return edge here, especially the “spine”. Here’s Han’s for reference. :-)1 point
-
Also - I snagged some NEAT foam helmet liners from WS Custom Helmet Liners. I bought a second one for the Scout that I’ll be working on at some point. I found them through their Facebook shop... Very high quality and so practical. I've tried hardhat liners and chin straps in the past, but my head can't turn much anyways because I don't have a long neck (the helmets haven't been able to clear the should bells very well). And since I'm not tumbling around during photo ops, I'm content to just let it rest in place with enough padding on the top of the helmet. Sent from my iPhone using Tapatalk1 point
-
Greetings, everyone! I just wanted to make a quick post and say that today I received my first brown box from Dave Conklin at Dave’s Darkside Depot (on Facebook) that contained my recent order. My first item for my new adventure down this Star Wars trooping rabbit hole! I’m just getting started and reading everything I can find (here on the FISD forums) and watching lots of YouTube videos in doing my research. Since I’m hard at work losing weight for my eventual full TK armor build, I thought I’d reward myself for my first 25lb loss and get an Armor Master 4.5 TK helmet to start on! I opened the box and was immediately impressed at the quality of the ABS, the sharp crisp details and especially the thickness of the vacu-forming! These helmet components were vastly pre-trimmed and looked largely pre-finished except for cutting out the teeth, the assembly and the painting. I have to admit, I was kind of expecting a fairly flimsy pull with thin, fragile areas and a lot more trimming and pre-finishing to do before the assembly. Was I surprised! I’d seen several videos on basic helmet assembly, but it’s hard to tell just what your getting in quality from them. Let me assure any new prospective troopers out there that the Armor Master 4.5 armor kits from Dave’s Darkside Depot is A GREAT WAY TO GO! Although I can honestly only speak from the standpoint of the helmet alone, I’m confident that the rest of Dave’s product is on par with my new helmet acquisition! I’m glad of my decision and confident that the quality of the AM line is one of the best out there. Looking forward to my continued success with my health goals and my future ESB TK build. Newbies CAN buy in confidence!1 point
-
Congratulations for your BBB day Bryan !!!! looking forward for your building thread. Remember, we are here to help.1 point
-
Take your time. Have a great weekend.1 point
-
Nice work, you have to think at times, will the sanding ever end1 point
-
Thanks, Dave! I'll be with you as soon as I can. Hope you're having a restful weekend.1 point
-
Short question. Did I read that correctly that I can still use the old CRLs?1 point
-
Good advice. I'm working on strapping this weekend, so I'll do as you suggest and get it on before making a molten mess! Sent from my Imperial Communicator1 point
-
Got there in the end! TK 150261 point
-
I use a heat gun all the time BUT you do need to know what you are doing, it's a tricky beast to use with ABS and you can go from pliable plastic to molten mess in less than a blink of an eye. LOTS of practice or safer to use a hot water bath. See how you look once you have all the armor strapped and test fitted, you may find it's really not an issue at all.1 point
-
Quick update. hopefully I'll get some more posted tonight. So, after a little testing a few things, I decided to make an "eye bump" on my ROTK bucket. @11b30b4 provided some great content on this here https://www.whitearmor.net/forum/topic/48619-definitive-proof-r1tk-helmet-is-asymmetrical/. I'm sure you've all seen this post previously, but I believe it clearly shows what we were discussing with regards to the new CRL. The "morphing" picture is perfect. Also, I know that I can continue with the old CRL since I was added to the ROTK Build Roster on 9 August, but I really like some of the new additions, especially the clam shell closures and eye bump. Last night I really didn't feel like sanding, so I decided to play around with the strapping a little bit. Honestly, sanding may have been easier. A few days ago, @TheRascalKing made the simple comment "ugh, shoulder straps," which made me laugh, but this was an understatement. After fiddling around with my hard straps, it confirmed that I need to get some flexible ones. I'll install the hard straps tonight when I put on the shoulder bells, and again later when I submit pictures. Ultimately, for me, the trapezious doesn't seem like an area that pairs well with rigid bridges. I want the weight of the armor resting on the nylon strapping, not what I consider "ornamental" piece. After some careful measurements, I determined that I would need 11mm of space between the chest and back shoulders. From there I installed snaps on some pieces of 2" nylon strapping and the armor itself. For the armor, I held the snaps in place with JB Weld SteelStik. Also, yes the interior of the armor is unfinished for now. I used Plasti Dip on the inside of my last bucket, and had originally intended to do the same for the armor, but didn't like it at all. For my armor, I'll be taking another page from @11b30b4's playbook and using Flex Seal throughout. After I put on the snaps I decided to employ a secondary fastening measure by throwing in some Velcro as a test. This actually worked much better than I could have imagined. This is some sticky back stuff that I picked up off Amazon here for my Mando build: https://www.amazon.com/gp/product/B01KBBVWAO/ref=ppx_yo_dt_b_asin_title_o04_s00?ie=UTF8&psc=1 This isn't advertised as heavy duty, but it definitely is. I'm pretty sure I'll be using it in all my future builds. So, sewing really isn't my thing, but I decided it was absolutely necessary for my Mando build because I refuse to spend $600+ for a flight suit and cape. On the plus side, since it seems relatively easy, I'll be sewing my own Clone Commander Kama and all the soft parts for a future Shoretrooper build. For now, all I needed to do was this: And it turned out pretty good. I know this is simple, but hopefully it helps out someone in the future. I'll attach the shoulder bells tonight, I just wanted to give the one I painted on Tuesday another day to cure. On to other things. Even though I spoke about this at length earlier in this build thread, I just realized last night that I forgot to print out the correct ammo box with the "trapezoid" on top. Here's the correct box. This is such an easy step and like a 1 hour print. I would have re-printed it last night, but I had just started printing a new clone helmet. Whatever. I'll take care of this tonight. Finally, this is what I think I'm most excited about. As I said earlier, I decided to add a bump to the eye-socket of my bucket. Basically, I created a "dam" with some blue painter's tape and filled it with epoxy. I let the epoxy cure for about two hours, removed the tape and was left with this: I cut it with a razor blade while the epoxy was still soft enough to work with, but hard enough so that it wouldn't deform. When I woke up this morning, I was left with this: I may add a little more up towards the corner of the eye, but honestly, after some sanding and a thin layer of glazing putty I think we're good. Now I'm real excited about this helmet. Hopefully I can get it mostly finished by the end of the weekend. I wasn't going to add too many pictures of the helmet since I outlined my process earlier, but this has now turned into a much different project. I'll be sure to show the results because I haven't seen anyone else try this yet. If it has been attempted, my apologies, I couldn't find it in the forum. If not, hopefully this helps someone out again. Cheers!1 point