Leaderboard


Popular Content
Showing content with the highest reputation on 05/30/2020 in Posts
-
Jumping back to the helmet, here's its current state. There are a few spots on the ears that I will trim when I pull them off, but overall I think it looks pretty good for how wonky it was [emoji3] I started with the belt boxes, glued the elastic to the back but I didn't want to glue them together yet because I want the belt more finished before attaching them. The belt has the button covers installed now, so I can measure and glue them a little more accurately. I almost used chicago screws for them but I figured glue would be easier to adjust if needed. Back to my personal checklist: trim excess return edge of body pieces Fix weak shoulder elastic Remove excess glue from all appendage pieces chicago screw holster onto belt Install snaps for holster retainer finish attaching belt boxes Add shims and rivets to kidneys and abdomen including crotch strap Paint all the rivets that need paint (6 ab-kidney, helmet ears, thigh ammo box rivets) paint the screw heads around the torso pieces Attach button panels to abdomen finish helmet. Talk to the GML My list is getting shorter, so that's good. I removed a lot of excess glue, but I don't think I got everything yet. When I wore the armor last time I realized that if I can bend the ab and kidney plates a bit it will make life easier. Also I only have about an inch on either side that needs to be shimmed so that's going to be helpful. Ill likely make the shims 1.5" wide to keep them comfortable and in case I don't keep my present weight. That's it for now, back to work [emoji4]3 points
-
I have no issue if the interior sides are not painted white, but the rear "nipple" should be white, as should the rim (at least a little). I also see no problem with the screen being painted black.2 points
-
Hi! My name is Emma! I'm a long time Star Wars fan, cosplay fan, and overall hobby enthusiast. I'm a senior in college now, and I tried to start this project 4 whole years ago, way back in high school. I gave up- it was too difficult, it wasn't perfect. But I'm back with some free summer time because of COVID-19 and a determination to get as much done as possible to follow through on my dream to join the 501st. My build thread is here: I ask a lot of questions. Given, I still do a ton of research, but this isn't my strong suit. It's a big learning curve for me. I'm trying my best and any and all help is always always always appreciated. I'm on my own right now because there are no armor parties happening any time soon, but I'm excited and nerding out. Come follow this journey with me1 point
-
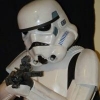
Hi, everyone: I've just sent off my application for basic approval ANH Hero and am getting ready for EIB. One of the requirements for the Hero helmet is to paint the inside and the rims of the hovi mic tips white: Correct 'Hovi mic' aerator tips are present. Screens used shall be of a wide type mesh, with the rim of the mic and the inside white or painted white. Based on my research, conversations with other armor makers, and pouring over images from A New Hope, I'm unsure if this requirement makes the helmet more screen-accurate. In fact, it might be just the opposite. From what I can tell, most of the hovi tips for Hero Helmets were black, with wear and tear on the rims forming white or silver sections. Screens were the wide type and either silver or black. Here are mine: Here's a great site with many hero helmet images as a reference: http://www.starwarshelmets.com/original-ANH-hero-Stormtrooper-armor-helmets.htm I'm curious what you think and if there's any consensus to perhaps broaden or revise this particular part of the requirement? Three armour makers I'm aware of use black tips for the hero helmets already, and again, there are many screen captures you can reference that support this. Seems like a petty thing, but it's one of the few requirements I'm wresting with right now as I prepare for the next level. Thanks for you input, help, suggestions, and friendship fellow troopers! Peter1 point
-
Hey all, for transparency we've made a couple minor CRL wording corrections, these will not effect any approvals. All OTTK armor related CRLs for Basic and L2 were updated. What used to state "Aerators/Hovi mic tips" now state "Aerators/Hovi-MIX tips" All FOTK armor related CRLs excluding Phasma for Basic and L2 were updated. What used to state "The right outside thigh (to the wearer) includes a base for a holster", now states "The right outside thigh to the wearer includes a base for a holster (holster must be present)". Level 2 "Holster must functional"1 point
-
Welcome (back)! It seems daunting at first but by the end of the build you'll learn so, SO much. Especially if you decide to make another costume down the road... TK's are actually not the hardest first costume in the Legion, IMO.1 point
-
Welcome back and good luck with the build, coming along well1 point
-
I continued to make progress on making my own backing for the ab button plate. Another reason why I decided to make my own rather than try and make the replacement one work is that the plate is very tall. I made my ab plate have a shorter profile which better matches the screen shot references and my RS: Side by side comparison in case you veterans think my ABS paste version should not be used (abs paste is on the right) It's now ready to glue on. Just waiting on constructive criticism: Once its glued and dried I can make progress with the belt. I am trying to see what else I can be working on since I am going to wait a day or two for opinions before gluing the plate on. Most of my armor is assembled. Once the belt is attached then thats when I will start trying to make the butt piece fit. So far (besides painting details) the legs, arms, helmet, boots, undersuit, neckseal, chest, thermal detonator, basic approval gloves and centurion gloves are done. The belt, ab plate buttons, and the butt are all I have left before strapping everything together. OH! I have been trying to find a E11 blaster. I don't want to steal my RS blaster. Look like doopy doos blaster is sold out, and original stormtrooper blaster is sold out as well. I messaged praetorian blasters on facebook 3 weeks ago, but have gotten no response. If someone can direct me to a blaster that meets centurion standards I would be most grateful.1 point
-
I really like that idea.......the concept of being able to remove the belt for maintenance or replacement seems to be a more efficient move than riveting. Have you had any issues with your snaps pooping off? I think I am leaning towards snaps but want to make sure that the snaps wont pop once the belt starts to curve.1 point
-
Good luck with your build!1 point
-
A split CRL would be cool! The Deathstar variant would be the easist to nail down for a split out CRL. All those guys were pristine, had white soles,bubble lenses,TDs and holsters. The Endor version has so many variables. All of the above mentioned re: TDs etc but also flat lenses/bubbles, some were weathered, some not. Some even liked to wear their chestplates under the ab plate...if we really wanted to be thorough! Sent from my SM-J320FN using Tapatalk1 point
-
I believe the original hovi’s were white/off-white and painted black, and what you see is the paint wearing off as mentioned. I think rewording the CRLs as some kits come with black and others white hovis, to avoid confusion, maybe?1 point
-
No time to work on armor this week- maybe tomorrow though? I'm taking a break from sewing cloth masks right now to share this super cool thing that arrived today!!! Behold! Fabric for gaskets!!! I was hesitant to plan on making somewhat accurate undergarments for my son's FOTK because of all the ribbing that I would have to sew. Last week somehow I ended up down a rabbit hole of fabric research online, and I found exactly what I was looking for! I don't know if it would pass for 501st approval, but heck, it'll work for Galactic Academy for sure! (I know this because Cameron was approved in his battle buddy FOTK with plain black compression garments.) It was on sale when I bought it, but it's kind of pricey now at $30/yard. https://www.joann.com/cosplay-ribbed-pleather-fabric-black/16228017.html Look for a coupon for it; Joann usually has coupons available to knock down the price. That said, I probably still would have bought it if only so that I could avoid sewing ribs!1 point
-
I think we just need to disagree. There were a lot of wardrobe flubs in ANH that if they had done it again would not have been missed. IOC also doesn't allow flubs in their CRLs, and I don't think we should either. The hallmark of a TK is uniformity, whereas every TD was unique.1 point
-
I have the pack pretty much assembled! I have a troop here in a few hours so I'm going to wear it to try it out. If the pack isn't comfy due to strap placement or whatever, I'll be able to ditch it nearby without any issues. First I bought some nylon straps: https://www.amazon.com/gp/product/B07H1D15LZ/ref=ppx_yo_dt_b_asin_title_o01_s00?ie=UTF8&psc=1 I then used a regular backpack strap to get a rough idea of how long I needed it and where to put the buckle. After cutting and melting/sealing the ends, I put super glue on about 1" of the strap and folded it over and clamped it. I then used an old soldering iron to burn a hole in the strap for a 1/4"-20 bolt. The straps were then attached to the tank with washers and nylock nuts. I used the mounting position of the straps from a couple other builds but I think the top strap needs to go up and inwards a hair but we will see after I do some trooping. Easy enough to change in any case. I then tried it on. Granted its without armor so I'm not sure how its going to actually sit. After deeming it "good enough" I took a black paint pen and covered up some of the exposed unpainted screws. It needs more touchup and weathering, but for the purpose of having a complete pack to take on a test troop I'm super happy with how its looking. ...keep in mind that this is my "rough draft" pack that I'm planning on giving to a friend. My revised parts, strap locations, improved assembly methods, etc. will all go into a second, more refined pack that I plan on keeping. I'll do a build on it as well and use those photos on my Thingiverse after I release the files. I have other projects and work and real life to take care of, but I suspect files will be available very soon for anyone else wanting to use my parts!1 point
-
Not so crazy really, but we do aim for as much uniformity as possible and I'd hate to see gaffer tape stuck on more armour than we should. Where do you draw the line is probably the hot point in that debate, like why allow this and not that etc etc. Sandies are a little different as they are heavily weathered and all can be comfortably different. We are faced with movie patch up jobs and simple mistakes that are our big issue. Also it would be a nightmare for any DO, and I could see many a disagreement happening. Do we wish that on anyone really but never say never right1 point
-
Well done, very impressive! Congratulations.1 point
-
Congratulations Jasper, impressive job.1 point
-
Yes, the back joint as I marked in red in the above photo, the trimming is as you have said, test an adjust. glue the inner cover on the front and test, I think a good tip would be to test together with each bicep (Blue Pinter's tape) and see the shape. Measure twice or more, cut once and glue once Just a short story : when I was building my armor, ( as you, I built it alone, just browsing this forum) , I searched the web looking for several Stormtroopers images to figure out how I wanted to look like and I feel It worked for me to get the best shape.1 point
-
The last post reminded me I need to update my shopping list. I'm happy to say that as of today, the armor has been ordered from WTF. As follows: Helmet: Dave's Darkside Depot (ANH Stunt helmet, will be modified) Armor: WTF ROTJ armor Shoulder bells: Dave's Darkside Depot (ordered with helmet) Handplates: Dan Laws Undersuit: scuba diving suit off some diving website I bought years ago - in hand Gloves: Joseph Boots: TK Boots - in hand Balaclava: Military surplus - in hand Neckseal: Darman - in hand Pauldron: Will be Katara8 after the armor is completely finished1 point
-
From a galaxy far, far away, coming to a neighborhood near you. I can't wait to see this at DragonCon1 point
-
Don't feel too bad about this- I installed my rivets just like in your pics (and on four different TKs, too! ha!). I liked the flat part of the rivet being on the inside of the belt to avoid scratching things up. I used a Dremel and coarse grit band to grind the "bulb" part flat enough down so the covers would fit.1 point
-
Rivets or snaps work well, I prefer snaps so I can remove the plastic section so the belt can be washed or swapped out for ESB style.1 point
-
Just one washer on the inside. Sent from my LGMS631 using Tapatalk1 point

.thumb.jpg.77bd551337f7adc46a4b151e703df6be.jpg)