Leaderboard


Popular Content
Showing content with the highest reputation on 04/23/2020 in Posts
-
Hi Dixon, I’m not sure quite how slim you are, however, it might be worth aiming for screen armour sizes first and see how it looks on you. TM’s armour looks spot on when at movie sizes. If it looks a little big, you can then scale it down. I started with screen sizes and ended up removing just 5mm extra to fit my frame better. Here’s the biceps, for example.2 points
-
Good call on the trimming with moderation; didn't even occur to me that with enough trimming it'll look like an imperial stick figure. I've been referencing Cricket's build a lot as she and I share some common woes and, while not as short, am in about the same area weight wise so pieces like the forearms might need some special attention. Going slowly but surely, just sanding things down right now. I haven't made any fitting cuts yet as I'm still putting together the actual process on making fitment cuts for the biceps and forearms but once I have those written down I'll get to fitting. Thanks for the info!2 points
-
BELT ASSEMBLY So after preparing the boxes and pouches, it is time to put everything together. Darren's (JAFO) Belts of the First Order kit is what I used, and it is an awesome high quality kit. No doubt about that! First, I test fitted the belt with my Abdomen, Cod and Posterior pieces on to determine the length of belt that I need. Do not just use your waist size as the ABS add a significant amount of length. I also took the fitting to determine the 2 snaps positions. Then, I sewed the female clip and attached the 2 snaps. Next, I measured the lengths and glued the middle foam and outer rubber layers together. I glued them in an oval shape to conform to the shape of my torso. You will also notice that by doing that, you will need more material for the foam layer, and even more for the rubber layer as they "travel" a longer distance around the oval. If you glued them flat, you will later realise that you cannot bend them around your waist without stressing and possibly creasing the foam and webbing layer. Finally, all 3 layers are glued together. Next, I proceeded to determine the front centre of the belt and punched holes through all 3 layers so I can fix the 2 horizontal boxes. This is where Empire3D's resin boxes and especially their curved backing really comes into play and rests on the belt perfectly. I also secured the end of the belt with 2 chicago screws through all 3 layers. This is how it looks from the inside. Next, I measured where the 2 drop boxes will be, threaded the rubber cord through their holes and corresponding to the belt, and knotted it up. I used the cords method for these 2 boxes as it will allow more play if I raise my thighs or bend my body, so the boxes will flex and not stress against the belt. Remember that the top of the 2 drop boxes sit lower than the 2 horizontal boxes. Finally, the belt is complete, and everything sits perfectly, even though this photo doesn't seem it. You'll see it later on when I take photos suited up.2 points
-
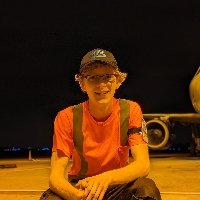
Heck yea, thank you all! I really appreciate it Big ups to @justjoseph63 for helping me look good!2 points
-
Yeabuddy. Been fighting Hodgkin's Lymphoma this year (sucky 30th birthday present haha) but I'm done with pretty agressive chemo and on to radiation treatment to finish off some tumors in my neck and chest. 1/4 of the way done and getting nuked every day, Mon-Fri for a month. Gnarly stuff and it's been kicking my butt, but I'm responding well and am in the home stretch. Been working remote from home, but thank goodness still working, and have had a little more spare time. The work helps take my mind off things but progress has admittedly been slow. I got both of these things in the bag forsure. Just gotta stay positive and put in the work.2 points
-
For my FOTK build, I’m thinking of using the Nerf Rival F-11D as my blaster. Of course I’m going to need to do some painting, and slight modifications. However, I wanted to know if it was allowed, or viable. Thanks, Ian1 point
-
Hello, Im Ian Vance, I’m 16 and I’m from Florida. I plan to start my FOTK build to join the 501st when I’m 18. It’s really nice to meet you all. Thanks, Ian Vance1 point
-
Thank you sir!!! This is very encouraging to hear, and I’m totally on board to get it looking as symmetrical as possible! Re: the biceps, the lower shoulder bell strapping wouldn’t hold them up, so I was struggling to keep them in place for the photo, hence the unevenness and twisting (I’m guessing probably because of how far down I had to pull the arms/biceps to align with my arm length).1 point
-
Congratulations trooper1 point
-
Aside from his automotive painting, I have tried to follow his build thread closely. Thanks!1 point
-
Terrific job so far, Garrett, and brilliant work on removing those return edges... DANG I'm proud of ya'! I realize that you are still in the fitting stage, and wise move to post up photos of your progress, but I have a few suggestions below if I may. Heaven knows that the movie suits were not perfect, but when doing approvals we are in search of the "ideal" TK armor to make you look your best and show off all that hard work! The trimming you did looks to be spot on, and at this point I would leave it as is. The issues below are simply strapping concerns that are easy to remedy at this stage to give you a little more symmetry. Keeping that in mind, here are a few pointers: 1. Yep, that right shoulder bell could be brought up a tad. Note the orange line second from the top. Raising the bell would make them more even. 2. The left bicep needs to be twisted in to get rid of the gap. 3. The left bicep is sitting lower than the right one. 4. I know you haven't attached the ABS belt yet, but once you do, the canvas belt looks to be in the perfect position to where the top of the ABS belt covers the bottom(s) of the ab-button panels. Nice work!! 5. The wrist opening height is a little different that the left. Not a biggie, but remember "symmetry". You have a lot going for this build, sir, and I can tell that your heart really is in it. Keep those photos and questions coming!1 point
-
Man that is a nice set of armor! Nice work and congratulations Justin!1 point
-
Congratulations Justin! Welcome to the Ranks Heavy!1 point
-
Definitely. Jeff's build was very helpful to me, though I did deviate on a few things, so definitely check it out when you have a chance (if you haven't already) - his suit is AWESOME and he did an amazing job documenting his build. Until Tony gets ahold of one of these (lol), his is pretty much the go-to guide for R1. He's also a nice guy (and sells urethane shoulder bridges!), so don't be afraid to reach out - there aren't a ton of resources available for R1, so take advantage of all you can!1 point
-
Hey Tony! Thanks for checking in. Progress has been made of sorts. Not on the armor yet, though. I was battling a massive sinus infection over the past few weeks that had me flat. It messed up my balance so badly that I couldn't leave bed. No fun feeling like I've had one too many, when I've not had anything to drink since early March. :/ At any rate, I finally started feeling better this week (my balance returned, yay!), but it's slow going. Here's what has been making the most progress lately: the scaled down (76%) F-11D! I was able to conquer white ABS, so the entire blaster is ABS printed. I used Germain's amazing files and instruction guide for assembly. I am so impressed by all the details that he put into the PDF assembly guide. Seriously, if you haven't seen it, go give it a look. It makes putting this blaster together completely effortless. I've thanked him privately, but I'll also thank him here, too- because he deserves it! Germain, THANK YOU for such detailed files that print like a dream, and clear, detailed instruction guide for it all. You ROCK! Because the blaster is reduced in size, I am using smaller hex button screws for the build. Fortunately, all I needed to do was go one size down for everything. So if the blaster needs an M3 screw, an M2 fits perfectly on this blaster. And I had to use shorter screws, but that was an easy thing to do since I own a decent assortment of small black hex button screws. Here are the first semi-assembled parts. So fun to see this come together! My son is super excited to help me finish it. Hoping to knock out some sanding/priming of the armor this weekend. Fingers crossed for good weather!1 point
-
Excellent news, congratulations Justin1 point
-
@TKSpartan thanks for the pointers. I’ll definitely have to do some level of this trimming at some point. Tried on the torso plus arms with most of the strapping in place. It was pretty cool to get all of this on. Don’t yet have any strapping in to keep the arms from falling down though. I had to squeeze my arms in to keep them for falling down all of the way! Not sure if I should make the biceps smaller or just get some elastic in there shoulder > bicep to keep them up. Also, I think the shoulder bells can come in a tiny bit more...1 point
-
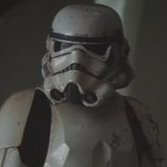
Maybe if I could offer a suggestion get an a Anovos Sand trooper helmet since it's already weathered change out the stickersAdd additional weathering if needed and you have a remanent storm trooper helmet You can find it on eBay for a good price I bought 1 for $184.00. Sent from my SM-G981U using Tapatalk1 point
-
You're doing an excellent work, about your questions, my two cents: 1- In my case I usually use 100 and 120 grit, just to let the plastic as smooth that It doesn't have splinters or pikes . 2-I use a vacuum just at the end, but make tha sanding over a plastic container to collect the maximun mess as possible 3- Rubber Blaster is definitely the "worry free." but more expensive, Doopy is cheaper but you need to be careful and I would rather don't let others to handle it. Cheers1 point
-
Don't worry Brad, It's better to have a back up pair .1 point
-
Justin, you did it, congratulations!1 point
-
Congratulations Justin, Great Work Trooper!!!1 point
-
Not sure if you knew this, but AM (Dave) includes the rubber gloves and flexible hand guards with his commission builds.1 point
-
Hi again, Justin, and thank you for your second EI submission! In the following review I will be going over items pertaining to your current submission, as well as those that will be required for Centurion level should you choose to apply. (I think you should)!! CRL and EIB Application Requirements: All required submission photos have been posted and I am very pleased to announce your armor displays all the necessary elements to qualify for HWT Expert Infantry. On behalf of Sha Sha and myself, Congratulations! Other-Armor Fit/Assembly: In this section we review observations made by your fellow troopers and ourselves. Some observations may lead to suggestions to improve the overall look of your armor. Note that we consider both text (CRL) and pictures (screen caps/reference images) when reviewing submissions. First, thanks for a fantastic job on the issues you have already addressed, brother. We honestly appreciate all the hard work, especially with what you are going through... well done! Only a few items to go over in this area, sir, and I must say in advance that I am well impressed with your weathering job. Not too much, not too little. Just right! First up is the vocoder. Overall a nice job, but ideally the lines on the ridges should be clean, crisp and symmetrical with the tops a bit more rounded. I realize that as a HWT that we are expected to have a few battle scars here and there, but since this armor is based on ANH Stunt we are suggesting that you touch up the paint on the small ab-button panel. Reference image Although the Battlefront game does not show them, the original DLT-19s used in ANH had thin black wire holding the T-tracks on at each end. Certainly not a deal-breaker by any means, just more of an FYI as you seem to be a fellow accuracy nut, lol. Reference image (Screen used weapon) Centurion Requirements In this section we prepare you for Centurion. More photos may be requested in the future that allow us to make better decisions on possible adjustments. If there are any areas of concern they will be discussed here. Because Centurion photos show much more detail than those for Expert Infantry, items to pertaining to Centurion might be seen there and not here. We try to point out all that we can from what is seen, but the final accuracy is the responsibility of the trooper. Just one item to mention here, sir. The gap between the bottom ridges on your left thigh is pretty prominent and needs some ABS love. You can simply add an ABS shim behind it, or if you want to make it look awesome (hint hint) you can fill the gap with a tiny bit of ABS paste. Battlefront game images Reference image And there you have it, brother. A super nice job on this conversion, and I can't wait to see you take this armor to the next level so that you can join the ranks of the few, the proud, the HWT Centurions!!1 point
-
Nice, my recomendation, use a cotton gloves under the latex ones to absorb the sweat. Cheers1 point
-
FIRST uniform piece arrived!! TrooperBay gloves. shiz iz getting real!1 point
-
Congrats, Thomas! The work was all you. I provided what information I could, but you took the initiative. I am glad you are happy with the armor-- as you should be. You did great work, and I too look forward to trooping with you on the other side of this pandemic!1 point
-
After waiting since the end of October.. my little brown box finally arrived! I got these from 3D-Props: *DIY Standard F-11D (TLJ Version) + LED + BlastFX *M300 Scout Light *DIY SE-44C Blaster Pistol The print quality is pretty decent from what I can tell. Definitely not paint ready like one company I have seen, but the parts themselves are pretty thick and sturdy. A huge step above my shield parts I had to work with. The SE-44C seems pretty straightforward. Just a few little parts to complete the assembly. The F-11D has quite a few small parts. But again, good prints with tight fitting pieces and nice tolerances. Just a bit of sanding and some cleanup to do. I didn’t receive any instructions and there aren’t any build groups or threads that I’ve found yet. A little unsure where everything goes, especially having all of the electronics to install, but as the armor has taught me.. finding out is part of the fun! Should make some progress on these by the weekend. Sent from my iPhone using Tapatalk1 point
-
What!? You're an animal Justin. I commend you on your desire achieve perfection at such a time. Checkered flag is out in both areas.1 point
-
Thanks guys! Bits and pieces coming along slowly, but I'm getting happier seeing each component closer to looking like an FOTK!1 point
-
Beautiful work Jasper1 point
-
1 point
-
Very clean work Jasper.1 point
-
1 point
-
Yes , You're on the right path trooper!1 point
-
I know Matt used Spies Hecker 7715 and I used Dynatron 650, both worked well. I went with the Dynatron because it advertised a finish with some flex, but I'm not gonna lie... it looks and behaves just like Bondo glazing putty so far hahaha The key (same with auto body work) is just to use it in as thin a layer as possible. There are a LOT of very minor imperfections in the kit, so depends on how hardcore you wanna go. Yea the FibreGlast was not cheap, I definitely feel ya. It was a bit more palatable just because I bought a full quart and did the whole suit with it. Vinylester resin in general is expensive, but again, it advertises maintaining a firm flex, and improving impact resistance. I am VERY new to the fiberglass world, so I can only endorse what I've used and know works, but give that Bondo stuff a try and let us know how it goes! Just make sure you research if you're not familiar with fiberglassing. Little tips like supergluing your chip brush bristles in and "double cupping" when thoroughly mixing resin help LOTS and making sure you use the right type of cups and whatnot (they can melt!). Also gauging how much to mix within your working time can be a challenge - I would probably do like 2 coats of 100ml or less. Remember to get the lip at the bottom of the helmet, near the neckline, and by the mic tips well. The 2-part epoxy CAN be used an adhesive as well, but each (between E6000, CA, and like a flexible bumper filler like I also used) behaves a little differently and works better in certain applications. Good to have options. I'll probably CA glue the vocoder and mic tips on - I'd actually probably rather have the glue fail than epoxy them on and have the helmet crack, you know? The GEL version of CA is a huge improvement over traditional too if you haven't used it. Gives you much better control when applying it, and an extra couple seconds before it cures usually. My only other advice off the top of my head is to make sure you really PLAN your build steps out - with these suits as opposed to ABS, a lot of things HAVE to happen IN ORDER for best results. Always happy to answer what questions I can though. Good luck!1 point
-
Quick update.., my bucket electronics from ukswrath arrived at Dave’s Darkside Depot yesterday! The commission build can now commence! All soft goods ordered. I like the Praetorian E11, but TrooperBay is fairly local by SoCal standards - so I might try to drop by in person to pick one up once the Emperor releases us from house arrest. So now I wait.1 point
-
IT'S HEEEEEEEERE! BBB has arrived!! It had to sit for a little longer than usual since it came from overseas but man oh man was it worth it!! You know that scene from A Christmas Story where Ralphie sees his coveted official Red Ryder carbine action, 200-shot, range model air rifle with a compass in the stock and this thing that tells time? That's how I felt. It felt great to be able to unpack and see every little piece there and accounted for, just like the rest of y'all in your build threads. I got one of my own now :') Sure enough, everything's accounted for, with some extra ears and drop boxes to boot (thanks Paul!). I'm debating when to get started on trimming and sizing up the arms; I'm in the home stretch of school this semester and I'm just finishing the process of moving out, so I may be going at a snails pace the first couple weeks or so--then again, nobody has anything but time on their hands so what's the rush, ammirite? CAN'T WAIT to get going, I'm sure I'll have a ton of questions to ask and pictures to link as the days go by.1 point
-
BELT BOXES PART 2 The supporting pieces of the 2 horizontal belt boxes have been sprayed matte black. Here, they are glued to the belt boxes, ready to be fixed onto the belt.1 point
-
Shipping and stock is a common issues around the world in the current situation. I think the return edge in you chest plate image looks fine. Unless it’s causing you issues I would leave it for the time being until you can get fully kitted up and see how everything moves together. Sent from my iPhone using Tapatalk1 point
-
The Doopydoos kit is a really good and you can achieve excellent things with it. Although Doopydoos are renowned for terrible customer communications, the blaster is great when it arrives. The standard kit is great and can be built and painted to be easily good enough for 501st clearance. If you want to take it to the next level, check out “T-Jay’s Completion Set” here on FISD. He has created a bundle of excellent upgrade parts that can be added to the Doopys kit, if you fancy it. Here’s an example of what I did with mine; Btw, I agree with Joseph regarding the return edge on the chest plate - looks good as is. :-) Dan1 point
-
Looks like you are off to a fantastic start, Shane! One thing I would suggest is to save your ABS scraps. The wider ones (photo 1) can be cut down and used as interior cover strips to strengthen the joins. They don't have to be pretty, but will definitely make the seams stronger. This is especially important on the calf armor pieces, (photo 2) as those get a lot of wear and tear (flex) from opening/closing the backs when suiting up. Another thing that may seem like a no-brainer is to make sure the clear plastic protective cover is removed before gluing. My Hero armor is Anovos, and I found this out the hard way, lol. Lastly (for now) I would suggest using some of the scraps to reinforce a few areas as seen below (photo 3), as Anovos is famous for splitting/cracking there. A few well placed 1/4 inch shims on the inside will prevent this, but try to use single pieces for each and not sections. 1 2 3 I am following your build, so keep up the great job and keep those photos coming! Remember, when in doubt, post a pic before cutting/final gluing.1 point
-
You are making great progress, Emily, and especially nice job on that ear placement!! If I could make a few suggestions, they would be: 1. It looks as if the wire mesh in your Hovi-tips is of the fine type. For Level 2 and above it needs to be the wider (more open) type. Reference image 2. The paint at the ends of the frown is more Stunt style as opposed to Hero. Instead of the longer taper you may want to shorten it a bit with some (non-acetone) mineral spirits and a toothpick. Not the biggest of deals, but note how the paint on the teeth doesn't extent quite so far toward the tops as seen in Stunt frowns. Hero frown reference images Last up, as you mentioned the forearms/biceps will need to be reduced in size (the length is spot-on, though). It should not be snug against you, but should not look over-sized. The rule of thumb I use is 4 (maybe 5) fingers of space between your arm and the armor, with the wrist opening just wide enough to get your hand through with a little extra room. Keep up the fantastic work, and keep the questions and pics coming!1 point
-
I'm gonna hold you to that, brother... Now that you have reached Centurion, I hope you will consider hanging around the boards and using all that you've learned to help and encourage others.1 point
-
The helmet does look better The length of the forearm looks right Sent from my GM1900 using Tapatalk1 point
-
Looking great so far. Sent from my iPhone using Tapatalk1 point
-
Yes, the length is just right. and the bubble lenses looks great to me and just as the crl states: Lenses may be flat or bubble, green or smoke, sufficiently dark enough to obscure the costumer's eyes Keep on doing a great work.1 point
-
Thank you, for your recommendations Tony.1 point
-
Progress! In this photo though the chest plate isn't secured properly just yet.1 point
-
Not much time to build over the last week due to work, but found some time to repair the forearms as mentioned earlier. I shaved off both forearms leaving only the return edge: Then I glued 2 pieces of 2mm acrylic pieces together as I wanted a 4mm depth, but could not find any sheet that was that thick: Next, I bevelled off the edge, so that it will sit behind the return edge and be flush from the front, glued it in place, and filled the gap with more CA glue. After sanding down the front to make the acrylic flush with the return edge, I cut the pillbox recess. And then finally shaved off the rest of the excess at the bottom. This is how it looks after sanding and priming. Did the same to the other arm. Before final sanding and priming: And the finished forearm: Both forearms completed. A tedious step, but I think the results are worth it.1 point