Leaderboard


Popular Content
Showing content with the highest reputation on 01/08/2020 in Posts
-
OP (MV) Post #9 For the past week I've been consumed with my HWT build (thread), but I also have a few updates/questions on this TK Stunt side of things. First, an updated component list with some changed items since my first post, and ✓ marks next to items already in-hand. ✓ Bucket: ATA ✓ Armor: ATA ✓ Undersuit: Trooperbay One-Piece Double-Zipper (courtesy of a GA Garrison mate) ✓ Boots: Imperial Boots 421 ✓ Gloves: Trooperbay gloves, Joseph's pre-attached tutorial pair ✓ Hand guards: justjoseph63's kit (these are AWESOME!) ✓ Strapping: TheRascalKing's double-snap strap system ✓ Blaster: Hellhounds / Trooperbay rubber E-11 ✓ Holster: Darman's thread. 8oz leather (Etsy) (see questions below) ✓ Neck seal: Darman (Etsy). I may consider fashioning my own to start with; see below. ✓ Belt: TKitell's Imperial Issue (site), (thread). Will likely purchase two to have a dedicated weathered one for my HWT. ✓ TD hooks: Ukswrath's kit. Something prefabricated, with Centurion screen-accurate screw hole locations. ✓ Mounting hardware: justjoseph63's kit for Centurion level approval ✓ Helmet fans: Possibly Troopertronix (see questions below), B-Grade Echo Bracket from Ukswrath Voice Mod/Amp: iComm (Etsy) with VB MR1506 (Aker) amp sometime down the road. Will try to find one used; let me know if you ever see one for sale! Questions Are the Trooperbay rubber gloves superior in some fashion to any others on the market? I'm wondering if these two (1) options (2) would be ok. After purchasing the TB flexible hard guards I cam to realize that they are inferior to others readily available, so I want to avoid that happening again with the gloves. Do any of you have experience with either the 4oz or 8oz versions of the Darman ANH leather holsters (thread) (Etsy)? I like the idea of the heavier 8oz construction, but might it be limiting in some way? I'd hate to spend extra only to find the lighter one would have been superior for some non-obvious reason. I did see this thread comparing Darman's soft goods to some others, and several Troopers said the heavier option was great. It appears that Ukswrath's (Etsy) helmet fans are the gold standard, but I'm seeking something a bit more economical. I found the Troopertronix triple fans, which I believe would pair well with the extra USB battery packs I already own. I'm not sure if they come wired with a switch though, so I'll need to investigate further. Any good sources for the small brushless radial fans for a DIY solution? DIY Neck Seal When I first began my research I came upon Darman's seal pretty quickly and decided that was the route I wanted to go. However, I later stumbled upon this thread, which peaked my interest in DIY options. Several people have used these Home Depot weather seals, but I recently stumbled upon this Walmart bumper which I thought might also work. I like these options because they are low-cost, but with them I'd need to deal with constructing a rear closure, and it would also not be washable like Darman's is. That last point may actually be the kicker, since I know I'll be sweating down here in the south. ARMOR ORDERED My ATA armor has finally been ordered. AKA I'm on the wait-list for delivery sometime in February or early March. The holdup with the armorer is a delayed ABS shipment, but I'm really ok with that since my DJI Mavic 2 Pro drone hasn't sold yet. I'm also clearly still collecting soft goods, and will be working on my HWT backpack while I wait for the shiny white stuff to arrive. =) Finally, here are some photos of some of my recently tool and hardware (from Joseph) acquisitions. The heat gun will actually likely see very minimal use since I know it can easily destroy armor, but I am foreseeing needing to bend some ABS (bicep hooks and Cricket's magnetic shins), and I can also use it for other projects. The jigsaw will be for the woodwork on an eventual DLT-19, and hopefully a T-21 for my HWT! I think that's about it for now. Amazingly, I don't have any non-build life stories to add at this time. Peace. MV3 points
-
Hi guys, I'm, Andrea, TK-91186 ready for duty! I'm from Italy (Genoa, North-West) and I'm very honored to have become a member of the 501st (Stormtrooper ANH Hero). I hope to meet you in future events. Ciao a tutti! Greetings! Andrea Lagostena - TK-91186
 2 points
 -
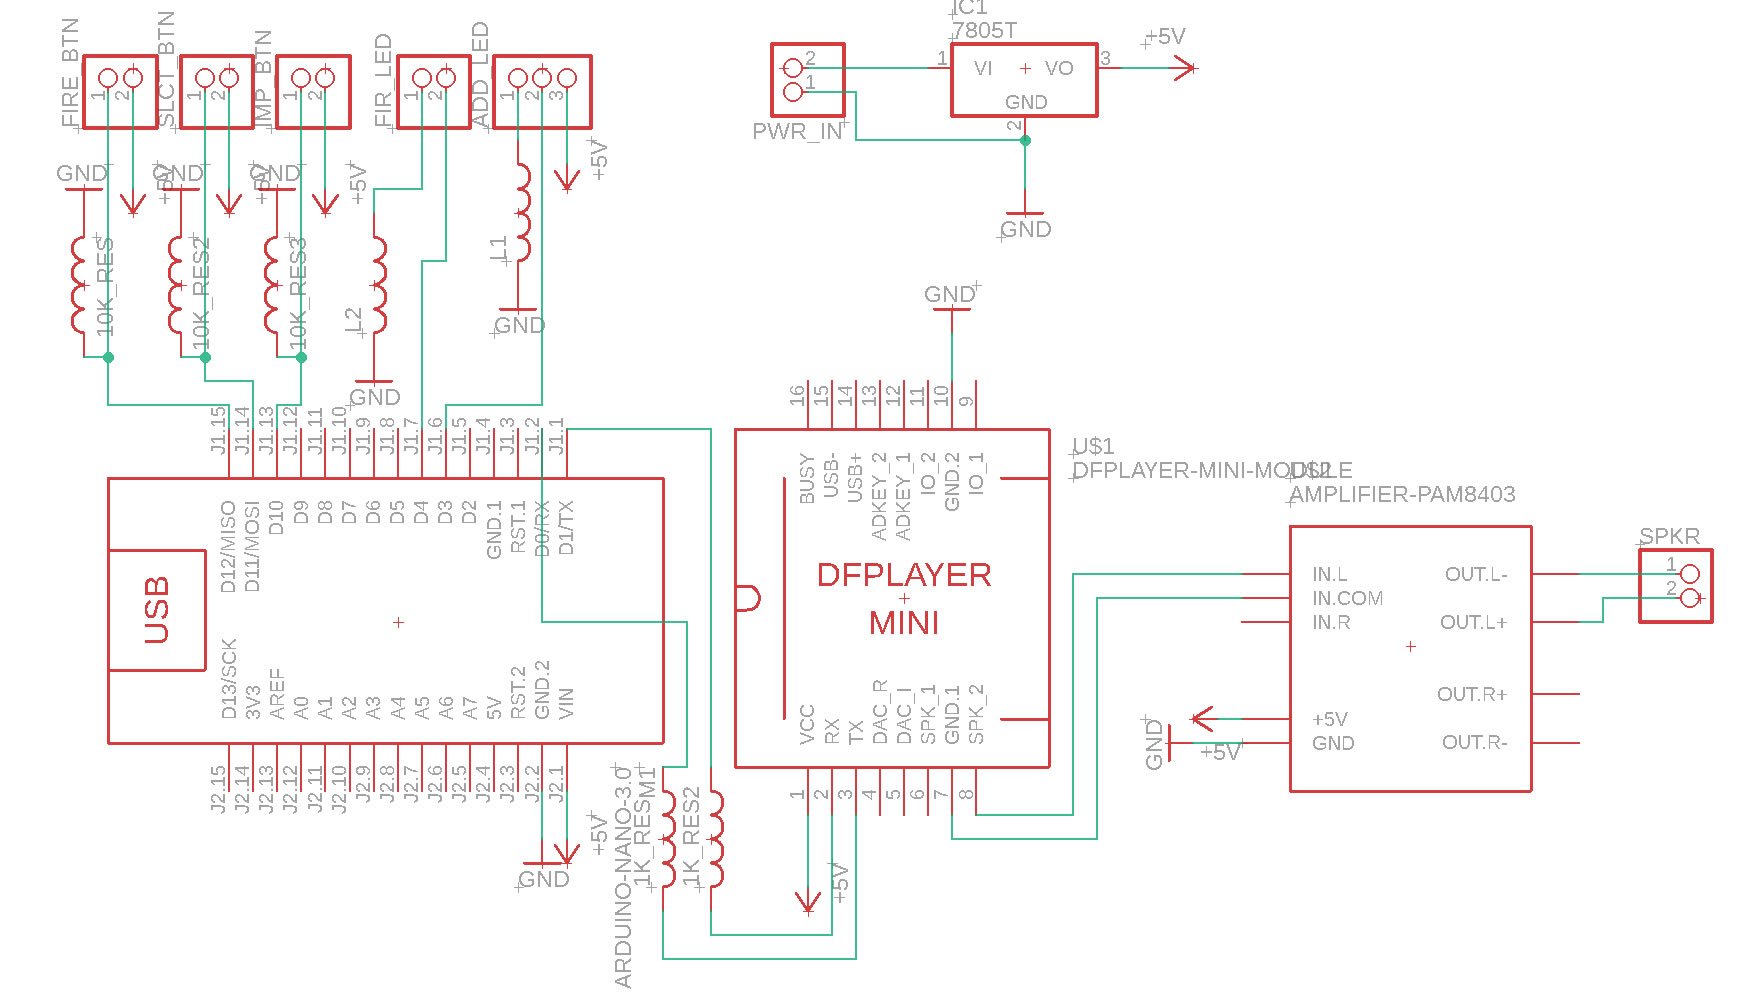
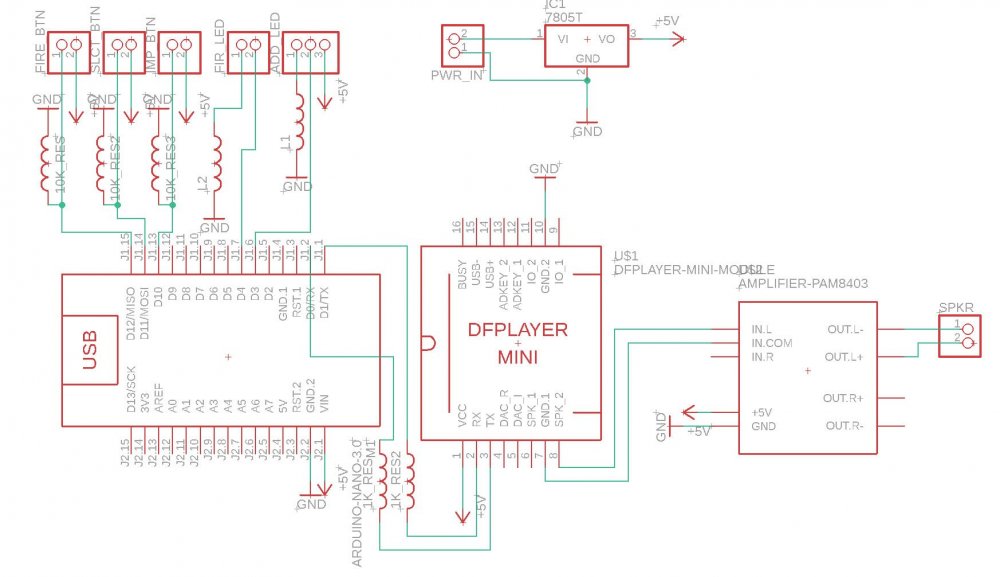
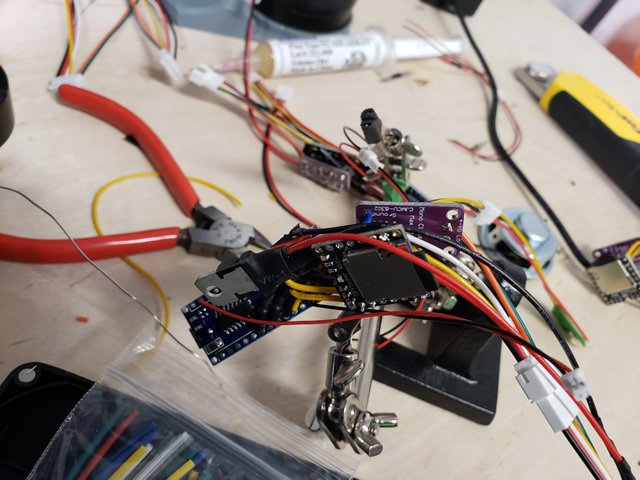
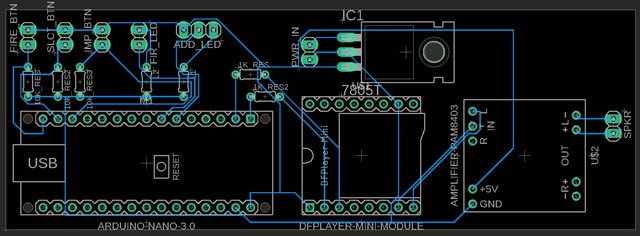
I'm going to do up a V3 one next week, it's already printed in a box. I'm considering doing a video on assembly and wiring depending on how busy work gets, but a 'how to' pic build guide is coming at least. Here's: - the vector image of the sight. To make it I printed this on some transparency and airbrushed one side red lightly - the Arduino code, it's a WIP but it does work. I have another direct drive version for the front emitter rather than the neo-pixel, I started off with a 3W LED, but I think neo-pixels are more ubiquitous. If you want the 3W version let me know. - The circuit diagram. I think I have everything labeled. Everything with gnd can be connected together as well as +5v. The 7805T is a step down from a 7.4Lipo, but you can just as easily step up from 3.7. V4 will have that as well as USB direct charging. edit: in the diagram ignore 'imp btn', that's from V1 where the imperial march had it's own button, it's now a long press of the fire select, and the fire LED is 3 pin now for the addressable light strip. I'll post a detailed parts list and guide next week. E11_Sight.svg E11blaster_V1a.ino
 2 points
 -
It's been a long year and a bit. 2018 was rough, and then 2019 I was fighting health issues. It's been kinda crappy honestly.. I've managed to troop a little bit but not like I have in the past.. fingers crossed for 2020.. I completed a fun little build on a MSE Droid.. I'm working on a GONK Droid now.. truly a fun build.. still have my TK.. and my Tie Pilot.. Hoping 2020 is a better year.. Still around and checking in!!2 points
-
https://www.thingiverse.com/thing:4087124 Hi all, I just spent about 100 hours modeling an E-11 for 3D printing and giving it away for free. I made it as true to life as I could as well as adding in support for light and sound elements. It has: - Working trigger/selector with light and sound changes by mode - Light up scope - Addressable LED fire effects with focusing LED on front, range is about 10M with indoor light, not a laser so eye safe - 3D printed spring with cycling bolt - Removable magazine with battery inside - Removable rear cap with D ring mount - 3W speaker, as big as I could get to be heard in noisy areas - Plays the imperial march when you hold the selector for 3sec - discreet wiring guides, no wires are visible or in the way - Stock folds out and locks in place - All major parts are removable via snap lock or screws, so you can upgrade or replace anything without a full rebuild (and get at the electronics) I'm trying to improve the model as much as possible so feedback and suggestions would be appreciated. If anyone wants a custom TK number on the Hengstler let me know and I'll model one for you.1 point
-
These are great, thank you! *goes to check forearm and bicep return edges before measuring circumference*1 point
-
Added some thoughts on stuff. Also, your strapping kit is seriously almost done - this round of chemo kicked my a** and set me back more than I expected, but I'm wrapping everyone up this week for sure. Making good progress and I LOVE seeing people do their research. Cheers!1 point
-
It could mean your GML (garrison membership liaison) has not added FISD as a detachment to your profile or you have not visited the forum in over 12 months, you will have to contact him/her to add affiliation, then it should show as pending. Usually before legion elections pending affiliation is updated but sometimes some get missed. Once you are showing as pending you could contact the FISD DL Sarah @Alayand ask for a manual update, then you will be able to vote for the detachment in legion elections.1 point
-
Hi Caleb. It looks like you're doing your homework excellent about your questions I can give my personal experience with my Tk armor build. 1- Rubber Gloves: I prefer the option 1 (Chemical gloves) they're thick and give a better shape to your hand. I recommendo you to use a cotton glove before you put the rubber ones in. 2- The thick holster is in my opinion better than the 4 oz. one, better look and stay firm. 3- About the helmet fan I think you could use the system that better apply for you. I use two fan system from Henry's Helet fans fronm ebay and have no issues. but someone would prefer to use 3 of then or a Do it your self kit (I'm not good in electronics personally ). 4- About the Neck seal for me is the same story as the helmet fan, I prefer the ready to go system than thje DIY one. it's about what you prefer and your builder skills for electrical and tailoring Hope this can help, and if not, thanks for reading Cheers1 point
-
Congratulations TK, welcome to the Legion!1 point
-
Thanks all, pulled the trigger on a pre trimmed AP kit, ordered boots ( since I cannot locate mine as well as my darn blaster which I know I didnt sell!) and all my soft parts! Super excited!1 point
-
Hi troopers, Little update now and more to follow later. The helmet is now prepared for primer. Just need to find a suitable time to do it. For now, I’ve now painted the hovi tips. https://youtu.be/LpRcLsvbg-I1 point
-
thanks! im currently looking at RS and TM armor. still waiting for reply from TM on whether they offer a complete bundle like RS. hopefully everything goes well and will be able to have myself a set of stormtrooper armor by this year1 point
-
Hi Trenton, welcome to FISD. Have you joined the Galactic Academy? If not it is a great place to start getting involved with the 501st before you reach the age to become a member. As we are nor sure of your geographic location, you can search for your local area 501st Garrison and they can also help you get connected with the local GA's. Its a great way for young people to see how it all works, trooping, knowing how to handle members in costume as our visibility isn't always the best with helmets on etc. To find your local 501st unit, use this link for all unit listings and make contact. They inturn can put you in contact with your local Galactic Academy member. https://www.501st.com/members/displayUnits.php Link to the Galactic Academy website http://www.galactic-academy.net/ Glad you want to become a Stormtrooper and member of the Legion, it's a lot of fun, and we do good work in the community. You are certainly in the right place for Stormtrooper advice so ask plenty of questions take all the advice you can and let your journey begin.1 point
-
Congratulations Andrea, Welcome to The Legion!1 point
-
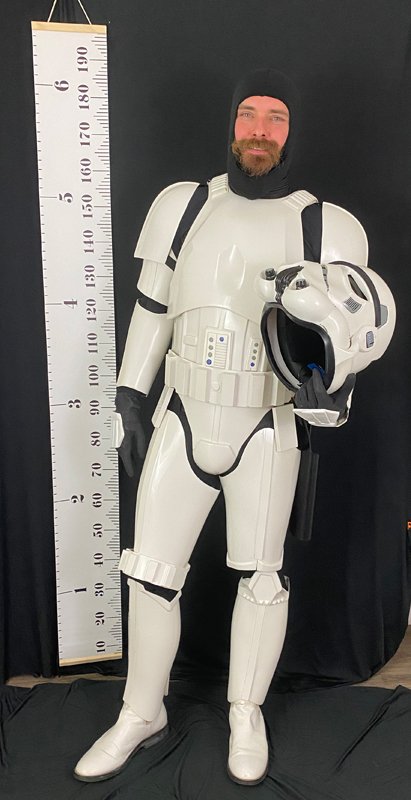
congrats but what you have is a ANOVOS ANH Stunt not Hero1 point
-
Thanks Wook1138. - I was thinking about the rubber trim as well. I’ll be doing a slooowwwwww sand/trim to make the head hole a bit bigger. At least get it to the same size once the rubber trim is on.1 point
-
Bucket off shot Bucket off shot (Gratuitous bucket off shot from the set of Mando!) Abdomen Details Action Shot Cod/Butt Plate Attachment


 1 point
 -
Haven’t posted in a while due to remodeling the garage. I’ve been spending so much time out there with this build that it moved up on the honey-do list to Priority One! With that said I’ve got pictures. Let me start by saying one thing: magnets hurt. I read before that these 7/8x1/8 magnets were strong.. but man. I’ve played with magnets as a kid but never over a dozen at a time! These little guys can jump far and can really snap those fingers! As said by others, be careful with these.. the magnetic field of a big stack reaches a long way. I’ve pulled single magnets off the table from over two feet away while holding a stack. And it hurt. Bad. They also can and will break when a bare magnet hits the other hard enough. Via my research on this forum, these are the ones I have: I do have some gluing pictures. But a majority of my time was spent trimming. So. Much. Trimming. I’m gluing some pieces tonight. Using e6000 on everything with plenty of drying time and following over seams with ABS paste. I have some Pro-Flex finishing putty for the final touch ups before priming and painting the pieces. Been following Ruthar and TheSwede’s builds for help. Somehow all of Ukswrath’s pictures are completely gone. But luckily the other two in conjunction with KB’s Facebook build groups, I’ve managed ok. Tonight I decided to make the basic attachments. I cut these tabs and started assembly on the spats. Took advice from Ruthar’s thread and will be heat molding these for the spats. Cut a few ruler sized tabs for use on the biceps and shins to be done later tonight. Also made me torso tabs and went ahead and cut those down and glued them. I did finish up the shoulder bells. Not much to those. Trim the pieces and leave them sticking out about 1/2”. And I also glued and trimmed up the chest/back pieces. I really wrestled with leaving the inner chest piece whole. Granted they are whole on the screen used armor but from what I understand, that was a different material, and I couldn’t get the chest to do what I wanted without flaring out the outter chest/back ‘wings’ on the side. So after reading the KB build thread, I decided to do what almost every does and cut the inner chest and use two arms. It’s much more flexible but was a pain to try and get it just right. After some persistence with trying to create my first batch of ABS paste, I finally made some. And boy do you have to work fast! It was messy but I got what I wanted. Had to fill the seam where the inner chest met the vents on the back. Trimming was a pain because the trimming line (a new improvement to the current mold on the chest piece) was not very distinguishable. I will say after gluing that the shoulder area is probably the stiffest and sturdiest part of the armor. In other news, 3D-Props should be shipping out my TLJ Blaster (w/stock) and Pistol soon. I have the scout light, Blast FX kit and LEDs to do once I receive them. Teresa just posted on FB that she’s currently sewing the current run of gaskets, harnesses, and seals that I’m on. So hopefully it won’t be long so I can start test fitting things. I’d really like to have those before I do my arms and thighs. Until next time. Sent from my iPhone using The Force1 point
-
Yeah I will agree that the actor really delivered this character. He was a badass with a big destructive weapon and he knew it. Sent from my iPhone using The Force1 point
-
Awesome, welcome! Sent from my iPhone using Tapatalk1 point
-
There is a vetted sellers list that can help. But before all that my suggestion would be start saving. Armor and soft parts isn’t cheap and who knows how big you’ll be in two years so making it right away might not be the best idea. Find your local garrison and see if you can help out, make some friends, go to some events and get established while you save. Then when you get closer to 18 you’ll have the money saved up and lots of connections to help with the build. I know it’s tough but it’ll be worth it in the long run. Sent from my iPhone using Tapatalk1 point
-
He was truly awesome, what a great scene.1 point
-
Welcome aboard Andrea, congratulations on becoming a legion member.1 point
-
A little more progress made. This time the distraction was getting Ep IX Rey ready for the premiere, then trying to completely redo the whole thing for Rebel Legion submission.... I’ve played with torso placement with the return edge trimmed to a minimal size, an rightside up, and following Cricket’s advice on ab button placement with respect to sternum. This places the ab higher than I would have thought (in front of rather than under my bust), but it may actually make fit easier in that I’ll have less to take in at the “waist”. (Or, should I be trimming off the top for comfort purposes?) I feel like this actually fits pretty well aside from possibly needing to bring the collar down a bit, but please share feedback. Cod is cut and taped in place here. Gap here can be fixed by bending sides of kidney in closer to me. Awkward backward selfie.... unsure if kidney is a bit too tall. I think butt will be ok once strapping is in place. With chest armor. I feel like it may be too close to my neck. And up next, limbs! I decided to start with arms as the less scary option. A friend and I worked these at an armor party and got good advice for the trimming and gluing process. I have removed one indent from the wrist end of the forearm on each arm and minimized the return edges at the elbow end (and on both end a of the biceps). I will need to reduce forearm circumference but may be ok with biceps as is. Glued interior cover strip on front, trimmed length. About what the circumference needs to be. Another angle So when I trim the circumference... I have conflicting advice. Evenly from both sides? Pick one side over another? I know either way to make sure to even out the curvature across the trim. Advice? up next I will post my undoing ear woes!1 point
-
Congratulations! Looking sharp! Have fun out there!1 point
-
You should do great with RS. You've done your research. And it's your choice to make not ours. With your size any kit can work. In regards to your ESB add on in the future. A thing to consider is plastic will age and you wouldn't want to have a bright white helmet and some aged armor below it. Also I'm your local Attache for FISD. So I look foward to your build here and on the NEG forums. Good Luck Future Trooper!1 point
-
Welcome to the Legion Trooper, Enjoy being a Bad Guy Doing Good !!1 point
-
Hi Chris, great to see you're on your way to becoming an Stormtrooper, and Yes, you're just rigth with the RS Armor size. Remember to start a building thread post when you are ready to start so you can recieve feeback , tips and suggestions from the very expert troopers we have here. Meanwhile you may want to search the ANH Build threads and the EIB and Centurion Sections so you can be familiar with the building process and the advenced program requirements. Looking fordward to see your BBB day photos. Cheers1 point
-
Just watch how much you change the position on the sides as it can make fitting the ears an issue as they sit on different areas. Can also change the height of the brow trim so it's something to keep in mind. Trimming the opening a little more is acceptable. Also not to put the helmet on you need to twist sideways first get your head and nose through then twist1 point
-
Hello and welcome aboard, check out some other build threads as well as EIB and Centurion applications, also use the reference gallery, don't forget the CRL's (costume reference library) great images you can refer back to while building. There is also the Reference Image Depository here: Here is a great supply list:1 point
-
A quick “confirmation of research” question! After reading through this entire thread, and lots of others, I’ve finally decided on an RS untrimmed kit. Me: Height: 5’10.5” Chest: 40”-41” Waist: 33”-34” Weight: 170-175lbs Just to confirm my research, is there any reason to think RS would NOT fit me (I have found no evidence that it wouldn’t, or that any other manufacture would fit BETTER)? Assuming no one throws me a huge red flag, I'll be ordering it next week. Also, my intention is go as movie-accurate as possible, which means by default I am aiming for Centurion from Day 1 (a main reason why I picked RS). I am really back and forth on ANH/ESB stunt. So, the obvious answer is, well, BOTH! (esp. considering how little it takes to switch over). My heart is with ESB, but there is so much info/resources on ANH, that I’m doing that first. ESB helmet, hand guards, etc to come after. So, all that said, thoughts/comments/suggestions? Last, you guys are going to get sick of me saying this, but…deep gratitude, and a heartfelt thank you, to everyone for all the info on this forum. You guys are amazing. -Chris1 point
-
I had the same problem. I wouldn't mess with the screw holes too much - you don't want the bottom of your face plate to stick out - the helmet won't have the right profile and the tubes along the cheeks will not line up nicely with the tube shape that runs around the back of the helmet. I trimmed the opening a bit. You could easily trim some off of the front part and probably a bit off the back. One word of caution - take very little off at a time. It doesn't take much to make that opening larger and you don't want to overdo it. Also, keep in mind that you will have rubber trim installed along the opening. You will need room (edge) to get it on under the ears. Plus, it will decrease the size of the opening slightly (as I found out the hard way). I struggle a bit every time I put my helmet on - it was so tight that I had to practice getting it on.1 point
-
Hi Andrea, welcome to the legion and welcome aboard FISD. You look great!1 point
-
Hello and welcome to the ranks trooper1 point
-
Congrats and welcome to the FISD!1 point
-
I never really cared for these guys before, but the dude in the show really turned that around! Whoever the stuntman wearing it is, his swagger and overall body language really sold this trooper as a real badass. Sent from my SM-J320FN using Tapatalk1 point
-
Hello fellow Badlander! Check out the build section for FOTKs - there are separate threads for each movie. Also, check out the Centurion and EIB applications (https://www.whitearmor.net/forum/forum/72-request-centurion-status/) and scoll through for FOTK applications. These are great for seeing high quality builds. And of course, if you haven't been to the Badlands forum yet, be sure to check in there (badlands.ca). We have a few FOTKs and you may be able to meet up with members at an armour party. There is also a Facebook group if you are on FB. Good luck with your build!1 point
-
Hi, Welcome to FISD . If you haven't seen the following forum sections yet, i think It's a good starting point: https://www.whitearmor.net/forum/forum/38-getting-started-read-this-first/ if you have received your armor kit already, this following sections of building threads may be helpfull. https://www.whitearmor.net/forum/forum/84-rotj-build-threads/ https://www.whitearmor.net/forum/forum/195-tlj-build-threads/ Fell free to ask whatever you need, here we can find tons of info and a lot of experienced troopers willing to help. Cheers and good luck. !!1 point
-
Hi there! It's finally time for me to build my a femtrooper armor. I'm doing this for my beautiful girlfriend, @Vicky_Velocipanda. She recieved the BBB yesterday (nov. 16th) and we started right off with trimming and assembling the helmet. Here's the progress so far. Unpacking the BBB... trimming the ears... trimming the rest of the helmet... and assembling it: We will trim the eyes and teeth later today and document it. Afterwards I started trimming the backplate and then... well just went on. So this is what we've roughly trimmed now: Vicky will modify these boots to fit the CRL. The next step is trimming the legs and arms. Is my assumption correct, that we're supposed to use the butt joint method here with an inverted coverstripe? (on the inside instead of outside) Or shall we use the overlap method? p.s.: this thread will be pic heavy.1 point
-
FYI if you are looking for Biker Scout info head to Pathfinders forum: http://forum.501stpathfinders.com/index.php1 point
-
Welcome to the FISD, Wayne! I would go with the ANH build - I hear those Biker Scouts... *Mandalorian spoilers ahead* ...punch babies.1 point
-
The boots took me a little longer than anticipated... but I'm still waiting on armor, so that's OK. I received my neck seal and am ALMOST finished with boots (unhappy with some messiness around the soles, but getting close). Some pictures throughout the boot journey... Post-acetone rub: Taped up and ready to go: Layer 1 of approximately 1 billion: A few more layers in: All painted, acrylic layer, and fabric paint on the elastic! So now to fix the couple of smudges, make some magnet satchels, and continue researching...1 point