Leaderboard


Popular Content
Showing content with the highest reputation on 10/18/2019 in Posts
-
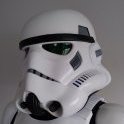
After 2 years of trooping (as part of the Galactic Academy) alongside my father (TK-72313) and my uncle (TK-17671) in my own TK, I finally became an official member of the 501st this month! Now to get my Expert Infantry and Centurion approvals! Big thanks to my squad mate @DeathTrap for the Photoshop!
 7 points
 -
WARNING: The following content may be controversial! DISCLAIMER: These are my opinions from years of experience, pure and simple. Over the years I have noticed many future Troopers doing an OT (Original Trilogy) TK ask about return edges before, during (and after) their build... If this is a subject that you are curious about, grab a cup of coffee or a tall glass of frosty blue milk (this is a long post, lol) and read on.... QUESTION: "What are they, what do they do, and should I leave them, trim them down some or remove them"? ANSWER: Return edges are part of the molding process and provide strength in certain areas on the edges of your armor. They also provide a heftier look to some pieces. To help you decide whether or not to keep them is why I started this thread. Here I will attempt to go into a few details about them. Know in advance that as mentioned I personally am NOT a fan of them in many areas for several reasons (listed below). Some people love them and some may disagree with my opinions... many of you may trooped for years with no problems which is AWESOME, but many folks have had issues and questions. 1. In most areas they are not screen accurate- In looking at the screen caps and film used armor photos below you will notice their scarcity. 2. They can (and in many cases will) get very uncomfortable- Many folks like the "thicker" look it gives their armor, but they can cut into you, especially in the area where your arm bends ("armor bite") and the groin area (chafing). As Troopers we do a lot of walking and arm bending carrying a weapon, so keep this in mind. 3. If aiming for higher levels they can cause fitting issues- Examples: A. If you leave them on your forearm openings and glue on the cover strips, they will need to be completely removed at the wrists for Centurion level, making the opening too wide. This can lead to you having to remove the cover strips, reduce the sides of the forearms and re-attach the strips. Quite a pain in the posterior plate to say the least. *** See EXAMPLE 1 below. B. If they are overly thick on the bottoms of your shoulder bells, they can prevent them from lying snug against the biceps. 4. They can cause splits/cracks- Especially on some armor areas. ABS is designed to flex, and in some cases a small amount of return edge is fine, but too much can cause stress on those areas. *** See EXAMPLE 2 below Over time that stress will take it's toll somewhere, and that is usually the return edge. Anovos armor is especially prone to this on the sides of the chest/back plates and neck openings. I suggest shimming these on the rear with ABS strips and E-6000 to prevent it. Let's start with the chest plate: Note how the ones below (including the back plate) have either no or minimal edges with no cracks or splits. Now here is a screen used one with a pretty prominent edge, Notice the stress crack. Now, onto the ab/kidney/back plate: To keep them in line and prevent them from overlapping, it is suggested that you LEAVE a fair amount of the edges on the top/bottoms of the kidney and bottom of the back plate, especially if using the "classic" strapping method. Yes, these can split/crack as well but not normally. Shoulder Bells Trimming off the entire edge on the bottoms is not only screen accurate (first two photos), it allows them to rest close to the bicep (bottom photo). Third photo shows "suggested" trim lines (red) of an untrimmed bicep. My recommendation is the blue line. Biceps/forearms For sheer comfort and a sleeker look, I recommend removing ALL of the top and bottom edges before fitting/gluing them. First, no one sees the tops (covered by the shoulder bell) and the bottoms can cut into your arms (armor bite). Suggested cut lines in red. Again, if you do get armor bite you will have to take them both completely apart, remove the edge and re-fit. Better to think ahead. Some (myself included) like to leave a bit of the return edge on the outside of the top of the forearm for a thicker look. However, I highly suggest removing all from the inside part (the "scoop") where your arm bends. Again, an armor bite issue. This should also be done BEFORE final fitting. Here are some screen used examples: For level 3 (Centurion) all of the return edge on the wrist opening must be removed, including the area inside the "hump" as seen below: Posterior (butt) plate: Again, it is suggested that you leave some of the return edge on the top (and bottom in most cases) to keep it from riding under/over the kidney. Now, the BOTTOM of the posterior plate is where we often find splitting issues. Should you leave some return edge? Sure! BUT(T), when trimming the corners, (see below) be SURE not to give it a sharp angle... this is where the trouble usually starts. Instead, give it a slightly rounded angle (as shown in green). Thigh tops The tops of the thighs are where we see a lot of questions. I recommend removing all the return edges from the entire upper parts, and here is why: As mentioned above, you will be doing a lot of walking. If you have the edges (or at least a large portion of them) intact, the friction and inside facing angles can really chafe the heck out of you, especially on the inside of the groin area. (Ouch). If there are sharp edges/points on the tops (below) these will poke into you. When trimming these, just follow the existing line. Also, if you do your final fitting, glue everything together and find this out afterward, you will have to take the entire thing apart, remove the return edges, trim down the sides and then re-build/glue them back together. The reason is that afterward the opening will be entirely too large and you will have a giant gap all the way around. Not a good look. Easier to do it beforehand, trust me. As seen below, there were no return edges (or at least minimal ones) used in the films. Sniper knee plate The bottom of this piece is an area often not trimmed enough. To allow it to sit flat (or very close to flat) against the top of the calf enough for the glue to adhere properly I suggest removing most if not all of the bottom edge. Note how in the first and third photos how the sniper knee is parallel to the front of the calf. Last up, a photo that best illustrates my point about return edges and how they were not really present in many places on ANH armor. *** Example 1. of what happens when you have to reduce the return edge(s) after attaching cover strips. NOTE: For the example below I am using an ATA bicep (first 3 photos). Be aware that ATA makes the "suggested" cut line on their return edges pretty slim (a GREAT thing in my opinion). As seen on the armor in the 4th photo, if followed, the "suggested" cut line makes the return edges much wider (red line). Top view Bottom view For the purposes of this tutorial, we will assume that the ATA has those wider suggested return edges. Okay, let's say you really like the thicker look the return edges give your armor, so you left them pretty wide during fitting and then glued on the cover strips. Enough to get your arm through with a little extra room. Should be good to go, correct? BUT, you find that after having your arm bent for a while they cut into you (armor bite), so you find you have to reduce or remove most or all of it. No biggie, right? Just break out the Lexan scissors or Dremel and cut away, leaving the cover strips attached. Easy! So you remove it and then you run into the fact that the opening is now enormous. This is not a good look, and can result in the piece(s) jangling around and not being approvable at higher levels (or even Basic depending on your GML). What I am getting at with the above info. is that if you decide to remove them, it's better to do it before final fitting/gluing. Side note: Many biceps have an unusual shape at the tops (in red, below) normally located on the inside. This can be completely removed. Doing this will not affect approval at any level, and is screen accurate. It sits under the shoulder bell so no one sees it anyway! Screen used bicep USELESS TRIVIA: Many have asked about the "thumbprint" that many armorers have on the left bicep (screen used example below). Some think it is so you can tell them apart, but I was speaking with Brian Muir a few years ago (he sculpted the original armor used in ANH) and asked him about it: "To be honest, I have no idea... it was not in my original sculpt, and must have been a mistake in casting". There you have it. *** EXAMPLE 2: What causes cracks/splits: ABS bends pretty well, just as it's designed to. BUT, when there are return edges involved that changes the game. For the below example I used a 2 inch wide strip of ABS with a 1/2 inch "return edge". Looks pretty solid, right? That's because the edge provides stability. Now I am bending it up/in to simulate use over time. (More than it normally gets bent in many cases, but only to prove a point). That stress has got to go somewhere, and it's the return edge that takes it all and gives way, again causing cracks/splits. The red arrow shows a weak area where the stress in concentrated and cracks can form. Even if trimmed off afterward that area will be prone to splitting, so a small shim behind it is suggested. To sum it up, return edges are not meant to bend a lot. I suggest inspecting your armor occasionally to spot any existing/potential cracks/splits so that you can catch them before they get worse. I hope this helps answer any basic questions you may have, and always feel free to ask more detailed ones here or offer differing opinions.5 points
-
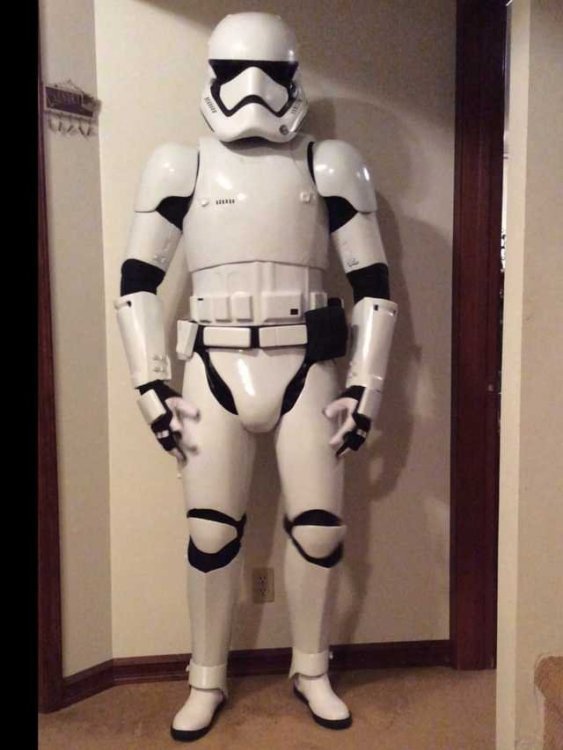
Well... really TK-19262 ready to serve in the First Order. First White armor to wear though nothing beats good solid clone armor. Happy to be apart of the FISD,
 3 points
 -
Looks like you are off to a GREAT start! Ok, more long posts from me. Sorry.... I know we talked about it offline, but I want to make sure I emphasize that allot of the things I did are not required for Centurion. Just me, my OCD and extreme Star Wars geekiness that made me do it I only make the following suggestions to ease building. It all depends on your financial situation and how much you want to invest. Not needed at all: The clamps are good. You MAY want or need 2 to 4 more. I started off with 4 clamps, then quickly bought 4 more. It just speeds up the clamping and gluing process and minimizes wait times. I.e. Instead of only being able to work on one side of the bicep armour, clamping and gluing for 24 hours, then doin the same to other side (now a 2 day process) I could clamp and glue both sides at once. Down to one day of wait time. Sandpaper is good. I can't tell if your sandpaper is wet, butI made sure mine was wet sandpaper. This really aids in the sanding process. I started with 400 grit, and made it up to 1600 I think? If you buy a car headlight polishing kit they can go up to 3000 or 4000, and it gives you a very nice smooth finish. The kits can be pricey though I also found that sanding sponges (just google it) came in handy. I got them at a hardware store in 2 or 3 grits. They were handy to sand some bigger areas or spots that were rounded. I sent you a list of the model paints you will need. Various Trooper companies sell them on their websites, or you can go to a plastic model store. For the brushes, I used a flat brush, maybe 1/4" wide and a #6 or # 8 round brush for the details. Trooperbay does have video links on their website on how to use their stencils. When you order they send you 2 sets in case you mess up For the hardware (rivets, screws etc) some TK parts companies sell everything in ready-to-go packs with just the right amount of each item to do the job (plus 1 or 2 extra). If you go on Trooperbay and look under the Costuming Supplies / Hardware dropdown tabs, they sell kits of hardware. They even have snaps and strap combo sets ready made for $42. You can probably make them for cheaper on your own, but this is ready convenience. Even though I've done building my armor, I have to look at it to do an accurate screw and rivet count. LOL. I can let you know once I get home from work I have allot of extra helmet screen I can pass to you. I think I used a double layer of good tent repair screen. You can use spare window screen. For the strapping it is kind of hit and miss. It is hard to know until you actually make it and put the stuff on. The good thing is, you can always swap out the strapping if it doesn't work for you. Mr No stripes brackets: Screen accurate Armour fits exactly the same way every time you put on and take off (after adjusting for your body type) Can be fiddly or difficult to install due to minimal return edge on SDS May need additional strapping to make everything sit right. I had issues with my chest and ab spacing and used 3' wide velcro May need to shorten / re-sew some or all of the provided elastic straps to close gaps in the armor Snap plates and straps: When you put on and take off the armour, it goes back together the same way and in same position. Easy to replace straps when they become worn SDS provide more than enough elastic strap to repurpose it Have to either make or purchase snap plates. Making them is fairly easy. You can re-use some of the snaps ( like the crotch / cod snap plates) that you will remove for the Centurion upgrades. I can send you maybe 15 to 20 SDS snap plates I am not using in the care package Have to make or sew your own elastic or regular straps with snaps. Very easy to do, just takes time. In case you want to change things later, it is easy to remove the snap plates after gluing with E6000 Velcro system very easy to install and adjust. Armour does NOT fit the same way every time you put it on. Velcro wears down relatively quickly Hopefully this helps2 points
-
All I was saying is that the BSP ones are just arriving so let’s see how they are before telling everyone to go buy them. Not that anyone is saying that.2 points
-
Welcome aboard son!2 points
-
First ROTK of my Garrison1 point
-
Very nice, beats wrapping a towel around with safety pins, which is what I normally do1 point
-
Here's a great recent thread from @justjoseph63 on return edges which may be of help1 point
-
awesome. thanks for that.1 point
-
Yeah, I think I just need to wait for everything now.1 point
-
You can reduce your return edge to at least half of what you have now and totally remove the sharp pointed part. I would trim them like this.1 point
-
It is done... I have now ordered from trooperbay, imperialissue (belt) and Mrnostripes (brackets) My poor wallet...1 point
-
Now I have1 point
-
Here is my cart at Trooperbay: Looks good? Have I missed something?1 point
-
Congratulations Trooper Sent from my SM-G960F using Tapatalk1 point
-
Hey Nathan I´m sure you are correct, just meant you don´t need to include one for your EIB approval. Supplying screenshots will be great when it comes to update the CRL and in the meantime, how you Troop is up to you and of course your Garrison. Same applies here. The emblem would be optional as not all the Troopers are wearing it and apply at basic. Meaning if you want one you can wear one. Animated style is a L3 already. The line will be preserved when shins are fully closed, you can use the same method as the FOTK Shins. It does but I wouldn´t use it as it don´t seem accurate and to my mind would make it harder to preserve a nice seam. Lower Leg Armor Butt joint is required in the front. Overlap construction is not allowed. Greaves close in the back across the seam that lines up with the thigh seam via velcro or snaps. Greaves may utilize a white cover strip over the rear seam. The hexagon knee plate (sniper knee plate) is affixed to the left greave and may have two visible brads or rivets securing it to the greave.1 point
-
For the teeth holes I use a miniature file set. Perfect width, straight lines. Bring your TD end caps with you to Home Depot. You’ll know when you’ve found the right pipe. Mine was black ABS pipe and I painted it grey.1 point
-
Doesn't matter who made what statement. As you should know the CRL is constantly changing. As accuracy details are implemented so does the requirement.1 point
-
Hello and welcome aboard if you are looking for 501st access post here1 point
-
Any chance we can see some photos of the BSP kit posted up, interested to see how they look. Also just to add, nothing is 501st approved until it is built, correctly fitted to the member and reviewed by their GML.1 point
-
When the Mouse calls, you answer! Sent from my iPhone using Tapatalk Pro1 point
-
The intent of the award was to incentive and recognize those who help other people go EI. It need not be a full set of armor by yourself. I would say anyone spending 30 or more minutes counts as a "win" if that person goes EI and says they helped and put in > 30 minutes towards the project. If 30 minutes seems too low, 1 hour can be the bottom mark. So, the OP would read: 1 hour or more on a single EI awardee, regardless of how many other people helped.1 point
-
Welcome Trooper looking good.1 point
-
Thank you sir. I use your fan system in my helmets and love it. I will need to order another one for this TK now.1 point
-
I would advise against using shims for the front. There really is no need and you would be forced to use a very wide cover strip and that simply put won´t look good. If you already decided to shim then you have the great option to do so in the back AND therefore be able to use cover strips with a more Canon look which normally are 20-22mm for the thighs1 point