Leaderboard


Popular Content
Showing content with the highest reputation on 09/07/2019 in Posts
-
Hey Brian and Dan Like Dan said, nice job with the TD and although I have started the review is’s fine to include it because now there’s no question that it will pass. As for the belt, it’s not particularly accurate and there was discussion to exlude inner support but as of now we still allow it for Centurion (majority vote) Like Dan I also suggest you replace it with a multi-layered canvas belt, it makes a world of difference to the overall look and hopefully it would also be a better color match. I belive the outdoor photos makes it look worse than it actually is but I would still think about replacing it as many Troops are outdoors and of course for accuracy2 points
-
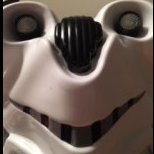
Hi Mark, Frown looks good. :-) The shape of the vocoder is okay and should pass fine. If you wanted to, you could extend the 2nd and 6th bars as many Stunt helmets had that look; Regarding the neck opening, you should easily be able to trim to the pencil line you have. If you have additional shots of your helmet (ideally from a few feet back), we can see whether you could trim any neck opening around the back, if required. :-)2 points
-
Shape looks good. Sent from my iPhone using Tapatalk2 points
-
Nice work, Brian. Just a couple of things that I don’t think have been mentioned; - thermal detonator end cap look a little big (without measurements, I’d guess that the end caps are around a third too big and are affecting the proportions of the TD) if you trimmed them down, the clips would also have to be moved outwards - screen used belts were usually a closer colour match to the armour and also didn’t have the thick support structure in the middle - this could be a future upgrade if you fancied higher accuracy Good luck with approval. Shouldn’t be too difficult for you as you’ve done a nice job overall. :-)2 points
-
Here’s the requested photos2 points
-
Congratulations trooper and welcome to the centurion ranks1 point
-
A block of wood with sandpaper wrapped around is a good way to get jagged lines straighter. You may find wrapping tape around the pieces tightly they may come together a bit more. If you are still left with a gap cover strips will sort that out. With shins it's a great idea to add inside cover strips as they are opened and closed a lot so some extra strength is a great idea.1 point
-
Well done trooper! I’ve enjoyed following your build.1 point
-
Great job Erick, good luck once again1 point
-
See you on the other side Erick1 point
-
Regarding the waist belt. Given the CRL was just updated it's safe to say if specific details are not mentioned in the CRL then it shouldn't be mentioned here either.1 point
-
Awesome work so far1 point
-
Just reached the first marker, 5 assisted EIB now,1 point
-
Fantastic job Fabio welcome to Centurion1 point
-
Great job in the TD, Brian!! :-) The belt will likely get you through, just might be mentioned by the DOs as a suggestion for greater accuracy. There was talk of prohibiting the central support structure with the recent CRL updates but this doesn’t appear to have been implemented. :-)1 point
-
Please let me know when it’s time to panic. [emoji23] Sent from my iPhone using Tapatalk1 point
-
Btw, CRL pics are okay, however, don’t forget either starwarshelmets.com and the screen used armour/helmets in the gallery. :-)1 point
-
Fixed frown let me know if it will be good for centurion Tried to model voicecoder on CRL photo, still needs finishing touch, shape ok? Given I’ve got a big noggin, how much can I trim from the bucket? Sent from my iPhone using Tapatalk1 point
-
Congratulations trooper!! Now to centu!!!! C’mon!!!! Enviado desde mi iPhone utilizando Tapatalk1 point
-
Congratulations man!!!!! Te queda genial, buen trabajo!!1 point
-
Congratulations trooper!! Now to centu!!!! C’mon!!!! Enviado desde mi iPhone utilizando Tapatalk1 point
-
Congratulations trooper!! Now to centu!!!! C’mon!!!! Enviado desde mi iPhone utilizando Tapatalk1 point
-
Beautifully done, congratulations!1 point
-
Congratulations trooper, welcome to the ranks!1 point
-
Hi Fabio, Great to see your Centurion application! Really great job on all the fixes. They're subtle but your armor fits you so much better now. CRL and Centurion Application Requirements All required photos are now in and, after review, we are pleased to welcome you to Centurion! On behalf of the DO team and myself, many congratulations! Other-Armor Fit/Assembly In this area we discuss areas that could benefit from additional improvement. Note that we consider both text (CRL) and pictures (screen caps/reference images) when reviewing submissions We have nothing to add beyond what was already mentioned in your EIB review. Congratulations again; you clearly put a lot of pride into your armor and it really shows. Welcome to Centurion!1 point
-
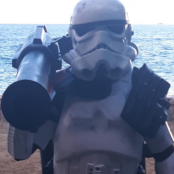
Hi José, Thanks for your application! You have a really nice ESB build. CRL and EIB Application Requirements All required photos are now in and, after review, we are pleased to welcome you to Expert Infantry rank. On behalf of the DO team and myself, many congratulations! Note that for ESB reviews, while we do our best to use only ESB reference images, since ESB suits are mostly reused ANH suits, we will sometimes use ANH armor as reference. Other-Armor Fit/Assembly In this area we review observations made by your fellow troopers and the DO team. Some observations may lead to suggestions to improve the overall look of your armor. Note that we consider both text (CRL) and pictures (screen caps/reference images) when reviewing submissions First, your ab plate is a bit large, and overhanging the edge of the panel it's sitting on top of. We're suggesting to trim it back a bit. Reference Image: Next, your butt plate is sticking out some. This is a very common problem, so we're suggesting that you add/adjust the strapping. Ideally it should sit right below the kidney plate. Reference Image: Next, there is quite a large gap between at the top of your thighs. Although we'd ideally like to see as little black as possible, for the gaps that are there, it cleans up the look to have them even., so we're recommending that you raise your thighs to reduce the upper gap, even though that will cause a bit of black to show between the thighs and shins. Reference Image: Finally, great job on aligning your sniper knee. In order to go for that extra bit of screen accuracy, we're recommending you trim the return edge back a bit. Reference Image Finally, a small detail. Your ammo pack rivet is a bit too close to the edge of your ammo pack compared to the screen-used suits. If you'd like to go the extra mile, you could move it in some. You would have to fill the old hole with ABS paste. Reference Image: Centurion Requirements In this section we prepare you for Centurion. More photos may be requested in the future that allow us to make better decisions on possible adjustments. If there are any areas of concern they will be discussed here. Because Centurion photos show much more detail than EIB, items to pertaining to Centurion might be seen there and not here. We try to point out all that we can from what is seen, but the final accuracy is the responsibility of the trooper. First, while overall your helmet looks great, the teeth are unfortunately overtrimmed. Before applying for Centurion, we're asking you to fill in the extra space with ABS paste. Reference Image: Also, the black rank bar paint is very thin on your ear bumps. This should be a simple fix - just paint the bars slightly wider. Reference Image: Continuing on to the shoulders, the L3 CRL states: There should be a minimal gap between the shoulder armor and the chest/back plates. Your shoulder bell gap actually looks quite good, but there's still some gap at the top of the bells. You should tighten the strapping holding the shoulder bells on, as well as make sure to trim all the lower return edge off the bells so they sit closer to the chest. It may also just be a matter of relaxing your posture for the photos. Reference Images: Concluding with the belt, the L3 CRL states: The top of the ABS ammo belt should sit at or just above the bottom of the central and vertical abdomen button panels. Yours is sitting just a touch too low. On my own kit, I added two small strips of velcro to the belt to ensure it doesn't sag in the front. Reference Image: And that's it! I have full confidence in your ability to make the Centurion fixes, so I hope to see your application there soon. Now get out there and make Lord Vader proud!1 point
-
I’m thinking about using a spray satin or “varnish” on all the painted surfaces on the backpack to help improve durability. Anyone have any thought on this? Or other variant? Thanks! Sent from my iPhone using Tapatalk1 point
-
The finer sandpaper you can use the less chance of scratching the surrounding surfaces, but ABS paste is not the easiest to sand so using a little coarse to start off with is a good option1 point
-
Time for the sniper knee. How does it look? It is off centered a bit but it lines up on sides and the front looks balanced horizontally.1 point
-
I found it does quite some time to fully cure, the longer you leave it the easier it is to sand. Started out using course sandpaper then swapped to wet and dry from 240 grit up to 2000 at the end, use soapy water too it helps cut down the sandpaper clogging1 point
-
its been a minute since I have been able to work on this, with moving homes recently and unpacking and getting a proper workshop back up. Glad to announce finally got the chest pieces figured out and have begun printing I did have to cut the parts to fit the build surface of the printer but this will save time on the print as well as printer material.1 point
-
Sadly won’t be at SWGE any time soon, so will be waiting to see what other Black series 6” figs are released. Sent from my iPhone using Tapatalk1 point
-
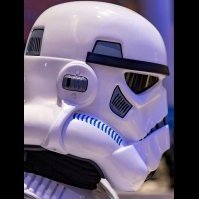
Hey Niclas and welcome to FISD You can´t go wrong with either RS or TM both are great! RS has the advantage of beeing made of an original screen used suit, not all the parts though as it wasn´t complete but the most important piece was present - the helmet. TM is by far the best fan sculpt so it´s basicly down to personal preference. My advice is going with 1.5mm as it´s more flexible and screen accurate, I like screen accuracy I have two TM´s, a Hero and a Stunt and an RS suit which I used for my Sandtrooper and an extra RS helmet I built as a Stunt replica so I have experience with both and just love them1 point
-
Thank you for the suggestions. The bicep was rotated and I can reshoot pictures with it correct. The frown was completely stripped by me then entirely repainted. If it is too far up on a few teeth I will have to try some white paint. Small brush and shaky hands are a bad combo, LOL. I'll get the mike tip edges touched up.1 point
-
Hi Brian, Glad to see another EIB application. for upload your photos here are two links for Google Photos and Imgur. (even though there are so many apps you can use) Cheers1 point