Leaderboard


Popular Content
Showing content with the highest reputation on 09/06/2019 in Posts
-
Ok. You played the hurricane card. I got nothing.... What am I supposed to say Glad you made it through safe and sound. Thanks for staying on top of this.4 points
-
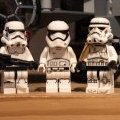
We're gonna put to bed this whole button thing right now! Are you listening?! [emoji2957][emoji13][emoji1787][emoji3064][emoji849][emoji854] Sent from my Pixel 3 XL using Tapatalk2 points
-
Finally got some work done! It was already 85 degrees by 9 am, and warmer in the garage, but we did a mini build party anyway. I helped a friend start working on upgrading his TK strapping, and an other friend came over and we looked over some of his Clone parts. We just had to quit by noon because it was going to be 104 that day and it was pretty close by that time. Ah, gotta love Central Valley summers... The shin spats were wonky and needed to be trimmed to make the V shape to the floor, so I did that by eyeballing it and just going for it. Then I sized them. I had to cut them down to line up and fit, but I purposefully trimmed the main shape before sizing because then I knew I was working with excess material- so if it got screwed up, I still had wiggle room. I forgot to take a picture of the finished piece, but I also trimmed the right inner thigh to actually have a curve shape and be wearable. I basically lined up the other thigh against it, and slowly rolled it around to trace the curve shape. The guys asked me how I had the confidence to just wing it and make the cuts by eyeballing and hoping for the best. The answer? Basically, you just do it- you can't think too hard, you can't worry, you just have to do it. I've officially reached the point in this build where I just can't care anymore about it, and just do stuff. I just want it done, so I'm going to make that happen. It's not like I recommend letting yourself get to that point, but I think it is a very real experience and possibility for long builds, might as well use it to your advantage. I also have done a lot of work with ABS parts and had to eyeball cuts before, so I have some experience in that area. This certainly helps, as well. I'm over this build- I'm not over this costume, I'm still in love with her and it. But I am very much over the building of it. I just want to send it off to the chromers and wear it. New Jimmy helmet came in! I am in love! It's... far superior in my opinion. It need some basic clean up and a fine sanding and then it's ready to go out of the box. I think I'll even paint in the inside black before I send it off to the chromers- I don't care about chrome over-spray on the inside, but I will care very much about black over-spray on the chrome. Finishing finesse and fine sanding needed: Chest plate Back/yoke Biceps Forearms Boot spats Shoulder bells Cod piece Butt plate Knee plates Hand plates Up next: Secondary hand plates- a few minutes with the belt sander and they'll be done. Attach all greeblies/boxes (forearms, thighs, shins) - a few more minutes with the belt sander and some E6000 fumes Clean up 3D print lines from blasters - hoping the acetone wipe down the Mandos use will work. More fumes! 1st Helmet/now prop- more sanding and clean up - but this is kind of last on the list, and maybe even on hold. A prop is cool, but the costume takes precedence. 2nd Helmet- minor sanding, clean up, spray paint inside Finish/assemble thermal detonator - Yeah no, it's optional and I'm done. For now. Maybe I'll Al Clad it at a later date for the hell of it. Or maybe it will be like my temp lens mount with velcro in my TK that's lasted almost four years, or my temp TIE bucket padding that's lasted about two years. Work up connections so they’re ready to install - You'd think this would be the easiest, but have I even thought about it? Nope. Even if I wait until she's back chromed this won't take but an afternoon, maybe two. And I can do it indoors. Where there's AC. The good news, the to do list is slowly dwindling down. The bad news, we're booked with troops for basically every weekend except two or three (so far) for the rest of 2019, and the heat will linger for a while yet. It's not uncommon for us to have warm Halloweens. But sometimes we get freakishly cold Halloweens, too. Fingers crossed!2 points
-
Thank you Spartan!!! Sent from my iPhone using Tapatalk2 points
-
Ok, so the same up close shots but with me in the armor. Got it! My photographer is asleep so I’ll send those ASAP. Thanks for the clarification2 points
-
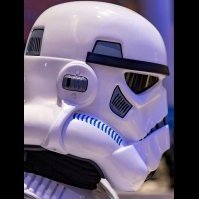
Much better, you will be amazed how much that little extra on the insides of the eyes makes your vision so much clearer, you could even go a little more in the smaller corners near the nose, but entirely up to you. Here's a screen helmet for comparison2 points
-
I took the plunge head first and am starting my AM 4.5 Stunt build so I can be up and running prior to Halloween for its debut and who knows where else. For now, I am fulfilling a dream I have had for many years. Thus far as I do not have any pics to provide as of yet- Armor- I purchased the AM 4.5 armor kit from davesdarksidedepot. I am 6'4 and he will be customizing the armor for me. I would love to build it myself but I lack the tools and time to pull it off. I will however be tackling the bucket myself so he is sending that to me separately. Thus far I have purchased a UKSWRATH Stormtrooper speaker system for the helmet UKSWRATH 2 FAN Set Padding for helmet Testors Paint Darman Neck Seal Still need: Bodysuit Boots Balaclava Gun (Plan on getting a Praetorian E11) I plan on plasti-dipping or painting inside of helmet. I know there are a few bobs and bits I will need to get but I will try to document the process as I go. Trying to get this going as soon as possible to allow it to all come together before Halloween. I posted this elsewhere, but I have a young nephew who loves "Chootroopers" as he calls them. I am going to surprise him as a full on stormtrooper this year. And this will be the only Halloween costume I will ever need again! Unless of course I become a bearded Han Solo!1 point
-
Dave Galant TK-98695 Helotech Canadian Garrison Armor Maker: SDS Helmet Maker: SDS Blaster Type: SDS E-11 Height: 5' 10" + Weight: 185 Boots Maker: SDS Canvas Belt: Imperial Issue Hand Plate Type: Silicone, Joseph Electronics: TK Products Neck Seal: SDS, modified Holster Maker: SDS, modified Right side snap Right shoulder snap Left strap and bell snap. The Hovi tips originally had white rims, but I painted them black as per a forum post that I can no longer find... I understand they are supposed to be painted white, but I was going to see if I could leave them black as seen in many online studio shots of helmets, such as what Han Solo wore on the Death Star. Close up of forearm edge Right thigh ammo belt Thigh ammo attatchment Paint is still fresh on the ring and cap....1 point
-
Nice work, almost there1 point
-
looking good trooper.1 point
-
Ok. So the glue is still wet and I have some cleanup to do when it's dry. Better???? I think so. The key, I think, is to resist the urge to paint the ENTIRE button. The buttons on the ATA armor are much larger than the ones in the reference pictures. So it almost feels like you're doing something wrong if you DON'T paint the whole button. That also goes for trimming the pieces. There is a fine line between too much and not enough. I hope this puts to bed my TK button adventure. I think tomorrow I will be camera ready and.... "when this thing hits 88 miles per hour,.... You're gonna see some serious sh@#." Sent from my Pixel 3 XL using Tapatalk1 point
-
Just perusing the handbook while the buttons are drying. I wanna be prepared for the first day of the academy. Sent from my Pixel 3 XL using Tapatalk1 point
-
Thank you!! Sent from my iPhone using Tapatalk1 point
-
Hi, may be this can help. cheers === ANH DERIVED ARMOR === Type: ATA (Affordable Trooper Armor) Country: USA Contact: Supertrooper on FISD / [email protected], please email for armor inquiries. Kit: ABS (HIPS by request), untrimmed, ANH derived Availability No known problems. Assembly: Armor needs to be trimmed, parts butt joined with finishing strips, HIPS needs to be painted. Comments: The quality of HIPS material is such that it is the most durable of all HIPS armor makes. ABS is a custom made ABS for color, gloss, and durability, so you can order it either way and feel confident.1 point
-
Also I bought the kit from a friend of mine so I am not quite sure how to contact ATA Sent from my iPhone using Tapatalk1 point
-
Welcome!!! It's so much fun here! Ask all the questions. I'm fairly new and just finishing up my build but I've learned alot from these wonderful people! You are taking your first steps into a larger world....... Good luck trooper!!!1 point
-
Good luck Brian. almost there!1 point
-
I‘m trooping with a Hyperfirm rubber E11 and wouldn’t change it... well perhaps against a Praetorian Blaster... but only because the better detail. Rubber is my favorite for trooping because I don’t have to care about damaging the thing. If you want electronics in your Blaster, resin is the way to go. There you have the space for the parts and the weight is good for trooping.1 point
-
37 troops with my DoopyDoo's full resin blaster. No serious problems. So far I managed to break off a magazine and a front sight guard. Both was fixed the same day with CA glue. Weighs about 1.1 kg (2.43 lbs). Good for long events. Some full rubber blasters weigh more.1 point
-
I've heard they may be local for Triple Force Friday 4th October1 point
-
I've been silent around here because of holidays and work stuff. And trooping Handed in my EIB-Application and can't wait to wear my TK on a movienight next week1 point
-
Quite a few pre-order sites on the go. I don’t have any real love for this trooper but I do love the First Edition packaging. Nice collectors piece. Sent from my iPhone using Tapatalk Pro1 point
-
Thank you Sent from my iPhone using Tapatalk1 point
-
Nice work trooper, good luck with approval1 point
-
Congratulations Ivaylo!! Sent from my iPhone using Tapatalk1 point
-
1 point
-
Nice looking helmet, could you also add pricing please and just a fyi no payment to be accepted before sale item is ready to ship. For Sale Rules: 10) All merchandise including armor must be "in-hand" and ready to ship before accepting payment. Interest threads are allowed to determine selling order. 11) Sale items must be listed with an asking price. This does not exclude OBOs (Or Best Offer) and price negations, but no open priced sales.1 point
-
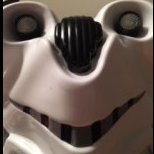
Ha! No hate. Just a small roll of the eyes. [emoji2957] What do you think of the eyes on my bucket? A little before and after. Sent from my Pixel 3 XL using Tapatalk1 point
-
Dave, Thanks again for your patience. Now that hurricane Dorian is out of the area I can get back to normality and that includes getting you approved for EIB. Promise I'll get this review done by the weekend so hang in there I'll be right with you.1 point
-
Very nice, you will hate me @echo327, one more thing, ab plates aren't rounded on the edges and could be trimmed a little more, could still go a little smaller on the buttons too1 point
-
Congratulations Ivaylo, onward to Centurion!1 point
-
Congrats trooper. :-)1 point
-
Congratulations trooper and welcome to EI1 point
-
Congratulations Ivaylo, Welcome to EIB. Don't stop and go for Centurion, just few adjustment1 point
-
Hi Andrew, Welcome to FISD. I have started with a Hasbro Mod E11 , but when I decided to go for Centurion Level I had to change it, now I'm trooping with a Praetorian E11 Blaster, hard Rubber made and very accurate and excellent, (my own opinion), for trooping in case of droping it. ------------ Cheers1 point
-
Ops, I had forgotten to link them, I updated the post Thank you1 point
-
Nice work trooper, another photo the DO's like to see is the inside fixing of the rivets on knee ammp plate. Good luck with approval1 point
-
Looking great. When it comes to the thigh, I would leave it as is. A bit of extra room is better than too little. Foam padding will help if it is even needed. The space between the thigh and cod looks good. It is all about balance - if you are a taller trooper so you can get away with a bit more black there than some - just so long as the black at the knee is proportional. You are really moving along with this build. Keep up the awesome work!1 point
-
I thought I would take some initial fittings before I work on the other thigh. Should I trim more of the thigh? I can fit about a finger in on each side of the knee, some padding on 1 side should keep it more aligned. Need to make sure I space the elbow and wrist so an even amount of black shows. Align drop boxed better at the end of the belt and pull them up a bit. I plan to glue the elastic to keep them in place. Gap between thigh and cod piece ok? I have a belt with a piece of black elastic on it and I still need to keep pulling up the thigh piece. Maybe nylon strapping would work better. Reduce black in shoulder gap in picture below. Again make sure drop boxes are better aligned in picture below. Keep spacing between the elbow and wrist the same. Align ab and kidney plate better. Align rivets better and paint white in picture below. Keep spacing between elbow and wrist the same. Align drop boxes better. As always any feedback is greatly appreciated.1 point
-
And here we go! Rough trimming is mostly done- a few curves I need to use the dremel on. Next I will fine sand the edges and then I can start assembling the armor! Finger armor has arrived (the yellow pile), and they need sanding and polishing. Gaskets are on order, threw in a neck seal as well (Geeky Pink's), cape, belt and soft belt boxes will be the next purchase. Close up of the boots and lifts: The CRL says no laces, but no laces are going to show, so I should be able to make it work. I found that because of the height the lifts added, my foot wouldn't fit comfortably in most non-lace boots. A pair of my work heels with my lifts for scale, roughly 4''. If I can wear those heels 4 - 5 times per week and walk comfortably, then I think I can do the same with these lifts. I'm going to build up the base a little so that there's not such a distinct drop in slope at the arch, which should also make it more comfortable. And finally, the helmet thus far: A little more fine sanding along the eyes and then I'm ready to fine sand the whole thing. There's a lot of little extra bits that I have to remove, most of which are in tricky places. We'll see how that goes. I'm also going to cut out new lens material. The helmet came with bubble, and I just can't see out of them except a tiny little spot in each eye. Not a great combo for someone on lifts who's already kinda clumsy. No stumbling Phasma around here! With luck, I'll have some time between a troop, decorating for Halloween, and Book Club this weekend to get some more work done!1 point
-
This is how I do it.1 point