Leaderboard


Popular Content
Showing content with the highest reputation on 05/07/2019 in Posts
-
BUILD UPDATE: After 4 months of building my ANH Stunt TK, I finally suited up and took photos from my GML. My goal for my TK armor is to reach Centurion status with the FISD. Part / Status: Neck Seal - Adjusted neck seal as it was too big, re positioned velcro for tighter fit. Torso - Rivets to be painted white Right thigh - Rivets to be painted white Helmet - Repaint, align ear piece, fans to be installed, chin strap to be installed E-11 - Husky Travel Case - Interior padding with Star Wars material, 3D printed imperial cogs Front Front - No Bucket I received feedback from my GML that my neck seal was too loose. I have since re positioned the velco and sewn the neck seal for a tighter fit. Left Side Right Side Back THUMBS UP - I was so excited to finally take this photo after all my hard work!!! Thanks again for reading my posts! Matt3 points
-
I've had mine for sometime, but always enjoy showing it off.2 points
-
OOOOHHHH. I did that before I left the Mosquito Humidity Tourist Retiree Sunshine State, lol, so I am in good shape!2 points
-
For my old boots I used white acrylic water based paint, covers nicely then use the polish over the top so it matches the rest of the boot. For my new boots and armor I've added some thin dense foam inside the bottom of the shins, helps to stop them wearing.2 points
-
We have our yearly convention coming up at the end of June and I'm always looking to build something new for the public to see and as many of us down under won't get the opportunity to get to see Galaxy's Edge I thought it could be nice to replicate a few thigs we've seen so far. 709th legion banner and also the new Star Wars style aurebesh Coke and bottles. Reference Now this was a bit of work, of course I couldn't find any fonts that exactly matched so I had to photoshop a few different versions together. FO Emblem and helmet weren't an issue as they are standard and I was able to find them on a google search, shame I couldn't find larger versions though as they are just a little soft/pixely on the edges. I prefer using the pull-up banner stands rather than flags as they are self standing and don't require any fixings but I'm thinking I may still do a flag in case there is hanging room. Have a fellow member who works at an Officeworks store who can get printing down at discount which saved some $'s and here it is. Coke reference So the first thing was to replicate the font, again it was a matter of photoshopping a few different fonts as well as using the iconic Coke font. Had to print a couple of pages to get the right size, roughly measuring from computer screen. I was pretty happy how they turned out, not exact but pretty close. Next was to find orbs, half an hour walk around the shops and found some plastic orb solar garden lights roughly the right size, $4 each. Indecently we've never had the Coke round bottles here but did notice while searching they've been a thing at some Christmas's in the US. Next was the tops, no way I could have found these locally so it was time to put the new 3D printer and software to work. Enlarged the images with the girl holding the bottle on screen and roughly sized and designed from there, next printed just under 2 hours each, not exact but I'm pretty happy with them. Painted the orb's with a base silver, once dry added strips of black decal sheet to emulate the dark lines (I gather these are clear and can see the Coke inside). Next cut out the printed wording, added clear tape on top, gave them multiple cuts on the ends to help them bend and applied. Lastly the paint, I used acrylic water based paint, found them really easy to use when weathering my Sandy so used the same principals with them. Once rubbed back and weathered I sealed them with a clear coat so the weathering won't rub off. That done I tried find a box similar, no way I was going to find the exact box and I really didn't want it that big. Happy with a similar box I gave it a light sand and applied a few coats of red enamel, once dry in was on to weathering. While drying I made a couple of bent strips of aluminium, when you take of the lid you can turn it around and with the aluminium strips you can stand the lid up showing the logo. That I made once again merging fonts, printed out on paper, the cut out, traced around those on white decal sheet and then cut out and applied, was a bit of work but nice way to spend a rainy day inside. Also made a base plate for inside the box so I don't have to completely fill the box, covered the plate in chrome finish decal sheet which should help reflect the fake ice I'm waiting to arrive. I've also got some blue EI wire which I may use underneath the fake ice but will have to see how much it shows through before final fitting it. All in all I'm pretty happy the way it all turned out, I wish I'd taken more photos but I was just head down an too busy building. Will update once the fake ice arrives. Got a few more things I am thinking of putting togther but we'll see how the design stages work out, works in my head1 point
-
Hello! I have recently purchased a Magma Trooper Kit and boots. I’m look for the soft fabric piece for the belt. If you have any links or direction I’d greatly appreciate the help! thank you so much!!1 point
-
Correct1 point
-
You can do it, buddy. It’s just a little challenge. ;-) You could try gently prizing it off with something firm. At very worst case, you could get it off with the dremel then shape a new guard out of green stuff. That would be too bad. Keep it going, sir. You got this!! :-)1 point
-
Sort of. Two of the costumes are in the Jolly Rogers Squadron: Gideon Hask and Commander Iden Versio And one is in the Spec Ops Detachment: Del Meeko I don't know why they are separated... But hey, that's how it is.1 point
-
Hey Jake, Great progress. I feel your pain when you’re struggling to find time. Just a little something - it look like one of your flash guards is on top of the blaster. These should go in the right hand side. Here’s some pics. :-) Keep up the good work. :-)1 point
-
Yep I had to cut a half moon in my elastic. It's the only way Sent from my SM-G950U using Tapatalk1 point
-
Thanks, Tony. This is usually more of a Jolly Rogers Squadron kind of thing, am I correct?1 point
-
Dude you seriously need to come to the states I'll put you to work finishing all the costumes I don't have time to build Stellar work as always1 point
-
That is a question for the ages, my friend. When I figure it out I'll let you know.1 point
-
awesome work1 point
-
Wow, nice work Glen, where do you find the time?1 point
-
Looking forward to the progress. Make sure you contact your GML and give him/her the heads up that you will be undertaking a new to the legion costume, here is some info which you may wish to have a read off: http://databank.501st.com/databank/Costuming:CRLGuide1 point
-
Don't mind at all!1 point
-
The boards arrived today, but I'm getting a buzz on the DFPlayer when running on the 5V from the Arduino. I found that it's the RX line on DFPlayer, but a 1K resistor or powering off the 3.3V pin clears it up. I've been using DFPlayers in lightsabers for a while now without ever encountering this problem, but they run on a single cell Li-ion. If I wan't them to be able to run on a 9V or a USB power pack, I'll have to re-design the boards.1 point
-
The boards for the voice changer I designed arrived today, so I've been putting one together.1 point
-
Cool! I met some troopers from the Outer Rim Garrison at Vancouver Fan Expo (I met Billy Dee Williams too!) and they gave me the contact info for Mark at AP and then Quest Canada. Now I'm on my way.1 point
-
Hey!!!!! You found me! I’m also an AP Stunt Centurion with a Quest Canada blaster. I will happily sew you your seal. Shipping is $2.10 Canadian I think. I’ll message you privately for details. Good luck with your build... (from what I have seen, you don’t need luck. You are doing quite well!) Sent from my iPhone using Tapatalk1 point
-
Thank you so very much!! Sent from my iPhone using Tapatalk1 point
-
Thank you!! And thank you for all your direct and indirect (your fans are a must!) help in getting here! Sent from my iPhone using Tapatalk1 point
-
@TheSwede thank you so very much for all the great feedback!! I am beyond excited to join the EI ranks (and get us one step closer to 1000!). And now it looks like I have a to-do list for the weekends!! Thank you again!! Sent from my iPhone using Tapatalk1 point
-
Even so often I go over my boots with shoe whitener ---------1 point
-
Congratulations trooper and welcome to the EI ranks1 point
-
Awesome, hope you don't mind I use these when customers ask for installation photos1 point
-
Hi Wayne and thank you for your Centurion application and also for your patience - I will be with you shortly1 point
-
Congratulations Lindsey welcome to Expert Infantry1 point
-
I know what your talking about same things happened to my boots. Made me wanna cry damnit! Pay a bunch of money and then they run the boot and not wear and tear like messing the boot up itself. I made a strap around the boot and it Velcros together that helps prevent it, I also made sure the edges were sanded well. Next I’m gonna put some felt on the inside of the shins to help with rubbing against the boot. Sent from my iPhone using Tapatalk1 point
-
I was waiting for that, thank you for making me feel a bit less crazy Sent from my iPhone using Tapatalk1 point
-
PM your old or (to be) new Garrison Commanding Officer. Let them know you moved and what territory you'll be in, and ask they transfer. The rest is up to them!1 point
-
I'll do you one better: WHY is justjoseph63?! Sorry I couldn't help myself.1 point
-
こんにちは! D.O.の前 スタッフが申請を進めることができます、あなたはもっといくつかの写真が必要になるでしょう。 1. E-11の左側面図 2. E-11の右側面図 あなたのE-11の背面図 4. TD(Thermal Detonator)の背面からネジを見ます。 5.左側のすべてのリベットを示しているあなたの腹部プレート/腎臓の関係の側面図。 また、私はあなたの投稿のタイトルを修正しました。 どうもありがとうございました!1 point
-
Forearms are done. When I took off the clamps I found gaps on one of them. I found some posts on ABS paste and made some to fill the gap. Then it was just a matter of sanding, polishing and elbow grease. ABS paste is a brilliant.1 point
-
Hope the move has gone smoothly Joseph!1 point
-
Looking good! Gesendet von meinem ONEPLUS A6013 mit Tapatalk1 point
-
Thanks for all the great info and advice guys. I bought the full set from AP, so I might have purchased a few extra things that are already supplied with the kit. I guess I should have asked before buying anything. Too bad about needing more magnets, The dang things are expensive and I have to drive to the US to get them because the shipping to Canada is nuts. Greg, I see you're in Sakatoon. Where did you source your magnets. I was planning on ANH Stunt and working towards Centurion. I've poured over the CRL and the list gmrhodes13 linked to. If the only difference between Hero and Stunt is the helmet, then could I make a Hero helmet later and submit with the TK Laser Sword? I'd also like to do a HWT. It looks like some people have their armour set up to switch back and forth between stunt and HWT, is that correct? My Quest Design Canada blaster arrived yesterday! I'm hoping it's a good one for approval. I think I'll be doing some customizing by eventually upgrading the Hengstler counter and the M38 Telescope and some other bits. I may add sound effects and light, if that doesn't disqualify it for approval. Do people usually do separate build threads for blasters and such, or just do them in their main build thread?
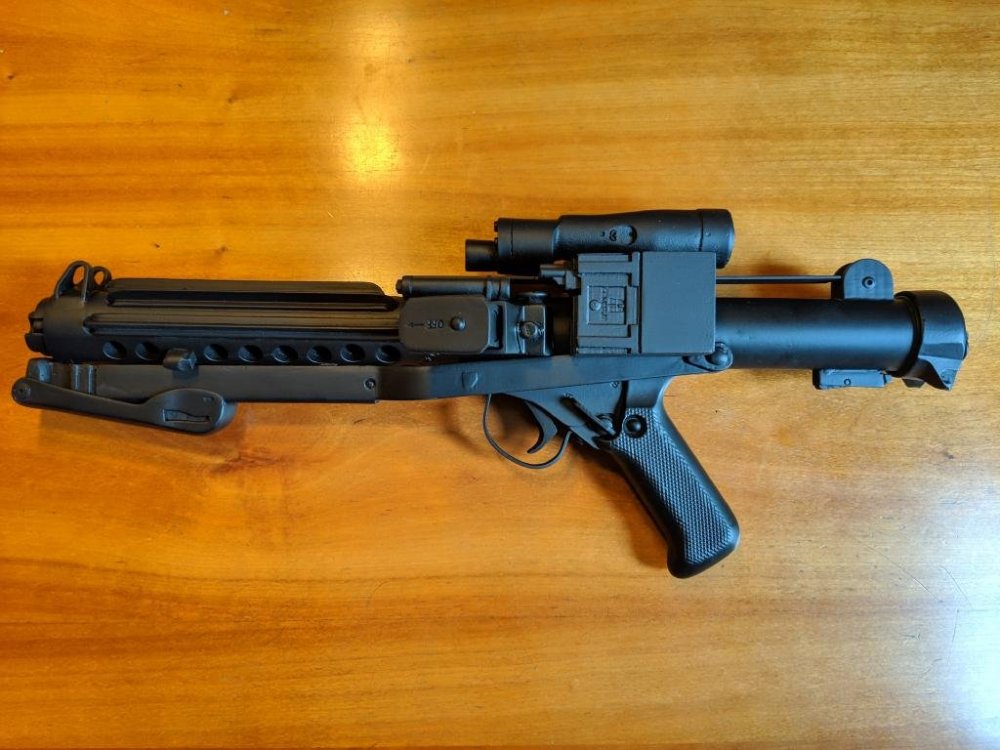 1 point