Leaderboard


Popular Content
Showing content with the highest reputation on 12/09/2018 in Posts
-
And here it is fellas: Snuck a little 501 reference in there3 points
-
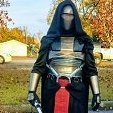
I received the Blaster(s) and Rifle this week: F-11D w/ lights F-11D w/o lights SE-44C Here are some photos. No photos of second half of build yet, since I have not had time to work on my own stuff. Building too many packs and other peoples armor right now. haha. Since they are 3D printed, they will take some finishing work. Next thing is I have to decide if they are going to be red for Capt. Cardinal....or keep them white?2 points
-
These first images (if they upload) are how I made the template for the dome for the helmet, and beginning of shaping. Sent from my iPhone using Tapatalk2 points
-
Hiya Great link from Joseph, there. The FISD Blaster Reference guide was invaluable throughout my build, and many others. Tino’s kit is also worth the investment for a more detailed build, if required. I used the FISD E-11 Blaster Reference guide, along with a few other build threads, to get through my build. I specifically found the build threads of T-Jay (Tino) to be incredibly helpful for tips and tricks. He also goes into paint options. My own blaster (video and build thread links in my signature) used 4 different paints. Grey primer, silver undercoat, hammer black, Matt black top coat, brass for scope and part of counter. The application of these paints, and to which parts of the blaster in which order, are included in my build thread. Personally, I only used spray paints so brushes were not required. Glue - many parts are screwed to the tube. Glue can be used at the very end to add extra stability. Super glue for some parts. E6000 for others. A Dremel is also an E-11 blaster builder’s friend. Any other questions, do feel free to shout. Best wishes Dan2 points
-
Sorry for the no progress pictures. I had a slight medical condition that required two brain surgeries but I did manage to fix the shin that I messed up and everything is ready for me to do the snaps and it'll be done. I missed seeing everyone's builds.2 points
-
Hey everyone, Just wanted to sharea fan film I've been working on for almost a year now with my fellow TKs from the Outer Rim Garrison. Hope you enjoy! EDIT: We just released a trailer for a follow-up series that we'll hopefully be able to film later this year!1 point
-
Thanks! A.J.1 point
-
1 point
-
Oh those shins...I did a lot of hot water baths to get my rear cover strips to line up on my ATA kit. Great job so far on your build and the fix on the kidney! Keep up the good work!1 point
-
You can be proud of this, James. It looks good. You also did the Z-bend on the rear end. That meant some extra work for you. Well done! Just a side note: the counter arm is very close to the receiver tube and will cause scratches there in the future. After painting the rail, you could wrap the arm's lower end with black insulation tape. Or you can ignore it, as the counter will later cover this area. Up to you. Just wanted to mention it.1 point
-
The boys definitely got you covered. Look through the Blaster Reference and some build threads to get an idea of what is possible. We have all been where you are now. When I had this kit in hands the first time, my thoughts were "I glue it and paint it black". God knows what this then turned into... If you want more help you could post your build progress here to have many eyes watching and giving advices. The result will benefit from that.1 point
-
You think this is the only blunder I'll make?! For now the title makes sense. I prefer the pipe version, as it allows for a hollow version, which I find will look closer to the prop versions.1 point
-
I actually use Velcro in one of them and keep either challenge coin and or credit card, money etc.1 point
-
For the seam I would say just do another go 'round of ABS paste and see how it turns out.1 point
-
Great work I’m missing one thing though - the ”to be continued”1 point
-
Just tried uploading the drop box pictures and it seems like Imgur is throwing a fit atm. So I had to use Photobucket for these Drop box side pictures: I agree. I've added velcro to that elastic connection so adjusting is no problem Here's one from a troop where it was more suitably placed, if needed i'll ofc take new pics in the same pose. I'm in the middle of a move atm so things are all over the place!1 point
-
I'll ditto Cranks response. Awesome work and cant wait to see that holster. Sent from my VK815 using Tapatalk1 point
-
Snaps 'n' Straps -- Part II OK, back to work. All the snap plates are done, so let's start gluing them into the armor. For reversibility I'm going with E6000 all the way here. Yeah, it's slow to cure but I definitely want to be able to rework and relocate the snaps for whatever reason may arise. Like putting them in the wrong frakkin' place... which I did with one pair. Duh. No problem; just tugged them free, cleaned the plastic, and reset them with fresh glue where they belonged. I took a careful look inside the armor and did some measuring and marking in pencil to be sure that everything would go in evenly and symmetrically. (Symmetrically?!! Yeah, anti-canon, I know. But there you have it.) To make the snap plates easier to handle and to avoid getting E6000 all over my fingers, I used an extension magnet to hold them while I slathered on the glue. This is just one of those telescoping pick-up tools I use in my shop, but it works quite nicely to hold the plates while working and placing them. Yes, I'm still using the white E6000. I found that its holding power is no different than the clear version, and I've also come to like it better -- it's easier to see when applying to be sure you get it right where you want it in the right amounts. With the underside of the snap plate fully slathered, it was a simple matter to use the magnet to place it where I wanted it inside the armor, in this case at the top/center of the Kidney. I decided I wanted the snaps uniformly at 1" from any joining edges, so in the photo above you can see that I used a ruler to slide the plate around as needed to get it into position. (The sticker on the back of the ruler is 1" from the end, and it was easier to just use this side for placement rather than looking at tiny numbers with Old Fart eyes.) Once positioned and held in place with the ruler, I just pulled the magnet free, then used a small wooden stick to press the snap plate down securely and allowed the glue to set. Some thoughts on E6000 --- I think I noted before that even though you want to allow a minimum of a full 24 hours for it to be fully cured, the glue doesn't really take all that long to set. It's all slippery-slidey when you first put things in place, but they'll typically set in 15-20 minutes when gluing webbing. The fabric webbing allows some air movement right through it and unlike, say, gluing plastic-to-plastic, these webbing snap plates were fairly solid in short order. Still, take care not to push on them or they might still slide, but you can safely work with the armor in far less than the full 24-hour curing time. At this point, I just worked my way around the Kidney until all the snaps were in place and the glue set. Next up were the mating snap plates in the Butt. First, line everything up the way it'll be when worn, and slap some masking tape on the outside to keep it lined up. On the inside, I used a pair of small clamps to pinch the return edges between Kidney and Butt together, and glued the mating snap plates in place as before. While the glue is still slippery-slidey, use a straightedge to be sure the new snaps are in-line vertically with those glued in earlier, and adjust as needed. If the snaps aren't aligned vertically, the straps will want to pull the armor pieces out-of-line when snapped on. That would be a Bad Thing, so check that alignment now and be sure nothing moves until the glue has set (again, in about 20 minutes or so). Once all the snap plates were in place in the Butt, I put it aside and glued in the three snap plates at the bottom of the Back piece, and then put it, the Butt and the Kidney aside for a while to allow the glue some more setting-up time while I started with the connections for the left side of the armor between the Ab and the Kidney. If you've looked at the many builds here, you know that there are half a dozen ways of doing this. The one and only thing that has to be consistent is the fact that there must be rivets on the outside of these two pieces of armor, three evenly space in each. But what you do on the inside is up to you -- snaps and straps, glued straps, use the rivets through straps, etc. One of the things I liked that a number of folks here have done is to use a single wide piece of strapping that bridges the edge of that joint between the Ab and Kidney. This keeps things lined up nicely and prevents one piece or the other from shifting up and down, and I liked that idea. So I stole it. I also saw how several folks reinforced this strapping with strips of ABS, so I stole that, too. I combined both ideas to create a strapping "hinge" for that side of the armor. I used a piece of 2" black webbing, to which I glued 3/4" wide strips of ABS using Duco cement for a permanent, fast-curing bond. Next, I secured the left edge of the Ab to my worktable with some clamps, then measured out the locations for the rivets. If you haven't done this yet, it's pretty basic. Measure in 10mm from the edge and pencil in a line. Then, measure down about 20mm from the top edge of the Ab and mark, and 20mm up from the bottom edge of the Ab where the Cod starts, and mark again. Then, just split the difference between your marks and pencil in the center rivet location. Clamp the Ab side of the hinge in place securely with clamps, making sure everything is centered top-to-bottom and that the center of the hinge is right on the edge of the Ab. Now, using a 5/32" bit, just drill through the Ab on your marks and on through the hinge. You can't see it in the photo, but I also have a thin scrap of wood clamped with the hinge on the underside for support. This keeps everything pressed against the inside of the Ab for efficient drilling. With all three holes drilled, I removed the clamped hinge and used the tip of a soldering iron to seal the edges of the holes in the webbing. Now, it's just a matter of slipping in the rivets from the outside, putting the drilled side of the hinge in place, slipping on some washers and bending over the wings of the split rivets. I started this process on my worktable by using a large screwdriver to open the wings of the rivets just enough to hold everything in place, and then moved to the concrete floor. I placed a scrap of ABS underneath, then simply hammered the wings flat and flush with the washers. Keep in mind that even though the rivet wings are flush, they can (and will) snag and catch on your undersuit, so once I have everything done with the armor I'll put a dollop of silicone caulk on those wings, essentially creating a rubbery cap on top -- no snagging and catching. With the Ab side done, now on to the Kidney side. The glue on all the snap plates has set nicely, so I taped the Ab/Kidney assembly together, and then marked matching hole locations on the Kidney side. With the hole locations marked, I repeated the drilling steps as before by clamping the hinge and the wood scrap in place, and drilled right through to make the matching holes. Then just slip in the rivets, position the hinge, add the washers, bend open the rivet wings with my screwdriver, and then move to the concrete floor to hammer the rivets flat. At this point, there's just one more step to do and that's add the "Han snap" to the top right corner of the Ab. Like those rivets, this must be visible from the outside but it's not necessary for this snap to be functional. However, I decided to make it functional and use it as part of the closing straps on the inside (like they did originally). For this, I measured in 20mm from the top and 20mm from the edge, drilled a 5/32" hole, countersunk the hole from the outside to accommodate the male snap post, and then set the snap. OK, let's take a look. Not bad at all, if I do say so myself. (Spoiler alert: I just did.) I'm considering the lower half of the body armor done, ta-da! The Ab, Kidney and Butt are all trimmed and sized, and all snaps are in place. You'll notice in the above photo that I haven't yet done the snap plates at the shoulder extensions or on the lower inside of the Chest piece. There's a reason. When I start making the straps I'll need to make them in sets that match the fit of the lower half of the armor -- in fact, I'll be doing that in the next installment. From there, I'll work up across my back, and it's at that point that I'll decide how those shoulder extensions need to be trimmed to match my height and body shape. Not much you can do with the lower armor since it has to fit snug in the Nether Regions and around your abdomen; can't trim for height down there. You have to trim for height at the top. Wearing the abdomen assembly (Ab, Butt and Kidney), I'll hold the Back and Chest pieces in place, then mark and trim those shoulder extensions to size. That's when I'll add those snaps and straps at the shoulders. With that done, I'll see where the Chest piece falls in relation to the top of the Ab, then mark and add those final snap plates.1 point
-
Oh and here's the action photo:1 point
-
Check the outer diameter of your tube.1 point
-
Doopydoos certainly makes a great kit, Aine! I have built several, and there are hundreds of us who use them. I would highly suggest having your partner check out this thread, which will answer many of your questions: https://www.whitearmor.net/forum/topic/32111-fisd-e-11-blaster-reference/ I'm not sure how "screen accurate" your partner wants to get, but they can get really close depending on how much time you want to put into it. For a more realistic look, I can highly suggest picking up one of Tino's E-11 finishing kits. Well worth every penny! https://www.whitearmor.net/forum/topic/28444-fs-completion-sets-for-e-11-resin-kits-with-worldwide-tracked-shipping-and-paypal/ Once it is painted, I recommend adding "weathering" to it in certain places with a bit of silver paint, which gives it that realistic look. Below are a few pics of mine to give you an idea You can pretty much weather any area except the T-tracks (the little "fins" around the barrel) and the handle. The scope can be weathered using some brass colored paint. Here are a few pics of mine to give you an idea: Close up pic showing the small details (screws and such) that are included in Tino's kit: I wish your partner all the best on their build, and if they should have any questions we are here to help!1 point
-
Hi Paul, I'll only comment once as to not further hijack Rodney's thread. Also, I didn't see what you'd previously posted so I'll just respond to what's written now. Not everyone knows that despite a single person posting the review, all EIB and Centurion reviews are actually a collaboration amongst all DOs, and everyone needs to sign off on an approval before it's posted. Everything that was in my post was OKed by the others, and in fact I had a couple suggestions that Tony asked me to remove due to them not actually being consistent across armors. That all said, I will be the first to admit that I'm far from an expert on Stormtrooper armor (especially Hero armor), I just have a desire to give back to this community and a willingness to learn. Those particular suggestions on the helmet were based on my own observations and also from looking back at suggestions I'd seen in previous EIB/Centurion reviews. As I'm sure you know, what we know about armor is constantly evolving, and I was just suggesting something that I thought would improve the look of the armor based on my own knowledge. If that was incorrect, so be it, and I can only try to improve next time. None of these suggestions are ever meant to be an attack on the armor or builder. At the end of the day, we're all here for the same reason - our love of Star Wars and these cool plastic spacemen. I'm happy to discuss more over PM - like I said, I know I have a lot to learn still. Cheers, Sha Sha1 point
-
I'm approved!!!! Now to work on expert infantry stuff! Sent from my iPhone using Tapatalk1 point
-
Nice job Rodney, don’t let the negative side track of this conversation, which should have been done in private take away from what you’ve accomplished. You’ve worked hard on your armor, it shows, you’ve earned this, enjoy it for a few days then on to Centurion, that should be easy as well. Just make sure you get all the pics the first time around, lol. Sent from my iPhone using Tapatalk1 point
-
And secondly, this is the very first application ShaSha has done as she was only recently appointed to a DO position, cut her some slack please, she is learning the ropes.1 point
-
You could always remove more of the return edge at the bottom of the bell and that should help atleast a bit Fit looks great and a heads-up just in case....using the undersuit during fitting is highly recommended as when wearing one the fit is different, especially for the limbs.1 point