Leaderboard


Popular Content
Showing content with the highest reputation on 09/21/2018 in Posts
-
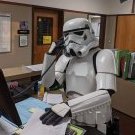
Here are some photos of a full commission I recently finished.
 5 points
 -
Woot! Basic approved. Now perhaps onto Expert?3 points
-
That`s an easy fix - just glue some abs on the inside and then put some abs-paste from the outside and you don`t have to be to concerned with sanding as it will be fine just evening it out with just your finger, and it`s screen accurate You also might want to check your left cover strip as it looks to be sticking out at the top. Have a great time at the armor party3 points
-
Sorry, I should have been a bit clearer. I was thinking levels 2 and 3 for some reason. (It's terrible getting older... sometimes I forget... uh... what)?2 points
-
Also got my new bucket bag from Trooper Bay today. I’m pumped! Sent from my iPhone using Tapatalk2 points
-
Spending friday night with the sewing machine nothing wrong with the gaskets but I wanted them more snug and taper more so some sewing was in order, thighs are done and currently working on the elbow gaskets and left one is finished. Didn’t take any before shots but there were a lot of wrinkles when trying the armor on, again nothing wrong with the sizeing from Theresa(geekypinks) but I’m bigger than average so can’t have much space beteeen limbs and armor unless I want to look like a cube so had to Keep the armor relatively tight although I would prefer not to. Anyways happy with the outcome and contemplating sewing the gaskets onto the undersuit but haven’t decided yet2 points
-
Thanks Joseph and yeah I did plan of eventually switching over to painted details instead of decals. I thought the fixes were more suggestions, but have made the adjustments and fixes. So look for that PM. Yeah I've just been procrastinating on the hand painting Daniel. Yes Dan someone mentioned tube stripes. Hahahaha!2 points
-
Snuck in a wee bit of work last night. Closed up the right bicep: Thanks to @Cricket's suggestion, I got a roll of gaffer's tape, which is super sticky and much better for holding together pieces. I also glued one side rail of the right forearm: For those of you who have completed the 4-part KB forearms, I have a couple questions: 1) For the side rail that doesn't include the indents for the greeblies (so not the one in the picture above), is it glued to the outer forearm piece with an overlap or are you supposed to trim the outer piece and attach them with a butt-and-cover technique? I looked at both @Ruthar and @Anzo's build threads and it's not 100% clear to me. I wanted to confirm before I trimmed the outer piece. 2) How much return edge (if any) do you leave on the inner forearm piece? Should I trim it completely off so that it's basically just a flat piece? If I do leave a bit of return edge (I have a few mm right now) it's not really clear to me how to glue it on, as it would just be sitting on the mounting rails of the side pieces, which gives little surface area for gluing. On the Anovos kits it seems to be totally flat, but looking at some KB build threads, it seems like some folks leave a bit.2 points
-
25mm might be enough. I’ll know more after the armor party tomorrow I’m sure. My plan is if 25mm work to glue together from the inside with a cover strip then once that sets, lay the 25mm over the outside to hopefully cover about a 20-22mm gap. Sent from my iPhone using Tapatalk2 points
-
Loctite super glue, the key is to use only a very small amount, I glued them on while wearing the glove, put a tiny bit of glue in the center of the handguard and then presed it on the glove. When it had set I simply went over were the glove haden’t stuck with very small dabs of glue untill I was happy2 points
-
Did someone say tubestripes....?2 points
-
great news guys, got new gloves, and carefully got both hand guards off and attached to the new gloves and they are all finished! now back to working on those legs.2 points
-
I used white ABS scraps but not from my build. The paste is a brighter shade of white. I will post some pics.2 points
-
TBH, I think a cobbler can add that stitching on the inside if they don't come with them easily enough. Yeah, it's a little bit of an extra cost, but hey boots used to run $120 for a good pair of MC's back in the day, so for $61 and a bit out of pocket for stitching if needed, they seem like a work-able solution. If you GML is the flexible sort, they may even spot approve with the note that you get the stitching done in 30 days or something like that.1 point
-
Shoulders done and in case anyone else will be downsizing it’s pretty quick to just sew the new measurement and then cut the extra material afterwards so there’s no need to remove any stiching1 point
-
Awesome, i figured that i just wanted to make sure is all Sent from my SM-G950U using Tapatalk1 point
-
Just making sure the machine is being treated like a princess Sent from my iPhone using Tapatalk1 point
-
Yes all the FO variants have ANH/ESB TK boots as an option at basic, if other boots are used then they must be as Joseph described I’m also guessing that was what he meant just wanted to clarify1 point
-
Hopefully you bought the sewing machine dinner first? Sent from my iPhone using Tapatalk1 point
-
new gloves updated! Sent from my SM-G950U using Tapatalk1 point
-
For basic approval regular TK boots are allowed unless the CRL is to be updated. From TLJ Executioner Boots ANH/ESB TK boots are allowed.1 point
-
Probably going to wait till I get either my Praetorian Blasters E11 or QuestProps E11 in first. I know the QuestProps should ship in October, no idea when Praetorian Blasters will. Sounds like they are having some health issues and too many orders.1 point
-
Awesome! Just a heads-up, for basic approval they must have a seam that swoops down the side of the foot as well as zippers on the inside that span the height of the boot as seen below.1 point
-
One fix from my centurion application that I did was fix a couple of the black mic paint stripes Before: After: I extended paint stripes 2 and 6 up1 point
-
Evening! We are going to add elastic straps at the back of the boots to attach to the rear of the calves. We have trimmed the rear of the thighs too [emoji6] Sent from my SM-G950F using Tapatalk1 point
-
I have Rob's belt and I love it- I second the recommendation. And congratulations!1 point
-
First kit up, still to do are the shoulder bridges, rear thigh covers, sniper plate, and rig up something to stop the calves pulling up Sent from my SM-A520F using Tapatalk1 point
-
Congrats Jim! These are relatively easy fixes for Centurion.1 point
-
I would try and not go over 25 for the back of thigh, you can glue the back with a gap and strenghten it with a wider inner stip....meaning if you have a strip of 25 you glue 10mm on each end leaving a 5mm gap thus making the thigh a bit bigger, sometimes it`s those small changes that makes all the difference and the gap at the lower ridge you just fill in with abs scrap and paste (unless you choose to cut for mobility) You can also go smaller on the area that gets glued if necesarry, the 10mm was just a suggestion.1 point
-
Paul has made a truly beautiful set of armor1 point
-
Then show us There`s no such thing as to many pics1 point
-
Your Sniper plate is sitting as good as it can. The AP kit is impossible to mount with the ridges aligned at both sides without it sitting crooked. It look identical to mine and the other AP builds in my garrison or any other AP I have seen. No one will ever notice once you are wearing the kit as it is not obvious unless the viewer is on their hands and knees and 1 foot away lol. Great work on this build, very clean.1 point
-
We buy our belts there. They are the best Verzonden vanaf mijn iPhone met Tapatalk1 point
-
Making some adjustments and fixes for my Centurion application. Replaced snaps on the butt plate and strap, added some of the Anovos supplied velcro to tighten up a couple of spots, made further mods to the belt by adding a small scrap of abs to stiffen up near the holster (no photo as it is gluing) and did some touch up paint on the vocoder. Sent from my VK815 using Tapatalk1 point
-
Dear valued customers Just letting you we just started a new batch of kits, plastic arrived later then expected since company we deal with was relocated so this set up back a couple weeks but rest assured we will keep you updated on the progress on your order, for those who ordered untrimmed or fully trimmed kits these will ship fairly fast once production is complete, for ready to wear orders a few extra weeks is required. Mark (AP)1 point
-
Congrats and welcome to the club Jim. Sent from my VK815 using Tapatalk1 point
-
Thanks! Again this really helps! I feel like I understand the approach better now. I had also referred back to ukswrath’s guide and see how I need to measure the excess, trim it, and leave space for the cover strips. Sent from my iPhone using Tapatalk1 point
-
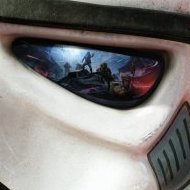
Alright Jim thank you for your EIB application and patience. Let's take a look shall we. CRL and EIB Application Requirements: All the required submission photos have been posted. Thank you for making the suggested fixes mentioned by your fellow troopers. Your armor appears to display all necessary element as set out in the level 2 CRL. The DO crew would like to welcome you to Expert Infantry. Beautiful job on your MTK .... Congratulations Other-Armor Fit/Assembly: In this section we review observations made by your fellow troopers and ourselves. Some observations may lead to suggestions to improve the overall look of your armor. If any suggestion affects any application it will be listed separately in the above or below sections. We have a few concerns to go over so starting at the top. The tube stripes are a bit too far from the face. They should be roughly be a #2 pencil width away. We're encouraging you to reposition the stripes. Please take a look at the reference photo that's been provided. Reference photo Next up, the frown. It could just be a photo angle issue but it looks as if the right side is not as thick and as long as the left. If this is the case please thicken up and lengthen that area to give the frown a nice uniform look. Reference photo Working around to the back left vent looks considerably larger and longer than the right. We're requesting you revisit this area and correct it as necessary so that both sides are of similar shape and size. Reference photo The lower right ear appears to be a bit bigger than the left. Not a huge deal but worth mentioning none the less. Reference photo Though the shoulder bell strapping to shoulder strap cover is rarely talked about nor mentioned in the CRL, it's worth mentioning it should be black in color. Reference photo While on the shoulders there should only be one layer of material holding the cover down. Reference photo Making our way down, the chest plate should remain covering the Ab and there should be very minimal gap between the back and kidney plates. Tightening up the straps should bring these areas into spec. Reference photo Taking a look at the Ab plates the 4 button vertical plate should be smaller than the raised section that it's glued to. We're suggesting you trim it down a bit. Reference photo So we were taking a good look at the cloth waist belt and comparing to canon photos and your appears to be really thick and off white more than normal. I understand this is a good belt however, it just doesn't look canon. We're suggesting thin it out and lighten it up some how. Reference photo Holster is very shiny. It should look semi gloss in texture. Toning down the reflection would make it look more accurate. Reference photo Now for the legs, not a big deal but it looks as if the cover strips are extending past the top of the thighs. If they We encourage you to trim them back to the edge of the armor. Reference photos That's it for the EIB section. Centurion Suggestions: In this section we prepare you the best we can for Centurion. If there are any areas of concern they will be discussed here. We have a few areas to discuss here as well. There can be no return edge on the wrist side of the forearms. Though yours appear to be pretty clean we can still see a little remaining. Please remove as needed. The CRL states: "Level three certification (if applicable): No return edge on the inside of the front of the forearm is allowed." Reference photo Ab to Kidney plate spacing. There should be very minimal gap between these two areas. Tightening the strapping between the two should do the trick. The CRL states: "Level three certification (if applicable): Ideally there no gap between the abdomen and kidney armor." Reference photo Lastly the drop boxes appear to be a bit out of alignment with the farthest edges of the waist ammo belt. Adding a bit of glue between the cloth belt and connecting strap should hold them in place. The CRL states: "Level three certification (if applicable): Drop boxes are vertically aligned with the end of the ammo belt with minimal gap between belt and box." Reference photo Congratulation again, great job and hope to see you at Centurion1 point
-
Thanks all!! Next task is making the torso tab/lock system and also lengthen my TD strips a bit as the white panel isn't facing upwards enough it seems. Thoughts? Already have suitable material so can give it a go this sunday1 point
-
mounting holes fore the body and the plastic grip next up/1 point
-
Once strapping is attached it should help to keep everything pulled in nicely1 point
-
Much better mate. If you look at both pics, you can see that by extending that distance it pulls the chest round the curve of the ab plate. Nice work! Sent from my SM-G950F using Tapatalk1 point
-
so got my centurion updated gloves all taken care of.1 point
-
Good call in taking a break if it`s not fun, because is should be And if I may, unless you`re just fed up with all things Stormtrooper at the moment, use the "down time" to read up on the many build threads, that will get you ahead of the game for when you get your mojo back1 point
-
Already congratulated you on Facebook, but I'll make it official here as well. For belts I strongly recommend Rob Kittell's belts (imperialissue.com) - they are made of sturdy canvas and also have a strip of plastic sewn inside. http://imperialissue.com/product/canvas-belt1 point
-
It's always the built up... antici- Pation. It's nerve wracking. Glad I'm patient, but I love suspense. Sent from my VK815 using Tapatalk1 point
-
That is a big colour difference, could also be from aging, some ABS discolours over time depending on what type and also if it's been out in the sun. Personally as a GML I wouldn't be able to approve it, I would suggest either looking for a helmet closer to the colour of the armor or last resort trying to paint the helmet to match the armor. Original helmets where painted so it would be screen accurate -----------1 point
-
A way to identify the shins is that the inside should have a shorter swoop, conforming to the muscle, outside then has a longer….good thing is it really doesn`t matter, the RS kit (made from Movie suit) comes with only outer parts (left and right) and is Centurion "worthy" so bottom line is: if it looks and feels right to you then all is good The Troopers in the Movie had all variants but all we see are awesome Stormtroopers1 point
-
**As he holsters the smoking gun**1 point
-
So, I finally made myself a full kit in 1.5mm gloss ABS and have started the trimming today. I will get some photos posted very soon1 point


.thumb.jpg.9e934f6d8fe42c9336611e829a1973bd.jpg)