Leaderboard


Popular Content
Showing content with the highest reputation on 07/24/2018 in Posts
-
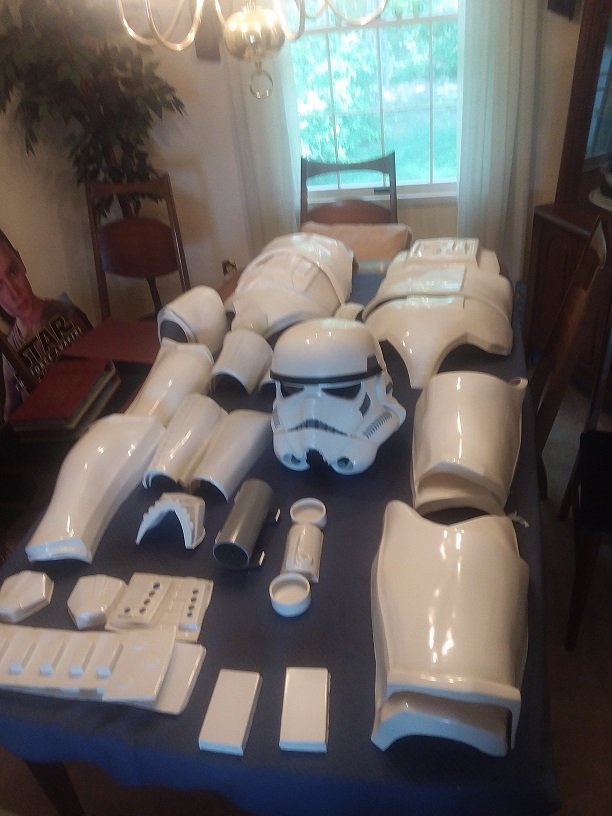
Update time! So I stuck with the Rustoleum 2x for my paint to see if I could get it to work by better following the instructions on the cans. I had previously sprayed my hand plates and knee plates with two coats of the 2x gloss white. It covered really well even with lighter coatings of spray so I didn't really need more than two coats. From here I let this sit over the weekend (three days exactly) while I worked on filling spots on the rest of the armor components. Here's a visual representation of what you might be dealing with when filling spots. It seemed scary that I had that much to cover, but to be honest the spot filler is only going to make the parts smoother and more beautiful, so definitely use this as an opportunity to get very picky about what you are filling. I've found in some of my first runs filling spots I've actually missed some areas that I've gone back over and covered so I could have better outcomes. The best ways I've found to actually find where to cover are first, to use a well lit area or have a light close and nearby while you look from many angles. This will point out the little areas to cover. Next after you've filled, let sit for 24 hours, and then wet sanded back down with 600 grit. If you can't see anything, prime it again. This will either prove you've covered what you intended and are ready to paint, or that you have missed some spots. Again, take your time with this. It will prove worth it in the long run. Now from here I had let the previously painted pieces sit over the weekend and cure for a good 72 hours. I yesterday decided to take the risk again and use the enamel clear coat. And it worked out just fine. So I think I'm good to say that with Rustoleum 2x if you give yourself a good 72 hours before clear coat you shouldn't have the awful paint destruction like I had when I first did my helmet. Here's the results: Finally, I started the white paint on two more pieces that I had filled, primed and sanded. Their turn to cure for 72 hours. Forgive all the random messes. I'm using a lot of old plastic containers and all to rest the dried armor on just in case so I don't get it all over the house. I don't have very much room to store these in a garage or so at the moment. More to come!3 points
-
Devolver, Thanks and I am planning on going for EIB and possibly Cent. The helmet opening trim keeps getting scratched up even though it’s clear coated so I am considering masking it off and painting it with black flex seal. If this comes out nice I may do the same with the brow trim. Brain, Thanks brother. I have some thoughts about the flexible fiberglass vs HIPS that I will talk about later in the post. Darthcue, it looks to be about 7 but there may be some people who have built one and not reported their progress here in FISD. I was paging through several of the build threads and noticed several people (Big Deal) have started their builds but not finished them and Most of them started before me...So I think we should be hitting up these guys and pushing them to complete their ROTKs (ahem, Big Deal). Also, as I was looking at the build threads I found NaturalBornDT’s thread. This guy is scratch building the abdominal armor for his build. Reminds me of Yosh’s build and I am really impressed with his progress. Darthcue, thank you for the reply about the flat vs glossy. Are we sure the sides are glossy? I have already sprayed them with flat clear…… Update, Alright, so like I stated previously, the nuts in the shoulder straps keep coming loose. I removed them completely and filled in the holes with PC-7 and let it cure for 24 hours. I stopped at Ace hardware and spent an hour in the specialty hardware looking at various parts and thinking of ideas when I found these threaded inserts. I snagged a few of them and tested this out in a piece of wood. Once I was fairly confident this would work, I drilled ¼” holes all the way through the shoulder straps where they matched the holes of the back plate. I screwed-in the insert and then test fitted the whole thing on the back plate. The small crack you see next to the left hole is only a cosmetic crack in the paint. But this does bring up my only real concern about using this method. Given how the fiberglass has cracked in other areas I am hoping that it will be strong enough to hold the threaded inserts and no crack or break. Ok, so I used a ¼” hole punch on some painter tape and made some small ¼” circles that I placed insde the top of these holes to prevent anything from getting on the threads then filled the holes with Bondo. While the Bondo was curing, I need to add a metal D-ring to the end cap of my HFX E-11. I had a sling ring in my gun junk bin that closely matched the actual D-ring. Ok it’s not exactly oval but close enough and I needed something for EIB. I masked off all the stuff that needed to be sprayed with the flat clear and sprayed this stuff. I did this before seeing the post from darthcue telling me that the side plates are glossy. I can sand them and go back and reshoot them with clear. Once the Bondo was cured on the shoulder straps, I sanded them and applied a layer of glaze putty then sanded again. I mixed up a small amount of the white base coat and sprayed them. 45 minutes later I clear coated them. I did have a spot on one of the biceps where I removed some Velcro and it pulled the paint off the bicep. So I masked it, sanded the primer and reshot paint and clear on it as well. And that is it for the update. Thanks for the interest.3 points
-
I know haven't done anything in a while! real life and all happened but did start making progress again, finished the biceps tonight then starting on forearms! picture was taken in mirror that's actually the right bicep! =D3 points
-
Put down a few layers of ABS paste, sanding each time and reapplying. Does anyone have a better way to apply the paste? I’m using a finger because I can’t find something else seems that works. But then maybe my paste is too thick? It’s about the consistency of toothpaste, maybe a little thinner. Sent from my iPhone using Tapatalk2 points
-
The Staff has voted, and the winner of the STORMTROOPERS: Beyond the Armor book is Dave C. of the Empire Garrison! Vicky was a close second, and will receive the official 501st car decal. On behalf of Randy (magni) and myself, congrats to you both, and a big thank you to all who participated! I will PM the winners to get your shipping info.2 points
-
Nice work. [emoji1303] It’s odd watching this thread compared to what we usually see - most DD builds have lots of extra details being carved into the resin - yours is the opposite with lots of parts covered up with putti. Good job though. Very interesting to see. :-)2 points
-
So, I'm starting another build - much to my wife's chagrin. I got another AP kit a while ago (untrimmed with belt and flexible handguards) and I'm finally starting the build. The difference this time is that I'm building a Sandtrooper. The build is very similar so I'm posting the build here at FISD and I will post the more TD-specific stuff over at MEPD. The only real differences between the TK and TD are: TD is dirty TD has a pauldron, pouches, and sometimes a pack TD does not have plastic shoulder bridges or large button panel on ab. They also don't have the 4 button panel - they have a three button panel (not painted) TD is dirty TD does not have the black lines on the traps or tears of the helmet Sniper knee plate if different shape. TD is dirty TD does not have holster or TD (or drop boxes) on the belt I think that is pretty much it. I thought a TD build here might be good for new troopers who are debating a TD build. And I know a lot of people here have completed a TD as well as a TK, so I'm sure I will get pointers on either site. The fun part about the TD build is that one is encouraged to build a specific onscreen trooper. There was no question for which trooper I wanted to build. This guy: The captain that talks to Garindan. The first shot above was one of the most memorable trooper scenes for me back in '78 (didn't get a chance to see the movie until '78 - longest year ever). The best part about this trooper is that the helmet is still around (it was recently at auction - I think it went for $250K, but don't quote me). Anyway, there are pictures of the helmet floating around. Starwarshelmets.com is a good place to see these images. Here is an example: MEPD has a bunch of additional reference. They have also broken down all the different sandtroopers and what equipment they have. This is an example of the graphics created for reference. There is one snag to the whole process. For basic approval in to the 501st as a TD, you need at least two pouches with one of those being a proper shoulder pouch. So I will need to add a shoulder pouch in addition to the belt pouches. For level 2 (PO), I need a backpack. This trooper does not have one - so If I want to advance to level 2 I need the pack (and from what I understand, I don't need said pack for level 3). To put together a proper pack takes some time - so I won't be doing that right away. My plan is to build the actual armour as close as possible to what would be expected at Level 3 (SWAT) and just go for basic approval for now. I'm still waiting for some more pouches to arrive, but I should have a variety of pouches so that I will be able to emulate other characters - most notably the Cantina Captain who wears the exact same armor as the Garinden captain. He also has a pack - so this might be a Plan B. I'll post some pictures of all my collected gear later.1 point
-
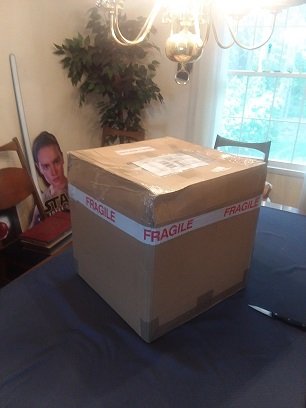
BBB day has arrived! ...about four weeks ago. Didn't have a chance to post anything earlier. Better late than never! P.S. Bear with me while I try and figure out this picture uploading process.
 1 point
 -
Here are a few photos of my 3D build, sir. The widest points (front and back) are 1 1/2 inches, and the concave part in the center is 1 inch wide. Hope this helps!1 point
-
Hi Rat Looks like your getting on well If you want to be fussy vent hole pattern should be off set slightly Set the tape out in metric as this is how the Germans worked . Love confusing you guys as well . Vent holes as far as I know are 14mm .with the four smaller ones at the very front of the barrel are 12mm , easy conversion is 25.4 mm to the inch , Good luck Sent from my iPad using Tapatalk1 point
-
1 point
-
ok all, need your advice now....is this enough of the return edge taken off of the front?, I believe I got it all, didn't remove all from the rear just shaved for comfort.1 point
-
I use a Popsicle stick when I applied mine. Its looking good! fill in a few small parts you got and sand it all down to smooth. Than apply a small amount of acetone to the finger and run it over the sand to give it back that shine! I'm excited to see how this turns out. It actually looks like that flat edge is not as noticeable either! GREAT WORK!1 point
-
started trimming out the return edges, going to use my sander to get off what is left over, more pics to follow!1 point
-
Thank you DanI This has been a fun build. Feel the same way about filling in on the gaps and cutting off all the details. One reason why I thought this thread could be useful, because unless it's archived somewhere.. I've never seen a "promo" pugman build on FISD.1 point
-
This looks absolutely stunning. Loving your attention to detail!!1 point
-
More progess on our kit1 point
-
I totally agree with Dan. And your precision and accuracy is fun to watch. Loving this build.1 point
-
1 point
-
Trigger: Once the e6000 cured, the metal trigger was securely attached to the grip, I finally glued in the trigger trying to match the placement from my reference photos.1 point
-
Yeah, it was my first attempt at making it work and it came undone. I'm going to strip off the velcro and try it with just epoxy once we get a few days without rain so I can work on that outside and leave it out there to air out. These chemicals are amazing but also so gnarly.1 point
-
You always can drop us a line here and we can take your order "off-wave" if urgent. Thank you and Regards IB Team1 point
-
Looking good! Sent from my iPhone using Tapatalk1 point
-
So...as I decided to use an inner strip to connect the back with the bottom front piece instead od´f an overlap some more cutting was needed and as I already had markings were the overlap ended from previous session I simply took the pieces apart and traced a line and cut it. Now all the parts are layed out, ready to be glued and I choose to use CA glue and plastic weld for the job and I´m sure there are other ways to do it but this is how I did. I started with the sides to the back, top part is closest to the camera. I then glued the front pieces together and forgot to take pics of each section but the top and bottom piece gets glued to the tabs on the middle piece that you can see two pics up. I maneuvered the pieces together and rough fitted them (I tested this during the "tape-phase") Made sure everything lined up and taped the middle piece to the sides for a good hold and started to glue the bottom piece, pulled it apart and spread the glue on that lower edge. I then used the plastic weld to glue the middle and top part - repeat for the other side. I glued the inner strip for last and put tape on the outside to make it easier. All glued together, next up is some filling with abs paste and sanding before painting. Been thinking about the cover and think I´ll go with magnets altogether and not use a hinge at the bottom to be able to take it of completely but we will see, have some other ideas for the back pack as well but for now...to be continued1 point
-
You got this! Little bit of abs paste along the ridge and feather it out. Much like icining cupcakes. Sand to smooth and than can dip a finger in acetone and run finger along to bring back the shine1 point
-
Just for confirmation and future reference, for Centurion as well? Sounds like a good plan We can`t have that so if all else fails I will send you a pair of untrimmed RS shins if you cover the shipping cost1 point
-
I’m really impressed with how much you’re looking into it. I’ve no doubt that you’ll end up with an epic TD. :-)1 point
-
Thanks! This has proven to be more difficult than I anticipated. I shouldn't be surprised at this point. Short answer: yep - I'm not done with the colour yet. The colours go on in layers as washes. Long answer: To be honest - who knows what colour the actual screen-used weathering was. But, based on most of the pics I've found, yeah, the weathering appears more dirt or dark grey coloured than the reddish burnt umber brown. I still have to add the black / grey colour layers yet - so it will (hopefully) look more like the reference pic (if that is what you mean). Also, don't trust that reference pic above for colour - I think I ran it through a filter or two in photoshop to bring out other details. About the colour: Word on the street is that there is some amount of red or rust in the colouring of the weathering (ukswrath) - to match the on-location (Ajim, Tunisia) sand/soil. Also, motor oil used with local dirt was used on set (I think I got that from Pandatrooper at MEPD), and recent attempts to replicate this process returned a rich brown colour. I am under the impression that the film process and lighting would desaturate the warmer brown colours (the majority of the reference pics). I recently found a behind the scenes pic of the troopers in the alley before the Falcon takes off - you can distinctly see areas of reddish brown weathering and areas of just black or charcoal coloured weathering. Is this what it looked like in person? Is the picture's crappy quality affecting the colour? Who knows, but the pic probably has better colour representation than what you will see on the release film stock / Blu-ray transfer. I can't post pics right now, I'll try to remember to post the pic later. This doesn't help me with the colouring on the chest, but it has helped me decide on how to approach the weathering in general. Also, you may have noticed that I've flipped-flopped on my subtle or "realistic" approach to weathering. I'm still using the airbrush to make it look a bit better up close in person, but it seems one needs that stronger colour and contract to hold up in photos (to a certain point) - and it seems to be more accurate in terms of on-set appearance. Somebody did tests (maybe Pandatrooper again) with the strong weathering by taking pictures and blurring/compressing them to match the reference pictures - the test compared very nicely with the reference pics. I'm going for a balance of how it appears in the movie and how it may have appeared on set. And with that, I'll probably get both wrong.1 point
-
JUST the bucket, not the whole armor? Depends on whether you want [flexible] fiberglass or ABS. Jimmiroquai's armor is fantastic, but it's quite a bit of work, dealing with fiberglass. He's a reliable source, with a great rep, so if you're cool with fiberglass, it's an excellent option. Anovos will mostly likely deliver... eventually. But could literally be years. Finished helmets only, for some time, so if you're looking a build, that's not what you want anyway. KB might be up and running someday, but not in the short term. Hopefully that turns around, but not going to help you now. I've not worked with 850 before, but I've heard very good things from people who have. If you want ABS, and you want it sooner than Anovos or KB can deliver, it's probably your only choice.1 point
-
Beautiful Bucket! Nice Work!1 point
-
Requesting 501st access http://www.501st.com/members/displaymemberdetails.php?userID=247481 point
-
The shop on shapeways is Suitcase Props ie me1 point
-
I've done one of these before. Do yourself a favour (Canadian spelling) , and buy the Rubies 2piece kids FOTK Helmet. It takes way more effort to mod the bucket than it's worth.1 point
-
Well, it pains me but I decided to redo my chest to match the shins a bit better. Plus, it will be easier to match other pieces moving forward. I want to get the reddish colour from the burnt umber to match the sandstone of the original filming location. Removed most of yesterday’s work except a few dark spots. I used several light washes of burnt umber to bring back the colour and contrast. And then work some of the extra paint away with a damp cloth. I haven’t added the airbrush layers yet. I’ll let this paint dry/set overnight. Sent from my iPhone using Tapatalk1 point
-
You can try Imperial Boots, Otis. They are closed until August, but make a really nice product. When you go to the home page, look under "shoes" and you will see their Classic 421 model. https://www.imperialboots.com/ The only thing I would advise is to order a size larger than you normally wear, as they tend to run a bit small.1 point
-
Hey Guys, I'm Dave C (TK-34288) from the Empire City Garrison. On of the most memorable troops for me was at a place called St Pat's Kid's Camp in NY. During this troop there were 5 of us White Armored troopers. This was great to see at one our local events on a warm Sunday night in July. During the troop we were not given a place to set anything up or have a banner to take pictures, they just asked us to walk around and mingled with all of the participants. This was the last day of their week long camp and we were the finally of there science day. There was about 200 kids, plus their families and staff at the camp. After we were out for about 1 1/2 hours we heading back to a cottage house that they had for us to change in. This is the time during the troop that it was made to be so memorable for me. While there, one of the staff came back to thank us and this is when I found out about the program which floored me. This program is a week long camp for children with cancer and other blood disorders which are terminal. Being told by the staff and what it meant to the kids, their families and to them to have us there, where we were the finally of their science section of the camp was so amazing. We were told that some of the kids will not make it through the year for the next camp. This in itself made me realize what kind of difference and joy we can bring to a group of people or just one individual by just donning our imperial trooper armor for them. It doesn't matter whatever the temperature, the day of the week or what we have going on, to be able to do this for them can change that one hour, minute or second of the day for someone and make that memory for those that may not be here tomorrow or the ones that are left behind. This is just one of my memories since joining this incredible organization. Thanks to all that want to put these costumes on and make a difference.
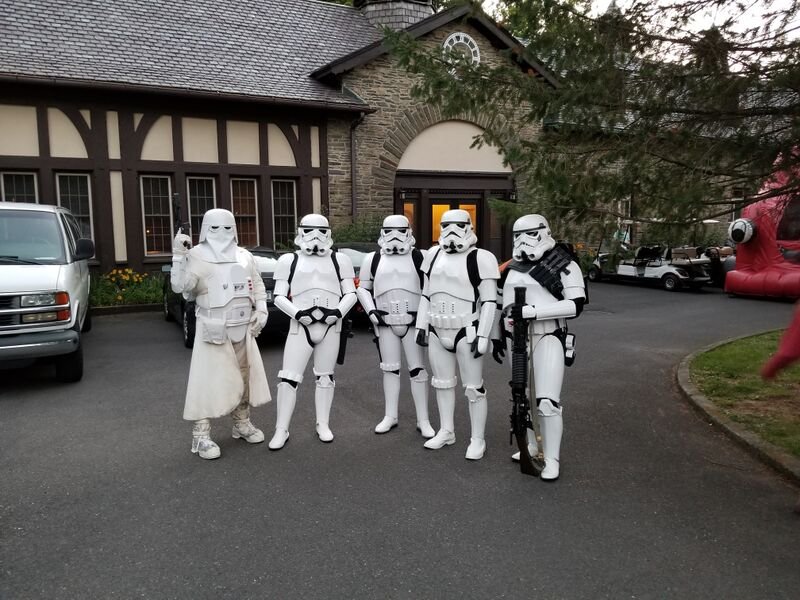 1 point
 -
First pull. Coming along faster than we thought!!!!1 point