Leaderboard


Popular Content
Showing content with the highest reputation on 01/24/2018 in Posts
-
Thigh ammo pack. I hot bathed this piece earlier just to make fitting easier. Just held the ammo pack up to the thigh and figured out the distance from the back return edge. I measured 6mm from the top edge. Drill hole and install split rivet with #6 washer Wrap ammo pack around to other side and marked hole. 6mm from top Install second rivet and I will add a couple drops of glue to hold ammo pack up to cover seam. Add some tape to hold and let dry. Much easier than that f&@$ing sniper knee. Oh sniper knee, I shalt maketh thee my bit... . Sent from my iPhone using Tapatalk3 points
-
By the way, it is normal to have the pieces not line up. You’ll get used to forcing pieces to where you want them. Sent from my iPhone using Tapatalk2 points
-
You lot have toooo much time on your hands. I'm struggling to keep up with the number of conversations and post happening all over the place2 points
-
Every time a new film/video game comes out I add another costume to the ‘want’ list.2 points
-
OK, it happens. You look at your Legion profile and it shows that your detachment affiliation to FISD is pending, or otherwise incorrect. Why does this happen, and what is detachment affiliation anyway, and what will FISD do about it? The answer is that detachment affiliation is only ever used once a year, and for one purpose. The only time the Legion ever uses it for anything is to determine who can run for DL and who can vote in detachment elections. That's it. Otherwise it is pretty much ignored and not used for anything. The process of validating detachment membership is cumbersome and time consuming because people use different email information between their Legion and detachment logins, and that there is no way to bulk update the rosters. For a small detachment it is not a big deal to do this manually, but for a detachment the size of FISD with hundreds and soon thousands of 501st members, it's impossible. Fortunately we have technical folk both on FISD and in the Legion web team. Once a year they take a feed from FISD's database and do a bulk update on the Legion database. This occurs right before the election cycle starts and is done once per year. Also NOTE: *NOTE: Make sure you log into the forum at least once through a website and NOT through TapaTalk, as sometimes it does not register the login as a true login. Pro tips: 1) Ensure the email address you use on the Legion & FISD boards are the exact same. 2) Ensure that your FISD profile has the correct TKID. 3) IMPORTANT! You MUST be in the right security group. It should be "501st Stormtrooper" in order for the automated system to pull you over. This thread is where you get your detachment access updated. 4) If after the bulk update is complete and your profile is still not updated, and you are 100% sure your info is in sync between the two boards, then ask for to the Legion web team. They should get feedback on why this isn't working. 5) If all else fails, ping the FISD staff. Which basically means that we'll simply tell the 501st web team to bulk approve everyone Whew! Hope that answers everyone's questions!1 point
-
WHAT THIS PROGRAM IS: A dedicated forum where members can submit their completed stormtrooper costume for peer review prior to formal submission to their GML. Your armor will be reviewed and suggestions made by the FISD Staff and Imperial Attaché team, but detachment members can also provide peer review on any submission. All feedback provided will be specific, constructive, respectful, and helpful. Any feedback that is deemed negative, derogatory, inflammatory, or otherwise offensive will be deleted, and the poster can be subject to account suspension for repeated offenses. You may also be provided suggestions for attaining the rank of EI (Expert Infantry) and Centurion levels should you wish to pursue higher levels of screen accuracy. WHAT THIS PROGRAM IS NOT: This program is not a replacement for the GML approval process, as Detachments are not charted to approve costumes for membership. While a costume that passes Detachment peer review should be in a state to be accepted by a GML, Detachments cannot override a GMLs decision, nor are GMLs bound to accept the ruling of a detachment costume approval. That said, as a general rule the goal is that any costume that passes peer-review approval should be accepted by a 501st GML. WHAT YOU WILL NEED TO SUBMIT: You will need to post up various high quality photos of your armor/accessories on the list below, as well as the basic information listed next to it. We realize that this is more information than normally required for basic approval, but we want you to look your best! Also, please include the name(s) of any approved Trooper(s) who have significantly helped you with your build. Yes, we are asking for more photos and information than are normally needed for basic approval. The reason being is that we feel it gives us a better overall view, and we can catch things that may be missed should the recruit want to move to level 2. PHOTOS: INFORMATION: 1. Front view (arms down) 1. First/last name 2. Back view (arms down) 2. Future Garrison/Squad/Outpost or local area 3. Left side (arms raised) 3. Armor maker 4. Right side (arms raised) 4. Helmet maker 5. Ab plate close-up 5. Cloth belt maker 6. Helmet close-up (front, left and right sides) 6. Neck seal maker 7. Detail photos of any parts you have questions on 7. Boot maker 8. Interior strapping (optional) 9. Blaster maker (if applicable 10. Gasket maker (if applicable) 11. Height (optional) 12. weight (optional) 13. TK type (ANH Stunt/Hero. ESB, ROTJ. TFA etc.) 14. Name(s) of any Trooper(s) who significantly helped with your build. INSTRUCTIONS FOR POSTING YOUR REVIEW REQUEST: 1. Go to the Request Pre Approval thread: https://www.whitearmor.net/forum/forum/193-request-tk-pre-approval/ 2. Click on Start New Topic. This is located on the left of the blue "Reply to this Topic" option near the top of the page. 3. In the Title area, post the following information: (Fisd screen name) Requesting Pre Approval Review, followed by the armorer who made your kit in parentheses. Example: MegaTrooper123 Requesting Pre Approval Review (Anovos) 4. Post all required photos/information (as listed above). HELPFUL LINKS: 1. Where can I get in touch with my GML/Garrison? http://www.501st.com/members/displayUnits.php 2. Where can I choose my official TK number? http://www.501st.com/members/search_avail_ids.php 3. How do I join the 501st Legion? http://www.501st.com/members/join_form.php 4. What do I do once I am approved? https://www.whitearmor.net/forum/topic/16-501st-trooper-status-requests-include-link-to-your-501st-profile-in-your-request/ ____________________________________________________________________________________________________________________ WHY WE ARE DOING THIS: Not every garrison has responsive GMLs, and even those that do are not always experts in the stormtrooper costumes. Costume peer review provides members with a supplemental feedback on items that need to be fixed prior to approval, as well as other feedback that will help the overall fit and finish. Catching errors earlier will result in increased confidence a build will pass GML review and thus save GMLs time. It will also provide GMLs insight in to a sounding board beyond the GML peer review area on the 501st boards. Additionally it provides non-GML forum members the opportunity to learn about and gain experience in the costume judging process. This is valuable because it can provide people considering being a GML real-world experience before accepting the role, and provides GCOs a potential pool of people experienced in costume judging who may not have yet served as a GML. ADDITIONAL INFO: 1. Any feedback that is negative, derogatory, inflammatory, or otherwise offensive should be reported immediately, will be deleted, and the poster may be subject to account suspension for repeated offenses. 2. Feedback should follow the same format that Deployment Officers use, e.g. for each item to fix they will be marked as “must fix”, “should fix”, “could fix”. 3. “Approval” only covers base 501st acceptance (aka L1). Expert Infantryman (L2) and Centurion (L3) standards can be cited only for “could fix” items and are never “must fix”. 4. For GMLs, this is intended to catch errors early to make your lives easier. This is not a replacement for what you do. Additionally, since detachments can't approve costumes, there is no concern that a Detachment will override a GML decision. 5. For GCOs, an advantage is that a 501st member in their garrison can gain experience in the costume review part of being a GML before they take on the role officially, and this may also for their Garrison provide an outlet for people considering being a GML, and a pool of experienced members should they need to fill that role. 6. For FB users, other TK Facebook pages can offer advice on their site that may or may not be correct. FISD is the official Detachment run by experienced 501st costume approvers the world over, and this is a service we can provide prospective and current 501st members that a FB group cannot.1 point
-
Greetings everybody! Probably it is my first topic on FISD, despite that I approve my stormtrooper in 2013 +)) But after conversation with Daniel during our trooping in Moscow. He asked to give a look on 3D model of stormtrooper armor that I currently work under in my workshop. So there is our current progress with 3d modeling of helmet and armor. After "approved" parts I will do first 3d prints of it and then will think cast of vac forming it. So there is a links on: Helmet ------------------- Armor ------------------ Armor in piece------------------ We use my photos from celebration London, photos from Visual Guide, Hot Toys figure & Anovos manual for @part sepereation@ to create this pieces. Probably we miss something or don't see. And I know that many people don't like look of new armor, but for me it is really like HD version of OT armor. But I will be very grateful for help, view and critique notes Best regards, Andrew TK-250071 point
-
Happiness! Isn't it great when it fits like a glove without doing anything more then adding coverstrips! Compliments to your tailor!1 point
-
1 point
-
Yea there’s no way I would dare to put scissors to plastic today. I tried to just zone out on the PlayStation but almost chucked a controller out the window. Settled into brewing an ipa kit I had and watching ROTJ right now. Sent from my iPhone using Tapatalk1 point
-
When he say's lower edge he means of bell. Make sure strap is snug. From the pictures the bottom of bell should be right around bicep. Like TK's in photo. But yes your tops could come in more at bridges. Elastic is no good for that spot. Nylon wont give and will hold in place better. Sent from my LGMS631 using Tapatalk1 point
-
Can I grab a quick clarification before I start my thigh trimming? So as far as return edges go I keep reading conflicting opinions. I know they are not required but add to the appearance of thickness. Others have stated that they cut them off for comfort. As a starting point what do most of you leave for upper and lower edges? I’m running on 4 hours sleep from a late shift and just can’t tolerate trying to determine this on my own any more today. Thanks guys! Sent from my iPhone using Tapatalk1 point
-
They are massively time intensive. I think most people pay between $300-$500 to have someone build their TK for them. Clones used to be about the same, plus a few hundred for a really good paint job. KW said that when they did a run of EP3 clones, the average from start to finish including paint was about 108 hours of work. Even at $10/hour (minimum wage in a lot of the US), that's $1000 in build/paint time. A TFA TK is at least as hard at an EP3 clone, so unless you can take advantage of some crazy arbitrage, I could easily see someone charging $800+ for build time alone, maybe $1000 including paint. Yes, I know ANOVOS is working to simplify the kit to make it about as on par as an ANH TK, but we've not seen that yet. I also know people are working to 3D print some hard parts like the thermal detonator and the forearm details, but so far those haven't driven down the cost/time complexity of putting these together yet.1 point
-
Sent from my iPhone using Tapatalk1 point
-
Sent from my iPhone using Tapatalk1 point
-
I used a bandsaw but you could use a Dremel or jigsaw. Try to keep the line as strigh as possible. Also I definitely recommend a belt sander to trim off the rest of the white part and straighten it out1 point
-
It’s looking good! My sniper came out a little crazy too! Keep up the good work! Sent from my iPhone using Tapatalk1 point
-
They are different this has come up before. There are different pouches out there, the reference picture that MEPD use that are leather has cut corners on the flaps were the TFA version are straight across. The other type of pouches they show are canvas and the TFA are leather/vinyl as you can see the shine in the photo below. I made mine from scratch, not a very difficult job, templates are available from MEPD you just have to alter them so they are straight cut top flaps. Also the side buckle is positioned closer to the pouches. Left MEPD Right Trooperbay equivalent Mine Leather version with cut corner top flap Seems they can be sourced, just did a google images search and found leather with straight cut flap https://www.amazon.co.uk/StormTrooper-SandTrooper-Leather-Magazine-Pouches/dp/B06ZZW3PLL1 point
-
Wohoo! Thank you for those kind words Sir and will do1 point
-
Superb, Daniel!! Was there any doubt? Centurion awaits, again. ;-) Best wishes, Dan Sent from my iPhone using Tapatalk1 point
-
Nailed it (again). Congratulations. Onward to Centurion #2!1 point
-
Congratulations trooper1 point
-
Good work. Sniper knee... you will need all the clamps. ALL OF THEM.1 point
-
Yea I think we need to reevaluate the pauldron vest combo1 point
-
Could take a little while longer, there is still a backlog from the festive season break1 point
-
I actually cut a notch in the centre of my sniper plate the width of the coverstrip, helps to keep central while the glue is drying also allows it to go backwards further so looks better on sides. I also applied some heat to both sides as I hated the slanted look, don't panic about using heat on these as they are quite thick. I just applied the heat on the two front corners and applied a little pressure.1 point
-
Sorry if were not always very clear. We'll be here when you ready to move forward, waving the checkered flag brother.1 point
-
I haven't been posting here because all the work I've gotten done lately is on the backpack and posted on mepd. Fingers crossed I should be done this weekend1 point
-
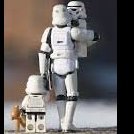
Awwww...cute as a kitten.1 point
-
All the bells and whistles. Just call me "deleted trooper"1 point
-
Congratulations on your approval!1 point
-
Congratulations on BBB arrival! I love the smell of ABS in the morning! Good Luck with your build! No question is a dumb question. Ever! Looking foward to your build thread! Oh, one more thing. We love pictures!1 point
-
The Oracle is mysterious, and while I can perform the ritual and attend the sacrifices, it's beyond the ken of men to know when they will choose to intercede.1 point
-
Thanks! Centurion here I come! [emoji3]1 point
-
For clarification regarding the blaster denial. On the Rubies the Hengstler counter and scope are incorrect. There's missing or very soft details on the scope rail mount and "T" tracks, just to mention a few. Centurion is the ultimate level of accuracy without also focusing on interior details. Out of thousands of 501st Stormtroopers there's only 370 Centurions.1 point
-
HI all, Here are some proof of concept pictures I have for the trigger components. I am really liking my custom trigger; after light sanding the aluminum, the rough edges are off and it feels pretty soft and the piece is sturdy. E-6000 worked great to adhere the metal, resin, and green stuff together. As for the trigger plunger, still want to tidy it up and deciding on how long to make its channel. I may have to pull the compression spring apart some to give the trigger some real pull action. Still brainstorming on how best to stabilize the trigger switch. Raymond (Blaster Master) pegs it, then hot glues it. Perhaps I can find tiny screws and do so that way? Nails? Thanks for reading although update only really a brainstorming session at best. If you have any ideas on how best to install / stabilize the various components, give me a shout, Have a terrific day!1 point
-
And that`s what matters - beeing happy1 point
-
Sniper knee plate - round one. Once the shin was sized, I tried to shape the knee plate to fit the shin. I already offset the shin halves so now it was time for hot water bath. After a lot of bathes and trying to shape it, I tried to glue. I was making things worse with the hot baths and gave up. I glued the front and right side first. I figured I could wrestle the left side later with the help of a heat gun It wasn’t looking too bad. After I glued the left side (it was more than 24 hours since gluing the front and right side), things began to shift. I’m kind of a coward when it comes to the heat gun so I don’t think it did much. When I forced the left side into place, the rest of the plate moved. Here is the result. My main concern is how it fits at the front. It is not centred and not fitted very well to the front of the shin. I think I will pull it apart and try again. I need another tube of E6000. That went fast. Sent from my iPhone using Tapatalk1 point
-
The front dosen`t need to be canon for any level of approval but keeping cover strips screen accurate (front and back) is what to strive for, however, if the builder is a bigger person it will look better if the cover strip for biceps are 18 front/back rather than having the front at 15 and the back at 21. But that`s ultimatly up to the builder1 point
-
This is what I used, lots of others use it as well: https://www.amazon.com/NOVUS-7100-Plastic-Polish-Kit/dp/B002UCYRZU1 point
-
850 Armor Works has an FO kit for about $500 plus shipping so I heard. No helmet, but there are other suppliers for the helmet.1 point
-
Yeah, I think you should ask on your garrison's forums to see if anyone might be interested in doing this work for you. If the person is local, they can ensure that the costume fits you best right away instead of building the whole thing and then having to change a bunch of stuff for fit. In my experience, measurements only go so far; lots of tweaks required even when you get a commissioned build for armour.1 point
-
Jim doesn't do full commission doesn't have the time KB I don't think would have the time either they will finish the bucket for you The closest you'll find to close to finished is MIMIC and he is quite behind because when you over finishing to lots of people it adds a lot of time when your just one person and pulling everything. I don't think he's taking orders but he might. We had a bit of a mess with communication but I still think he's a good guy and very talented just need to understand it will take lots of time to get finished product. IMO you'd be better off finding a kit you like the best and finding someone in the community that has built this armor before and ask if they will do it for you. Or just get up the nerve and work on it yourself piece by piece. Honestly if you set your mind to it anything is possible.1 point
-
Hi everyone, I received the best news today, I’m also known now as TK11874. Thanks to everyone that commented along the way I couldn’t have done it without your help. EIB and Centurion I’m on the way Thanks TK11874 (matt)1 point
-
Hallu TK Frenz! I've finally rebooted my Hero build and am currently waiting for e6000 to cure on my assembled pieces. No more clamps available to put other parts together now, so I figured it would be a good time to share some thoughts I had regarding sizing down a TK. First let me mention that I forgot how scary it can be to cut-cut-cut away at plastic armor. I tackled my forearms yesterday, and I was surprised about how nervous I was to do it all again. For me, fear and doubt always leads to inertia. Doubt kept creeping back into my head, and it took a lot to shut it up so I could get to work! After all, it's just plastic. If I screw it up, then I'll just fix it. Or buy another part. No biggie. So, let's get this done! The WTF armor is smaller overall than my RS armor, so I'm not trimming any of the lengths yet, just sizing things to fit around my arms for now. When making everything smaller, the word to remember is symmetry. The armor isn't perfectly symmetrical, but there are large details that need to be recognized when cutting things down. For example, you don't want to just shrink down the forearm without consideration to how things look on both sides. Below is the mistake I made on my RS build. Don't make this mistake! I wasn't paying attention to cutting the front and back pieces in a relatively symmetrical way. I ultimately had to replace the front half of this forearm entirely. Gah! I won't be making that mistake again. Here is one of the forearms before I sized it down yesterday: I need to keep that front swoop intact. And I need to keep the back ridge with the dimples straight once the arm is assembled. And it's all gotta fit nicely. The outside halves (where the front cover strips are located) have already been glued together because those front cover strips and ridges are a consistent size among TKs (somewhere around 15mm on the arms give or take). You make all of your sizing of the limb armor pieces in the back. Here you can see my forearms before I sized them down. The ridges are ready for the 15mm cover strips in the front. In the next photo, you can see how I've tucked in the 'swoop' piece and am calculating where that 'swoop' ends relative to the 'ridge' (outer) piece. Where I've made my mark is almost directly across from the opposite seam on the forearm. And this measured cut leaves each half roughly the same size. And here is the wrist end of the same forearm. It's hard to see in this photo, but the cut line is almost directly across from the opposite seam. Once trimmed, the forearm will have two halves that are fairly symmetrical. Not mirror images of each other for certain, just balanced! After trimming and inserting internal cover strips, here is the result: I still have fine-tuning to do to the inside forearm trims, but I'm happy with it. While I would prefer that the 'swoops' be more centered, this is the best I can do with both fitting these properly and maintaining as much of the 'swoop' as possible. I may remove more of that return at the top of the forearm for comfort, so I might be able to get things more centered as I progress with this build. Another thing I had to consider when constructing the forearms was that not only do the forearms have to fit, but they need to look proportional to the biceps. I could have sized the forearms larger, but my biceps would have looked ridiculously skinny above them. By the way, my biceps were the first things assembled, and they're on the smaller side because of the fact that I removed the ridges for the cover strips. This got me thinking about how things should line up. Ridges and seams should line up relative to one another from one limb armor piece to another. For example, front forearm seams should be in line with front bicep seams. In addition to this, the outside ridges should line up between the forearm and bicep and the back seams of the forearm and bicep should line up. It would look odd if the front seam and outside ridges lined up, but the back seams were off significantly. I know it's impossible to get everything absolutely perfectly aligned with these parts, but you do your best, right? So here is what I did to make sure biceps and forearms are sized down so that they look correct proportionally to other pieces and that things line up: I took my assembled bicep (which is on the top in the photo below, please ignore the blue tape!), and placed it on top of the still-untrimmed forearm. I lined up the front seams and made sure that the outer ridges were also fairly in-line with one another. From there, I marked on the forearm the location where the back seam of the bicep was located. I then made some eyeballed adjustments on where the cut line should go (based on how that mark would affect the relative symmetry of the forearm pieces). Having the bicep to use as a guide was extremely helpful for me not only getting the forearm sized, but also making sure the seams and ridges line up properly. In the photo below you can see how everything pretty much lines up between the bicep and the forearm. It's difficult to get a good shot of this while still unassembled! As a small TK, I have enough challenges to deal with for the build. By making sure things line up at this stage, I'm saving myself the hassle of having to make serious adjustments later on when all the pieces come together.1 point
-
Hey guys! Just wanted to let you know that I was approved. I am officially TK55933!!! I am very grateful for this!!!! So excited to troop1 point
-
Hi all. Starting painting last night. Satin black (85) for mic tips and vocoder. Not completely finished these bits yet but first coat is looking okay, I think. ;-) More to follow shortly. :-)1 point
-
Here you go ----------1 point