
Leaderboard


Popular Content
Showing content with the highest reputation on 12/29/2017 in Posts
-
Rubies is ranked right up there with Hasbro. Neither is adequate enough to meet Centurion standards. Though Rubies is not mentioned it is still recommended it be replaced with something more accurate at the higher level. That said, as Andrew and I always state the accuracy of your armor, weapon included, is ultimately up to you. Hope this helps2 points
-
Looking great Greg. Hmm. Here comes that temptation again to rip off my stickers and paint everything. Maybe next week. I have a troop tomorrow.2 points
-
Just starting my build thread for my Walts Trooper Factory ANH Stunt TK. My goal is centurion level approval. I'm hoping to give lots of documentation and description along the way.1 point
-
Two days ago I got all the torso straps on. I sewed various lengths and tried different ones until I felt that the alignment of the pieces was good. For the back/kidney/butt 1inch seems to work well (2inch piece folded in a loop). For the chest/abdomen I used 1.5 inch loops (3inch piece folded in half). I guess I will see how these longer ones work. They seem to allow the chest to drop down more to better fit my torso height. This does however allow some range of motion of the chest piece. Don’t know if this is normal or not. Left shoulder strap chest to back fitted and glued. Here’s the whole unit so far. Throwing the belt on was a piece of cake since it all came pre snapped[emoji3] Planning on attaching shoulder bridges and cod strap tonight. Still working out the right shoulder strap issue. Sent from my iPhone using Tapatalk1 point
-
I did. The right side was correct; the left was obviously (now that I'm an experienced builder) wrong. E-6000 is the correct glue to use. I gently pried the parts apart (planning ahead of time which side keeps the cover strips!), cleaned off the glue, glued the parts together correctly, clamped, taped, and clamped with magnets. Two clues I missed when putting them together were that the bicep parts are a cm or two wider at the top end than the bottom, and the bottom ends are not 90° to the main axis. IIRC, those were among the first parts I worked on.1 point
-
Looking good. Not to be the bearer of bad news but it looks as if you have assembled the left outer bicep section up side down. Not sure how it happened, or wasn't noticed earlier. Can you post a couple photos of each bicep? Yours Should look like this
 1 point
 -
Thanks. Took your advice and sanded those front edges down. Gonna have to make a trip to the hobby store for snaps since I haven’t had to actually install any since everything came with them pre installed. Appreciate the advice! Sent from my iPhone using Tapatalk1 point
-
Now that my basic approval was submitted to my GML, I started back on the blaster to add the D-Ring for EIB. I masked off the blaster, just forward of the end cap. Then, I Dremeled off the formed D-Ring and drilled the mounting hole. Good thing, the Rubies cast makes the top section of the mold solid! After a bit of sanding and detailed filing, I installed the D-Ring from a spare light fixture, and I was ready for paint. I masked off the rest of the blaster with a large ziplok bag, and followed the same process (above) for painting the cap and new D-Ring. Voila! An EIB modded Rubies build. [emoji16][emoji16] Sent from my XT1254 using Tapatalk1 point
-
Completely. Thanks, brother.1 point
-
Regarding my quote, all I'm saying is that for my Rubies mod, I included additional detail not required by the CRL or EIB requirements. Cheers!1 point
-
Alright, so my Kittle belt finally fully dried (it took 24 hours) and I'm really happy with the results! It took me 2 passes with the tea dying method described by @Harbinger but I'm really glad I went for it. To recap, I wanted the belt fabric to be a warmer off-white tone than stock and slightly darker than the armor. I think this is good enough for me: Here's some notes on what worked for me, your results may vary and I tried to follow @Harbinger's instructions/advice but my results were different so I hope these notes help give others some potential hints. For the first bath, I boiled a small pot of water and steeped 3 regular sized black tea bags for 1min 30sec. I took the tea in the pot and poured it into a larger bucket that contained 16 Cups of room temperature water (this was the pre-measured amount needed to submerge the belt fully I this particular bucket). It was also an attempt to dilute the tea. I stirred the mix and let it cool a bit (maybe 1 min of cooling time, I checked that the bath was warm with my hand). I had already pre-soaked the belt when I was testing how much water was required to fill the bucket with fresh clean water... some people suggest you fully soak the fabric to help absorb dye more evenly. Next, I submerged the belt in the dye bath and gently moved it around for about 1 minute. Then I pulled it out and put it into another bucket of cool water and a bit of white vinegar. Again, I gently agitated the belt for a minute or so then removed it and let the water run out as much as possible. This was suggested to help the dye to set. I draped the belt over a coat hanger and let it sit overnight. The next morning, it was still damp, but it also wasn't the color/tone I wanted. The cool white was a bit muted, but not the result I was aiming for. I figured it was better to go this way as I should be able to repeat the process and get closer to what I wanted. I did most everything the same on the second pass except the following: 1. I increased the tea bag count from 3 to 5 this time 2. I steeped them for 2 minutes instead of 1min 30sec 3. The belt spent 2-3 total minutes in the diluted dye bath (checking the color after each minute) It's tricky, you can't tell what you've got while the belt is in the bath/wet as the color changes when it dries. It looks lighter when dry and slightly more tan than when it's wet. If I were to do it again, I'd probably do it the same maybe even use 3 passes of the same batch for more control. It just requires more patience as you need to wait for everything to dry. Sorry for the lengthy write up without photos. I just wanted to pay it forward, -Dana1 point
-
Properly modified the Rubies is accepted up to the EIB level, after that it will need to be replaced regardless. Hope this helps1 point
-
Thanks, Sean. Go for it. The stencils are working pretty well so far. I'm making a point of taking my time with them. As far as free-handing the outlines - all I can say is lay off the coffee, lock the door, and turn off the phone. I think I'm going to need one of those magnifying glass / lamps that electronics guys use. My old man eyes are not making this any easier.1 point
-
You are on a roll! Sent from my iPhone using Tapatalk1 point
-
Well obligatory BBB picture of course. I opened it up and rummaged through a bit (I did not take everything out as it was Christmas Eve when Santa dropped off my BBB).1 point
-
OK great, thanks Dan! Really appreciate it!1 point
-
1 point
-
On the shim.1 point
-
Such a lovely shape to the TM armour. Plus, you make a great job of putting it together. :-) Sent from my iPhone using Tapatalk1 point
-
I tried my armor on for a photo shoot. I found my thermal detonator missing. Distressing, that is. Wouldn't want that to fall into the wrong hands.1 point
-
Helmet painting. I found some quiet time without kids and tried to get some painting done. I had completed the grey a few days ago so now it is time for the black. I am using stencils as provided by Trooperbay. I will say that they can be difficult to get placed just right and without any bubbles. Trooperbay does send you two sets - which is great. I needed the extra tries to get the stencils placed and stuck well enough. I didn't paint the paint on very thick. In fact, I dry-brushed the first two or three layers. And then added a thicker coat after the dry brushed layers had dried. After two dry brush coats. they dry pretty fast so you can come back for the second coat within a hour or less. I think I waited 20 minutes or so. Carefully remove the stencils. This was the only evidence of bleeding. I'm very happy with the results! I still need to do the black outline - which will not be as easy since I have a less than steady hand. The tears were much more difficult as the lower part of the tear stencil did not adhere very well. I did four coats of only dry brushing. My last coat got a little thick and I got a little bleeding which I will clean up with some grey paint. This side worked out a bit better. I also started doing the outline around the grey traps and ears. Only one coat - I may need to do a second and slightly wider coat to thicken up the line a bit. Again, I might widen the black lines a bit. Not sure if I need to - they look pretty clean right now. I got lucky with these, I really don't want to press my luck and do a second coat.1 point
-
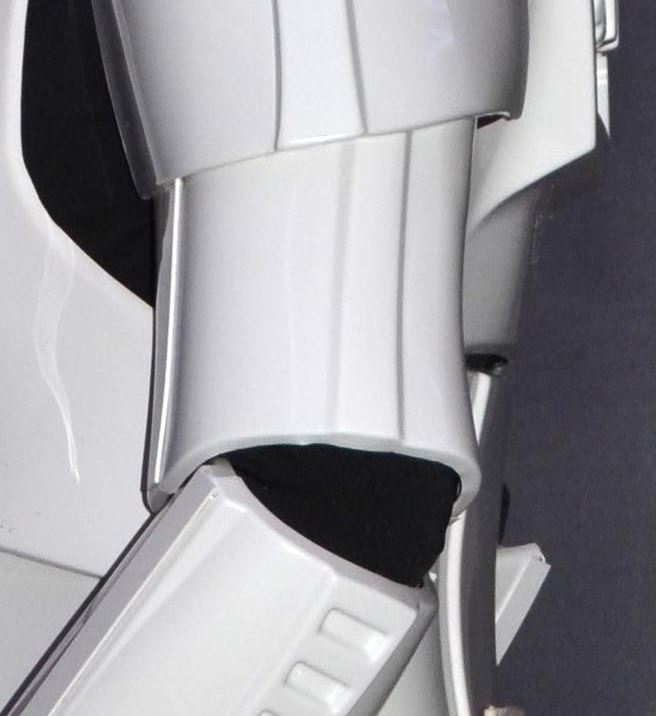
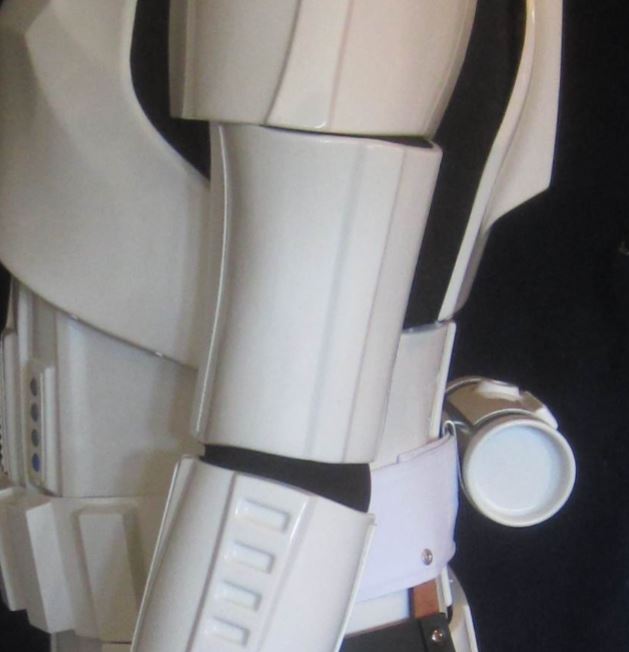
The forearms and the biceps should have the same width cover strips. Symmetry. My forearms and biceps are 20mm, front and back. My armour is made by AP. Your armour may be different but no matter the make, symmetry is what is required for EI and Centurion. My thighs and shins are 20mm too. I could have (maybe should have) gone bigger on those but didn't. It would look ok if my arms were 20mm and my thighs were 25mm. It is all about balance and what looks right.1 point
-
Under the cover strip does not matter. They do not need to butt up. You may want to put a cover strip on the inside to help reenforce the join though. Symmetry on the outside is what matters for approval. Make the cover strips on the outside the same, front and back. As close to the raised edge as possible. That's what matters.1 point
-
Thanks for all the input everyone! A few days ago I attached abdomen to kidney. I first had to trim a little off the sides of the abdomen. I used the pre installed snap on the right side as a starting point and measured over 20mm to draw my cut line. Once the right side was trimmed I took a little off the left to fit. Next was left side rivets. I marked the first drill hole on the abdomen 20 mm from the top return and 10mm in from edge. Then the bottom abdomen rivet hole 10mm up from the ridge. Marked the middle rivet hole midway between them. On the kidney side the top was marked 20mm down and 10mm in. Marked the bottom kidney rivet 40mm above the notch. Made sure both sides lined up and drilled 1/8 holes. Next I cut three pieces of 1inch strap and used a leather punch to punch two holes 20mm apart in each piece. Then placed the rivets and attached the straps. Next I took the pre snapped right strap and cut it down to about 2.5 inches. Glued it and clamped it with 15mm from return to mid snap. Bracket loops coming up next. Sent from my iPhone using Tapatalk1 point
-
You aren’t going to see the gaps in day-to-day trooping, I have them too on my Anovos kit in a few spots. As long as your strips aren’t falling off, it doesn’t look like an issue to me IMO.1 point
-
I finally finished painting the helmet. like I said before, it's not the best but it does look much better. I forgot to take a picture of it finished so I'll have to do that latter1 point
-
This side of the belt has the snap and rivet very close - hence the problem, but the other side of the belt has the snap and rivet location further apart than normal. It is like I don't have my ABS belt centered - but it all seems centered when I hold it up to the ab. I'm supposed to center the ABS belt to the middle of the button panel - right? I used the same measurements as the Billhags diagrams and used by Ukswrath. Maybe the cold has hampered by ability to use a ruler and tape measure. I'm sure that is a thing here in Canada.1 point
-
oops...I ment in my neck of the woods, there are some places with good winter of course...it must have been the Sith in me1 point
-
Expected to have done more but apparently I didn`t So...arms are done And the Shins are sized up, next up is the hook-closure before they are sealed...and the sniper-knee is rough trimmed Hopefully they dont walk away on me because that`s it for today1 point
-
Testors 1138 is a cooler gray, FWIW.1 point
-
Paint cured on the bracket screws. They look like a good match (they aren't tightened down in the first shot): So, I started installing all of the brackets using E6000, the screws with lock nuts, and some of my clamps: I also tried some of my smaller magnets to get some experience using them to hold drying glue: Overall I'm happy that this step is finally done. I lost some paint on some of the screws when tightening things down. Oops. I'll do some touch up later today when these parts all end up sitting 24 hours to cure. -Dana1 point
-
Naval Aviation Tool Control cured me of that a long time ago.1 point
-
... as opposed to "leaving everything out on a bench so you have to hunt for missing parts later" achievement ..... lol1 point
-
Yesterday I glued the cover strap back on my chest plate and glued in the new elastic. I went to take a couple pics with my phone and got a message that my memory was full. I spent an hour deleting pics in order to gain more room. So, two things today. First, I took the clamps off the chest to back strap. I re-curved the strap and it sits way better. Pics to follow. Lots of glue to clean up. That's ok. I used way too much but I know it isn't going to budge. Clean up is simple with E6000. I also found out that E6000 is different in Canada for some reason. It is way less stinky. Don't know why but it's true. I have never had a problem with fumes during my build. I took precautions but found they were not needed after the first few times I used it. Anyway... Second thing. My S-Trim arrived from Trooperbay! Sweet. It was way harder to put on than I expected. I should have waited for it to warm up a bit but I was too excited. It's -27C (-16F) in Toronto today and it sat in the mailbox overnight. Now I have everything I need for my Centurion application.1 point
-
Your best resource for the Anovos build is Ukswrath's build. It is step by step and everything is correct for Basic to Centurion.1 point
-
Awesome! Make sure to have your camera at the ready and ask lots of questions first. That was my big mistake, and I regret not doing it early on in my build.1 point
-
Cover strip as close as possible to this edge.1 point
-
Hello Mike. Back in 1976 when this little film was shooting, the actors playing the Stormtroopers were all around 5'10" and 165lbs. The suits were quite 'skinny' for lack of a better word. The arm cover strips were 15mm, Thighs 20mm, Shins 20mm and calf closures 25mm. This works for a slim build. With my build I found this would not be possible. I was told that for Centurion the cover strips needed to match, not be canon. My arm cover strips are 20mm front and back. This was important. The same width front and back. The narrower and closer to canon the better. At 20mm my arms just fit, albeit a little snug. If you need to go larger with the cover strip, that's ok. From what I've learned here, try to get your cover strips as close to the raised edge as possible. You may need to trim some off the back of your arms and create a gap below your front cover strip in order to make this work. Understand?1 point
-
Build hasn't moved as fast as I wanted. Mostly because it's winter and spraying inside stinks up everything. Sanding of spray filler Glued some various part on to minimize part count and also sanding Tapped all the holes I could This one was a royal pain in my behind to tap, had to use some pliers Feels really secure with the screws in place, but i'm going to add a little bit of glue to some of the parts for extra stability As I hadn't gotten every part and didn't want to stink up the house, I decided to take a look at the electronics. And the best solution for me right now was this: Got a bit of ABS plastic which I drilled 1mm holes in and fed the LED's through. These will be run off a 9V battery hidden inside the buffer tube. Still not sure where to put the switch (which will turn both on or off). My phone's camera struggles with such contrasting brightness, but it is really bright! Right now I have a piece of what would be similar to wax paper on the inside of the pill holes, which disperses the light really well. LED's like these are so directional.. Looking for a better way to disperse the light but so far this is the best one. Next up more sanding and filling until I get my other parts1 point
-
Step 16: Adding mesh behind the teeth (hot glue gun) Cut out a piece of screen material (found at the local hardware store). I used the type for heavy-duty pet protection, as it is a coated nylon and has a rubbery feel to it. I will typically cut out a wide rectangle, and then cut areas to better match the frown shape. Using hot glue, I put a vertical stripe directly in the middle of the center tooth, making sure to keep the glue away from the edge of the tooth. At this point, I push the mesh into the glue, holding tight at the top and bottom until it sets. I continue to glue one side, then the other, starting at the top of the frown area, and finishing the bottom, being sure to wrap it to the curves of the helmet as much as possible. Ideally your mesh should be in line with the teeth, with the square openings parallel to the teeth, rather than at an angle. Step 17: Adding the lenses (pencil, paper, tape, sharp scissors, hot glue gun) There are a ton of different tutorials out there for adding lenses. If you like any of those, awesome. This method is easy and does the trick. It is, however, a more permanent method of attachment but I haven't found the need to remove lenses from any other bucket as of yet. Using a pencil, create a rubbing on paper to get each lens opening cut this out, and tape it to your welding screen cut 1/4"-1/2" around the outside of your rubbing line test fit glue it in place with hot glue, making sure to keep the glue away from the opening edges as much as possible use lots of pressure while the glue hardens, 2 minutes or so We're getting really close!!1 point
-
The wife has imposed a build-ban until after Christmas. Something about spending attentive and quality time with family or whatever - I really wasn't listening that carefully as I just downloaded TrooperTalk and was trying to figure it out. Anyway, Merry Christmas and Happy Holidays everyone!1 point
-
I bought a WTF kit in April and had it within 7 weeks. I think the armor looks great - nice quality plastic, and like others have said, customer service is great. eg my kit only came with one set of ears (he usually ships 2 sets) and when I mentioned that on the fb page, Walt offered to send me a second set for free if I needed it. Also, I needed a new TD end cap and he sent me a new one completely for free, even free shipping. The armor is one of the smaller ones, so although I've seen a range of sizes of people in wtf kits, if you're very tall or heavy it might not be the best kit for you. Here's my build thread: https://www.whitearmor.net/forum/topic/42868-sha-shas-wtf-anh-stunt-build/1 point


.thumb.webp.27f7939d37871f319ff836257d4a3668.webp)


