Leaderboard


Popular Content
Showing content with the highest reputation on 11/26/2017 in all areas
-
Just got my email, TK11317 reporting for duty!2 points
-
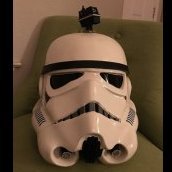
Hi all, What a day- my blaster AND armour all got cleared for service today. I’m officially a 501st Imperial Stormtrooper. :-) Although I might do some little bits down the line, I think my blaster is pretty much done for now. It’s been a thoroughly enjoyable project, and my huge thanks to out to the wonderful contributors to my thread, specifically Tino, Jesse, Chris and Brian. Of course, I appreciate everyone’s input along the way. Cheers guys. :-) Sent from my iPhone using Tapatalk2 points
-
Greetings fellow troopers! Picked up an ANOVOS suit secondhand... after many long nights building in the garage (and, um, 'sick' days), I finished my TK and was approved on Thanksgiving. Need to do a few final touches on my TK and then I'll be putting in my EIB and Centurion applications! Shout outs to Tony (ukswrath) and Joseph (justjoseph63) for their help in my build. Without your threads and supplies I think we'd be seeing far less troopers applying for L2/L3 - I know for me, at least, the difference between not applying and 'going for it' was about $90 and a few more hours worth of building. For anyone who doesn't think they can do a Centurion build, this is my first time building any costume, and I did it in a little over three weeks. If I can do it, so can you! Long live the Empire!1 point
-
Nice! I updated your record for you - you should see the full board now.1 point
-
Great news indeed, congratulations and welcome to the ranks trooper1 point
-
Aww hell yeah!! Congrats man, great job1 point
-
Thank you! I plan on it!1 point
-
Congrats mate! You nailed this build. Now, go and execute your duties [emoji38] Sent from my iPhone using Tapatalk Pro1 point
-
Hi all, Thought I’d do a little summary now that the build is done (barring any little tweaks). Let’s start with tools. With the exception of the obvious, like screwdrivers, drill, sandpaper etc, this is a selection of the primary tools I used. Firstly, and most importantly - a good respiratory mask. Mine is now filthy after spray painting. Dremel with flexible shaft. A selection of files. Dremel attachment - these were my most used attachment. Spade bits (for the scope) Sculpting tools for any work with greenstuff. SUPER TIP - (courtesy of Tino) - keep tools and fingers wet whilst working with greenstuff. :-) And here’s a summary of the paints, and quantities, that I used. 2 x 150ml Humbrol Grey Primer 1 1 x 150ml Humbrol Brass 54 2 x 150ml Humbrol (metallic) Silver 11 2 x 150ml Humbrol Matt Black 33 1 x 400ml Citadel Matt Black x 1 (still some left) 1 x 400ml Hammerite Hammered Black (still some left) 1 x 400ml Hycote Gloss Black (still some left) It’s been a thoroughly enjoyable build. Thankfully, there are not many things that I’d do differently if I did it over. Although, I’m still considering an upgraded Hengstler at some point. Anyway, that’s it from me for now. Thanks for reading. :-) Sent from my iPhone using Tapatalk1 point
-
Now that would be great Sent from my iPhone using Tapatalk1 point
-
Brilliant! Fingers crossed for both of us then. ;-) You never know - we might end up at the same induction event. Dan Sent from my iPhone using Tapatalk1 point
-
Thanks guys! They are actually painted, but very faintly-almost like the paint was watered down. I though maybe that was for screen accuracy but some of RS's other helmets look like they added more paint. Might throw a little more on there as I agree the gold isn't a great look. Cheers!1 point
-
Great suggestions Daniel! Thanks! I have painted the TD screws and moved the drop boxes out a tad further! I'll have to see what I can do about the black around the elbow. Might be able to move the forearms up a bit or lower the biceps like you suggested. Thanks again!1 point
-
For EIB half an inch or less per side, for Centurion, no gap. For basic approval doesn’t matter.1 point
-
Dan, thanks mate [emoji4] It’s all down to you mate, I was thinking about it, saw your post and thought why not I think we are both doing clearance and hopefully EIB together. Good luck also mate Sent from my iPhone using Tapatalk1 point
-
Looking good. Best of luck. :-) Sent from my iPhone using Tapatalk1 point
-
Hey Nicholas, thank you for your patience and EIB application. Lets check it out. CRL and EIB Application Requirements: All the required submission photos have been posted. and your armour meets all the necessary elements as per the level 2 CRL . Tony and myself would like to both congratulate and welcome you to Expert Infantry Rank. Other-Armor Fit/Assembly: In this section we review observations made by your fellow troopers and ourselves. Some observations may lead to suggestions to improve the overall look of your armor. If any suggestion affects any application, it will be listed separately in the above or below sections. We have just a few small items to cover with the Anovos helmet There are a number of things that can do with some tweaking, the frown paint work, incorrect ear screws and mesh in the Hovi tips as well as the Vocoder paint work, I have placed reference images of each of these below. Of coarse none of these are your fault as the helmets come pre built, but i must say the rest of your armour build is exceptional, so it would be a shame not to take the extra steps to get the helmet right. Stunt frown paint should extend to the edge of the last tooth. Yours will need to be longer. Know this may be a shadow from the camera angle but the paint should not leave the teeth area as in the CRL Helmet For 501st approval: Frown is painted gray and does not leave the teeth area. Reference image Hovi mesh Hovi screen mesh is too fine. The mesh Anovos uses is incorrect, it should be a bit more coarse. Some folks are using tightly woven flower sifter screens, but your best bet is to contact Hovi sellers here or elsewhere for replacement screens. Vcoder edge lines are too soft. The screen used helmets have very definitive Vcoder paint lines. We're suggesting applicants touch up the area as needed. The Anovos provided ear mounting screws are incorrect. Again, no fault of yours however, the screw type should be "V" head not the provided "Pan" head. If you haven't changed out the original ear screws we're recommending you do so. Don't discard these however, as they can be used to replace the Thermal Detonator screws. Reference image Belt positioning: If you can bring your ammo belt center up so its covering the bottom of your main button plate it will look just like many of they do in the movie. This should be a quick and easy adjustment for you. Reference image And lastly, Joseph mentioned in your app thread trimming off a few sharp edges on the top of your thighs. We will always recommend removing anything that looks like it could either do damage to yourself or your under suit so maybe a touch of sanding on those and any other sharp corners/edges that you find will save you in the future. Centurion Suggestions: In this section we prepare you for Centurion. If there are any areas of concern this is where we discuss them. Thank you for adding some extra images it does make it a little easier to see details ahead of a Centurion application. If you make the above mentioned corrections this should be an excellent example of how good this kit can look. Congratulation and see you in Centurion soon1 point
-
Also I know this is probably a pretty obvious answer, but along with all the updates to all TK CRL's (like weathering and battle damage scuffs as an option now), what are the chances that optional backpacks will be brought in? Like can the OTTK wear a Kyber Crystal backpack because it's canon? And can any regular TK from any of the OT and R1 wear the Battlefront jump pack? I think we need a run down of all the options that should be available to all TK's from OT as a standard. Also I fixed up my riot baton holster, I'll get some pics tonight or tomorrow.1 point
-
KB props has the mesh1 point
-
Congratulations Dan! You wear the armor well.1 point
-
Hi Freddy, Great work so far. :-) Just out of interest - are you intending to paint again when all of the parts are finished? Or are you planning on your current paint being the final finish? The reason I ask is that if you plan to do a full paint job near the end of your build, ie silver under coat, hammer paint, top coat etc., you might find it harder if all of the parts are glued together. This is because some parts are finished with gloss black, some with Matt black, some silver etc etc. It’ll be harder to mask off the relevant parts if they’re glued. :-) Also, regarding the clay, if you’ve got Tino’s kit you’ll find some “greenstuff” in there. It’s the yellow and blue stuff. You mix it together to creat greenstuff and can use it to fill gaps etc. Once dried you can sand and paint it. :-) Best wishes, Dan. :-) Sent from my iPhone using Tapatalk1 point
-
Hi Chris. Yes indeed. UKG clearance requested > 501st TKID requested whilst I wait (as advised) > UKG clearance granted. I’ve received the initial 501st “enlist” email so I think I just sit tight now. In fairness, the enlist email does state that it can take up to 3 weeks: I’m just too eager to apply for EIB and CENTURION. Happy to wait - no rush. Cheers, Dan Sent from my iPhone using Tapatalk1 point
-
Just to be sure, as it’s not clear, have you done both the UKG form and the 501st form? They both need to be done to be issued your TKID.1 point
-
EDIT: False alarm! The thighs fit around just fine. It pays to have someone there to help!1 point
-
Happy Life Day everyone! That is, if you celebrate that sort of thing.1 point
-
New day, new progress: replaced more resin screws with real ones, mainly to get them out of the way as I am pretty scared of losing them. For the rest of the day I am gonna do some work on the trigger mod (I am going for the average nail & ballpoint pen spring mod) because for some reason I just really want to attach the grip to the tube. I feel like that step is going to make the kit look a lot more like a blaster1 point
-
You are getting there Matt, the work you have done on your shims is amazing Sent from my iPhone using Tapatalk1 point
-
Those shims are looking great Matt, you have done a great job of filling them in I also doubled up the RS elastic for the ab / kidney connection , like you, I thought two lots of elastic are better than one. It’s coming together nicely, you will find once the torso is strapped together and do a test fit, how it all sits together. Initially my arms were strapped too closely together I couldn’t bend them, so I moved the snaps a bit at a time and hay presto got the fit that was right for me, I did the same with the thighs .... I tried the armour on that much that know find it a breeze to put on... lol It’s all worth the time and effort mate, and it’s amazing when you find out your armour is cleared ... not long now Sent from my iPhone using Tapatalk1 point
-
It's important to remember that costume designators are really more of a costume grouping and are only created when there is a gap. For instance BH is Bounty Hunters, and even though Mandalorian Warriors aren't bounty hunters, since the armor is the same they all end up getting a BH anyway. In earlier days of the Legion it was easier to get new costume designators created, but it became abused (RP anyone?) and now the bar is really high. Lastly, the books are written by people who just make stuff up. Look at TK-421. Probably more than 1000 stormtroopers in the Legion, so they can't all be TK-something. Finn is FN and the presumption is that the two letter designator is more a unit designator. If we really followed the books, people could in theory just make up whatever two letter designator they wanted and still be a stormtrooper. While this makes interesting fiction, it's too unwieldy for a real-world costuming club.1 point