Leaderboard


Popular Content
Showing content with the highest reputation on 10/14/2017 in Posts
-
Yeah you are being too much of a perfectionist. If you need to shave one hashmark off then it is no big deal. It is common to see helmets with a different amount of tubestripes on each side. Everything is looking good Joe!3 points
-
Hi i posted this on the UKG over the weekend and thought i would share with everyone here too. Here?s a quick guide to making a canvas belt for your storm trooper armour as an upgrade to something more movie accurate. This took me about two hours this morning to make this including stopping to take pictures, so it is not a long job. Ingredients; Tee Kay armour belt Heavy duty canvas 60 inch wide is best for this 3 meters of 3 inch wide elastic 2 inch wide velcro Camping snaps or rivets A piece of plastic 2/12 x 8 inch Scissors and a sewing machine and white cotton Method; Ok first thing to do is measure around your waist to see how long the belt is going to be. I made mine 1 ? meters in length and cut off the extra at the ends when I was finishing the belt. This gave me an overlap of about 12 inches which is plenty. Cut 2 strips of the 3 inch wide elastic to the required length and sew the two pieces together down the sides using the big zig-zag stitch leaving the ends open for now. I only sewed the sides once as you will go over these edges several times by the time you sew the rest of the belt together. Then put the armour belt in the middle of the elastic belt and measure and mark the outside with a pencil. Sew down the belt along these lines using a straight stich, this is for the plastic insert added later on to support the holster. On mine this was about 20 inches in from the end of the elastic. Then cut two strips of the canvas the same length but slightly wider than the elastic, you will cut this extra off after stitching the two parts together. Using the zig-zag stitch again sew the canvas to the elastic down the sides, I?ve sewn each side twice to give it extra support. Then cut off the excess canvas nice and close to the elastic and sew this side as well. Remember to leave the ends open as you sew the canvas to the elastic. Repeat this again on the other side of the belt. You should now have something that looks like this. Next using the piece of plastic were going to make an insert to support the weight of the holster to stop the canvas being pulled down or collapsing. Measure the distance between the two loops that usually go over the belt, im guessing all holsters will be different in size. My piece is 8 inches long and to fit inside the elastic 2 ? inch wide. Round off the edges so it doesn?t snag the belt and simply slide inside the middle of the two elastic pieces and push all the way in until it stops. Remember you sewed the straight lines in earlier to keep it in place. Now its time to trim the belt to size. I cut just a couple of inches off each side so that there is about eight inches of overlap that will secure the belt at the back. Sew up the ends and now its time to ad the Velcro.1 point
-
Looks like solid progress, Paul. Tidy job in the switch. :-) Sent from my iPhone using Tapatalk1 point
-
So today my plan was to fit the switch in the handle and for it to click [emoji1303] there is probably a quick and easy way to do this but I couldn’t find it, after many failed attempts with various bits of material I settled for a cut down screw and some glue. After channeling out the slot with the dremmel I popped the switch in and filled it with green stuff. Holes cleaned up. While the green stuff dries/sets I thought I’d go back to the scope, this time I filed the smaller end to take the lens then attached the screws. Does this guard sit better ? Thanks [emoji1303] Sent from my iPhone using Tapatalk1 point
-
Wow did not know this! Thank you guys for the pro tip! I will for sure make that edit. Sent from my iPhone using Tapatalk1 point
-
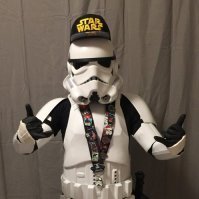
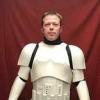
Finally able to wear it again, and just in time for Comic Con! I may move the shoulder bells up higher after the con if they are still considered too low as well as any other fixes or corrections you all can see. Still waiting for my approval to go through so I still have time yet before I try to tackle EI and Centurion1 point
-
1 point
-
Right, following on from Tino’s observation, I sanded a curve onto the underside of the rear sight. It now fits much better. Here a shot of before, after and a genuine sterling for comparison. I’ve noticed that my pivot point for the end cap clip is a little different, however it will be functional and appears to work okay for my build. :-) Cheers Tino. :-) Sent from my iPhone using Tapatalk1 point
-
Awesome job and thanks for the shout out! as for the Velcro, ours is doing just fine with no sign of wear or looseness and I'd say we must have put them on and off at least 20 times between fittings, submission pics and one long troop so far. I find that instead of pulling/ripping the two sides apart, it seems better to get a finger or two wedged in and then slowly work your way up or down, separating the two halves with your fingers. Also, when storing the shin pieces, I don't Velcro them together. I just tuck one side under the other if that makes sense. Whether it helps or not, we'll see but for now it at least makes me think so! LOL1 point
-
Indeed, a nice idea to make this from wood. Looks good. If not yet glued, I would kindly suggest to sand the bottom of your rear sight to better match the shape of the receiver tube. This would reduce the gaps on both sides. Or you can just fill them with green stuff. Sorry for comments like this. Don't want to sound like a teacher. Just following these cool build threads out there and I know, sometimes it's hard to notice these small details while being busy with building the whole thing.1 point
-
Wow - looks great, Tino. Love looking at your three blasters all lined up, and the subtle differences between them. Your TM armour looks great, too. [emoji4] Sent from my iPad using Tapatalk1 point
-
Wow that bucket paintwork is superb. Great stuff. I also added some white to the front edge of the hovis too. Just adds something extra to the 'realness' of the bucket. Sent from my SM-G930F using Tapatalk1 point
-
Welcome, Dimitri! As for the type of snaps, I would go with the line 24 style. I would advise not purchasing cheap ones, as they can come undone easily, which is not good on a troop. I would get the Tandy brand if you can. Like Dan mentioned, in many areas I always recommend using the double snaps in a lot of the areas, especially the shoulders and ab/kidney connections. Using double snaps is a bit more expensive to do, but you can be assured that nothing will ever fall off or come apart.1 point
-
Agreed. I had the same with my lid and had to lose a stripe from one side. I asked the community and the advise was just as Steve said. No problem with uneven number of stripes on either side. :-) Sent from my iPhone using Tapatalk1 point
-
I've installed my sniper plate and I'm stoked with how it turned out. Taking a pointer from FencingCorvetteTrooper's build thread (https://www.whitearmor.net/forum/topic/42075-fencingcorvettetroopers-triple-trooper-build-ap-anh-stunt/), I pushed one side of the left shin up to help with the "warpness" of the sniper plate install. I also gave the sniper plate a boiling hot water bath to give it some help. Here's how the back looks without me forcing it into shape. And here's how the back looks forcing the top to align (which I eventually do permanently using the hot water bath method). It took a lot of manipulating with the hot water to get everything to align, but I'm very pleased with the final product. I really wanted the sniper plate to sit flush against the cover strip and that was not easy, but not impossible! See below. I glued the front and the sides at the same time using E6000. Only thing now is one more hot water back to have the back edges sit flush with one another in order to help the Velcro stick. The other shin is already done with this process! See below. I used the 25mm typical cover strip measurement for the back of the shins. Industrial strength white Velcro is being used to attach them. Only thing I'm worries about is that I used the adhesive that comes on the back of the Velcro. Just wondering if it'll be strong enough to take the wear and tear of trooping. We'll see! Sent from my iPhone using Tapatalk1 point
-
A return edge is not a requirement. But is nice if it's there to create illusion of thickness. I have no return edge on my thighs and reached Centurion. Return edges are nice but can trash an undersuit quick if they have one rough edge. So be sure to sand edge smooth as much as possible.1 point
-
So I have another question... I asked this question in the TK Armor's Costuming Group on Facebook but I also want to ask here as this community will guide me towards what is acceptable for Centurion . I am assembling my the helmet. I followed Eric Dyck's videos and am almost done, as shown in previous posts/pics. I am at the point of applying the tube stripes when I noticed that my tubes are different lengths. I found that the problem is that I attached my faceplate slightly off center. It is not noticeable when you look at the helmet right now. However, once I put the tube stripes on it will be a bit more noticeable. If I put the same number of stripes on both sides the right cheek will have about a 3/8" gap between the stripes and the ear. The responses I got on FB (from AM & Eric among others) was to not worry too much about it, wonky is the way of the TK. I was told that it is not uncommon to have a different number of stripes on each side. My question is this acceptable for Centurion level? Should I take it apart and re-assemble? Or am I being too much of a perfectionist?1 point
-
I compared my track side-by-side and in person to multiple screen-used props that have original track on them. They were indistinguishable with caliper dims as well as overall profile and color. No other t-track maker out there has track that matches mine or the screen-used track. Close but not an exact match. Nothing wrong with close but to say that there is no difference is false. The way I see it is if you spend big bucks on an original graflex, kobold clip, original calc strip, refurbished sterling etc.. that you're going to have in your collection forever, and then want to skimp on getting perfectly accurate t-track to save $20 or because you don't like me personally (even though you don't even know me) is mind boggling to me. Any prop that has t-track on it from another maker is always going to be slightly less accurate than the exact same prop but with my t-track. I wouldn't use my track on my props if that weren't true. .1 point
-
Weird how long the seem, they also look reasonably balanced front to back. Did the armourer make a suggestion? Check with the AT team before but I suspect just cutting a ridge or 2 off and adjusting might be all you can do. Looking good otherwise though.1 point
-
Hi Paul! Excited for you as you embark on this great adventure! With patience, forethought and a steady hand, you'll be holding a completed blaster in no time! Familiarity with tools and know-how will develop over time; you'll be a craftsman in your own right. And if you get it wrong, 'green stuff' will come save the day. In my experience, keeping the FISD E-11 Blaster Reference close by is a good idea to give you the lay-of-the-land and insight on the build. I like to then dive into Tino's two builds to show me how it can be done, and done well in reaching personal build goals. Look forward to future posts! Cheers!1 point
-
looking good trooper but would have to agree with you that the shoulder straps seem to be a bit long and also again with the forearms. Don't know if that effects basic clearance though. i would now start looking through the expert/centurion photo listing and start working through them quite a few shots required. Also which gets mentioned quite a lot if you haven't done it already add some felt to the clips on your TD saves your Armour when trying to position it1 point
-
It is made of plastic and aluminum.... got the plastic parts and PVC pipe from Robert or swpropman in Ebay1 point
-
You can see the CRL here: http://databank.501st.com/databank/Costuming:TK_rogue_one Troopers - you can now build this costume with full confidence that it will be approvable by your GML. This particular CRL was painful to get all the way though. We had lots of fits and starts, and it's unusual that it would take most of a year after a movie to come out for us to get it live. This is a pretty cool costume and not only will it be a distinct TK unto itself, it is also the basis of the Jeddha trooper. So like stormtroopers and sandtroopers, you can have fun going dirty or staying clean. So, if you have done this costume, go bug your GML to get approved. If you have not started one, kits are on sale and make great additions to your costume hobby. Special thanks to Jim T. who was the power behind bringing this costume to life with his talent, hard work and creativity. UPDATE: I also want to shout out to Henry TK-80421 for all his research and dedication on getting the blaster all figured out. This is huge. With unquestioned loyalty, TK-8020 "Daetrin"1 point
-
Update #07 - Found a way When I came across this cabinet at work, there had actually been two of them. So I still had the option to use the backdoor from the second cabinet. Just had to get rid of the venting slots to install glass there. Used this opportunity to transfer some design from the gun rack onto the cabinet door… Bought a sheet of Polycarbonate (t=3mm) and glued it to the door with clear double-sided adhesive tape. Removed the protection cover, added the lock and a foam seal to close the gap between both doors and the cabinet. Then added front door, gun rack, 3 blasters plus some collector items and placed my TK mannequin next to it. Yes, the cabinet looks a bit empty and I am still thinking about ways to fill it. There is enough space to install 3 identical gun racks for a total of 9 blasters (like Bapty, real Sterling, ESB and ROTJ versions, maybe a Rogue One version and so on). Alternatively the dimensions allow the storage of 2 or 3 BFGs below that gun rack. Not promising anything now but maybe an update will follow in a few months (or years). Anyway, for the moment I call this project done. Thanks everybody for reading and commenting. Enjoy your weekend Troopers and Cadets1 point
-
You are a bad man Tino [emoji12] A genius bad man. Showing us mere one blaster owners that we do not have enough blasters. I have just about convinced my wife that I should have my E-11 on a display stand and now I have to build one of these racks and then fill it with new blasters. I think I may be in trouble [emoji51] Sent from my iPhone using Tapatalk1 point
-
Update #01 - Woodworks Went to my local DIY store, got wood-fiberboards (t = 16 mm) and a nice aluminum tube (OD = 25 mm). In case there is any interest, I can provide exact dimensions and measurements at the end of the build… The next 8 photos unfortunately have a strange color distortion because of the electric light in that room. The side panels looked a bit empty and boring, so I searched for an idea… Hope you like it so far. Please feel free to leave critics and comments.1 point