Leaderboard


Popular Content
Showing content with the highest reputation on 10/09/2017 in Posts
-
Oct 2017 Jim Tripon TK-82480 (aka jimmiroquai) has made substantial contributions to the Legion and FISD in particular by bringing to life the Rogue One Stormtrooper and The Last Jedi costumes as well. His creativity, energy, and dedication to stormtrooper costuming has earned him special recognition in service to the Legion community. In recognition, I am please to award Jim the FISD Achievement Medal. Well earned, and we as a costuming club are thankful to you and all you continue to do. With unquestioned loyalty, TK-8020 "Daetrin" FISD Founder | DL4 points
-
This is the 2nd New-to-Legion costume I've worked on (first one being the Death Watch Airborne, Type B), so definitely happy to let the process play out at the Detachment and Legion Level. I'll look at getting a white beard in the meantime since I'm more the build of "Old Rex"3 points
-
Hi i posted this on the UKG over the weekend and thought i would share with everyone here too. Here?s a quick guide to making a canvas belt for your storm trooper armour as an upgrade to something more movie accurate. This took me about two hours this morning to make this including stopping to take pictures, so it is not a long job. Ingredients; Tee Kay armour belt Heavy duty canvas 60 inch wide is best for this 3 meters of 3 inch wide elastic 2 inch wide velcro Camping snaps or rivets A piece of plastic 2/12 x 8 inch Scissors and a sewing machine and white cotton Method; Ok first thing to do is measure around your waist to see how long the belt is going to be. I made mine 1 ? meters in length and cut off the extra at the ends when I was finishing the belt. This gave me an overlap of about 12 inches which is plenty. Cut 2 strips of the 3 inch wide elastic to the required length and sew the two pieces together down the sides using the big zig-zag stitch leaving the ends open for now. I only sewed the sides once as you will go over these edges several times by the time you sew the rest of the belt together. Then put the armour belt in the middle of the elastic belt and measure and mark the outside with a pencil. Sew down the belt along these lines using a straight stich, this is for the plastic insert added later on to support the holster. On mine this was about 20 inches in from the end of the elastic. Then cut two strips of the canvas the same length but slightly wider than the elastic, you will cut this extra off after stitching the two parts together. Using the zig-zag stitch again sew the canvas to the elastic down the sides, I?ve sewn each side twice to give it extra support. Then cut off the excess canvas nice and close to the elastic and sew this side as well. Remember to leave the ends open as you sew the canvas to the elastic. Repeat this again on the other side of the belt. You should now have something that looks like this. Next using the piece of plastic were going to make an insert to support the weight of the holster to stop the canvas being pulled down or collapsing. Measure the distance between the two loops that usually go over the belt, im guessing all holsters will be different in size. My piece is 8 inches long and to fit inside the elastic 2 ? inch wide. Round off the edges so it doesn?t snag the belt and simply slide inside the middle of the two elastic pieces and push all the way in until it stops. Remember you sewed the straight lines in earlier to keep it in place. Now its time to trim the belt to size. I cut just a couple of inches off each side so that there is about eight inches of overlap that will secure the belt at the back. Sew up the ends and now its time to ad the Velcro.1 point
-
And on the night of the new TLJ trailer. I’m stoked!!!! Sent from my iPhone using Tapatalk1 point
-
Looking good trooper1 point
-
That's true, tomorrow I use dome sand paper, to rounded a little[emoji6] thx Inviato dal mio iPhone utilizzando Tapatalk1 point
-
Yeah same here. I'd recommend you go get a sheet of matte black vinyl wrap for cars or similar and cut out your own. And get more than you think you'll need1 point
-
So pretty!! And I had utterly forgotten you're in Vegas. Oof. Did you at least not lose anyone, personally, I hope?1 point
-
New belt and lid arrived Sent from my SM-N950F using Tapatalk1 point
-
Welcome to the FISD Trooper! Us Florida guys have the luxury of having 5 Garrisons and some great troops in the area, see you around!1 point
-
Assuming you are successful in doing that, how do you see getting it on? With no hinge and little-to-no flex, it's hard to imagine how you would actually pull it on over your head and getting your arms through the sleeve openings.1 point
-
That kit is a mess. Colors are mismatched if I'm not mistaken. And they still appear to be using that goofy in accurate sculpt for the premier helmet. What a shame. Sent from my Pixel XL using Tapatalk1 point
-
I think that’s a great idea and I’m sure your son will enjoy trooping with his stormtrooper dad [emoji3] Sent from my iPhone using Tapatalk1 point
-
I updated my DLT-19 a while back from that image1 point
-
Thanks. We'll have to update the CRL when we add L2/L3.1 point
-
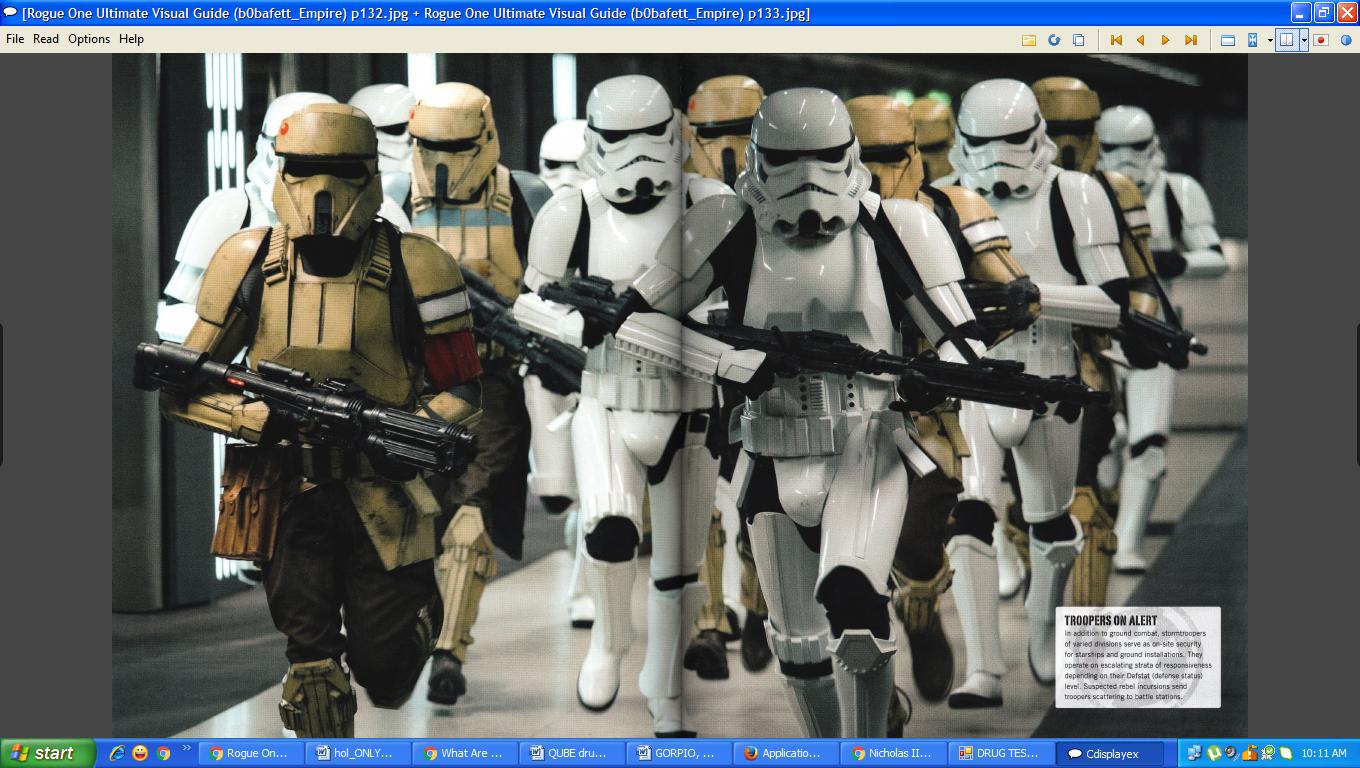
Here is the picture bro...
 1 point
 -
The ultimate visual guide has a pic from scariff showing regular TKs (no packs, no pauldrons) carrying DLT-19s.1 point
-
Watching closely1 point
-
Go for it! Would love to see it. Good luck. Sent from my KFDOWI using Tapatalk1 point
-
Came out real nice. Good work. Sent from my KFDOWI using Tapatalk1 point
-
Both my TFA and TLJ-E use the same biceps (although I also have a more screen accurate pair with curved inside seam), they should be the same in both CRL's a seam facing forward and a seam on the inside.1 point
-
Nice!1 point
-
It really depends on the depth of the paint and what paint is used, a lot of enamel paints can be quite soft and are hard to sand. It would be best to lightly sand as it gives the new paint something to stick too as well, I would go over and sand it wet with soapy water (makes sandpaper last longer) with a wet and dry 400 grit sandpaper. Once dry you could go over with a primer, just to make sure the paint doesn't react to what you are going to use as well as to show if there are still any blemishes appearing before applying top coats. There are a few different masking tapes available, definitely use one for painting, don't use a normal house hold tape as it can let bleed through. Also for the corners you could use an automotive masking tape, it's more plastic and can be stretched and curved while standard painters tape can't. I have also just cut painter tape into curved pieces to go around some pieces, what ever works for you. Don't go heavy with your first coat of paint as it can build up and bleed under the tape, if this does happens once you remove the tape you could use a tooth pick to rub this off. Good luck, hope you have a win.1 point
-
He's by-the-book. Phasma ignores what she feels like and does what she wants. The back cover and the Barnes & Noble poster both show regular Stormtrooper armor to the shins -- just in red. The artists went from the author's description in the book, and she had to approve of their work before it went ahead, so that's accurate. The only deviation from standard isn't shown in the art, but described in the book: he has boot armor like Phasma. Since he never did anything on his own initiative (for nearly his entire career), but went with what he was assigned, the supposition is that that was part of the red armor he was given upon promotion, along with the cape, and is likely part of the standard First Order Captain's ensemble. Phasma went with prototype pieces she preferred over the later standard-issue, had to modify the greaves for length, likely went with the Flametrooper groin armor for fit, and acquired crushgaunts from somewhere. It's also possible, given her personality, that she did the red stripe on her cape on her own initiative, rather than stick with the standard gray that Cardinal has (it's also possible the red denotes a higher rank, as the ancillary material makes mention of Phasma being higher than a Captain but refusing to be addressed as anything else, preferring to work at that level where possible).1 point
-
Is he wearing a regular FOTK or the Captain armor? From the book descriptions, it sounds like it's the same armor as Phasma's, just red instead of chrome. It's MOSTLY the same. IIRC, the cod is different (Flametrooper instead, but KB makes those, too) and individual finger armor.1 point
-
I seem to have made a lot of progress today.... don’t know why.... but it seems that all the work I have done to date is finally coming together..... I started with the strapping for the arms .... Started with the shoulder Bell strapping.... Punched a hole Fitted the top of the snap Job donm Stuck the male straps on the shoulder Bell.... just stuck them on with duck tape.... tat way I can work out their final location before finally gluing them.... Then did the shoulder to the above elbow bit .... sorry senior moment .... I’ve forgot what that part of my body is called..... doh Bracket stick to shoulder bit Fitted the shoulder to the other bit Taped the bell straps ... again trying to get the right place before I glue Sorry no pic Then did the bottom erm to the middle arm Really chuffed with that.... even though I don’t know exactly what I’ve done .... lol Then I sorted out the thigh strapping.... I can remember that name Trimmed and glued the drop boxes Then finished fitting the torso brackets I feel that I have got a lot done today.... I’m well chuffed [emoji3] Sent from my iPhone using Tapatalk1 point
-
Been around for a while, but never requested access here on FISD. TK-73185 reporting in! https://www.501st.com/members/displaymember.php?userID=20416&costumeID=124 edit - hmm. Maybe I do have access. Never mind! Thanks anyway!1 point
-
CRL is Now Live: http://databank.501st.com/databank/Costuming:TK_rogue_one Sent from my iPhone using Tapatalk1 point
-
I applied some glue behind the front pate to cover strip, you can use clamps or apply a little heat on the sides , which will help them come in closer, E6000 does hold quite well even without a lot of area making contact1 point
-
Hi guys, Great work. The kids must have loved it. Out of interest, what DID you say in the end? I’m yet to get my clearance so, based on your first post, I’d love to hear how it went for you. :-) Sent from my iPhone using Tapatalk1 point
-
Agreed you have to start somewhere, I was only just looking at these images the other day thinking how long before we see our first approved. Good luck, looking forward to seeing a build thread soon.1 point
-
I say go for it. Someone has to be the first, and we've certainly seen stormtrooper costumes based on comic book characters - the Legacy stormtrooper comes to mind.1 point
-
Congratulations... looking good1 point
-
Congrats trooper! Well done.1 point
-
Congratulations and have fun! But be safe! Mostly, have fun! We are happy to have you trooper.1 point
-
Just some of what I've been working on so far with this armor. I've been able to disassemble parts without much trouble. The sight of the excess glue at the seams are driving me crazy. Removed button plates to clean all glue and reassemble for a cleaner look. Also working on repainting the buttons for a cleaner job as well Helmet was in rough shape. Lots of glue around the bottom edge under the rubber "S" seal, as well as inside the dome. Removed old padding and temp installed padding I used in my motorcycle helmet. Cleaned and cleaned and cleaned to remove the old glue. Two cracks were also very present. I removed the glue from them and super glued backing material, old white tshirt, then gave a light sanding and covered with ABS paste. Will do something better for the inside. AB/Kidney rivets removed and old holes filled with paste. All 3 rivets were visible above the belt and based off other builds and reference photos, they need to be spaced out more. As for the thigh fitting and knee plate. I removed the knee plate and will clean it up as well. In the meantime will try to figure out how to securely attach it to the shin since it doesn't seem to want to sit where it makes a lot of contact for glue. I also removed the rear cover strip from the thigh and fit it pretty tightly to my leg an taped in place. Marked a center on each overlapping end, where i'm assuming I should cut a straight line down so I can use the cover stip and glue back together. Question is, does the shape look correct now vs. my previous photos?1 point
-
Congrats and welcome to the ranks Sent from my iPhone using Tapatalk1 point
-
Congratulations! Have fun out there!1 point
-
My strapping setup needs some work but now that I've tried everything on again I know exactly what I need. I need to put together the TD for the back of the belt. If everyone here thinks the weathering and pencil look about right I'll spray the gloss coat on and lock it all in. But after that I think I might be done?!? @eqdizzle what do you think about the lines and weathering? Look good? How's yours coming along?1 point
-
And did a test fitting:1 point
-
Finished the grey misting of the rest of the parts and added the pencil lines into everything:1 point
-
Looking smart trooper, good luck on your first troop1 point
-
Wow, I really like the weathering on this.1 point
-
Ab and Kidney Plate are joined together as one piece:1 point
-
Backplate:1 point
-
Hand plates and Shoulder Bells:1 point
-
Chest & Shoulders are integrated together:1 point
-
Here's my completed helmet:1 point
-
There is an automotive product here wihich is called spot putty, you may have a similar product available there. Not as hard as bondo, comes as a smooth paste which when dry can be sanded wet or dry with fine to medium sandpaper, may be an option for the pin holes.1 point
-
I believe this is a picture Tino's living room in his house1 point