Leaderboard


Popular Content
Showing content with the highest reputation on 09/19/2017 in Posts
-
Gonna keep my mouth shut. I have strong political comments that would only get this off topic Sent from my SM-G950U using Tapatalk3 points
-
Let's get some traction on this together shall we? I've come across a posting by Lucas (ZeroRoom) back in 2011 with topic 'The Best Sterling Templates EVER!' I downloaded the PDF on the trigger group: The length of the trigger guard, laid out and flat is 105mm long and discussions say the width is between 11 and 13mm. Perhaps we can gauge a workable width by measuring the width of our Doopydoos 'ports' (for lack of a better word), that take in the trigger guard ends? Discussions say dimensions are not off of a British Sterling, but I gather the measurements are still suitable.2 points
-
Tino, you're the man2 points
-
Everything harness elbow harness knee. They are cloth and I got the one with the shine Forgot what her options are. Very easy to work with and they feel good so far Sent from my SM-G950U using Tapatalk2 points
-
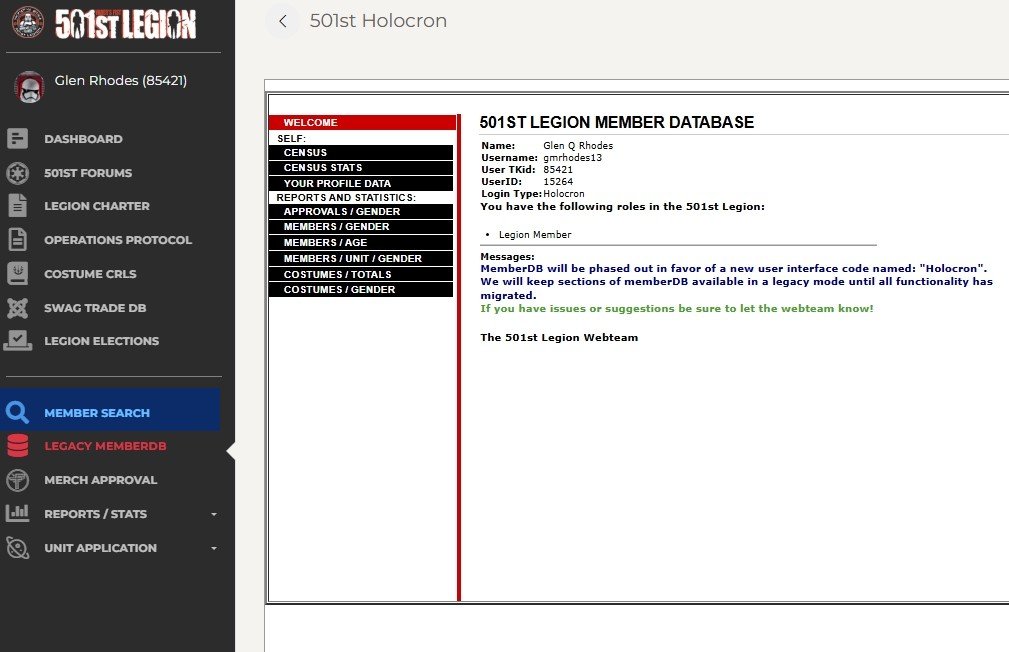
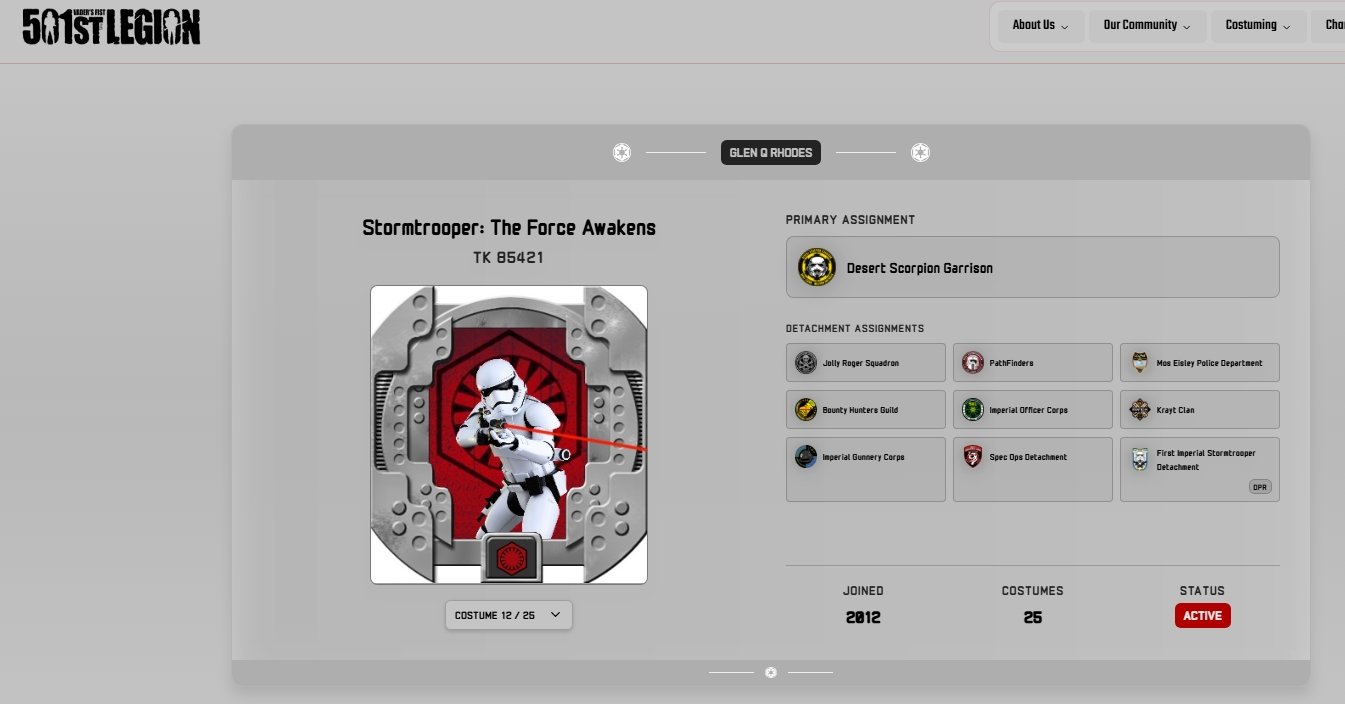
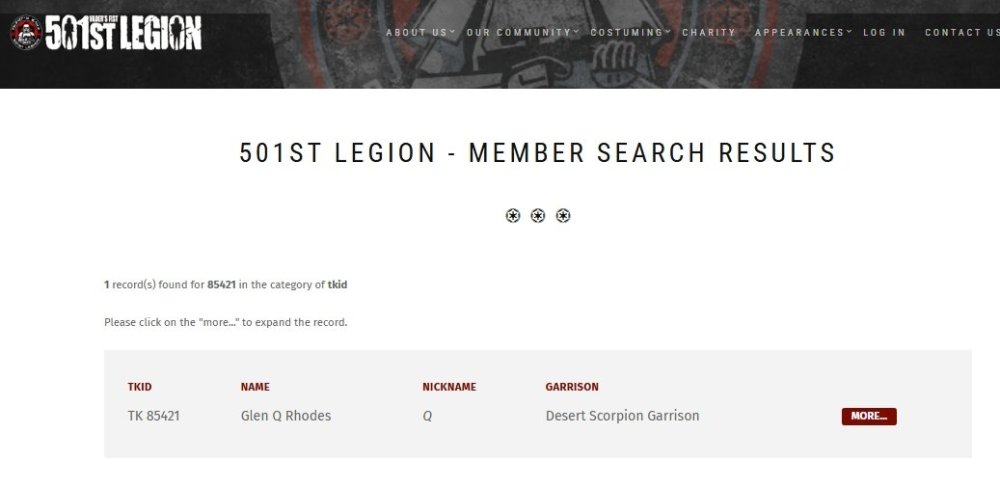
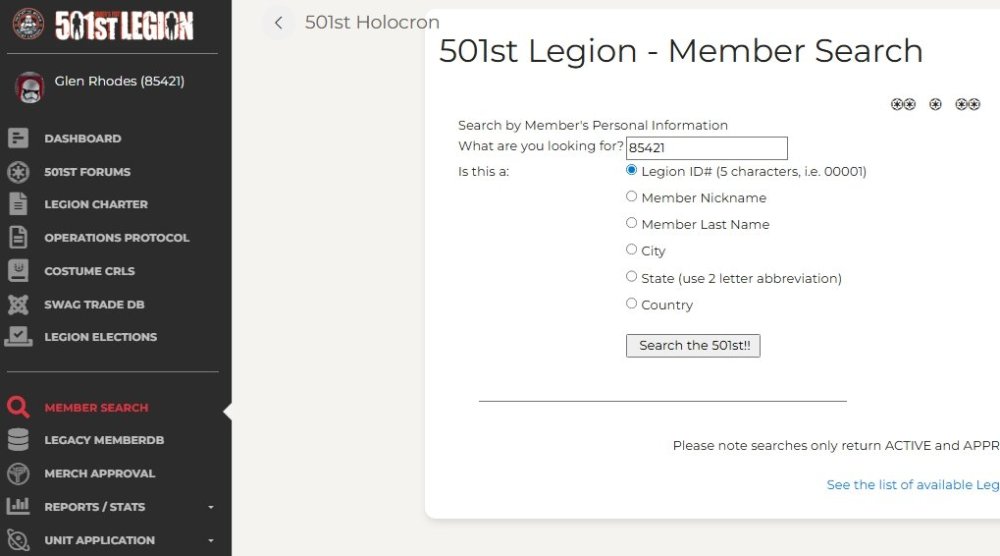
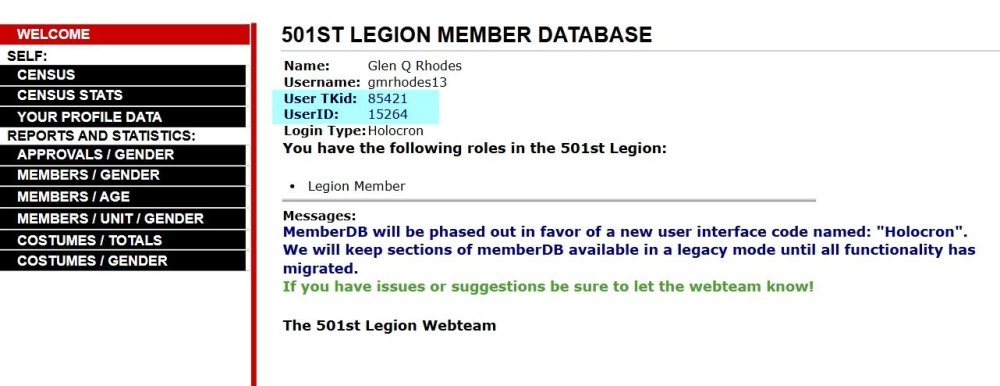
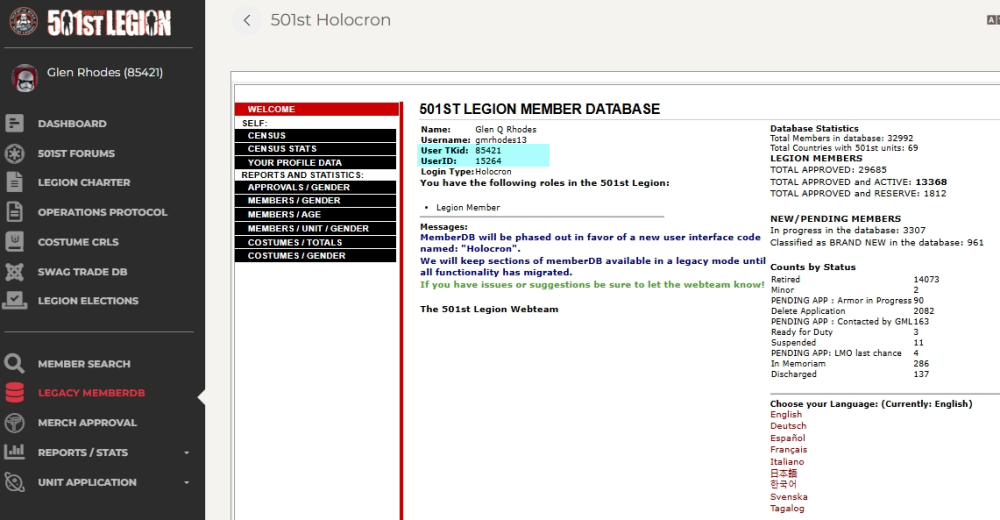
Request 501st status changes here. You must be an approved legion member with an official TKID to request higher forum access, or you can request TK higher access if you are an approved legion member with an approved TK version costume. NOTE: we (the site admins) will periodically check the list of people in this forums database against the list of 501st members as kept by the Legion COG. People will be added or dropped automatically, so it's a good idea to ensure that the email address you use for this board is the same you use in the Legion records. If you need your status adjusted in between database checks, please post here. UPDATE 05/04/2026 NOTE: You must include a link to your 501st record as per below, else your request will be ignored: With the recent legion website updates the link has changed. Please add both TKID and the User ID to your request, you can find this in the legion Holocron NEW INSTRUCTIONS There are 2 ways to find your membership profile: Go to legion forum https://www.501st.com/forum/index.php Click on Holocron/Census https://www.501st.com/holocron/login?returnUrl=%2Fmember%2Flegacy Enter your legion username and password then Login On the side menu click on Legacy/MemberDB and you should be able to access your USER ID OR In the navigation bar post this link https://www.501st.com/member/85421/ and replace 85421 with your TKID then click enter A.C. @NoVATie will then check the members costume list for TK costumes and update access accordingly **Please test your link when you post your request to make sure it goes to your legion profile page. We cannot use links for the Legion forum or Garrison pages.** Thanks to @gmrhodes13for pointing this out. Swapping your TKID into the link below no longer works http://501st.com/members/displaymemberdetails.php?userID=4733 Using the link below, replace 12345 with your TKID: https://www.501st.com/members/searchresults.php?searchfield=12345&criteria=tkid Paste that link with your status request post to have your FISD profile updated. Thanks to @revlimiter for pointing this out. 1. Go to https://www.501st.com/members/searchform.php 2. Input your TK number and "Search" 5. On the "Results" page click "More" to the right of your name 6. On this page that lists all of your costumes, copy the URL and paste it into this thread with your request.


 1 point
 -
Hi folks! I've had lots of people ask about various details regarding how I did my helmet interior. So, I thought it may be wise to just summarize it all so others may learn things or try to replicate some/all aspects of what I did. My goal was to have all my electronics systems embedded inside my helmet, with individually switchable systems, whilst all being very clean and hidden along with a blacked out look. No problem right? For reference, this is what the interior looks like. Note that inside there I have 3 battery banks, four fans, a powered condensed microphone, the iComm unit and an Aker amplifier, all attached to a switchbox: Ok so I quickly found out that it would take quite a wall of text to summarize how to do this build, so I decided to throw a video together to summarize it all instead! https://youtu.be/eYeUpAHOSHM The basic gist is this: 1) Black out your bucket as you desire, I used 1/4" thick neoprene to line it. 2) Create a junction box by leveraging your hovi bolts onto a custom backplate which your switch box also get screwed into. 3) Refine your project box so it has the right size and number of switches for your application (I have 3 subsystems, others may have more or less). 4) For every one of your systems make a custom harness where the electronics run through your switch to its power source, ensure that the switch is the only mechanism to turn it on (so if the electronics had their own switch keep it stuck in the on position and let the switch you use at the project box be the one that controls it). 5) Using high quality velcro, mount all your electronics up at the top, and/or your fans at the bottom. 6) Route all of your wires that need to run from your electronics down to the switchbox in a clean loop, and everything else tied down neatly at the top. Use tubing to wrap the wiring with the least amount of wire and tubing required. 7) Add velcro to the bottoms of your electronics at top and add black padding to hide it all and make a comfortable fit. 8) Use any extra helmet padding as necessary to ensure you have a solid and snug fit. 9) Optional step: You may want to do this at the start but have your eye lenses done up in a manner that will work well with the clean look of your interior (see my other howto to check out how I did mine). Here are some helpful detail shots that highlight some of what I was referring to within the video. One shows all the bare electronics before any lining or hiding was performed at the top. Another shows a detail of the swicthbox at the bottom to show how the hovi bolts and the project switch box mount into the backplate. Here are some links to the more unique or non common materials I used: Project box: https://www.amazon.com/gp/product/B0002BBQNM Flip switches: https://www.amazon.com/gp/product/B001JT7D0G Neoprene lining: https://www.amazon.com/gp/product/B00488DB10 Helmet padding: https://www.amazon.com/gp/product/B00A4TNQ8A 12V fans: https://www.amazon.com/gp/product/B015S5XFJE 12V battery box: https://www.amazon.com/gp/product/B00VE7HBMS All right folks, enjoy and I hope this helps you with your own helmet builds. Post any questions or your own interiors!1 point
-
This picture says it all! My SBB in all it's glory! Wooh, it was a good month of waiting which isn't so bad at all considering it came from the UK. For my E-11 Blaster, I decided to go with a Doopydoos Full Resin Kit. All parts were delivered but the folding stock - wishbone had a piece broken off. This is my first blaster build. First time also working with Resin. I am going for good level of screen accuracy, battle worn and as realistic as possible, especially as it pertains to the SMG part. I will be making a ANH version of the E-11. To bring the blaster to the next level, I am complimenting the doopydoos kit with T-jay's Completion set, and Chris's 3D printed parts. Although originally looking to get Steve's magazine replica some time in the future as well, it will be a toss between it and Robert's magazine, as the latter is hollow and I may need room to put electronics. One huge addition I am absolutely to-the-moon-and-back about is installing Paul's fully wired and ready to install BlastFX - electronics that will bring the E-11 Blaster alive with lights and sound. This latter addition will be a dream come true; order made to arrive late October 2017. As for instructions, I am relying heavily on the E-11 Blaster Reference Manual. Thank you thank you for all the authors involved in this valuable document - gives us newbies a solid step forward. My timeline for completing the blaster is likely a year or so into the future. I am just out to revel at every detail, enjoying small advances every day. With E-6000 as my CA of choice and allowing for green stuff to fix mistakes with that cure time of also, 24 hours, I need all the time in the world anyways. Also, I'm not going on any particular order. Generally speaking, I will be putting the SMG portion together first then, move to the E-11 parts following, but not in every case necessarily. Also, I will seemingly leave component parts 'incomplete' and jump to another component part. So in short, my build will not be done in orderly fashion. Well, without any further due, let's begin!!! After a nice wash to get rid of fine resin dust and left over release agent chemicals, I proceeded to sand down the two ends of the broken part to get ready for applying the reinforced epoxy. I then placed the entire folding stock / wishbone piece on my vise. I placed Popsicle sticks to fill the void between two forks of the wishbone and held them together with tape. After having the epoxy settle while the piece was on an angle sitting on my vise, I felt the epoxy was starting to harden, although really, it was just a short while, so I positioned the piece vertically, so to use gravity for better surface area contact between the resin parts and the epoxy. After cure, all is well! The forks sit evenly between themselves - Yes! Just need a little sanding down of the left over epoxy around the seams which I'll do later when I tackle that piece. Here, I drill all holes in the Receiver tube. Before getting into details, want to emphasize how fine the resin gets when you're killing it. Highly recommend, as it was highly recommended to me, to use a proper respirator and safety glasses. Nothing beats safety and ensuring for good health! So I began by measuring out the existing holes made by Doopydoos using my precision measuring tool and came out with 7 / 16 " and was delighted to see a matching step on my step drill - bingo! I then used my kids crayola crayon to mark the center of the to-be-cut holes and placed the receiver tube on my vise trying to keep it as horizontal as possible, trying to eliminate any tipping and rolling etc. As for the drilling, I tried to keep it as vertical as possible and let the drill do it's work. It took a while, especially when you hit the inner metal tube. I was afraid to go too far so, as you can see, I didn't go all the way to the 7 / 16 " mark, afraid I would over-rotate and make a large gaping hole! It was difficult to see how far I drilled too with all that swiggly resin coming about from the drill process. I will need to go back with some fine precision to get it just right. Better to proceed with caution right?, then have nothing to work with and sorrow. I will need also to finish drilling the rest of the holes, which, hopefully, I will be brave enough to commit to the 7 / 16 " mark more firmly. Here is finer detail showing the work more clearly. I am happy to have made it this far though as I try to be as systematic as possible, wanting to have a clean build with as few mishaps as possible. I proceed with finishing off drilling the remaining holes of the receiver tube. After marking the center of the holes, I created pilot holes and proceeded with using the step drill bit this time around. This just gave the step drill more grab and helped me have my holes more aligned. If you noticed, my first set of drilled holes had one that was pretty off! Here's the piece after drilling. As you can see, I still have the folding stock notch that still needs to be cut out. Oh and yeah, I went a little trigger happy with my drill and tackled the holes on the underbelly of my wishbone. I also will need to do some modeling with 'green stuff' to fill out the handle piece I mangled. This complicates things for this piece, especially about the extension tube which I destroyed, but I will get around to addressing these later. I picked up a 6 in. Round Bastard File (the weirdest of names) to help sand down the uneven inner parts of the drilled holes. While sanding, I noticed that Doopydoos leaves allot of resin where the T-tracks meet / grab onto the receiver tube. The holes on either end of the tracks are filled with excess resin which obscures and takes away the kind of detail I want. To open up the T-track grab holes, I first drilled... ... and then used, what's called a Riffler file to get at shaping out the hole. I learn something new everyday. It says they are made for woodworking, but it is working fine so far. They're pretty tiny tools that come in many sculpting forms. The one I chose is curved on the outside and cornered on the inside. I am hoping the curvature will help me shape the hole and the cornered part of the file to give me the angle I want for shaping the T-track part. Here's the cornered part of the Riffler file tool I just mentioned. Here's the tool getting at the T-track part... ...and now the hole curvature part. Here's the T-track grab hole the way I want it. I think the cut out / file will get cleaner as I work the other holes. The vent hole notch is now cut out and I've managed to patch-up a vent hole that was quite off. Hollowing out the folding stock was quite a bit of work as you will see. Receiver Vent Hole Notch Precision measured the notch to be 3/16" and applied a 1/8" router bit to my Dremel 3000 and put it to task. Followed up by using a square file to get it clean. Redo of Vent Hole Used a 7/16" thread-cutting tap to carve out a portion of the vent hole. Then proceeded to fill entire hole with green stuff. I let the green stuff harden over 10-12 hours to be safe. Then I drilled through once again and followed through with a sanding file. Now, the vent hole is the right size and in the right place, mostly - it's now to my liking. Hollow out Folding Stock Used 1/4" 60 Grit Sanding Band (Dremel 430) at medium then high speeds, ranging from 30,000 to 35,000 RPMs. Before I knew it, resin dust was spewing into the air. SO glad I have a good quality respirator because there was a lot of resin dust by the end of the task. My little nylon brush came in really handy to brush away dust between sanding sessions. I managed to hollow it out in about 1/2 hour. I will need to go back to lightly sand to get it just right. Finally set-up my workshop - here's my set-up for resin work for use of my dremel and for manual handheld sanding. Progress on front sight. I precision measured a dimension on the block and compared that measurement with the real sterling dimension from the E-11 Blaster Reference guide. They don't match up. I gather, generally speaking, doopydoos somehow reduced the scale of the thing? Think will likely need to eye-ball it to get it to proper shape. I came away quite literally, 'short' on trying to make due with my Doopydoos front sight block. Having filed it to shape it,it came out really small! Don't think any pin is going to fit inside let alone a grub screw! Order for Chris's 3D printed part happened real soon after this! In this test-fit pic, the block does look reasonably well but definitely, still on the small side. I did do good on texturing the appropriate parts of my front sight though, like that of the original sterling - green stuff applied and patterned. Green stuff applied Knurling pattern source Pattern applied Pattern applied to back I then removed the strip on the bolt and also made that part of the receiver tube more pronounced. Doopy's resin blobs for screws were also removed. Strip removed Edge enhanced Resin blobs for screws Left blob removed Right blob removed Proceeded to hollow out the outer edges of the bolt, I've gone and recreated the plunger and extractor. I'm happy with it mostly, although still lacking in size and detail but I like it enough to move on. When my completion kit arrives, I have to follow through with putting in the strip that diagonally runs across it. As I don't have a letter and number stamp set to put in the serial number thingy on the bolt, that will be a much later addition. Plunger & Extractor Did more detail on the folding stock. Having hollowed where the rod sits a while back, today, spent the time to add realism to the piece. Carved in and around individual pieces that make up the folding stock to add realism by making it look more like movable parts. There's a ton of 'green stuff' where I was too generous using the Dremel. Still need to follow-up to sand those parts down. Folding Stock I was careful not to hollow out too much of the opening so to reveal the latch inside. Proceeded to work on magazine power cylinders. I just took out the central capacitors with my dremel. Original power cylinder Close up of central capacitors Central capacitors removed I proceeded to tackle a rather significant component of the E-11 Blaster - the m38 scope. I've managed to use spade bits to hollow it out and made some front and end cuts. I've purchased a monocular and will place it in the inside. With the scope being hollowed, I'm hoping the light coming through to the inside will make the monocular functional. Lenses will be placed on either end of the scope as well - with it's concave shape, this will help with drawing light in. A third glass-like disc will also be placed near the large lens end of the scope to reveal graticulars, cross-hair thingys, you know, for aiming at those rebel scum! Original m38 scope - front assembly end Original m38 scope - large lens end I uses spade bits to get the job done. 1" (25mm) bit was used to begin hollowing at the large lens end. 3/8" (10mm) bit was used to begin hollowing at the front assembly end. I tried to be as tactful as I could to progressively move to smaller bits as I proceeded deeper into the scope from the large lens end as you need to take into consideration the narrower contours as you get further in. If you do make a mistake as I did, not tapering in far enough, it's nothing green stuff can't fix. Hacksawing to remove large lens housing Front assembly end - lens housing removed large lens end - lens housing removed Reassembled scope - front assembly view Reassembled scope - large lens view I was eager to get started as ordered items from Shapeways arrived in the mail recently. I now have a true replica of the sight block and pin. With this piece in my possession, I proceeded cautiously to carve out a 'dove tail' channel that will hold the sight block. Having cut-guides put in place, I proceeded to cut out the channel using a hacksaw blade, and using a square and mostly a triangle file to get it to shape. I dare not use a dremel or I would have messed this up really bad. Applying intricate filing and allot of patience paid off. Although the block sits a little loose on the channel than desired, it's nothing green stuff can't fix. I'm overall quite happy with the results. Sight block position template Outline of template Template removed Precision measure for depth of dove tail channel Hack sawing is the first go Square file to retain hard edges at 90 degrees Masked hard edges so I don't widden top edge of dove channel Finished dove tail channel Top view of finished dove tail channel Side view of finished dove tail channel Sight block with pin, test fit on finished dove tail channel Side view of front sight installed Thanks for reading! Any and all comments welcomed.1 point
-
At the encouragement of @ukswrath, here is a post I originally made a year and a half ago on the Anovos FB build group, which is handy for all makes of armor, not just Anovos. ABS Paste?!?! WTF is THAT? I've seen variations of this question over and over. So perhaps this will be helpful. ABS paste is homemade glue for your ABS plastic. It literally melts and reforms the plastic into a solid piece, so it's more like welding than gluing. But as the warning phrase "it literally melts..." foreshadows, you should be careful. Making couldn't be easier. Get a GLASS jar. Don't be that person who makes it in a plastic cup. You know... the one that puts plastic melting stuff into a plastic cup. You've met that guy. Don't be that guy. All you need is a jar, some ABS scrap, and some construction grade acetone. Nail polish remover is NOT strong enough, even though it has "some" acetone in it. Pick up a bottle at Home Depot or the like. (For people in other countries, like the UK, where Acetone is not readily available... you have my sympathies) For containers, I feel a glass baby food jar is ideal. It's just the perfect size (unless you doing something epic!), stupid cheap (if you don't already have one somewhere), and easy to work with. I'm going to assume baby food jar, so if you choose a 2 quart mason jar, scale as needed. In general, ABS paste is practically free, other than the price of a tiny bit of Acetone and maybe a buck for a jar of baby food, if you don't have a suitable container already, since your source material is scrap from your own build. (never toss that armor scrap!) A NOTE ABOUT FUMES: Pure Acetone is nasty stuff. You really don't want to be breathing Acetone fumes. A whiff here and there likely won't cause lasting harm, unless you have existing pulmonary issues, but still, do your best to avoid breathing a lot of the stuff. At a minimum, you can end up with a NASTY headache. At worse, you can actually cause damage to your lungs. Use your own level of protection that feels best for you... some want to wear a full respirator (with a volatile organic cartridge), others, like myself, are content to work outdoors and minimize breathing it. (Once the jar is capped, it should be fine to bring indoors.) FILL the jar with the tiniest scraps if ABS you can get. I literally used the curly-que and powdered scrap from under my belt sander, after all my rough cuts, in addition to cutting up a few pieces of scrap into 1/4" square pieces, with scissors. And now the magic. Add approx 1 teaspoon of Acetone (and remember, I'm assuming a baby-food size jar... scale accordingly if you're trying to go big and make enough for your entire squad to build with!). Cap the jar, wait 15-20 min (or more, no worries) and then check on it. Poke it with a stir stick. (You can literally use a stick. Although IMO, a wooden coffee stir stick (free at Starbucks!) is ideal, and Popsicle sticks have their proponents, too, as does the toothpick crew, for detail work.) If you literally do not have a stick, a strong piece of scrap you don't care about will do, just be careful where you set it afterwards. But poke at it. Get an idea where it's going. Then add about 1 tsp more Acetone. Re-cap it again, wait 15-20 min, then check again, and this time, stir it a little more seriously. Note the consistency. You'll probably want to add some more, perhaps 1 more tsp, perhaps less? You may be starting to get a feel for it by now. Let sit for a good 1/2 hr, then check and stir AGAIN. We're going slow. Slow is good. Watch some TV or read a book. You have better things to do than watch ABS melt in super slow motion. At this point, you SHOULD be close to ready to go. If not, I recommend letting it sit overnight before checking it again. (in fact, that's not a bad idea in general, but it's not strictly necessary) Only add more Acetone if you still really think it's too thick and clumpy in the morning, after stirring it some more. Repeat until you reach that magic mayonnaise moment. Correct consistency is *roughly* mayo-like. I'd say somewhere between Elmer's glue (a little too runny?) and Toothpaste (perhaps a little too thick). Too runny = bad. Remember the "melting plastic" part? You don't want that running down your armor. Too thick and you may get air pockets. Shoot for the Goldilocks zone. ) When you're ready, apply with a stick. Let it dry (duration depends on thickness... maybe 20 min, maybe overnight?) and sand it down. Repeat until pretty. Relatively small amounts (read: the small patches that ABS paste is generally best for) should be relatively safe to use indoors, just be aware of the fumes. Larger projects (or sensitive spouses... not that it smells too different from the nail salon, in my mind) are probably best to work on outdoors. The beauty of using the same plastic your armor is made from, to make paste, is you get a dead-on 100% perfect color match. No painting needed! (note: The level of polish/sheen will not be the same, but the color itself will be a match. ABS paste isn't really good for large area applications... and trying to do that will likely end up causing warping from too much acetone anyway) (2nd note: ABS paste is not as strong as the original plastic. It's not actually a glue, even if it looks like one. For connections needing a very strong join, use CA glue, as usual.) (pre-sanding... but note that color match to the Anovos armor!) The paste doesn't really go bad, but eventually it'll harden and you'll need to add more Acetone. Keep it capped, and it'll last longer, of course... you can dry it out quite fast if you leave the cap off for more than a few hours. Future batches you can probably go faster (read: add more acetone, sooner), but I recommend the slow approach when you're starting out, until you have a good feel for it. Good luck!1 point
-
Name: Brittany Huff 501st ID: TK-63088 Member Page: https://www.501st.com/members/displaymember.php?userID=25777&costumeID=124 FISD Name: kittyvangogh Garrison: Star Garrison Mandatory Information Armor Maker: Anovos Helmet Maker: Anovos Blaster Type: Hyperfirm (E-11 & DLT-19) Optional Information Height: 5' 7" Weight: 160# Boots: TK Boots Canvas Belt: Imperial Issue Hand Plates: Trooper Bay (Rubber) Electronics: Fans (Henry's Helmet Fans), Voice (Trooper Talk) Neck Seal: Darman's Props Holster Maker: Anovos Front Back Left Left Detail Right Right Detail Action E-11 Action DLT-19 Ab Detail Strapping Cod-Butt Connection Chest-Back Connection Forearm Return Edge Thigh Pack Attachment - Outer Thigh Pack Attachment - Inner Sniper Plate - Left Sniper Plate - Right Helmet Front Helmet Back Helmet Side Hovi Tips Lens Backlit S-Trim Neck Seal TD Back Belt - Front Belt - Back Details Boots - Left Boots - Right Gloves Hand Guards E-11 Left E-11 Right DLT-19 Left DLT-19 Right Thank you for your consideration!1 point
-
Hi dan not sure what your plans are for this but this thread is worth reading over at the UKG if you've not seen it regarding the policy on lights and sounds. Must admit I wasn't aware of it until today, so I'm trying to bring it to new troopers attention. https://r.tapatalk.com/shareLink?share_fid=30911&share_tid=66997&url=http%3A%2F%2Fwww%2Eukgarrison%2Eco%2Euk%2Fforum%2Fviewtopic%2Ephp%3Ft%3D66997&share_type=t1 point
-
To me the main problem looks like the strap to join the shoulder bell to your shoulder bridges is far too long . The bell should practically touch the shoulder bridge , this would help your problem no end. Sent from my iPad using Tapatalk1 point
-
Hehe, funny that. Great minds think alike. ;-) Yeah, sounds possible. However, I'm not 100% sure of the aluminium thickness, so don't rely on me for that bit. ;-) Thanks for the tips on the heat. I think I'll have a chat with my dad. He has pretty much every tool under the sun and is experienced with metal work. I'll keep you updated if I make progress. :-) Sent from my iPhone using Tapatalk1 point
-
Wow, just read this and had no idea, somebody was working on this in the background. Will get in contact with Danny (Ripper_L). Sorry to hijack your thread, Jesse. Back to topic1 point
-
For the hasbro unfortunately no, I know that on etsy there is a kit but it costs $ 100 to send it here to Venice, and it is not worth it, it would serve as a secondary blaster for photos with the children, I others ordered two that should arrive shortly, of course to mount a doopy kit with the barrel, sold by T-jay as it did not serve him, and another by propdudes https://www.facebook.com/propdudes/ he is my friend and he is helping me with the armor Inviato dal mio iPhone utilizzando Tapatalk1 point
-
Wow that was fast! Good job!1 point
-
it certainly is good enough well done. I will get onto your review shortly.1 point
-
Sweet! Q also submitted the following CRL text that I'm looking at. CRL link is here: https://origin-wiki.501st.com/databank/TK_TLJ_Executioner Helmet For 501st approval: - Lenses are smoky brown or gray in color. They may be bubble in shape or flat and must be sufficiently dark enough to obscure the costumer's eyes. - A single silver aerator/mic tip cylinder is on lower left side of the wearer's chin. - The frown is solid black and covered in black hexagonal mesh that extends to the tears - Each tear (area beneath the corners of eye lenses) is solid black - Seven cut out tube stripe slots are on each side of the helmet - Two clip greeblies are present over the traps on the side - Two clip greebles are present on the top of the helmet, parallel to the trap greeblies - Along the base of the helmet a black stripe runs from the side of the helmet and across the back to the other side. - There is a slight groove that circumvents the helmet above the brow - There is a slight grove that circumvents the helmet along the bottom and over the chin - A brow of solid black material spans from the traps over the lenses - Directly below the traps toward the base of the helmet is a small trapezoidal stripe. - Mouth area is angled and has 7 teeth with mesh/grill behind. - There is a matt black stripe on the wearers right side of the helmet, which excludes the trapezoid area. Neckseal For 501st approval: - Black with horizontal ribs, fitted to the wearer, and extending from the base of the neck to conceal the entire neck. No hair or skin should be visible around the neck area. Chest Plate For 501st approval: - The chest plate overlaps the abdominal plate - The center-top of the chest plate is recessed and black on the side and upward facing edges. - A smaller clasp greeblie shall be present on each side of the chest, just inside a small indented area the size of the greeblie. - There is a slight groove running vertical on each lateral side of the chest that angles toward the center - Six recessed black ovals are on the wearer's right side, left of the greeblie. Back/Yoke For 501st approval: - The back plate contains a "O II" design where the O is black - The back/yoke is one seamless piece - The yoke portion extends over the wearer's shoulders and curves under the armpits - The yoke is painted matt black. Thermal Detonator For 501st approval: - The thermal detonator mounting plate sits under the back plate and rests above the belt. - The control panel is black. - The righthand recessed end cape is black. - The lefthand end cap extends from the detonator assembly and is all black. - There should be no visible seams. Shoulder Gaskets For 501st approval: - Gaskets shall be rubber or a shiny black material with ridges - The shoulder gaskets must cover all exposed areas under the shoulder bell, between the bicep and chest, and between bicep and back. Shoulder Bells For 501st approval: - One on each shoulder. - The shoulders are considered effectively symmetrical. They may be worn interchangeably on the left and right shoulders. - Shoulders have small round extension at the top under the bell itself that butts up against the yoke. - Shoulders are matt black. - There is a 2.5 - 2.75 inch wide, silver painted or decal First Order Cog present on each shoulder bell. Biceps For 501st approval: - Biceps have a seam that faces forward, also a seam on the inside of the arm. The rest of the bicep must be seamless. - A clip greeblie is present low and across the seam - Two black ovals are present on the outside facing side of the bicep Elbow Gaskets For 501st approval: - Gaskets shall be rubber or a shiny black material with ridges - The elbow gaskets must cover all exposed areas between the bicep and forearm Forearms For 501st approval: - Forearms shall have ridged rail, similar to a picatinny, embedded on the inside of the forearm, roughly covered 1/3rd by a box shape. - Forearms shall have a box on the bottom the wrist end. Each box shall have a single black square in the lower inside corner. - Each forearm shall have two 'clasp greeblies' on the outside facing surface, near the wrist. - Detail box includes black rectangle on small edge perpendicular and closest to wrist. Gloves/Handplates For 501st approval: - Are black with white palm, thumb and forefinger. - Extend underneath the forearm. - White area is made from leather or leather-like material. - Handplates are rigid square boxes and the hand plates are mounted securely over the back of the glove. - The black oval detail is aligned with the index finger of each hand. Abdomen Section For 501st approval: - The abdomen section must wrap around the wearer's body without a visible seam. - The abdomen has 7 boxes attached that matches the order and placement shown and sit flush against the armor. - The large box has a small black recessed square to on the lower left to the wearer. - The second box to the right of the wearer has a small black recessed rectangle near the top. Codpiece For 501st approval: - The codpeice sits below the abdomen and under the belt. Posterior armor For 501st approval: - The posterior armor sits below the abdomen and under the belt. - The top portion of the part shown is hidden by the belt and used to connect the plate to the abdomen armor. Belt For 501st approval: - The belt is ribbed and made from a rubber or a rubber like material. - Five white rectangular boxes and one pouch sit on the belt. - There are 2 horizontal boxes on the front, on each side of the center. They are painted white on the outside half and black on the inside half. - There are 2 vertical boxes on the right of the wearer. - There is a large vertical black pouch with a white cover behind the left side of the wearer. - A small black cloth pouch is worn on the left side and hides the buckle or remaining belt material. Undersuit For 501st approval: - An undergarment must be worn such that the space between the thighs and the belt shows a black material. The black material may be shiny or matte. - The reference photo shows the type used on screen but is not required for basic approval. Thighs For 501st approval: - There are seams on the inside and outside of the thighs. - A clip greeblie is present high and across the outside seams of each thigh. - The right outside thigh (to the wearer) includes a base for a holster. Knee Gaskets For 501st approval: - Gaskets shall be rubber or a shiny black material with ridges - The knee gaskets must cover all exposed areas between the thigh and shin Knee Plates For 501st approval: - The knee plates mirror each other and are placed evenly between the thigh and the shin. - Convex edge of knee plate faces upward. Shins For 501st approval: - There are seams on the inside and outside of the shins, with the opening on the inside. - A clip greeblie is present high and across the outside seams of each shin. - The wearer's left outside shin includes two vertical thin boxes that are seamless. - There is a small black recessed rectangle at the bottom outside front of the shins. Spats For 501st approval: - The spats wrap around the lower ankle, just below the black ankle rectangles. - The spats are enclosed on the outside of the ankle with a greeblie that overlaps the open side. - There is a visible seam on the inside of the ankle. Boots For 501st approval: - The boots are above ankle height and made of white leather or leather-like material. - There is a seam down both sides of the front that swoops out to the side of the foot. - There is a vertical zipper on the inside that spans the height of the boot. - There is a black flat sole with no heel. - No buckles or laces. Optional Accessories Items below are optional costume accessories. These items are not required for approval, but if present appear as described below. First Order Stormtrooper Laser Ax For 501st approval: - Scratch-built or a 3D printed laser ax. - Details to be painted black, white and silver per reference photos. First Order Stormtrooper Blaster For 501st approval: - Based on a replica Sterling sub-machine gun, scratch-built, or a modified commercial toy Stormtrooper blaster. - Details to be painted black, white and silver per reference photos. First Order Stormtrooper Blaster For 501st approval: - Based on a replica Glock 19 repeating pistol, scratch-built, or a modified commercial Stormtrooper toy. - Details to be painted black, white and silver per reference photos.1 point
-
I'm aware of the Disney/LFL embargo on weapons at some events and in certain areas as well as specific countries not allowing prop guns of any kind at all. I was just surprised that there was a restriction in Colorado. Sorry to sidetrack this thread. Lets get back to the important business of anxiously awaiting progress pics from Mimic!1 point
-
I would also say that RS is pretty easy to work with if you need a replacement part, etc. and even if the price were par, I echo everyone else on RS being the way to go. Not knocking the ANOVOS guys, but unless it was much less money, you just get more with RS.1 point
-
True, but RS's quality, screen accuracy, and customer service are leaps and bounds above Anovos'. Anovos does not supply spare parts if needed and their customer service/delivery times are sketchy at best.1 point
-
Speaking only to complete builds the RS knocks the Anovos into a cocked hat. Price is probably great for non UK people too *grumbles about exchange rates* Worth remembering too that the Anovos kit appears to share the same heritage as the RS kit.1 point
-
If you are looking for gloves that will not only fit well, but "breathe", I suggest these: ebay The palms are leather, but the backs are cloth. This allows you to glue any sort of (latex or silicone) hand guards on and has the advantage of the wrist being extra long which prevents them from slipping out from underneath your forearm.1 point
-
I just left the Launch Bay at Disneyland... they sell TK Helmets for $280 (I didn't check shipping on this item) and the TK Armor Ensemble for $1800 (plus $150 shipping). No kits. The woman working there was nice enough to pull out their Store catalog that they use for ordering. I flipped through the whole thing and found no kits. As an Anual Pass holder you can get 20% off (at least at my pass tier). So the Armor Ensemble would end up costing about $1700 after discount (including shipping and CA tax). She also said they think you receive the items within 6-12 weeks. But they ship direct from Anovos and the employee said It's out of Disneyland's hands at that point. Hope some of that information helps. I went there today hoping to order a TK Armor Kit since I was notified my order from December of last year has been delayed (sadly as I expected). Was slated for Summer 2017 shipping. Oh Anovos! Oh, and they replaced their TK Helmet in the display case with a v2.0 -Dana1 point
-
Hi all, I've made significant progress on the folding stock over the weekend. Happy to say I am well on my way to making the latch for the folding stock fully operational. I've borrowed much of the know-how from T-jay's 2nd E-11 Build on FISD. Having already hollowed out the folding stock; I proceeded to hollow out, let's call it the front end retainer, which is that part that holds the inner rod at the front end. Discovered 6" is sufficient and purchased the correct bit extender size. Used a 3/8" spade bit to make the hole. The hollow aluminum rod was drilled at the end, width wise to make way for support pins. The other end was trimmed to length to match support pins through the stock cube. Pins were cut to recommended lengths (30mm for the front and 20mm for the back) from the solid 5mm diameter aluminum rod. Front end of folding stock drilled through with 3mm drill bit then a 5mm drill bit to prepare for pin installation. There are quite a few components sourced and revised to make the latch mechanism work. A hollow styrene plastic tube at 5mm diameter was used to link the pencil to the spring coil. 30mm piece of styrene used to support spring against plastic tube. Length of components revised according to the recommended lengths and further confirmed by test fitting. Here's is a close-up of how the individual components worked together to form a functional latch. Here's the fully installed folding stock rod with functional latch components installed and pins in place. Here are some more details to come. The latch opening needs to be created and the latch itself needs to be created and installed. The 'washers' at the front end also need to be revised and installed along with the support piece that runs down the front. I had quite the ride putting this part together! Felt like I was doing open heart surgery for a bit lol I have to give a shout out to Tino for his detailed build; thank you thank you for your contributions to the forum; I would not even have dreamed of such a mod let alone do it, with out your enthusiasm and technical documentation. Three cheers for Tino! Jesse1 point
-
Thanks Rudi! My way of giving back to the community as I have learned from many awesome build threads here too.1 point
-
Instead, I am going to invest in a couple of other parts/upgrades that I will share when they eventually arrive.1 point
-
Hello and welcome, the bump in the eye is very screen accurate so don't worry about that ;). Great news you are aiming for centurion right of the bat, best way to build from the start. Looking forward to the progress, good luck1 point
-
Thanks for approving me, i look forward to updating my armor and applying for centurion. Sent from my iPhone using Tapatalk1 point
-
Looking Good Kris, Check out the “Advanced Tactics” section where you can see examples of those who have taken their armor to the next levels of screen accuracy (EIB and Centurion). I’d recommend that you aim to build to one of the certification levels, as TK’s look their best at these levels. It's really not hard to acquire EIB or Centurion either, so go for it!1 point
-
Hello Chief! Would it be possible to unpin the following post in the First Order Section of the forum? https://www.whitearmor.net/forum/topic/35680-howto-magnetic-plug-and-socket-no-more-velcro/ TK4205 did a wonderful job showing everyone how to use Magnets to suit up. I personally benefited from it. However, due to the Photobucket disaster of 2017, 95% of the images are no longer available to view. We had a trooper last night try to view the thread only to find that he couldn't see any of the images (His comments are on the bottom of page 3 on the thread). I think if we unpinned the thread it may cut down on more confusion in the future. I made a tutorial similar to TK4205's with a video link and fresh pictures so that new troopers could benefit from his info as i did. If you feel that it could be beneficial, that one could be pinned. I'm not campaigning for my thread to be pinned, just letting you know its available to replace the old one if you would deem that to be necessary. Here is the link to the thread I made in the First Order Section with new pictures of TK4205's method: https://www.whitearmor.net/forum/topic/42342-howto-using-magnets-suit-up-with-less-hassle/ Thanks!1 point