Leaderboard


Popular Content
Showing content with the highest reputation on 07/29/2017 in all areas
-
My Tshirtguns at celebration,,,, captured by REBEL forces ................................................................. https://www.youtube.com/watch?v=8odorUOSLv4 https://www.youtube.com/watch?v=szQpBockwlQ&feature=share http://www.tshirtgun.com/2 points
-
As the UKG are going to be the ones to approve my armour my primary WIP thread will be there. They have a strict approval system and so I want to give my self the best chance by doing the majority of the work there. That said I do want to have a thread here, as they don't allow discussion. To allow for this I will be mirroring my posts over here, but deferring the them on any real decisions that need to be made. And now back to our regularly scheduled program. Big brown box day has now happened: Wasn't feeling so well yesterday so it sat un-attended for a while but early afternoon I felt good enough for an obligatory bucket list moment: In the evening I started with an inventory and checked all part where present. I did a quick check for issues but nothing too detailed. Whilst I was checking everything was there I also used a chinagraph to re-mark all the part numbers on the inside incase the number label comes off. During this time I checked out the belt and I can completely understand why people aren't sure about this. The holster is made from quite a thick leather and the fabric used for the belt has no ability to hold it's shape at all. Even the drop boxes cause it to fold over.... I've ordered some super glue remover and will be testing this on some off-cuts. Hopefully this will make removing the rivet covers easier and reduce risk of damage. Inventory done I tried to put all the parts into the armour bin I purchased. This is the one you can get for around £20 for various DIY stores. I'd prefer the Stanley style one but at £100 it's not going to happen. Unfortunately all the excess plastic means it didn't all fit so seeing as I have to keep the shipping box anyway it all went back in there. The bin is being used as tool and trimmed part storage for now. I elected to start my trimming experience with the hand guards. The reason I went for them was I plan to get flexible ones so they are essentially surplus to requirements and so ideal to learn the material. I used the chinagraph to trace out the cut line and attempted score and snap. The glossy material is tricky to get that first clean cut on. Though once you have something to follow then it's pretty easy. What I did find though was some parts didn't snap so well. It's almost as it the rear layer of some material is different and just flexes rather than snaps. Mixed luck across all the parts I trimmed last night. In the end most trimming was done with some curved lexan scissors. They took a bit of getting used to but are great now I have the hang of them. Next I trimmed the thigh ammo pack. I clamped on a steel rule and scored the long edges and then used the scissors on the ends. The curves where refined with a small file and assorted sand paper. The curves on each end don't match but were accurate to the trim line. The final part I trimmed before time ran out was the inner right bicep. This is one of the more hidden parts being on the inside and under the shoulder bell so seemed like a good place to learn again. This went without much issues, I scored and snapped the straight sides but had the "flex" issues on one side so returned to the scissors to finish. Again after rough trimming I used my set of files and papers to refine the curves and remove all the material to the line. Finishing this part has given me a lot more confidence in trimming and will probably continue with the biceps before completing the arms and then moving onto the legs next. I'm in no rush to get the trimming done. I'm happy with my slow and stead route using hand tools and won't be cracking out the dremel any time soon. Full gallery of images is here with some bonus stuff not here: https://www.flickr.com/photos/themaninthesuitcase/albums/721576601027530741 point
-
So As I spoke about in the first look thread, I'll be putting together the TLJ trooper helmets as I did with the TFA helmets. The way I work is to not rush a product out before it's accurate enough. I'm not interested in getting a product done to capitalize on the craze and cash in with a helmet that needs to be updated multiple times. When I produce this it will be as close as I'm able to get it to screen accurate. I think that right now we have enough details to do this, and I'm planning to be able to offer these helmets towards the end of September, well in time for TLJ premier. I will also offer these as kits and finished versions, with the same pricing structure as my TFA helmets. It is very early in the process and I will be posting updates as they come. Currently we're building a new model based on the photos we currently have, the knowledge of the TFA original props and photos we're seen so far from TLJ. Here are a couple very very first draft, rough shapes. And a little smoother: More to come as we progress. ======================= UPDATE ===================== Open offering starting soon, private preorders up at www.phoenixprops.net for a limited discount.1 point
-
I have ten on mine also. I did the same thing when I built my first TK.1 point
-
It is fine with 10 teeth cut out in my opinion. Less than half of the original helmets have 8 teeth cut out, with several having 10 or 6 as can be seen in this photo of half-finished helmets outside AA's studio in 1976. That said, I don't have the final say, so better wait until one of the leaders chime in.1 point
-
Randy is a great guy. Top quality work. I know cause he's a member of my garrison. He's working on one for my TKC I'm putting together. Enjoy your masterpiece!1 point
-
https://www.whitearmor.net/forum/topic/33740-themaninthesuitcase-doopydoo-build/ Thats' my DD build thread, think it lists where most of the bits came from. Just bare in mind my end cap clip is a bout 4-5mm too close to the end.1 point
-
Thanks for catching my mistake, hopefully corrected.1 point
-
That's what happens when you get too excited about BBB. I've been lurking and learning on this site for 6mos but have never been a poster and am finally figuring out how to create, reply and upload etc on the site. Hopefully my title change will take effect and prevent confusion between our two threads. Although it will be slow going due to the nature of my day job I'll keep my thread updated with my progress. Very likely I'll be learning from you though so please keep doing the same on your build thread. Good luck!!1 point
-
Sweating? Inside a TK suit? Say it isn't so! LOL Thanks so much for the tip! Will definitely give that a try. I had heard of the velcro on the front of the boot as well (which was more to keep the shin from riding up), but I really didn't like the idea of sticking that stuff on my new boots. Fortunately, a test run last night around the house for 30 minutes only resulted in the left shin creep. Other than that, the fit and performance was great!1 point
-
ha ha ha so cool..1 point
-
And painted...this time I did it by hand, practise until it`s time for the helmet ...was thinking about going free-handed and not use any templates...not that I´m Rembrant or any thing and kind of expecting to do some clean up and re-painting but thought it would be fun to try at least1 point
-
Incase you didn't see this recent render is missing the nose plate as well1 point
-
Thanks Chris. Any tips for the DD? I know I'll need to get the metal 'track' (is that the right word)? I've seen others change the sight and counter too. Any tips would be greatly appreciated. :-) BTW, my Anker power pack arrived. It should fit nicely at the back of my lid. A bit like this but with the Anker at the back: I'm going to make my own bracket too using ABS. I'm going to try 3mm and see how that goes. :-)1 point
-
Agreed 100% Higher level requirements most definitely need to be based on a real or replica Airsoft S&T Sterling L2A1 AEG, not a real 9mm Sterling Mk4 L2A3 Sub Machine-Gun. Level 2 or 3 should most definitely require a real or replica Element M300A Mini Scout Light be mounted on the right side, not just any generic mini flashlight. As Chris said there is a much more detailed write up with all the information needed to make an accurate Rogue One E-11 right here on the forums, and it would be a real shame not to take advantage of this resource and all the work that's already been done there. Our Detachment Commander has put me in charge of the of the official FISD Rogue One E-11 Blaster Reference thread if you check out the link below. PLEASE CLICK HERE: https://www.whitearmor.net/forum/topic/41271-rogue-one-e-11-blaster-reference/1 point
-
Many of us with different types of armor (myself included) have experienced this, Gary. I used a 1 x 1 x 8 inch piece of "chair foam" placed along the inside of the shin along the cover strip cured the problem. I suggest attaching it with Velcro so that you can remove it for occasional cleaning... (it can get pretty smelly due to sweating).1 point
-
Morning all So, whilst I wait for my armour to arrive, I may have had a little spending spree. I've ordered a Doopeydoos E-11 kit, TRamp, Holster and need to measure up for gloves and Neckseal. After seeing a link on another build thread, I think I'll buy the boots as they are (Amazon most likely) and dye them. £35 seems pretty reasonable. Feels like Birthday and Christmas rolled into one. :-)1 point
-
That's why I mentioned it lol1 point
-
you have the same title... this is going to get confusing1 point
-
Here's mine!
 1 point
 -
Awesome, good to see more people on board for the R1TK train lol. Nice title for your post BTW Following so we can learn from each others progress!1 point
-
Hey! and well...I´m not entirely sure, I did a lot of looking at scenes and pictures and it´s hard to find a definitive answer, at least in my opinion...the scene suggested sure make it look black but since it´s metal, I could be wrong but it sounds like metal clashing when Luke fiddles with it or made to sound that way due to the fact it´s a prop...anyways...there´s a lot of reflection and shadows going on which make it hard to tell for sure...and almost all the reference pics show the hooks to be of silver/silver-like colour as does the "hot toy-figure". Going over the movie and pics yet again I think it´s somewhere in between, maybe gun metal/grey-isch and quite possible they also used diffrent ones ...however....due to your post I started thinking again (now I´m boasting) and as the pic in the CRL show it´s black so.....re-painting it is! Thanks for the input, much appreciated and..have you got yours yet? and if so, would you mind posting a picture?1 point
-
Not hard at all - it's just a matter of drilling a couple of small holes and installing the bolts. But I would wait until you get the actual armor together so that you can accurately determine where the holes should be.1 point
-
I don't have any issue with that. However for the higher levels I think it should be that the E-11 is based off the commercial replica and not a real sterling. The scope is different from the OT version as is the Counter. As well as the other small details. And I am even for having to use the Element surefire clone for level 3. There are some really great write ups on the R1 E-11 blasters subforum and I think it would be a shame to not take from those resources.1 point
-
Hi All,More progress made over the last couple of days. I must admit, I'm thoroughly enjoying this!!! Rear traps were okay for my existing templates (from TK4510), however the RWA tears/face traps are a little smaller so I had to go free hand, just using a top and bottom mask. Also touched up the ears, frown, and another coat on the vocoder. And here's some artistic shots... It's a great lid to work with, and so far I'm really pleased with the progress. Next up, tube stripes, mic tips and lenses. I might also trip the left ear a little too. I know that gaps are to be expected - and vary from helmet to helmet, including screen used - but I feel I can do better. More updates soon. :-)1 point
-
Oh man. Paul, it looks even more amazing than the blue. I see you were able to center it more as well. Fantastic work on these displays. PM to be sent.1 point
-
Hi all. Starting painting last night. Satin black (85) for mic tips and vocoder. Not completely finished these bits yet but first coat is looking okay, I think. ;-) More to follow shortly. :-)1 point
-
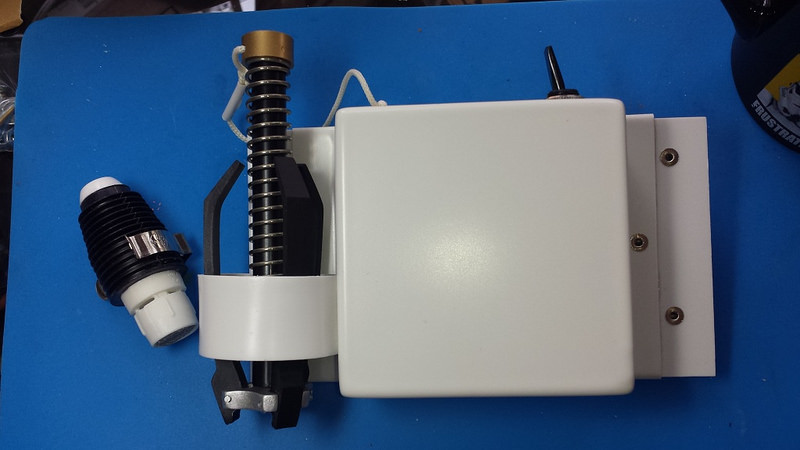
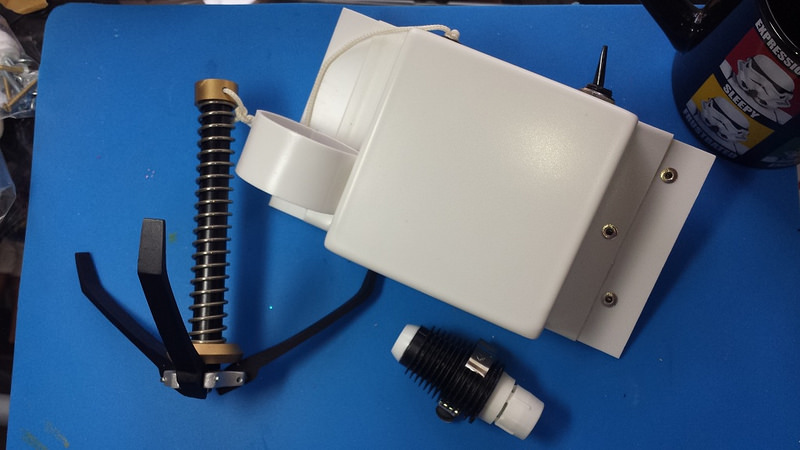
Hot off the press and using the newest TINY display and driver board, Bulldog's M38 scope kit fitted with custom electronics. Everything fits inside the main front collars including a convex lens, red acrylic cover and the display itself. and a quick video... https://youtu.be/ZNMxuq9ewi4 Brian, can you hit my up on PM or FB messenger please, I seem to have lost some of your details! Paul1 point
-
I've tried both methods: just snaps and just velcro. I tried the velcro first because I was told that it made adjustments easier- and I suppose it did. But I didn't like the extra thickness that the velcro gave to the belt. Even with the low profile velcro, it adds bulk. I didn't like that at all. Near the end of my build, I tore off all the velcro and went with just snaps. I liked the look much better! It wasn't always as secure as I wanted it to be, though. I ended up putting a small piece of low profile industrial velcro in the center of the ab plate (roughly at the center of the belt), and small pieces of velcro on the left and right sides of the lower part of the kidney (with corresponding velcro attached on the belt). This (along with the snaps) secures the belt nicely without adding bulk, and keeps the belt from shifting around during troops.1 point
-
scopes assembled Sent from my iPhone using Tapatalk1 point
-
you know you want to be a sandy1 point