


ukswrath
-
Posts
14,622 -
Joined
-
Last visited
-
Days Won
180
Content Type
Profiles
Forums
Gallery
Articles
Everything posted by ukswrath
-
Ensi's ANH Stunt Build [ATA] With Centurion in mind!
ukswrath replied to Ensi's topic in ANH Build Threads
Nice job! -
TK-20980 Requesting ROTK Centurion Status [407]
ukswrath replied to 11b30b4's topic in Request Centurion Status
Hey Jeff welcome back and thank you for your Centurion application. Let's do this. CRL and Centurion Application Requirements: All required submission photos are present. Outstanding job on your build trooper . At this time Joseph and I would like to welcome you to L3 Centurion. Congratulations! Other-Armor Fit/Assembly: Being honest here we looked really hard to see if there were any discrepancies worth mentioning for the sole purpose of enhancing the overall look of your armor, and.... couldn't find anything lol. A good number of people fly through builds just to be the first at something, but none compare to those that are built to the higher levels of accuracy. This is a very clean set of armor Jeff. Your attention to detail is noted and is something to be proud of . Now get out there and start representing the Empire as it's first ROTK. -
Awesome Sandy
-
Looks good
-
Difference, higher grade quality (Military, Police, and marine applications). Both are also anti-corrosive and shouldn't have any negative reaction to E6000. Theses snaps are strong, essentially eliminating the need for a two snap connecting strap system you see a lot of these days. Not to say there's something wrong with that, but if you didn't have to then why do it. Hope this helps
-
FN1313's Jimmiroqaui FOTK Armor Build
ukswrath replied to FN1313's topic in Build Threads Requireing Maintenance
Yep, the only way to go in my opinion also. -
Pad to your heart's delight so long as the armor section placement is correct and the padding cannot be seen .
-
Or just finish trimming up to the cover strip and be done with it lol
-
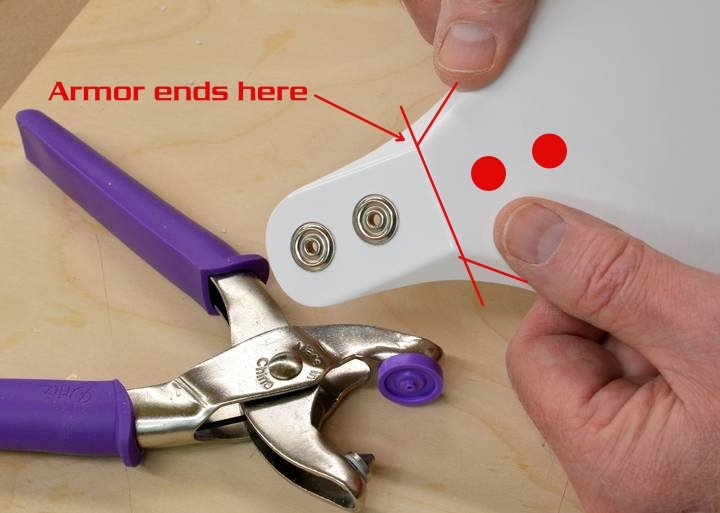
Hey A.J. looking good brother. Just and FYI the armor technically ends here with the rivets positioned as illustrated. Here's a reference photo
-
Looks perfect thank you
-
Nice job
-
That's a first, got a photo
-
Looking good John. Note, the top of the ammo belt should reside at the lowest Ab buttons. Here's a couple reference photos
-
No, a photo taken from wrist side looking through the forearm. Zoom out
-
Do you have a photo of the wrist side?
-
Boiling is common but usually for smaller more rigid components where it's much easier to control vs trying to find a large enough container for the entire or even half of the butt plate. These are merely suggestions with you and your armor in mind
-
Looking good though I'm lot entirely convinced boiling is the best or safest solution. Like Swede mentioned adding connecting straps in the corners would achieve the same result. Another note, you may need to drop the right bicep, the left side appears to be hanging lower. Also, I believe you mentioned connecting the forearms to the biceps, doing that would definately help the gap between in that area.
-
Good luck Rat, see you on the other side.
-
Freduster's ANH Stunt TK build (RS Props, aiming for Centurion)
ukswrath replied to Freduster's topic in ANH Build Threads
-
Fish's ANOVOS Build Thread - Aspiring for L3
ukswrath replied to fishgoh0nk's topic in ANH (Stunt and Hero)
Thank you, like you we learned from those that came before us. Troopers Helping Troopers -
Fish's ANOVOS Build Thread - Aspiring for L3
ukswrath replied to fishgoh0nk's topic in ANH (Stunt and Hero)
Some FB groups that aren't focused on accuracy and also aren't interested in referring people here think they have all the answers Sadly nobody has all the answers however, the collection of very talented builders that can be found here will get you going in the right direction and help maintain that. Without proper guidance people are more apt to head down the wrong path resulting in poor quality builds. -
Wow these came out awesome.
-
The left thigh top looks a little bit on the pointy side, I'd be a little concerned with that digging into your groin when lifting your leg.
-
Wow that's beautiful
-
ANOVOS (DENUO NOVO) FOTK Armor Delivery Possibility
ukswrath replied to JonnieBear's topic in TFA Stormtrooper
Beside building your own as Brien suggested I believe Diversity Props may have a few in stock. You can find them on FB.
