Ripper_L
-
Posts
1,757 -
Joined
-
Last visited
-
Days Won
3
Content Type
Profiles
Forums
Gallery
Articles
Everything posted by Ripper_L
-
The lasertag blaster is a great idea! If you can share the configuration, I'd be very interested and I'm sure others would be too. Good luck with your 3d-print helmet, I'm really looking forward to that. (I own a CR-10 Max 3D printer). Jasons thread definitely shows how much effort one can put into a 3d printed armor. If you have any questions, feel free to ask!
-
Congrats!! Now off to this section: https://www.whitearmor.net/forum/forum/160-newly-approved-members-sound-off/ I'd also like to motivate you for reaching higher levels. Our LvL2 standards for Expert Infantry are not far off from the basic approval. You'll find all the information about the EIB program here: https://www.whitearmor.net/forum/forum/95-expert-infantryman-program/
-
Sometimes the mold dimples don't fit perfectly, it might be better to start with the ear pieces. clamp them on and then drill through all 3 layers. you can keep the one screw you already have.
-

Themaninthesuitcase SE-44C build
Ripper_L replied to themaninthesuitcase's topic in Weapons of the First Order
Looking forward to see you progress within the next few years. Maybe you can move the target deadline slightly forward. Let's say 2039? Man, I can so relate, I have a bunch of open projects laying here since.... well I can't even remember, but it's been years! -
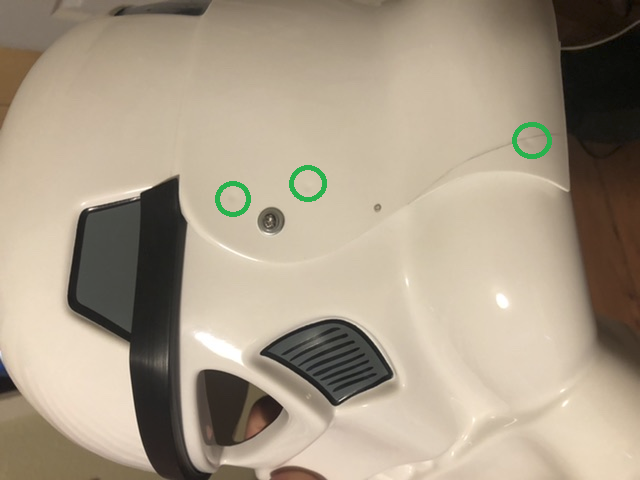
If you have a look on your ear pieces you may notice that they have 3 marked holes for drilling. This is where the screws go through. If you screw the ears on, the different plastic layers are pulled together and the gaps nearly disappear. Anyway that seam will be covered by the earpieces later. the 3 markings are also on the outer shell of your helmet: The hardest part is to trim the ear pieces, so they fit smoothly around the tubes. I used sandpaper to achieve that. Take your time, measure twice.
-
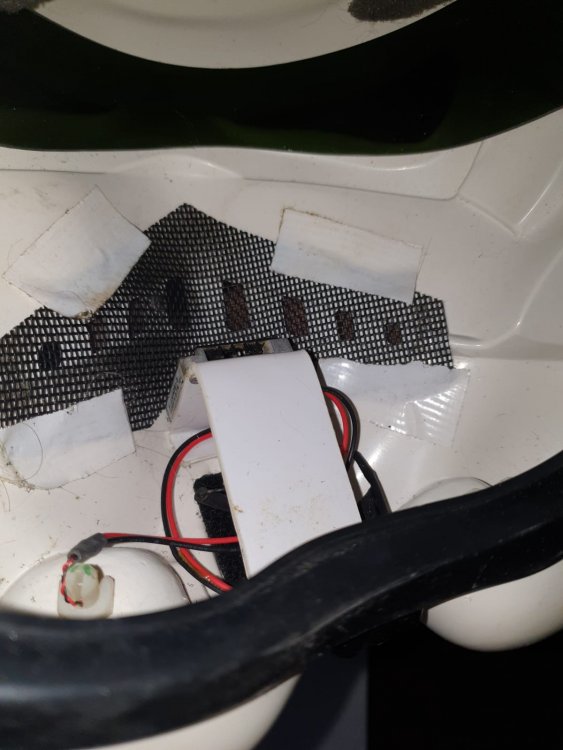
I glued a small scrap piece of plastic as bridge inside my helmet. I mounted my fan on it and stuffed the cables underneith, that way everything is in it's place. here's a picture: it is glued in like this and even has enough space to hide the fan battery:
-
Snap-Setting Solution?!
Ripper_L replied to TheRascalKing's topic in The Foundry - Armor and Prop Making
I used these pliers from prym similar to the ones @themaninthesuitcase has, but they have the same issue as your Dritz ones with the plastic bits on the tips breaking out sooner or later. I might print some replacement bits for them with my 3D-printer, though. https://www.amazon.de/Prym-PRYM_390900-1-Vario-Zange/dp/B000P1ASDI/ref=sr_1_3?__mk_de_DE=ÅMÅŽÕÑ&dchild=1&keywords=prym+druckknopfzange&qid=1609755372&sr=8-3 But it shouldn't be that hard to modify an eyelet press like this one to use it for snaps: https://www.amazon.de/Edelstahlmarkenshop-Ösenpresse-Ösenstanze-Nietenpresse-Druckknopfpresse/dp/B07CGRKDCV/ref=sr_1_7?__mk_de_DE=ÅMÅŽÕÑ&dchild=1&keywords=Druckknopfpresse&qid=1609755487&sr=8-7 -
TheRascalKing's Anthology Jimmiroquai TK Build Thread
Ripper_L replied to TheRascalKing's topic in Rogue One Build Threads
The helmet gloss looks excellent! To the shoulderstraps: paint reaction can have different reasons, either the layer underneath reacting with your paint, temperature issues, too much paint on one spot, etc. etc. It's sometimes really hard to not get an orange skin, but it looks like you've found your way! Did you polish the clearcoat at the end? I agree your thighs might need some trimming for better movements. Great thread and very good progress over the holidays!! -
Hello Georgia! RS Props is a great choice and it's good to hear, you've done months of research upfront. If you want to know some more about how life is in this great world of starwars fandom as a legion member, I'd suggest you check out the field training exercises section. https://www.whitearmor.net/forum/forum/13-field-training-exercises/ this is where our finest troopers report from duty and show their latest event attendances! I'd also recommend you to sign up on your local garrison forums on https://501st.nz/forum/ Whenever you have any questions, feel free to ask!
-
Another great edition at the end of the year! Congratulations to the two of you @justjoseph63 & @gmrhodes13 for achieving your milestones!!
-
Dan, you are a legend! :) Thanks for the 3k+ helpful posts you've done!
-
There's no specific criteria we follow. But this thread here is definitely worth pinning! Thanks a lot for the hard work!
-
In some of the scenes 501st members with their own armor were present on set. They were mostly used in the background. For the close-up and stunt shots it looks like Rogue One armor to me. btw this subforum is ment to be for technical support, I will move the thread to the correct place. ;)

-
weird. It works fine for me :/ I can send it to you via mail, if you wish.
-
might work on the pc instead of a mobile device with tapatalk.
-
"501st Legion" also vanishes if you reduce the screen even more. If it's too small, the toolbar switches to mobile version. Only way I see is to move it over to the left, maybe between "New Posts" and "Pages" (?)
-
you can sew a patch on there to cover the wrong prefix.
-
Hi Jimmy! I'm still a student, too. No worries about being too young, there are younger members within our ranks! I also started with a stormtrooper and I would never regret it. Especially if you're a little technically gifted it should be no problem to build your stormtrooper. If not, you can still buy an assembled set of armor from one of the armor makers, but this might cost you a lot more money. As stated before research is most important, check out the getting started section and consider which armor maker suits you most.
-
Welcome to the FISD! Feel encouraged to give it another try.
-
Hi there! It's finally time for me to build my a femtrooper armor. I'm doing this for my beautiful girlfriend, @Vicky_Velocipanda. She recieved the BBB yesterday (nov. 16th) and we started right off with trimming and assembling the helmet. Here's the progress so far. Unpacking the BBB... trimming the ears... trimming the rest of the helmet... and assembling it: We will trim the eyes and teeth later today and document it. Afterwards I started trimming the backplate and then... well just went on. So this is what we've roughly trimmed now: Vicky will modify these boots to fit the CRL. The next step is trimming the legs and arms. Is my assumption correct, that we're supposed to use the butt joint method here with an inverted coverstripe? (on the inside instead of outside) Or shall we use the overlap method? p.s.: this thread will be pic heavy.
-
the helmet looks like it is done by a member of skull garrison. you might have more luck over there: https://www.skullgarrison.com/
-
sorry for drifting away from the topic. I've hidden the discussion and will talk to phil via PM new wires for the speaker should be easy to get at low or no cost.
-
Modder421's Hasbro/Doopydoo's E11 conversion
Ripper_L replied to TKModder421's topic in ANH BlasTech E11
mine is already done. I'm trooping with it since a couple of years -
Here's another one TK-39701 Pascal Gutfleisch @GIZA87 Spent hours together with @GIZA87 side by side. Helping each other to build the helmet. And let's not forget that last-minute trimming on the forearms, haha
-
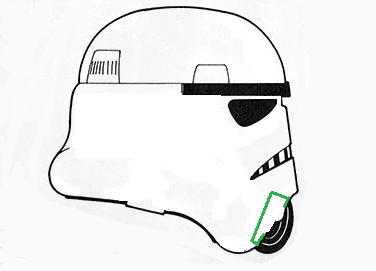
I can remember Paul (Troopermaster) said that this shape is actually the more accurate one: But unfortunately I don't know anything about the size. I can measure the size on my Anovos and on my CAP-W for comparison if you'd like.